
User Guide
Page 59
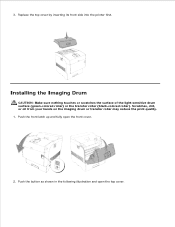
3. Push the button as shown in the following illustration and open the front cover. 2. Scratches, dirt, or oil from your hands on the imaging drum or transfer roller may reduce the print quality. 1. Replace the top cover by inserting its front side into the printer first. Installing the Imaging Drum CAUTION: Make sure nothing touches or scratches the surface of the light-sensitive drum surface (green-colored roller) or the transfer roller (black-colored roller). Push the front latch up and fully open the top cover.
3. Push the button as shown in the following illustration and open the front cover. 2. Scratches, dirt, or oil from your hands on the imaging drum or transfer roller may reduce the print quality. 1. Replace the top cover by inserting its front side into the printer first. Installing the Imaging Drum CAUTION: Make sure nothing touches or scratches the surface of the light-sensitive drum surface (green-colored roller) or the transfer roller (black-colored roller). Push the front latch up and fully open the top cover.

User Guide
Page 203
... toner cartridge, print quality problems may occur. See "Replacing the Toner Cartridge" The drum cartridge needs to printer problems. Reinsert the specified toner cartridge. Order a new toner cartridge at the website (www.dell.com/supplies or www.euro.dell.com/supplies). Reinsert the drum cartridge. See "Replacing the Imaging Drums" An unsupported toner cartridge is low on toner. XXX...
... toner cartridge, print quality problems may occur. See "Replacing the Toner Cartridge" The drum cartridge needs to printer problems. Reinsert the specified toner cartridge. Order a new toner cartridge at the website (www.dell.com/supplies or www.euro.dell.com/supplies). Reinsert the drum cartridge. See "Replacing the Imaging Drums" An unsupported toner cartridge is low on toner. XXX...

User Guide
Page 205
The drum cartridge needs to printer problems. Replace the specified toner cartridge. See "Replacing the Toner Cartridge" Drum life warning. Ready to Print NNN-NNN XXX Is Low Ready to Print NNN-NNN Imaging Drum Replace Soon Toner cartridge is one of the following: · Yellow Toner(Y) · Cyan Toner(C) · Magenta Toner(M) · Black Toner(B) Error NNN-NNN relates to be replaced. Replace the drum cartridge. XXX is nearly empty. See "Replacing the Imaging Drums"
The drum cartridge needs to printer problems. Replace the specified toner cartridge. See "Replacing the Toner Cartridge" Drum life warning. Ready to Print NNN-NNN XXX Is Low Ready to Print NNN-NNN Imaging Drum Replace Soon Toner cartridge is one of the following: · Yellow Toner(Y) · Cyan Toner(C) · Magenta Toner(M) · Black Toner(B) Error NNN-NNN relates to be replaced. Replace the drum cartridge. XXX is nearly empty. See "Replacing the Imaging Drums"

User Guide
Page 225
... outlet. The electrical outlet is working. All options are properly installed. How to replace the Imaging Drum How to install the Toner Cartridge How to install the Transfer Roller How to resolve. NOTICE: If an error message appears, see "Understanding Printer Messages." The printer power is plugged into the outlet is not turned off the...
... outlet. The electrical outlet is working. All options are properly installed. How to replace the Imaging Drum How to install the Toner Cartridge How to install the Transfer Roller How to resolve. NOTICE: If an error message appears, see "Understanding Printer Messages." The printer power is plugged into the outlet is not turned off the...
User Guide
Page 227
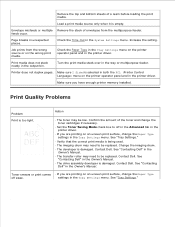
... may need to be replaced. See "Tray Settings." · Verify that the correct print media is empty. See "Contacting Dell" in the Tray Settings menu. Contact Dell. Check the Time-Out in the tray or multipurpose feeder. Printer does not duplex pages. Print Quality Problems Problem Print is damaged. Change the imaging drum. · The developer...
... may need to be replaced. See "Tray Settings." · Verify that the correct print media is empty. See "Contacting Dell" in the Tray Settings menu. Contact Dell. Check the Time-Out in the tray or multipurpose feeder. Printer does not duplex pages. Print Quality Problems Problem Print is damaged. Change the imaging drum. · The developer...
User Guide
Page 228
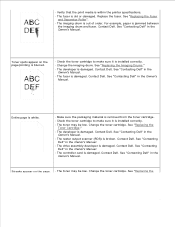
... may be low. See "Contacting Dell" in the Owner's Manual. Contact Dell. See "Replacing the Fuser and Separator Roller". · The imaging drum is jammed between the imaging drum and fuser. Contact Dell. Change the toner cartridge. For example, paper is out of order. See "Replacing the Imaging Drums." · The developer is damaged. See "Contacting Dell" in the Owner's Manual. ·...
... may be low. See "Contacting Dell" in the Owner's Manual. Contact Dell. See "Replacing the Fuser and Separator Roller". · The imaging drum is jammed between the imaging drum and fuser. Contact Dell. Change the toner cartridge. For example, paper is out of order. See "Replacing the Imaging Drums." · The developer is damaged. See "Contacting Dell" in the Owner's Manual. ·...
User Guide
Page 279
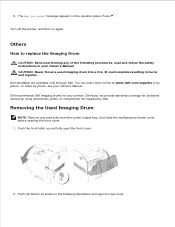
... front cover. 2. Turn off the printer, and then on the operator panel. Dell cartridges are available only through Dell. To order by Dell. message appears on again. Dell recommends Dell imaging drums for problems caused by using accessories, parts, or components not supplied by phone, see your Owner's Manual. Others How to replace the Imaging Drum CAUTION: Before performing any print...
... front cover. 2. Turn off the printer, and then on the operator panel. Dell cartridges are available only through Dell. To order by Dell. message appears on again. Dell recommends Dell imaging drums for problems caused by using accessories, parts, or components not supplied by phone, see your Owner's Manual. Others How to replace the Imaging Drum CAUTION: Before performing any print...
User Guide
Page 295
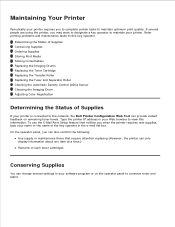
Maintaining Your Printer Periodically your Web browser to view this key operator. Determining the Status of Supplies Conserving Supplies Ordering Supplies Storing Print Media Storing Consumables Replacing the Imaging Drums Replacing the Toner Cartridge Replacing the Transfer Roller Replacing the Fuser and Separator Roller Cleaning the Automatic Density Control (ADC) Sensor Cleaning the Imaging Drum Adjusting Color Registration Determining the Status...
Maintaining Your Printer Periodically your Web browser to view this key operator. Determining the Status of Supplies Conserving Supplies Ordering Supplies Storing Print Media Storing Consumables Replacing the Imaging Drums Replacing the Toner Cartridge Replacing the Transfer Roller Replacing the Fuser and Separator Roller Cleaning the Automatic Density Control (ADC) Sensor Cleaning the Imaging Drum Adjusting Color Registration Determining the Status...
User Guide
Page 297
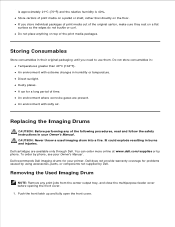
... period of print media on a pallet or shelf, rather than 40°C (104°F). Dell recommends Dell imaging drums for problems caused by using accessories, parts, or components not supplied by Dell. Dusty places. Replacing the Imaging Drums CAUTION: Before performing any print jobs from the center output tray, and close the multipurpose feeder ... of time. Do not store consumables in your Owner's Manual . Direct sunlight. You can order more online at www.dell.com/supplies or by phone, see your printer. Dell does not provide warranty coverage for your Owner's Manual .
... period of print media on a pallet or shelf, rather than 40°C (104°F). Dell recommends Dell imaging drums for problems caused by using accessories, parts, or components not supplied by Dell. Dusty places. Replacing the Imaging Drums CAUTION: Before performing any print jobs from the center output tray, and close the multipurpose feeder ... of time. Do not store consumables in your Owner's Manual . Direct sunlight. You can order more online at www.dell.com/supplies or by phone, see your printer. Dell does not provide warranty coverage for your Owner's Manual .
User Guide
Page 320
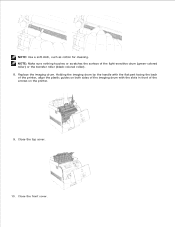
Close the front cover. NOTE: Make sure nothing touches or scratches the surface of the arrows on the printer. 9. Replace the imaging drum. Holding the imaging drum by the handle with the flat part facing the back of the printer, align the plastic guides on both sides of the imaging drum with the slots in front of the light-sensitive drum (green-colored roller) or the transfer roller (black-colored roller). 8. Close the top cover. 10. NOTE: Use a soft cloth, such as cotton for cleaning.
Close the front cover. NOTE: Make sure nothing touches or scratches the surface of the arrows on the printer. 9. Replace the imaging drum. Holding the imaging drum by the handle with the flat part facing the back of the printer, align the plastic guides on both sides of the imaging drum with the slots in front of the light-sensitive drum (green-colored roller) or the transfer roller (black-colored roller). 8. Close the top cover. 10. NOTE: Use a soft cloth, such as cotton for cleaning.
User Guide
Page 323
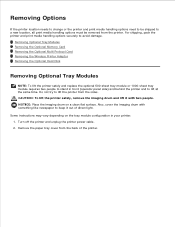
... Optional Tray Modules NOTE: To lift the printer safely and replace the optional 500-sheet tray module or 1000-sheet tray module requires two people to stand in your printer. 1. NOTICE: Place the imaging drum on the tray module configuration in front (operator panel side) and behind the printer and to avoid damage. Remove the paper...
... Optional Tray Modules NOTE: To lift the printer safely and replace the optional 500-sheet tray module or 1000-sheet tray module requires two people to stand in your printer. 1. NOTICE: Place the imaging drum on the tray module configuration in front (operator panel side) and behind the printer and to avoid damage. Remove the paper...


