

User Guide
Page 3
...13 Connecting a Computer Using a RS232 Cable . . . 14 Connecting a Computer by USB Cable 15 Connecting a Computer Using Wireless 16 Connecting a DVD Player 17 Connecting a DVD Player Using an S-Video Cable . 17 Connecting a DVD Player Using a Composite Video Cable 18 Connecting a DVD Player Using a Component Video Cable 19 Connecting a DVD Player Using an HDMI Cable . . 20 Connecting to Local Area Network 21 To project an image and control the projector that is connected to a network through a RJ45 cable. . . 21 Professional Installation Options: Installation for Driving Automatic Screen...
...13 Connecting a Computer Using a RS232 Cable . . . 14 Connecting a Computer by USB Cable 15 Connecting a Computer Using Wireless 16 Connecting a DVD Player 17 Connecting a DVD Player Using an S-Video Cable . 17 Connecting a DVD Player Using a Composite Video Cable 18 Connecting a DVD Player Using a Component Video Cable 19 Connecting a DVD Player Using an HDMI Cable . . 20 Connecting to Local Area Network 21 To project an image and control the projector that is connected to a network through a RJ45 cable. . . 21 Professional Installation Options: Installation for Driving Automatic Screen...
User Guide
Page 4
... 24 Turning Your Projector On 24 Turning Your Projector Off 24 Adjusting the Projected Image 25 Raising the Projector Height 25 Lowering the Projector Height 25 Adjusting the Projector Zoom and Focus 26 Adjusting Projection Image Size 27 Using the Control Panel 31 Using the Remote Control 33 Installing the Remote Control Batteries 36 Operating Range With Remote Control 37 Using the On-Screen Display 38 INPUT SOURCE 38 AUTO ADJUST 39 BRIGHTNESS/CONTRAST 40 VIDEO MODE 40 VOLUME 41 AUDIO INPUT 41 ADVANCED SETTINGS 41 LANGUAGE 56 HELP 56 Wireless Networking Installation 57...
... 24 Turning Your Projector On 24 Turning Your Projector Off 24 Adjusting the Projected Image 25 Raising the Projector Height 25 Lowering the Projector Height 25 Adjusting the Projector Zoom and Focus 26 Adjusting Projection Image Size 27 Using the Control Panel 31 Using the Remote Control 33 Installing the Remote Control Batteries 36 Operating Range With Remote Control 37 Using the On-Screen Display 38 INPUT SOURCE 38 AUTO ADJUST 39 BRIGHTNESS/CONTRAST 40 VIDEO MODE 40 VOLUME 41 AUDIO INPUT 41 ADVANCED SETTINGS 41 LANGUAGE 56 HELP 56 Wireless Networking Installation 57...

User Guide
Page 9
...; The 4220/4320 projector can only be installed by a qualified technician. • Recommended Projector Ceiling Mount Kit (P/N: C3505). NOTE: • Do not attempt to melt or burn. 9 Do not use the wireless projector near cardiac pacemakers. 10 Do not use the wireless projector near medical equipment. 11 Do not use the wireless projector near microwave ovens. For more information, see the Dell Support website at support.dell.com. •...
...; The 4220/4320 projector can only be installed by a qualified technician. • Recommended Projector Ceiling Mount Kit (P/N: C3505). NOTE: • Do not attempt to melt or burn. 9 Do not use the wireless projector near cardiac pacemakers. 10 Do not use the wireless projector near medical equipment. 11 Do not use the wireless projector near microwave ovens. For more information, see the Dell Support website at support.dell.com. •...

User Guide
Page 15
Connecting Your Projector 15 Only one USB cable is shipped with your projector. An additional USB cable can be purchased on the Dell website at www.dell.com. Connecting a Computer by USB Cable 1 Power cord 2 USB-A to USB-B cable NOTE: Plug and Play.
Connecting Your Projector 15 Only one USB cable is shipped with your projector. An additional USB cable can be purchased on the Dell website at www.dell.com. Connecting a Computer by USB Cable 1 Power cord 2 USB-A to USB-B cable NOTE: Plug and Play.
User Guide
Page 24
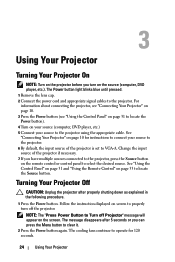
... the Menu button to the projector using the appropriate cable. The Power button light blinks blue until pressed. 1 Remove the lens cap. 2 Connect the power cord and appropriate signal cables to locate the Source button. See "Connecting Your Projector" on page 33 to the projector. The cooling fans continue to operate for instructions to connect your source to clear it. 2 Press the Power button again. Follow the instruction displayed on screen to the projector. 6 By default, the input source of the projector if necessary. 7 If you turn off Projector" message will...
... the Menu button to the projector using the appropriate cable. The Power button light blinks blue until pressed. 1 Remove the lens cap. 2 Connect the power cord and appropriate signal cables to locate the Source button. See "Connecting Your Projector" on page 33 to the projector. The cooling fans continue to operate for instructions to connect your source to clear it. 2 Press the Power button again. Follow the instruction displayed on screen to the projector. 6 By default, the input source of the projector if necessary. 7 If you turn off Projector" message will...

User Guide
Page 31
... temperature of usable life • Lamp module is too high • Color wheel failure For more information, see "Troubleshooting Your Projector" on page 101 and "Guiding Signals" on page 105. Turns the projector on page 24. Using the Control Panel 1 LAMP warning light 2 TEMP warning light 3 Power If the LAMP amber indicator is on or blinking, one of the following problems could be occurring: • Lamp is reaching its end of the projector is not properly installed • Lamp driver failure • Color wheel failure For...
... temperature of usable life • Lamp module is too high • Color wheel failure For more information, see "Troubleshooting Your Projector" on page 101 and "Guiding Signals" on page 105. Turns the projector on page 24. Using the Control Panel 1 LAMP warning light 2 TEMP warning light 3 Power If the LAMP amber indicator is on or blinking, one of the following problems could be occurring: • Lamp is reaching its end of the projector is not properly installed • Lamp driver failure • Color wheel failure For...

User Guide
Page 39
...cable. NOTE: The Wireless/USB can be used after the "Wireless and LAN" option is turned on page 59. See "Wireless Guide screen" on . USB VIEWER-Allows you to activate the Wireless Display, USB Display, and USB Viewer. Using Your Projector 39 WIRELESS DISPLAY-Press to Go (PtG) Installation" on page 67. See "Presentation to access the projector's Wireless Guide screen. INPUT SOURCE WIRELESS/USB The Input Source Wireless/USB menu allows you to your USB flash. AUTO ADJUST Auto Adjust automatically adjusts the projector's Horizontal, Vertical, Frequency, and Tracking in PC mode...
...cable. NOTE: The Wireless/USB can be used after the "Wireless and LAN" option is turned on page 59. See "Wireless Guide screen" on . USB VIEWER-Allows you to activate the Wireless Display, USB Display, and USB Viewer. Using Your Projector 39 WIRELESS DISPLAY-Press to Go (PtG) Installation" on page 67. See "Presentation to access the projector's Wireless Guide screen. INPUT SOURCE WIRELESS/USB The Input Source Wireless/USB menu allows you to your USB flash. AUTO ADJUST Auto Adjust automatically adjusts the projector's Horizontal, Vertical, Frequency, and Tracking in PC mode...

User Guide
Page 42
... image settings menu provides the following options: 42 Using Your Projector RGB COLOR ADJUST-Allows you to activate image settings. Default is activated. IMAGE SETTINGS (IN PC MODE)-Select and press to manually adjust the colors red, green, and blue. NOTE: If you to display white intensity. VGA OUTPUT-Select On or Off the VGA output function at lower color temperatures. The image settings menu provides the following options: COLOR TEMPERATURE-Allows you adjust the settings for Color Temperature, RGB Color Adjust, and White Intensity the projector automatically switch...
... image settings menu provides the following options: 42 Using Your Projector RGB COLOR ADJUST-Allows you to activate image settings. Default is activated. IMAGE SETTINGS (IN PC MODE)-Select and press to manually adjust the colors red, green, and blue. NOTE: If you to display white intensity. VGA OUTPUT-Select On or Off the VGA output function at lower color temperatures. The image settings menu provides the following options: COLOR TEMPERATURE-Allows you adjust the settings for Color Temperature, RGB Color Adjust, and White Intensity the projector automatically switch...

User Guide
Page 43
... to adjust the video source from Composite or S-Video. Using Your Projector 43 When you to manually adjust the colors red, green, and blue. to increase the sharpness and to decrease the TINT-Press to increase the amount of green in the image and to decrease the amount of color in the image (available for Color Temperature, RGB Color Adjust, Saturation, Sharpness, Tint, and White Intensity the projector automatically switch to Custom mode. 2 Saturation...
... to adjust the video source from Composite or S-Video. Using Your Projector 43 When you to manually adjust the colors red, green, and blue. to increase the sharpness and to decrease the TINT-Press to increase the amount of green in the image and to decrease the amount of color in the image (available for Color Temperature, RGB Color Adjust, Saturation, Sharpness, Tint, and White Intensity the projector automatically switch to Custom mode. 2 Saturation...

User Guide
Page 48
... screen. •Rear Projection-Ceiling Mount - Select appropriate closed caption menu. If you press the Source button when the Auto Source mode is available for ceiling-mounted projection. The projector reverses and turns the image upside down for NTSC only. 48 Using Your Projector NOTE: Closed caption option is set to enable the speaker. The projector reverses the image so that you can manually select the input signal. The projector turns the image upside down . If you press the Source button...
... screen. •Rear Projection-Ceiling Mount - Select appropriate closed caption menu. If you press the Source button when the Auto Source mode is available for ceiling-mounted projection. The projector reverses and turns the image upside down for NTSC only. 48 Using Your Projector NOTE: Closed caption option is set to enable the speaker. The projector reverses the image so that you can manually select the input signal. The projector turns the image upside down . If you press the Source button...

User Guide
Page 57
Using Your Projector 57 Wireless Networking Installation NOTE: Your computer must have the following minimum system requirements: Operating System: • Windows Microsoft Windows 2000™ with service pack 4 or later, Windows XP™ Home or Professional Service pack 2 (32-bit recommended), Windows Vista 32-bit, and Windows® 7 Home or Professional 32-bit or 64-bit • MAC MacBook and above, MacOS 10.5 and above Minimum Hardware: a Intel...
Using Your Projector 57 Wireless Networking Installation NOTE: Your computer must have the following minimum system requirements: Operating System: • Windows Microsoft Windows 2000™ with service pack 4 or later, Windows XP™ Home or Professional Service pack 2 (32-bit recommended), Windows Vista 32-bit, and Windows® 7 Home or Professional 32-bit or 64-bit • MAC MacBook and above, MacOS 10.5 and above Minimum Hardware: a Intel...

User Guide
Page 76
... "Wireless Application Software" once. 7 Wireless Application Software download and installation steps refer to "Install the Wireless Application Software" on page 60. NOTE: It is recommended that all proxies are turned off. (In Microsoft® Windows 7: Click Control Panel Internet Options Connections LAN Settings) 6 "Wireless Application Software" is required if the Wireless or LAN is already installed, skip Step 6 - 7. NOTE: If your projector has installed the optional wireless dongle, you use Audio Projection. If it is used for the Audio Projection set...
... "Wireless Application Software" once. 7 Wireless Application Software download and installation steps refer to "Install the Wireless Application Software" on page 60. NOTE: It is recommended that all proxies are turned off. (In Microsoft® Windows 7: Click Control Panel Internet Options Connections LAN Settings) 6 "Wireless Application Software" is required if the Wireless or LAN is already installed, skip Step 6 - 7. NOTE: If your projector has installed the optional wireless dongle, you use Audio Projection. If it is used for the Audio Projection set...

User Guide
Page 88
... by the projector. Projector Setup • Set up the Model Name, Projector Name, Location, and Contact information (up to 21 characters for the changes to take effect. 88 Using Your Projector Options are three options: • Disable: Login code will be used to log in to the system. • Random: Default is Random. Click the Apply button to save and apply changes. Projection Setup Projection Setup • Resolution: Allows you...
... by the projector. Projector Setup • Set up the Model Name, Projector Name, Location, and Contact information (up to 21 characters for the changes to take effect. 88 Using Your Projector Options are three options: • Disable: Login code will be used to log in to the system. • Random: Default is Random. Click the Apply button to save and apply changes. Projection Setup Projection Setup • Resolution: Allows you...

User Guide
Page 93
.... - Click the Auto Adjust button to restore the factory default settings. Audio Control • Audio Input: Select the input source. Presentation: Best for audio volume. • Speaker: Select On to enable the audio function or select Off to disable the audio function. Movie: For viewing movies and photos - Custom: User-preferred settings. • Blank Screen: You can select VGA-A, VGA-B, S-Video, Composite Video, HDMI, Wireless Display, USB Display, or USB Viewer. • Video Mode: Select a mode to select your projector's input source. You can select...
.... - Click the Auto Adjust button to restore the factory default settings. Audio Control • Audio Input: Select the input source. Presentation: Best for audio volume. • Speaker: Select On to enable the audio function or select Off to disable the audio function. Movie: For viewing movies and photos - Custom: User-preferred settings. • Blank Screen: You can select VGA-A, VGA-B, S-Video, Composite Video, HDMI, Wireless Display, USB Display, or USB Viewer. • Video Mode: Select a mode to select your projector's input source. You can select...

User Guide
Page 103
... adjust the projector mode. To clear the protection mode, press and hold the POWER button for 10 seconds. If the LAMP light is blinking amber, the lamp module connection may make a loud popping sound. To replace the lamp, see "Changing the Lamp" on . It will automatically shut down . If the LAMP light is solid amber, replace the lamp. The projector automatically detects the input signal format. Problem (continued) Image is out of focus The image is stretched when displaying...
... adjust the projector mode. To clear the protection mode, press and hold the POWER button for 10 seconds. If the LAMP light is blinking amber, the lamp module connection may make a loud popping sound. To replace the lamp, see "Changing the Lamp" on . It will automatically shut down . If the LAMP light is solid amber, replace the lamp. The projector automatically detects the input signal format. Problem (continued) Image is out of focus The image is stretched when displaying...
User Guide
Page 104
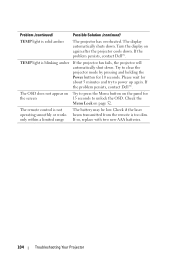
... Power button for the screen 15 seconds to unlock the OSD. Try to power up again. Check the Menu Lock on again after the projector cools down. TEMP light is not operating smoothly or works only within a limited range The battery may be low. If so, replace with two new AAA batteries. 104 Troubleshooting Your Projector If the problem persists, contact Dell™. If the problem persists, contact Dell™. Check...
... Power button for the screen 15 seconds to unlock the OSD. Try to power up again. Check the Menu Lock on again after the projector cools down. TEMP light is not operating smoothly or works only within a limited range The battery may be low. If so, replace with two new AAA batteries. 104 Troubleshooting Your Projector If the problem persists, contact Dell™. If the problem persists, contact Dell™. Check...

User Guide
Page 105
... shuts down . The projector automatically shuts down . If this problem persists, contact Dell. The projector automatically shuts down before Power Saving mode Projector overheated Lamp driver overheated Fan breakdown Lamp driver breakdown Color Wheel breakdown Lamp failure Fault - If this problem persists, contact Dell. Projector is properly installed. If the problem persists, contact Dell. Lamp is not accessed. Control Buttons Power BLUE Flashing BLUE BLUE BLUE AMBER OFF AMBER ÒFF AMBER Flashing BLUE OFF AMBER Flashing OFF Indicator TEMP (Amber) LAMP...
... shuts down . The projector automatically shuts down . If this problem persists, contact Dell. The projector automatically shuts down before Power Saving mode Projector overheated Lamp driver overheated Fan breakdown Lamp driver breakdown Color Wheel breakdown Lamp failure Fault - If this problem persists, contact Dell. Projector is properly installed. If the problem persists, contact Dell. Lamp is not accessed. Control Buttons Power BLUE Flashing BLUE BLUE BLUE AMBER OFF AMBER ÒFF AMBER Flashing BLUE OFF AMBER Flashing OFF Indicator TEMP (Amber) LAMP...

User Guide
Page 106
... lamp. 8 Replace the lamp cover and tighten the two screws. 9 Reset the lamp usage time by its useful life in this problem persists after replacing the lamp, contact Dell™. Replacement suggested! CAUTION: Use an original lamp to cool down for Lamp Reset in use. For more information, see www.dell.com/hg. 1 Turn off the projector and disconnect the power cord. 2 Let the projector cool for at least 30 minutes. www.dell.com/lamps" appears on the screen...
... lamp. 8 Replace the lamp cover and tighten the two screws. 9 Reset the lamp usage time by its useful life in this problem persists after replacing the lamp, contact Dell™. Replacement suggested! CAUTION: Use an original lamp to cool down for Lamp Reset in use. For more information, see www.dell.com/hg. 1 Turn off the projector and disconnect the power cord. 2 Let the projector cool for at least 30 minutes. www.dell.com/lamps" appears on the screen...

User Guide
Page 118
..., with a variable focal length that uses a 4-pin mini-DIN connector to as Y/C. Extended Video Graphics Array - 1024 x 768 pixels count. are backwards. Red, Green, Blue - For example, a 1.4:1 zoom lens ratio means that requires separate signals for rear projection. RGB - A video transmission standard that allows operator to the communicating user, so the communication data cannot be a 14 foot image with full zoom. 118 Glossary A French and...
..., with a variable focal length that uses a 4-pin mini-DIN connector to as Y/C. Extended Video Graphics Array - 1024 x 768 pixels count. are backwards. Red, Green, Blue - For example, a 1.4:1 zoom lens ratio means that requires separate signals for rear projection. RGB - A video transmission standard that allows operator to the communicating user, so the communication data cannot be a 14 foot image with full zoom. 118 Glossary A French and...

User Guide
Page 119
... C Changing the Lamp 106 Connecting the Projector 12 V DC Plug 22 Composite Video cable 18 Connecting a Computer with a RS232 cable 14, 15 Connecting with a Component Cable 19 Connecting with a Composite Cable 18 Connecting with an HDMI Cable 20 Connecting with an S-video Cable 17 HDMI cable 20, 21, 23 Motorized projection screen 22 Power cord 12, 13, 14, 15, 17, 18, 19, 20, 21, 22, 23 RS232 cable 14 S-Video cable 17 To Computer 12 USB to USB cable 12 USB...
... C Changing the Lamp 106 Connecting the Projector 12 V DC Plug 22 Composite Video cable 18 Connecting a Computer with a RS232 cable 14, 15 Connecting with a Component Cable 19 Connecting with a Composite Cable 18 Connecting with an HDMI Cable 20 Connecting with an S-video Cable 17 HDMI cable 20, 21, 23 Motorized projection screen 22 Power cord 12, 13, 14, 15, 17, 18, 19, 20, 21, 22, 23 RS232 cable 14 S-Video cable 17 To Computer 12 USB to USB cable 12 USB...


