User Manual
Page 9
... 230 Ordering supplies...231 Printer attached to a network ...231 Printer attached locally to a computer ...231 Replacing supplies...231 Replacing the toner cartridge ...231 Replacing the photoconductor kit ...233 Recycling Dell products...236 Moving the printer to another location...236 Shipping the printer...237 Administrative support 238 Using the Embedded Web Server...238...
... 230 Ordering supplies...231 Printer attached to a network ...231 Printer attached locally to a computer ...231 Replacing supplies...231 Replacing the toner cartridge ...231 Replacing the photoconductor kit ...233 Recycling Dell products...236 Moving the printer to another location...236 Shipping the printer...237 Administrative support 238 Using the Embedded Web Server...238...

User Manual
Page 10
... 254 Understanding printer messages...254 Change to ...254 Change to ...255 Change to ...255 Change to ...255 Check tray connection ...255 Close door or insert cartridge...256 Close front door...256 Disk corrupted ...256 SMTP server not set up .
... 254 Understanding printer messages...254 Change to ...254 Change to ...255 Change to ...255 Change to ...255 Check tray connection ...255 Close door or insert cartridge...256 Close front door...256 Disk corrupted ...256 SMTP server not set up .

User Manual
Page 11
30.yy Invalid refill, change cartridge ...259 31.yy Replace defective or missing cartridge ...260 32.yy Cartridge part number unsupported by device...260 34 Short paper ...260 35 Insufficient memory to support Resource Save feature 260 37 Insufficient memory to collate job ...... 62 Disk full ...264 63 Unformatted disk...264 80 Routine maintenance needed ...264 84 PC Kit life warning...264 84 Replace PC Kit...264 88 Cartridge low...264 1565 Emulation error, load emulation option...264 Scanner ADF Cover Open ...265 Scan Document Too Long ...265 Replace all originals if restarting job...
30.yy Invalid refill, change cartridge ...259 31.yy Replace defective or missing cartridge ...260 32.yy Cartridge part number unsupported by device...260 34 Short paper ...260 35 Insufficient memory to support Resource Save feature 260 37 Insufficient memory to collate job ...... 62 Disk full ...264 63 Unformatted disk...264 80 Routine maintenance needed ...264 84 PC Kit life warning...264 84 Replace PC Kit...264 88 Cartridge low...264 1565 Emulation error, load emulation option...264 Scanner ADF Cover Open ...265 Scan Document Too Long ...265 Replace all originals if restarting job...

User Manual
Page 18
... technical reference material for experienced users or technicians • Supplies and accessories for my printer • Replacement cartridges Dell Printer Supplies Web site-dell.com/supplies You can purchase printer supplies online, by telephone, or in select retail stores. • Safety... call and repair information • Order status • Live chat support • E-mail support • Telephone support Dell Support Web site-support.dell.com Note: Select your region, and then select your printer model. Printer configurations Note: Printer configuration may serve you looking...
... technical reference material for experienced users or technicians • Supplies and accessories for my printer • Replacement cartridges Dell Printer Supplies Web site-dell.com/supplies You can purchase printer supplies online, by telephone, or in select retail stores. • Safety... call and repair information • Order status • Live chat support • E-mail support • Telephone support Dell Support Web site-support.dell.com Note: Select your region, and then select your printer model. Printer configurations Note: Printer configuration may serve you looking...

User Manual
Page 97
...use before buying large quantities. Have metal clasps, string ties, or folding bars - Partial sheets also contaminate the printer and the cartridge with adhesive, and could void the warranty. • If zone coating of 230°C (446°F) without sealing, excessive ... can significantly impact print quality. Have bent corners - Have any way - Adhesive material contaminates the printer and could void the printer and cartridge warranties. • Do not use a non-oozing adhesive. • Portrait orientation works best, especially when printing bar codes. Have windows...
...use before buying large quantities. Have metal clasps, string ties, or folding bars - Partial sheets also contaminate the printer and the cartridge with adhesive, and could void the warranty. • If zone coating of 230°C (446°F) without sealing, excessive ... can significantly impact print quality. Have bent corners - Have any way - Adhesive material contaminates the printer and could void the printer and cartridge warranties. • Do not use a non-oozing adhesive. • Portrait orientation works best, especially when printing bar codes. Have windows...

User Manual
Page 182
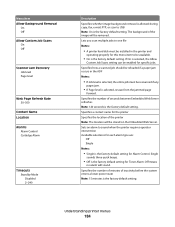
...; Default is the factory default setting for Message to Display. Menu item Scan to PC Port Range Displayed Information Left side Right side Custom Text Cartridge levels on the upper left and right corners of the home screen For the Left side and Right side options, choose from the following options...
...; Default is the factory default setting for Message to Display. Menu item Scan to PC Port Range Displayed Information Left side Right side Custom Text Cartridge levels on the upper left and right corners of the home screen For the Left side and Right side options, choose from the following options...
User Manual
Page 184
... Allow Custom Job Scans On Off Scanner Jam Recovery Job level Page level Web Page Refresh Rate 30-300 Contact Name Location Alarms Alarm Control Cartridge Alarm Timeouts Standby Mode Disabled 2-240 Description Specifies whether image background removal is allowed during copy, fax, e-mail, FTP, or scan to USB Note: On...
... Allow Custom Job Scans On Off Scanner Jam Recovery Job level Page level Web Page Refresh Rate 30-300 Contact Name Location Alarms Alarm Control Cartridge Alarm Timeouts Standby Mode Disabled 2-240 Description Specifies whether image background removal is allowed during copy, fax, e-mail, FTP, or scan to USB Note: On...

User Manual
Page 231
...list. 7 Enter your cartridge by printing a menu settings page. Note: Your Service Tag number is not covered under warranty. Firmly shake it side-to-side and front-to-back several times to a network 1 Type your printer IP address in your Dell printer Service Tag number.... Ordering supplies Warning-Potential Damage: Damage caused by the use of a supply or replacement item not produced by the manufacturer of your printer. 8 Click Visit Dell's cartridge ordering website. Maintaining the printer 231 Printer ...
...list. 7 Enter your cartridge by printing a menu settings page. Note: Your Service Tag number is not covered under warranty. Firmly shake it side-to-side and front-to-back several times to a network 1 Type your printer IP address in your Dell printer Service Tag number.... Ordering supplies Warning-Potential Damage: Damage caused by the use of a supply or replacement item not produced by the manufacturer of your printer. 8 Click Visit Dell's cartridge ordering website. Maintaining the printer 231 Printer ...

User Manual
Page 232
Warning-Potential Damage: When replacing a toner cartridge, do not leave the photoconductor kit exposed to distribute the toner. Extended light exposure can cause print quality problems. 4 Rotate the cartridge in all directions to direct light for an extended period of the photoconductor kit. Maintaining the printer 232 To replace the toner cartridge: 1 Open the front door by pressing the button on the left side of the printer and lowering the door. 2 Press the button on the base of time. Pull the toner cartridge up and out using the handle. 3 Unpack the new toner cartridge.
Warning-Potential Damage: When replacing a toner cartridge, do not leave the photoconductor kit exposed to distribute the toner. Extended light exposure can cause print quality problems. 4 Rotate the cartridge in all directions to direct light for an extended period of the photoconductor kit. Maintaining the printer 232 To replace the toner cartridge: 1 Open the front door by pressing the button on the left side of the printer and lowering the door. 2 Press the button on the base of time. Pull the toner cartridge up and out using the handle. 3 Unpack the new toner cartridge.

User Manual
Page 233
...Kit life warning or 84 Replace PC Kit on the tracks of -life, print quality significantly decreases. 5 Install the new toner cartridge by aligning the rollers on the toner cartridge with the arrows on the display. Note: The photoconductor kit is one item only. While the printer may continue to function ...properly after the photoconductor kit has reached its official end-of the photoconductor kit. Push the toner cartridge in as far as it will go. You can also see the status of the photoconductor kit by printing a menu settings page. The...
...Kit life warning or 84 Replace PC Kit on the tracks of -life, print quality significantly decreases. 5 Install the new toner cartridge by aligning the rollers on the toner cartridge with the arrows on the display. Note: The photoconductor kit is one item only. While the printer may continue to function ...properly after the photoconductor kit has reached its official end-of the photoconductor kit. Push the toner cartridge in as far as it will go. You can also see the status of the photoconductor kit by printing a menu settings page. The...
User Manual
Page 234
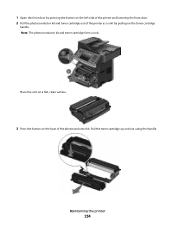
Maintaining the printer 234 Pull the toner cartridge up and out using the handle. Note: The photoconductor kit and toner cartridge form a unit. Place the unit on a flat, clean surface. 3 Press the button on the toner cartridge handle. 1 Open the front door by pressing the button on the left side of the printer and lowering the front door. 2 Pull the photoconductor kit and toner cartridge out of the printer as a unit by pulling on the base of the photoconductor kit.
Maintaining the printer 234 Pull the toner cartridge up and out using the handle. Note: The photoconductor kit and toner cartridge form a unit. Place the unit on a flat, clean surface. 3 Press the button on the toner cartridge handle. 1 Open the front door by pressing the button on the left side of the printer and lowering the front door. 2 Pull the photoconductor kit and toner cartridge out of the printer as a unit by pulling on the base of the photoconductor kit.
User Manual
Page 235
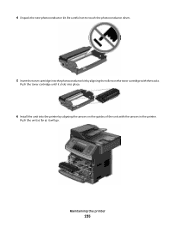
Maintaining the printer 235 Push the unit as far as it clicks into place. 6 Install the unit into the photoconductor kit by aligning the arrows on the toner cartridge with the arrows in the printer. Push the toner cartridge until it will go. Be careful not to touch the photoconductor drum. 5 Insert the toner cartridge into the printer by aligning the rollers on the guides of the unit with the tracks. 4 Unpack the new photoconductor kit.
Maintaining the printer 235 Push the unit as far as it clicks into place. 6 Install the unit into the photoconductor kit by aligning the arrows on the toner cartridge with the arrows in the printer. Push the toner cartridge until it will go. Be careful not to touch the photoconductor drum. 5 Insert the toner cartridge into the printer by aligning the rollers on the guides of the unit with the tracks. 4 Unpack the new photoconductor kit.

User Manual
Page 238
... Server If the printer is installed on a network, the Embedded Web Server is possible to see tray settings, the level of toner in the toner cartridge, the percentage of life remaining in the photoconductor kit, and capacity measurements of certain printer parts.
... Server If the printer is installed on a network, the Embedded Web Server is possible to see tray settings, the level of toner in the toner cartridge, the percentage of life remaining in the photoconductor kit, and capacity measurements of certain printer parts.
User Manual
Page 240
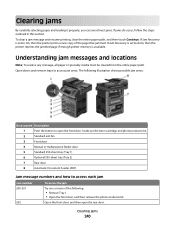
... the following: • Remove Tray 1. • Open the front door, and then remove the photoconductor kit. If Jam Recovery is available. Inside are the toner cartridge and photoconductor kit. 2 Standard exit bin 3 Front door 4 Manual or multipurpose feeder door 5 Standard 250-sheet tray (Tray 1) 6 Optional 550-sheet tray (Tray 2) 7 Rear door...
... the following: • Remove Tray 1. • Open the front door, and then remove the photoconductor kit. If Jam Recovery is available. Inside are the toner cartridge and photoconductor kit. 2 Standard exit bin 3 Front door 4 Manual or multipurpose feeder door 5 Standard 250-sheet tray (Tray 1) 6 Optional 550-sheet tray (Tray 2) 7 Rear door...
User Manual
Page 242
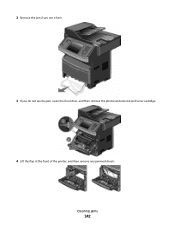
2 Remove the jam if you see it here. 3 If you do not see the jam, open the front door, and then remove the photoconductor kit and toner cartridge. 4 Lift the flap at the front of the printer, and then remove any jammed sheets. Clearing jams 242
2 Remove the jam if you see it here. 3 If you do not see the jam, open the front door, and then remove the photoconductor kit and toner cartridge. 4 Lift the flap at the front of the printer, and then remove any jammed sheets. Clearing jams 242

User Manual
Page 243
If the paper is exiting the printer, then pull the paper out, and then touch Continue. Clearing jams 243 5 If you do not see any jammed sheets, open the rear door. 6 Remove the jam. 7 Close the rear door. 8 Insert the photoconductor kit and toner cartridge. 9 Close the front door. 10 Touch Continue. 202 paper jam Touch Status/Supplies to identify the location of the jam.
If the paper is exiting the printer, then pull the paper out, and then touch Continue. Clearing jams 243 5 If you do not see any jammed sheets, open the rear door. 6 Remove the jam. 7 Close the rear door. 8 Insert the photoconductor kit and toner cartridge. 9 Close the front door. 10 Touch Continue. 202 paper jam Touch Status/Supplies to identify the location of the jam.
User Manual
Page 249
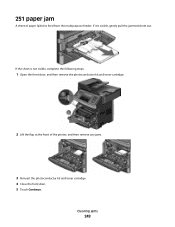
251 paper jam A sheet of the printer, and then remove any jams. 3 Reinsert the photoconductor kit and toner cartridge. 4 Close the front door. 5 Touch Continue. If the sheet is visible, gently pull the jammed sheet out. If it is not visible, complete the following steps: 1 Open the front door, and then remove the photoconductor kit and toner cartridge. 2 Lift the flap at the front of paper failed to feed from the multipurpose feeder. Clearing jams 249
251 paper jam A sheet of the printer, and then remove any jams. 3 Reinsert the photoconductor kit and toner cartridge. 4 Close the front door. 5 Touch Continue. If the sheet is visible, gently pull the jammed sheet out. If it is not visible, complete the following steps: 1 Open the front door, and then remove the photoconductor kit and toner cartridge. 2 Lift the flap at the front of paper failed to feed from the multipurpose feeder. Clearing jams 249

User Manual
Page 256
... hard disk must be repaired. Connect the printer to clear the message. Fax memory full There is not configured properly. Close door or insert cartridge The cartridge is disabled. An error occurred on a corrupted hard disk, and the hard disk cannot be reformatted. If the message appears again, contact your... fax job. SMTP server not set up. No analog phone line connected to clear the message without using the tray. Insert the cartridge and close all the files currently stored on the disk. 5 Connect the power cord to a properly grounded outlet. 6 Restart the printer.
... hard disk must be repaired. Connect the printer to clear the message. Fax memory full There is not configured properly. Close door or insert cartridge The cartridge is disabled. An error occurred on a corrupted hard disk, and the hard disk cannot be reformatted. If the message appears again, contact your... fax job. SMTP server not set up. No analog phone line connected to clear the message without using the tray. Insert the cartridge and close all the files currently stored on the disk. 5 Connect the power cord to a properly grounded outlet. 6 Restart the printer.
User Manual
Page 259
... Remove the unrecognized USB device. Unsupported disk An unsupported printer hard disk has been installed. Remove the toner cartridge, and then install a new one . 30.yy Invalid refill, change cartridge An unsupported, refilled toner cartridge is installed. If the printer cannot find a tray with the correct paper type and size, then it feeds...
... Remove the unrecognized USB device. Unsupported disk An unsupported printer hard disk has been installed. Remove the toner cartridge, and then install a new one . 30.yy Invalid refill, change cartridge An unsupported, refilled toner cartridge is installed. If the printer cannot find a tray with the correct paper type and size, then it feeds...
User Manual
Page 260
...set . Try one or more of the following: • Remove the toner cartridge, and then reinstall it. • Remove the toner cartridge, and then install a new one. 32.yy Cartridge part number unsupported by device Remove the toner cartridge, and then install a supported one. 34 Short paper Try one or more...some Held Jobs were deleted The printer deleted some held jobs in order to clear the message. 31.yy Replace defective or missing cartridge The toner cartridge is properly loaded in the tray. • Check the Print Properties or Print dialog settings to activate the link buffer changes.
...set . Try one or more of the following: • Remove the toner cartridge, and then reinstall it. • Remove the toner cartridge, and then install a new one. 32.yy Cartridge part number unsupported by device Remove the toner cartridge, and then install a supported one. 34 Short paper Try one or more...some Held Jobs were deleted The printer deleted some held jobs in order to clear the message. 31.yy Replace defective or missing cartridge The toner cartridge is properly loaded in the tray. • Check the Print Properties or Print dialog settings to activate the link buffer changes.


