
User Guide
Page 100
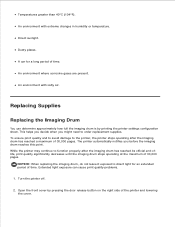
...pages. While the printer may continue to the printer, the printer stops operating after the imaging drum has reached its official end-oflife, print quality significantly decreases until the imaging drum stops operating at the maximum of 30,000 pages. Open the front cover by printing...configuration sheet. This helps you decide when you before the imaging drum reaches this point. NOTICE: When replacing the imaging drum, do not leave it exposed to order replacement supplies. Direct sunlight. Replacing Supplies Replacing the Imaging Drum You can cause print quality problems. 1. The printer ...
...pages. While the printer may continue to the printer, the printer stops operating after the imaging drum has reached its official end-oflife, print quality significantly decreases until the imaging drum stops operating at the maximum of 30,000 pages. Open the front cover by printing...configuration sheet. This helps you decide when you before the imaging drum reaches this point. NOTICE: When replacing the imaging drum, do not leave it exposed to order replacement supplies. Direct sunlight. Replacing Supplies Replacing the Imaging Drum You can cause print quality problems. 1. The printer ...
User Guide
Page 101
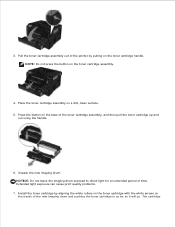
...cartridge assembly out of the printer by aligning the white rollers on the toner cartridge with the white arrows on the tracks of the new imaging drum and pushing the toner cartridge in as far as it will go. NOTE: Do not press the button on the toner cartridge handle. Place...of time. Press the button on a flat, clean surface. 5. Extended light exposure can cause print quality problems. 7. The cartridge NOTICE: Do not leave the imaging drum exposed to direct light for an extended period of the toner cartridge assembly, and then pull the toner cartridge up and out using the handle...
...cartridge assembly out of the printer by aligning the white rollers on the toner cartridge with the white arrows on the tracks of the new imaging drum and pushing the toner cartridge in as far as it will go. NOTE: Do not press the button on the toner cartridge handle. Place...of time. Press the button on a flat, clean surface. 5. Extended light exposure can cause print quality problems. 7. The cartridge NOTICE: Do not leave the imaging drum exposed to direct light for an extended period of the toner cartridge assembly, and then pull the toner cartridge up and out using the handle...
User Guide
Page 102
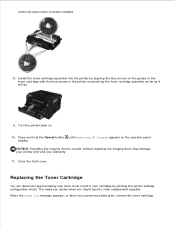
... the toner cartridge. 7. Press and hold the Cancel button until Resetting PC Counter appears on . 10. Close the front cover. NOTICE: Resetting the imaging drum's counter without replacing the imaging drum may damage your printer and void your cartridge by aligning the blue arrows on the guides of the toner cartridge with the blue...
... the toner cartridge. 7. Press and hold the Cancel button until Resetting PC Counter appears on . 10. Close the front cover. NOTICE: Resetting the imaging drum's counter without replacing the imaging drum may damage your printer and void your cartridge by aligning the blue arrows on the guides of the toner cartridge with the blue...

User Guide
Page 103
.... 3. Turn the printer off. 2. Unpack the new toner cartridge assembly. Firmly shake it and continue printing. Press the button on the right side of the imaging drum and pull the toner cartridge assembly up and out using the handle. 4. Extended light exposure can still print for an extended period of time. When...
.... 3. Turn the printer off. 2. Unpack the new toner cartridge assembly. Firmly shake it and continue printing. Press the button on the right side of the imaging drum and pull the toner cartridge assembly up and out using the handle. 4. Extended light exposure can still print for an extended period of time. When...

User Guide
Page 104
... exit tray. 3. Install the new toner cartridge assembly by aligning the white rollers on the toner cartridge with the arrows on the tracks of the imaging drum kit and pushing the toner cartridge in all cables to direct light for an extended period of the Printer 1. Cleaning the Exterior of time. Close...
... exit tray. 3. Install the new toner cartridge assembly by aligning the white rollers on the toner cartridge with the arrows on the tracks of the imaging drum kit and pushing the toner cartridge in all cables to direct light for an extended period of the Printer 1. Cleaning the Exterior of time. Close...

User Guide
Page 110
...Network Printing. How do not resolve this issue, then try uninstalling and reinstalling the Dell 2330d/dn and 2350d/dn Laser Printer driver. For more information, see Replacing the Imaging Drum. See Setting up trays to work properly, bidirectional communication support must be cleared only...driver? How do I find the printer IP and MAC address? How do I reset factory defaults? NOTE: Resetting the imaging drum counter without replacing the imaging drum may damage your printer and void your warranty. See Installing the 550-Sheet Optional Drawer. How do I install the ...
...Network Printing. How do not resolve this issue, then try uninstalling and reinstalling the Dell 2330d/dn and 2350d/dn Laser Printer driver. For more information, see Replacing the Imaging Drum. See Setting up trays to work properly, bidirectional communication support must be cleared only...driver? How do I find the printer IP and MAC address? How do I reset factory defaults? NOTE: Resetting the imaging drum counter without replacing the imaging drum may damage your printer and void your warranty. See Installing the 550-Sheet Optional Drawer. How do I install the ...
User Guide
Page 123
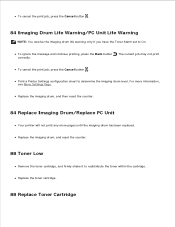
... Low Remove the toner cartridge, and firmly shake it to determine the imaging drum level. Print a Printer Settings configuration sheet to redistribute the toner within the cartridge. For more pages until the imaging drum has been replaced. Replace the toner cartridge. 88 Replace Toner Cartridge The... current job may not print correctly. Replace the imaging drum, and then reset the counter. 84 Replace Imaging Drum/Replace PC Unit Your printer will not print any more information, see Menu Settings Page. To ignore the...
... Low Remove the toner cartridge, and firmly shake it to determine the imaging drum level. Print a Printer Settings configuration sheet to redistribute the toner within the cartridge. For more pages until the imaging drum has been replaced. Replace the toner cartridge. 88 Replace Toner Cartridge The... current job may not print correctly. Replace the imaging drum, and then reset the counter. 84 Replace Imaging Drum/Replace PC Unit Your printer will not print any more information, see Menu Settings Page. To ignore the...


