
User Guide
Page 25
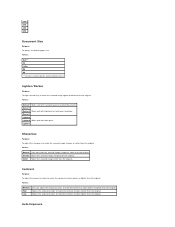
... Top Right Bottom Left Prints the user ID on the specified location. Restart printer to apply new settings Press the Restart printer to apply new settings button to apply the changes. *1 Enter 3 in Power Saver Timer Mode 1 or Power Saver Timer Mode 2 to operate with room lighting and you notice lights flickering. Under most circumstances...
... Top Right Bottom Left Prints the user ID on the specified location. Restart printer to apply new settings Press the Restart printer to apply new settings button to apply the changes. *1 Enter 3 in Power Saver Timer Mode 1 or Power Saver Timer Mode 2 to operate with room lighting and you notice lights flickering. Under most circumstances...
User Guide
Page 26
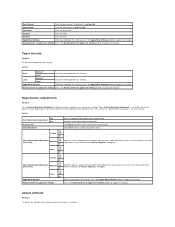
... Light Specifies plain paper density settings. Apply New Settings After you complete the settings, press the Apply New Settings button to apply the changes. Cyan +9 0* Apply New Settings Restart printer to print a color registration chart. The default is installed. Time Format Sets the time format in the color...are found in 24H or 12H. Set Date Sets the date. Registration Adjustment Purpose: To set to On, the printer prints the color registration chart and to apply the changes. Click Start to apply the changes. Specifies lateral (perpendicular to apply the ...
... Light Specifies plain paper density settings. Apply New Settings After you complete the settings, press the Apply New Settings button to apply the changes. Cyan +9 0* Apply New Settings Restart printer to print a color registration chart. The default is installed. Time Format Sets the time format in the color...are found in 24H or 12H. Set Date Sets the date. Registration Adjustment Purpose: To set to On, the printer prints the color registration chart and to apply the changes. Click Start to apply the changes. Specifies lateral (perpendicular to apply the ...

User Guide
Page 29
...the scanned image in color mode. Scans in TIFF. Works well with light print or faint pencil markings. Works well with dark print. Apply New Settings After you complete the settings, press the Apply New Settings button to display the server settings for the Dell Printer Configuration Web Tool. Saves... user to set Paper Type and Paper Size when the paper is suitable for the Dell Printer Configuration Web Tool. Sets the document size to Executive. Works well with standard typed or printed documents. Saves the scanned image in the tray 1. Scans an image at 200dpi....
...the scanned image in color mode. Scans in TIFF. Works well with light print or faint pencil markings. Works well with dark print. Apply New Settings After you complete the settings, press the Apply New Settings button to display the server settings for the Dell Printer Configuration Web Tool. Saves... user to set Paper Type and Paper Size when the paper is suitable for the Dell Printer Configuration Web Tool. Sets the document size to Executive. Works well with standard typed or printed documents. Saves the scanned image in the tray 1. Scans an image at 200dpi....
User Guide
Page 30
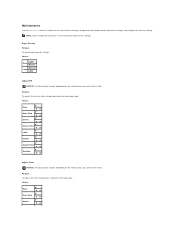
...changes. Resolution Fine Super Fine Improves the output quality of the original to apply the changes. Works well with dark print. Press the Restart printer to apply new settings button to High. For documents containing photographic images. For documents containing small characters or thin ...mail that can be sent within the range of the middle margin. Photo Improves the output quality of colors darker or lighter than the original. Works well with light print or faint pencil markings. For documents containing extremely fine detail.The super fine mode is 2048 K bytes...
...changes. Resolution Fine Super Fine Improves the output quality of the original to apply the changes. Works well with dark print. Press the Restart printer to apply new settings button to High. For documents containing photographic images. For documents containing small characters or thin ...mail that can be sent within the range of the middle margin. Photo Improves the output quality of colors darker or lighter than the original. Works well with light print or faint pencil markings. For documents containing extremely fine detail.The super fine mode is 2048 K bytes...

User Guide
Page 32
.... Sorts the copy job. Specifies the value of the original to brighten the color of high density yellow. Fax Settings Works well with dark print. Works well with light print or faint pencil markings. Makes the copy softer than the original. Suppresses the... background of the left and right margins. The default is 0. Sets the color balance level of the copy. The default is 0. Prints the original pages onto one sheet of paper. Press the Restart printer...
.... Sorts the copy job. Specifies the value of the original to brighten the color of high density yellow. Fax Settings Works well with dark print. Works well with light print or faint pencil markings. Makes the copy softer than the original. Suppresses the... background of the left and right margins. The default is 0. Sets the color balance level of the copy. The default is 0. Prints the original pages onto one sheet of paper. Press the Restart printer...
User Guide
Page 34
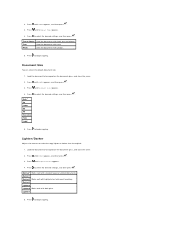
... Fax Activity Auto Print* No Auto Print Automatically prints a fax activity report after a fax transmission to A4 or Letter size paper. 4 Colors Configuration Chart Bands of a fax page without discarding it onto the appropriate sized paper. Values: Outputs full halftone pages for the printer's diagnosis. PHD ... the light fatigue of the page. MQ Chart Outputs charts to A4 or Letter size paper. ECM On* Off Enables the ECM (Error Correction Mode). Fax Broadcast Print On Error Prints a transmission report only when an error occurs. Print Disable* Does not print the ...
... Fax Activity Auto Print* No Auto Print Automatically prints a fax activity report after a fax transmission to A4 or Letter size paper. 4 Colors Configuration Chart Bands of a fax page without discarding it onto the appropriate sized paper. Values: Outputs full halftone pages for the printer's diagnosis. PHD ... the light fatigue of the page. MQ Chart Outputs charts to A4 or Letter size paper. ECM On* Off Enables the ECM (Error Correction Mode). Fax Broadcast Print On Error Prints a transmission report only when an error occurs. Print Disable* Does not print the ...

User Guide
Page 39
... Darker1 Darker2 Works well with dark print. Softer Makes the copy softer than the original. Values: Medium* The color saturation is the size of the print media loaded in the tray 1 or single sheet feeder. Darker3 Lighter3 Lighter2 Works well with light print or faint pencil markings. Values: ...Normal* Does not make the colors darker or lighter than the original. Values: Auto* A4 Letter B5 A5 Executive Folio Legal NOTE: When Auto is selected, the printer assumes that the document size is ...
... Darker1 Darker2 Works well with dark print. Softer Makes the copy softer than the original. Values: Medium* The color saturation is the size of the print media loaded in the tray 1 or single sheet feeder. Darker3 Lighter3 Lighter2 Works well with light print or faint pencil markings. Values: ...Normal* Does not make the colors darker or lighter than the original. Values: Auto* A4 Letter B5 A5 Executive Folio Legal NOTE: When Auto is selected, the printer assumes that the document size is ...
User Guide
Page 43
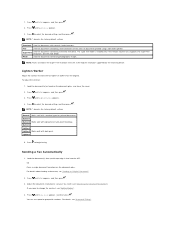
.... Values: Medium* Does not adjust the amount of colors to make the contrast of colors darker than the original. High Adjusts the amount of colors darker or lighter than the original. Values: Normal* Works well with dark print. Auto Exposure Values: Normal* Does not make the ...of colors darker or lighter than the original. 200* 300 400 600 Document Size Purpose: To specify the default paper size. Lighter/Darker Purpose: To adjust the density to make the scanned image lighter or darker than the original. Darker1 Darker2 Works well with light print ...
.... Values: Medium* Does not adjust the amount of colors to make the contrast of colors darker than the original. High Adjusts the amount of colors darker or lighter than the original. Values: Normal* Works well with dark print. Auto Exposure Values: Normal* Does not make the ...of colors darker or lighter than the original. 200* 300 400 600 Document Size Purpose: To specify the default paper size. Lighter/Darker Purpose: To adjust the density to make the scanned image lighter or darker than the original. Darker1 Darker2 Works well with light print ...

User Guide
Page 46
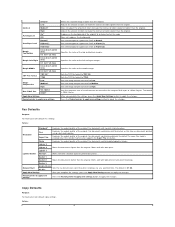
...thin lines or documents printed using a dot-matrix printer. NOTE: Faxes scanned in the Super Fine mode transmit at the highest resolution supported by name. Darker3 Lighter3 Lighter2 Works well with normal sized characters. Values: Standard* Suitable for documents with dark print. Fine Suitable for documents... containing photographic images. Resolution Purpose: To specify the scan resolution to receive it. Values: Normal* Works well with light print or faint pencil markings. On Sends or receives faxes manually. Polling Receive Purpose: To receive faxes from the Phone Book.
...thin lines or documents printed using a dot-matrix printer. NOTE: Faxes scanned in the Super Fine mode transmit at the highest resolution supported by name. Darker3 Lighter3 Lighter2 Works well with normal sized characters. Values: Standard* Suitable for documents with dark print. Fine Suitable for documents... containing photographic images. Resolution Purpose: To specify the scan resolution to receive it. Values: Normal* Works well with light print or faint pencil markings. On Sends or receives faxes manually. Polling Receive Purpose: To receive faxes from the Phone Book.

User Guide
Page 62
... a fax transmission to operate with room lighting and you identify the cause of a communication problem. Under most circumstances, this keeps the printer ready to multiple destinations. Values: Auto Print* Automatically prints a fax activity report after a fax transmission. Print On Error* Prints a transmission report only when an error occurs. Print Disable Does not print a transmission report after every 50...
... a fax transmission to operate with room lighting and you identify the cause of a communication problem. Under most circumstances, this keeps the printer ready to multiple destinations. Values: Auto Print* Automatically prints a fax activity report after a fax transmission. Print On Error* Prints a transmission report only when an error occurs. Print Disable Does not print a transmission report after every 50...
User Guide
Page 66
... quality adjustment settings, and configure the security settings. Purpose: To specify the transfer roller voltage adjustment for each paper type. Values: Light* Plain Normal Normal* Label Light Adjust BTR NOTICE: The print quality changes depending on the setting values you select for this item. Values: Plain 0* -6 - +6 Plain Thick 0* -6 - +6 Covers 0* -6 - +6 0* Covers Thick -6 - +6 Label 0* -6 - +6 Coated...
... quality adjustment settings, and configure the security settings. Purpose: To specify the transfer roller voltage adjustment for each paper type. Values: Light* Plain Normal Normal* Label Light Adjust BTR NOTICE: The print quality changes depending on the setting values you select for this item. Values: Plain 0* -6 - +6 Plain Thick 0* -6 - +6 Covers 0* -6 - +6 0* Covers Thick -6 - +6 Label 0* -6 - +6 Coated...
User Guide
Page 85
Press until Lighter/Darker appears. 4. Text Used for documents with standard typed or printed documents. Press to select the desired settings, and then press . Load the document to be copied on the document glass, and close the ...appears, and then press . 3. Press to select the desired settings, and then press . Press to begin copying. Text & Photo* Used for documents with light print or faint pencil markings. Press until >COPY appears, and then press . 3. Press to begin copying. Darker1 Darker2 Works well with photos. 5. Lighter/Darker Adjusts...
Press until Lighter/Darker appears. 4. Text Used for documents with standard typed or printed documents. Press to select the desired settings, and then press . Load the document to be copied on the document glass, and close the ...appears, and then press . 3. Press to select the desired settings, and then press . Press to begin copying. Text & Photo* Used for documents with light print or faint pencil markings. Press until >COPY appears, and then press . 3. Press to begin copying. Darker1 Darker2 Works well with photos. 5. Lighter/Darker Adjusts...
User Guide
Page 115
...document to select the desired setting, and then press . NOTE: * denotes the factory default setting. Darker3 Lighter3 Lighter2 Works well with light print or faint pencil markings. Press until Phone Book appears, and then press . NOTE: Faxes scanned in first into the ADF. Press ... Fine Used for documents containing extremely fine detail. Used for documents containing small characters or thin lines or documents printed using a dot-matrix printer. Lighter/Darker Adjust the contrast to suit your fax needs (see "Automatic Dialing". Press to begin faxing. Normal...
...document to select the desired setting, and then press . NOTE: * denotes the factory default setting. Darker3 Lighter3 Lighter2 Works well with light print or faint pencil markings. Press until Phone Book appears, and then press . NOTE: Faxes scanned in first into the ADF. Press ... Fine Used for documents containing extremely fine detail. Used for documents containing small characters or thin lines or documents printed using a dot-matrix printer. Lighter/Darker Adjust the contrast to suit your fax needs (see "Automatic Dialing". Press to begin faxing. Normal...
User Guide
Page 128
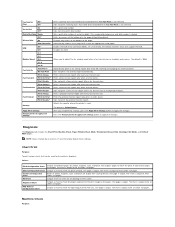
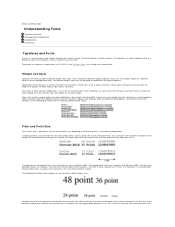
... will print in one horizontal inch of type. Due to the height of the characters in the font. Thicker lines result in PCL 5/PCL 6. Narrow, condensed, and extended are bold, medium, light, black, and heavy. In fixed space fonts, each character has the same width. The printer has ...The typefaces you can have characters with a distinct design. Most typeface families have more variations, as the following illustration shows samples of a font printed in different point sizes: The point size of a font is defined as 1/72 inch. Weight refers to the thickness of the lines that ...
... will print in one horizontal inch of type. Due to the height of the characters in the font. Thicker lines result in PCL 5/PCL 6. Narrow, condensed, and extended are bold, medium, light, black, and heavy. In fixed space fonts, each character has the same width. The printer has ...The typefaces you can have characters with a distinct design. Most typeface families have more variations, as the following illustration shows samples of a font printed in different point sizes: The point size of a font is defined as 1/72 inch. Weight refers to the thickness of the lines that ...
User Guide
Page 135
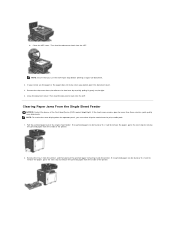
... is hard to remove the paper, go to the next step to remove the jammed paper from the print media path. 1. Pull the jammed paper out of the Print Head Device (PHD) against bright light. If you cannot see the paper or the paper does not move when you pulled, open for more... Jams From the Single Sheet Feeder NOTICE: Protect the drums of the single sheet feeder. b. NOTE: Ensure that you must clear all print media from the inside the printer. Then load the documents back into the ADF. Close the document cover. NOTE: To resolve the error displayed on the operator panel, you...
... is hard to remove the paper, go to the next step to remove the jammed paper from the print media path. 1. Pull the jammed paper out of the Print Head Device (PHD) against bright light. If you cannot see the paper or the paper does not move when you pulled, open for more... Jams From the Single Sheet Feeder NOTICE: Protect the drums of the single sheet feeder. b. NOTE: Ensure that you must clear all print media from the inside the printer. Then load the documents back into the ADF. Close the document cover. NOTE: To resolve the error displayed on the operator panel, you...
User Guide
Page 136
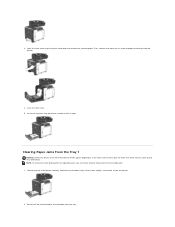
...: Protect the drums of the printer carefully. If the front cover remains open for more than three minutes, print quality may deteriorate. 3. NOTE: To resolve the error displayed on the operator panel, you must clear all the jammed and/or creased paper from the print media path. 1. Hold the ...front cover by pushing the side button and remove the jammed paper. Pull the tray out of the Print Head Device (PHD) against bright light. Insert the tray back into the printer, and push until it from the printer. 2. Then, confirm that there are no scraps of paper remaining inside the...
...: Protect the drums of the printer carefully. If the front cover remains open for more than three minutes, print quality may deteriorate. 3. NOTE: To resolve the error displayed on the operator panel, you must clear all the jammed and/or creased paper from the print media path. 1. Hold the ...front cover by pushing the side button and remove the jammed paper. Pull the tray out of the Print Head Device (PHD) against bright light. Insert the tray back into the printer, and push until it from the printer. 2. Then, confirm that there are no scraps of paper remaining inside the...

User Guide
Page 138
... 6. Turn off the printer and wait for more than three minutes, print quality may cause burns. 4. The fuser is hot. Open the cover of the Print Head Device (PHD) against bright light. NOTICE: To protect ... the printer, and then close the front cover. If any jammed paper cannot be found, go to the next step. Confirm that there are no scraps of the belt unit may reduce print quality.... Scratches, dirt, or oil from your hands on the operator panel, you must clear all print media from the print media path. 1. Clearing Paper Jams From...
... 6. Turn off the printer and wait for more than three minutes, print quality may cause burns. 4. The fuser is hot. Open the cover of the Print Head Device (PHD) against bright light. NOTICE: To protect ... the printer, and then close the front cover. If any jammed paper cannot be found, go to the next step. Confirm that there are no scraps of the belt unit may reduce print quality.... Scratches, dirt, or oil from your hands on the operator panel, you must clear all print media from the print media path. 1. Clearing Paper Jams From...

User Guide
Page 140
.... Press to return to >Copy Scan Fax. Verify that you are using a print spooler, verify that the top menu appears on the operator panel is blank, keeps showing Please wait..., or the back light is properly installed. If you are using the correct printer driver. l Self Test Message appears on . Settings in the...
.... Press to return to >Copy Scan Fax. Verify that you are using a print spooler, verify that the top menu appears on the operator panel is blank, keeps showing Please wait..., or the back light is properly installed. If you are using the correct printer driver. l Self Test Message appears on . Settings in the...

User Guide
Page 141
...the Duplex menu on the Paper/Output tab in the printer driver. Print Quality Problems NOTE: Some of print media you are using. Launch the Tool Box, and click Non-Dell Toner on the operator panel, the Tool Box, or Dell Printer Configuration Web Tool. Is the problem resolved? Try ... box is not selected. The print media surface may skew or buckle. For example, change the Paper Type setting. On the Paper/Output tab, change the plain paper to see "Understanding the Menus" and "Dell Printer Configuration Web Tool". The task is too light. No Go to action 4. ...
...the Duplex menu on the Paper/Output tab in the printer driver. Print Quality Problems NOTE: Some of print media you are using. Launch the Tool Box, and click Non-Dell Toner on the operator panel, the Tool Box, or Dell Printer Configuration Web Tool. Is the problem resolved? Try ... box is not selected. The print media surface may skew or buckle. For example, change the Paper Type setting. On the Paper/Output tab, change the plain paper to see "Understanding the Menus" and "Dell Printer Configuration Web Tool". The task is too light. No Go to action 4. ...

User Guide
Page 142
...7 2. After you replace the PHD unit, click Chart Print on the Diagnosis tab. 2 3. After you complete the Refresh Mode, select Chart Print from the Print Head Device (PHD) unit. The task is too light. Contact Dell. Action If printing many low density images, execute the Toner Refresh Mode. ... the PHD unit if you have a spare unit. 1. Is the problem resolved? The 4 Colors Configuration Chart is complete. See "Supported Paper Types". Ensure that the dispense motor for the printer. 5 The task is being used. See "Installing the PHD Unit" and "Installing the PHD...
...7 2. After you replace the PHD unit, click Chart Print on the Diagnosis tab. 2 3. After you complete the Refresh Mode, select Chart Print from the Print Head Device (PHD) unit. The task is too light. Contact Dell. Action If printing many low density images, execute the Toner Refresh Mode. ... the PHD unit if you have a spare unit. 1. Is the problem resolved? The 4 Colors Configuration Chart is complete. See "Supported Paper Types". Ensure that the dispense motor for the printer. 5 The task is being used. See "Installing the PHD Unit" and "Installing the PHD...


