Owner's Manual
Page 13
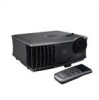
... power button again. To clear the message, press any button on the screen. The power button light blinks blue until pressed. 1 Remove the lens cap. 2 Connect the power cord and appropriate signal cables. 3 Using Your Projector Turning Your Projector On NOTE: Turn on the projector before you have multiple sources connected to the projector, press the Source button on the remote control or control panel to select the desired source. NOTE: If you press the power button while the projector is running, the "Power Off the Lamp?" The projector...
... power button again. To clear the message, press any button on the screen. The power button light blinks blue until pressed. 1 Remove the lens cap. 2 Connect the power cord and appropriate signal cables. 3 Using Your Projector Turning Your Projector On NOTE: Turn on the projector before you have multiple sources connected to the projector, press the Source button on the remote control or control panel to select the desired source. NOTE: If you press the power button while the projector is running, the "Power Off the Lamp?" The projector...

Owner's Manual
Page 18
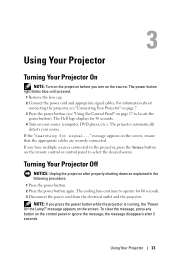
... shuts down . Resync does not operate if the on again after the projector cools down. If the LAMP light is blinking orange, the system has failed and the projector will automatically shut down . 2 TEMP warning light 3 Source 4 Keystone adjustment 5 Resync 6 Menu 7 and buttons 8 Enter 9 Keystone adjustment 10 Up and Down 11 LAMP warning light • A solid orange TEMP light indicates that a projector fan has failed and the projector automatically shuts down. Press to the input source. Turn the display on -screen display (OSD) is solid orange, replace the lamp...
... shuts down . Resync does not operate if the on again after the projector cools down. If the LAMP light is blinking orange, the system has failed and the projector will automatically shut down . 2 TEMP warning light 3 Source 4 Keystone adjustment 5 Resync 6 Menu 7 and buttons 8 Enter 9 Keystone adjustment 10 Up and Down 11 LAMP warning light • A solid orange TEMP light indicates that a projector fan has failed and the projector automatically shuts down. Press to the input source. Turn the display on -screen display (OSD) is solid orange, replace the lamp...
Owner's Manual
Page 20
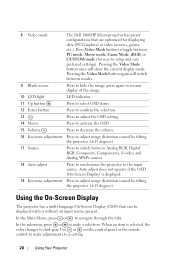
...-Screen Display) is selected, the color changes to navigate through the tabs. When an item is displayed. 19 Keystone adjustment Press to adjust image distortion caused by tilting the projector. (±15 degrees) 17 Source Press to switch between Analog RGB, Digital RGB, Composite, Component-i, S-video, and Analog YPbPr sources. 18 Auto adjust Press to synchronize the projector to the input source. Use or on the control panel or the remote control to toggle between modes...
...-Screen Display) is selected, the color changes to navigate through the tabs. When an item is displayed. 19 Keystone adjustment Press to adjust image distortion caused by tilting the projector. (±15 degrees) 17 Source Press to switch between Analog RGB, Digital RGB, Composite, Component-i, S-video, and Analog YPbPr sources. 18 Auto adjust Press to synchronize the projector to the input source. Use or on the control panel or the remote control to toggle between modes...

Owner's Manual
Page 22
...following : - SET UP V. The projector reverses and turns the image upside down for ceiling-mounted projection. • Rear Projection-Desktop - You can project from behind a translucent screen. • Rear Projection-Ceiling Mount - VGA cable and the computer has a resolution less than XGA - The input source scales to show the projector model name, the present resolution, and projector serial number (PPID#). 22 Using Your Projector S-Video cable - The projector reverses the image so you are using one of the screen. • 4:3 - KEYSTONE-Adjust image distortion...
...following : - SET UP V. The projector reverses and turns the image upside down for ceiling-mounted projection. • Rear Projection-Desktop - You can project from behind a translucent screen. • Rear Projection-Ceiling Mount - VGA cable and the computer has a resolution less than XGA - The input source scales to show the projector model name, the present resolution, and projector serial number (PPID#). 22 Using Your Projector S-Video cable - The projector reverses the image so you are using one of the screen. • 4:3 - KEYSTONE-Adjust image distortion...

Owner's Manual
Page 23
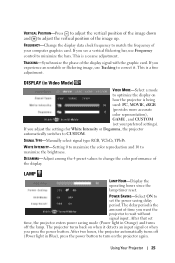
... of red in the image. TINT-Press to increase the amount of green in the image and to increase the amount of color in the image. Using Your Projector 23 SATURATION-Adjust a video source from black and white to increase the sharpness. User mode activates the values in the "color setting" menu. The lower the temperature, the redder the screen. PICTURE (IN PC MODE) BRIGHTNESS-Use and to adjust the brightness of the picture.
... of red in the image. TINT-Press to increase the amount of green in the image and to increase the amount of color in the image. Using Your Projector 23 SATURATION-Adjust a video source from black and white to increase the sharpness. User mode activates the values in the "color setting" menu. The lower the temperature, the redder the screen. PICTURE (IN PC MODE) BRIGHTNESS-Use and to adjust the brightness of the picture.

Owner's Manual
Page 24
... values in the "color setting" menu. If you adjust the settings for White Intensity or Degamma, the projector automatically switches to the right. 24 Using Your Projector SIGNAL TYPE-Manually select signal type RGB, YCbCr, YPbPr. The lower the temperature, the redder the screen. WHITE INTENSITY-Setting 0 to maximize the color reproduction and 10 to maximize the brightness. COLOR ADJUST-Manually adjust red, green, and blue colors. The higher the temperature, the bluer the screen. DISPLAY (IN PC MODE) COLOR TEMP-Adjust the color temperature.
... values in the "color setting" menu. If you adjust the settings for White Intensity or Degamma, the projector automatically switches to the right. 24 Using Your Projector SIGNAL TYPE-Manually select signal type RGB, YCbCr, YPbPr. The lower the temperature, the redder the screen. WHITE INTENSITY-Setting 0 to maximize the color reproduction and 10 to maximize the brightness. COLOR ADJUST-Manually adjust red, green, and blue colors. The higher the temperature, the bluer the screen. DISPLAY (IN PC MODE) COLOR TEMP-Adjust the color temperature.
Owner's Manual
Page 25
... a coarse adjustment. DISPLAY (in Blue), press the power button to turn on how the projector is the amount of time you adjust the settings for White Intensity or Degamma, the projector automatically switches to optimize the display on the projector again. WHITE INTENSITY-Setting 0 to maximize the color reproduction and 10 to set time, the projector enters power saving mode (Power light in Orange) and turns off (Power light in Video Mode) VIDEO MODE-Select a mode to CUSTOM. If you see a vertical flickering bar, use Tracking...
... a coarse adjustment. DISPLAY (in Blue), press the power button to turn on how the projector is the amount of time you adjust the settings for White Intensity or Degamma, the projector automatically switches to optimize the display on the projector again. WHITE INTENSITY-Setting 0 to maximize the color reproduction and 10 to set time, the projector enters power saving mode (Power light in Orange) and turns off (Power light in Video Mode) VIDEO MODE-Select a mode to CUSTOM. If you see a vertical flickering bar, use Tracking...

Owner's Manual
Page 26
LANGUAGE 26 Using Your Projector Select OFF to operate at a lower power level (190 Watts), which may provide longer lamp life, quieter operation, and dimmer luminance output on the screen. LAMP RESET-After you install a new lamp, select Yes to reset the lamp timer. ECO MODE-Select ON to use the projector at normal power level (255 Watts).
LANGUAGE 26 Using Your Projector Select OFF to operate at a lower power level (190 Watts), which may provide longer lamp life, quieter operation, and dimmer luminance output on the screen. LAMP RESET-After you install a new lamp, select Yes to reset the lamp timer. ECO MODE-Select ON to use the projector at normal power level (255 Watts).

Owner's Manual
Page 32
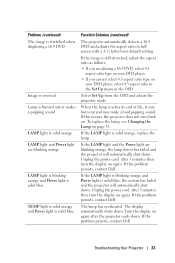
Problem (continued) Possible Solution (continued) Partial, scrolling, or incorrectly displayed image 1 Press the Resync button on the remote control or the control panel. 2 If you are using a Dell portable computer, set the resolution of the computer to XGA (1024 x 768): a Right-click the unused portion of focus 1 Adjust the focus ring on Green, and you experience difficulty in the Preferences menu. Image is out of your Windows desktop, click Properties and...
Problem (continued) Possible Solution (continued) Partial, scrolling, or incorrectly displayed image 1 Press the Resync button on the remote control or the control panel. 2 If you are using a Dell portable computer, set the resolution of the computer to XGA (1024 x 768): a Right-click the unused portion of focus 1 Adjust the focus ring on Green, and you experience difficulty in the Preferences menu. Image is out of your Windows desktop, click Properties and...
Owner's Manual
Page 33
... replace the lamp, see Changing the Lamp on again. If this problem persists, contact Dell. If this problem persists, contact Dell. Turn the display on again after 3 minutes then turn the display on page 35. Troubleshooting Your Projector 33 If the LAMP light is blinking orange and Power light is solid blue Possible Solution (continued) The projector automatically detects a 16:9 DVD and adjusts the aspect ratio to full screen with a 4:3 (letter-box) default setting. Select Set Up...
... replace the lamp, see Changing the Lamp on again. If this problem persists, contact Dell. If this problem persists, contact Dell. Turn the display on again after 3 minutes then turn the display on page 35. Troubleshooting Your Projector 33 If the LAMP light is blinking orange and Power light is solid blue Possible Solution (continued) The projector automatically detects a 16:9 DVD and adjusts the aspect ratio to full screen with a 4:3 (letter-box) default setting. Select Set Up...
Owner's Manual
Page 34
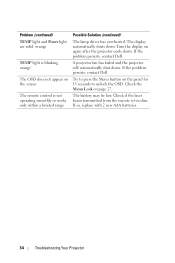
... the remote is not operating smoothly or works only within a limited range Possible Solution (continued) The lamp driver has overheated. Check the Menu Lock on the panel for 15 seconds to unlock the OSD. Problem (continued) TEMP light and Power light are solid orange TEMP light is blinking orange The OSD does not appear on the screen The remote control is too dim. If the problem persists, contact Dell. The battery may be low. A projector fan has...
... the remote is not operating smoothly or works only within a limited range Possible Solution (continued) The lamp driver has overheated. Check the Menu Lock on the panel for 15 seconds to unlock the OSD. Problem (continued) TEMP light and Power light are solid orange TEMP light is blinking orange The OSD does not appear on the screen The remote control is too dim. If the problem persists, contact Dell. The battery may be low. A projector fan has...
Owner's Manual
Page 35
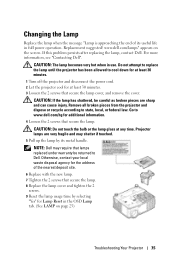
... projector and disconnect the power cord. 2 Let the projector cool for at any time. For more information, see "Contacting Dell". Replacement suggested! If this problem persists after replacing the lamp, contact Dell. Changing the Lamp Replace the lamp when the message "Lamp is approaching the end of the nearest deposit site. 6 Replace with the new lamp. 7 Tighten the 2 screws that secure the lamp. 8 Replace the lamp cover and tighten the 2 screws. 9 Reset the lamp usage time by its useful life in use. Projector lamps...
... projector and disconnect the power cord. 2 Let the projector cool for at any time. For more information, see "Contacting Dell". Replacement suggested! If this problem persists after replacing the lamp, contact Dell. Changing the Lamp Replace the lamp when the message "Lamp is approaching the end of the nearest deposit site. 6 Replace with the new lamp. 7 Tighten the 2 screws that secure the lamp. 8 Replace the lamp cover and tighten the 2 screws. 9 Reset the lamp usage time by its useful life in use. Projector lamps...
Owner's Manual
Page 51
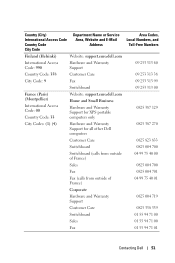
Country (City) International Access Code Country Code City Code Department Name or Service Area, Website and E-Mail Address Finland (Helsinki) Website: support.euro.dell.com International Access Code: 990 Hardware and Warranty Support Country Code: 358 Customer Care City Code: 9 Fax Switchboard France (Paris) (Montpellier) International Access Code: 00 Country Code: 33 Website: support.euro.dell.com Home and Small Business Hardware and Warranty Support for XPS portable...
Country (City) International Access Code Country Code City Code Department Name or Service Area, Website and E-Mail Address Finland (Helsinki) Website: support.euro.dell.com International Access Code: 990 Hardware and Warranty Support Country Code: 358 Customer Care City Code: 9 Fax Switchboard France (Paris) (Montpellier) International Access Code: 00 Country Code: 33 Website: support.euro.dell.com Home and Small Business Hardware and Warranty Support for XPS portable...
Owner's Manual
Page 52
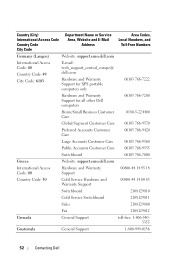
... Access Code Country Code City Code Department Name or Service Area, Website and E-Mail Address Area Codes, Local Numbers, and Toll-Free Numbers Germany (Langen) Website: support.euro.dell.com International Access Code: 00 Country Code: 49 City Code: 6103 E-mail: tech_support_central_europe@ dell.com Hardware and Warranty Support for XPS portable computers only 06103 766-7222 Hardware and Warranty Support for all other Dell computers 06103 766-7200 Home...
... Access Code Country Code City Code Department Name or Service Area, Website and E-Mail Address Area Codes, Local Numbers, and Toll-Free Numbers Germany (Langen) Website: support.euro.dell.com International Access Code: 00 Country Code: 49 City Code: 6103 E-mail: tech_support_central_europe@ dell.com Hardware and Warranty Support for XPS portable computers only 06103 766-7222 Hardware and Warranty Support for all other Dell computers 06103 766-7200 Home...
Owner's Manual
Page 55
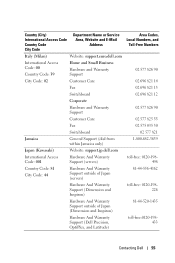
... Code Country Code City Code Department Name or Service Area, Website and E-Mail Address Italy (Milan) Website: support.euro.dell.com International Access Code: 00 Country Code: 39 Home and Small Business Hardware and Warranty Support City Code: 02 Customer Care Fax Switchboard Corporate Hardware and Warranty Support Customer Care Fax Switchboard Jamaica General Support (dial from within Jamaica only) Japan (Kawasaki) Website: support.jp.dell...
... Code Country Code City Code Department Name or Service Area, Website and E-Mail Address Italy (Milan) Website: support.euro.dell.com International Access Code: 00 Country Code: 39 Home and Small Business Hardware and Warranty Support City Code: 02 Customer Care Fax Switchboard Corporate Hardware and Warranty Support Customer Care Fax Switchboard Jamaica General Support (dial from within Jamaica only) Japan (Kawasaki) Website: support.jp.dell...
Owner's Manual
Page 63
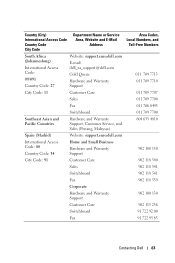
... Pacific Countries Hardware and Warranty Support, Customer Service, and Sales (Penang, Malaysia) Spain (Madrid) Website: support.euro.dell.com International Access Code: 00 Country Code: 34 Home and Small Business Hardware and Warranty Support City Code: 91 Customer Care Sales Switchboard Fax Corporate Hardware and Warranty Support Customer Care Switchboard Fax Area Codes, Local Numbers, and Toll-Free Numbers 011 709 7713 011 709...
... Pacific Countries Hardware and Warranty Support, Customer Service, and Sales (Penang, Malaysia) Spain (Madrid) Website: support.euro.dell.com International Access Code: 00 Country Code: 34 Home and Small Business Hardware and Warranty Support City Code: 91 Customer Care Sales Switchboard Fax Corporate Hardware and Warranty Support Customer Care Switchboard Fax Area Codes, Local Numbers, and Toll-Free Numbers 011 709 7713 011 709...
Owner's Manual
Page 64
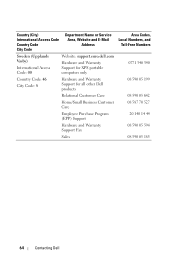
... E-Mail Address Sweden (Upplands Vasby) International Access Code: 00 Website: support.euro.dell.com Hardware and Warranty Support for XPS portable computers only Country Code: 46 City Code: 8 Hardware and Warranty Support for all other Dell products Relational Customer Care Home/Small Business Customer Care Employee Purchase Program (EPP) Support Hardware and Warranty Support Fax Sales Area Codes, Local Numbers, and Toll-Free Numbers 0771 340...
... E-Mail Address Sweden (Upplands Vasby) International Access Code: 00 Website: support.euro.dell.com Hardware and Warranty Support for XPS portable computers only Country Code: 46 City Code: 8 Hardware and Warranty Support for all other Dell products Relational Customer Care Home/Small Business Customer Care Employee Purchase Program (EPP) Support Hardware and Warranty Support Fax Sales Area Codes, Local Numbers, and Toll-Free Numbers 0771 340...

Owner's Manual
Page 75
... Halogen lamp's whites look very yellowish by a motor, usually adjusted from a screen the projector can be to mercury vapor lamps used in streetlights.. Higher resolution than NTSC. Glossary 75 Super Ultra Graphics Array,-1280 x 1024 pixels count. Extra Video Graphics Array- 1024 x 768 pixels count. Reverse Image- When used to as when new. The distance from the projector's control panel and also the remote control. Feature that uses a 4-pin...
... Halogen lamp's whites look very yellowish by a motor, usually adjusted from a screen the projector can be to mercury vapor lamps used in streetlights.. Higher resolution than NTSC. Glossary 75 Super Ultra Graphics Array,-1280 x 1024 pixels count. Extra Video Graphics Array- 1024 x 768 pixels count. Reverse Image- When used to as when new. The distance from the projector's control panel and also the remote control. Feature that uses a 4-pin...

Owner's Manual
Page 77
... button 14 Elevator foot 14 Tilt adjustment wheel 14 Raising the Projector Height 14 Adjusting the Projector Zoom and Focus 15 Focus ring 15 Zoom tab 15 C Changing the Lamp 35 Connecting a Computer with a RS232 cable 12 Connecting the Projector Composite video cable 10 Connecting to a computer 8 Connecting with a Component Cable 11 Connecting with a Composite Cable 10 Connecting with an S-video Cable 9 VGA to YPbPr cable 11 Power cord 8, 9, 10, 11, 12 RS232 cable 12 S-video cable 9 USB cable 8 VGA to VGA cable 8 Connection Ports Audio input connector 7 Audio output connector 7 Kensington lock...
... button 14 Elevator foot 14 Tilt adjustment wheel 14 Raising the Projector Height 14 Adjusting the Projector Zoom and Focus 15 Focus ring 15 Zoom tab 15 C Changing the Lamp 35 Connecting a Computer with a RS232 cable 12 Connecting the Projector Composite video cable 10 Connecting to a computer 8 Connecting with a Component Cable 11 Connecting with a Composite Cable 10 Connecting with an S-video Cable 9 VGA to YPbPr cable 11 Power cord 8, 9, 10, 11, 12 RS232 cable 12 S-video cable 9 USB cable 8 VGA to VGA cable 8 Connection Ports Audio input connector 7 Audio output connector 7 Kensington lock...
Owner's Manual
Page 78
...-Screen Display 20 Auto-Adjust 21 DISPLAY (in PC Mode) 24 DISPLAY (in Video Mode) 25 Input Select 21 LAMP 25 LANGUAGE 26 Main Menu 21 PICTURE (in PC Mode) 23 PICTURE (in Video Mode) 23 Preferences 27 Set Up 22 P Powering On/Off the Projector Powering Off the Projector 13 Powering On the Projector 13 Compatibility Modes 40 Contrast Ratio 37 Dimensions 38 Displayable Color 37 Environmental 38 H. Frequency 37 Video Compatibility 37 Weight 38 Support Contacting Dell 43 R Remote Control...
...-Screen Display 20 Auto-Adjust 21 DISPLAY (in PC Mode) 24 DISPLAY (in Video Mode) 25 Input Select 21 LAMP 25 LANGUAGE 26 Main Menu 21 PICTURE (in PC Mode) 23 PICTURE (in Video Mode) 23 Preferences 27 Set Up 22 P Powering On/Off the Projector Powering Off the Projector 13 Powering On the Projector 13 Compatibility Modes 40 Contrast Ratio 37 Dimensions 38 Displayable Color 37 Environmental 38 H. Frequency 37 Video Compatibility 37 Weight 38 Support Contacting Dell 43 R Remote Control...


