Owner's Manual
Page 3
Contents 1 Your Dell™ Projector About Your Projector 6 2 Connecting Your Projector Connecting to a Computer 8 Connecting a DVD Player, Set Top Box, VCR, or TV . . . 8 Connecting With a Component Cable 8 Connecting With an S-Video Cable 9 Connecting With a Composite Cable 9 Connecting to a Wired RS232 Remote Control . . . . . 9 Connecting to a Computer 10 Connecting With a Commercial RS232 Control Box 10...
Contents 1 Your Dell™ Projector About Your Projector 6 2 Connecting Your Projector Connecting to a Computer 8 Connecting a DVD Player, Set Top Box, VCR, or TV . . . 8 Connecting With a Component Cable 8 Connecting With an S-Video Cable 9 Connecting With a Composite Cable 9 Connecting to a Wired RS232 Remote Control . . . . . 9 Connecting to a Computer 10 Connecting With a Commercial RS232 Control Box 10...
Owner's Manual
Page 4
Adjusting the Projector Zoom and Focus 14 Using the Control Panel 15 Using the Remote Control 16 Using the On-Screen Display 17 Main Menu 18 All Images Menu 18 Audio Menu 19 Management Menu 20 Language Menu 21 Factory Reset Menu 21 Computer Image Menu 21 Video Image Menu 22 4 Troubleshooting Your Projector Self-diagnostic for Video 25 Changing the Lamp 26 5 Specifications 6 Contacting Dell 7 Glossary 4 Contents
Adjusting the Projector Zoom and Focus 14 Using the Control Panel 15 Using the Remote Control 16 Using the On-Screen Display 17 Main Menu 18 All Images Menu 18 Audio Menu 19 Management Menu 20 Language Menu 21 Factory Reset Menu 21 Computer Image Menu 21 Video Image Menu 22 4 Troubleshooting Your Projector Self-diagnostic for Video 25 Changing the Lamp 26 5 Specifications 6 Contacting Dell 7 Glossary 4 Contents
Owner's Manual
Page 6
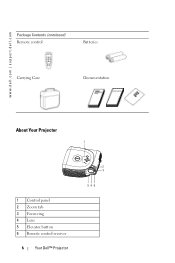
www.dell.com | support.dell.com Package Contents (continued) Remote control Batteries Carrying Case Documentation About Your Projector 1 1 Control panel 2 Zoom tab 3 Focus ring 4 Lens 5 Elevator button 6 Remote control receiver 6 Your Dell™ Projector 2 3 546
www.dell.com | support.dell.com Package Contents (continued) Remote control Batteries Carrying Case Documentation About Your Projector 1 1 Control panel 2 Zoom tab 3 Focus ring 4 Lens 5 Elevator button 6 Remote control receiver 6 Your Dell™ Projector 2 3 546
Owner's Manual
Page 8
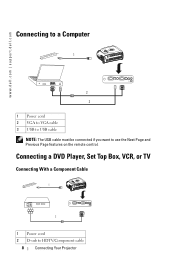
Connecting a DVD Player, Set Top Box, VCR, or TV Connecting With a Component Cable 1 2 1 Power cord 2 D-sub to use the Next Page and Previous Page features on the remote control. www.dell.com | support.dell.com Connecting to a Computer 1 2 3 1 Power cord 2 VGA to VGA cable 3 USB to USB cable NOTE: The USB cable must be connected if you want to HDTV/Component cable 8 Connecting Your Projector
Connecting a DVD Player, Set Top Box, VCR, or TV Connecting With a Component Cable 1 2 1 Power cord 2 D-sub to use the Next Page and Previous Page features on the remote control. www.dell.com | support.dell.com Connecting to a Computer 1 2 3 1 Power cord 2 VGA to VGA cable 3 USB to USB cable NOTE: The USB cable must be connected if you want to HDTV/Component cable 8 Connecting Your Projector
Owner's Manual
Page 9
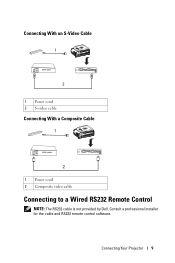
Consult a professional installer for the cable and RS232 remote control software. Connecting Your Projector 9 Connecting With an S-Video Cable 1 2 1 Power cord 2 S-video cable Connecting With a Composite Cable 1 2 1 Power cord 2 Composite video cable Connecting to a Wired RS232 Remote Control NOTE: The RS232 cable is not provided by Dell.
Consult a professional installer for the cable and RS232 remote control software. Connecting Your Projector 9 Connecting With an S-Video Cable 1 2 1 Power cord 2 S-video cable Connecting With a Composite Cable 1 2 1 Power cord 2 Composite video cable Connecting to a Wired RS232 Remote Control NOTE: The RS232 cable is not provided by Dell.
Owner's Manual
Page 11
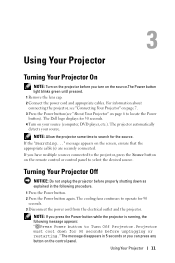
... light blinks green until pressed. 1 Remove the lens cap. 2 Connect the power cord and appropriate cables. The Dell logo displays for 90 seconds before properly shutting down for 30 seconds. 4 Turn on the remote control or control panel to select the desired source. NOTE: If you have multiple sources connected to the...
... light blinks green until pressed. 1 Remove the lens cap. 2 Connect the power cord and appropriate cables. The Dell logo displays for 90 seconds before properly shutting down for 30 seconds. 4 Turn on the remote control or control panel to select the desired source. NOTE: If you have multiple sources connected to the...
Owner's Manual
Page 16
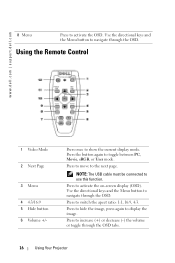
...4:3. Press to toggle between PC, Movie, sRGB, or User mode. Press to hide the image, press again to activate the OSD. www.dell.com | support.dell.com 8 Menu Press to display the image. Press to increase (+) or decrease (-) the volume or toggle through the OSD. Press to show... the current display mode. Press once to activate the on-screen display (OSD). Using the Remote Control 1 Video Mode 2 Next Page 3 Menu 4 4:3/16:9 5 ...
...4:3. Press to toggle between PC, Movie, sRGB, or User mode. Press to hide the image, press again to activate the OSD. www.dell.com | support.dell.com 8 Menu Press to display the image. Press to increase (+) or decrease (-) the volume or toggle through the OSD. Press to show... the current display mode. Press once to activate the on-screen display (OSD). Using the Remote Control 1 Video Mode 2 Next Page 3 Menu 4 4:3/16:9 5 ...
Owner's Manual
Page 17
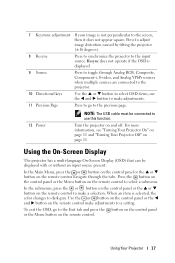
... an item is selected, the color changes to the Exit tab and press the button on the control panel or the Menu button on the remote control to a setting. 7 Keystone adjustment If your image is not perpendicular to make a selection. In the submenus, press the or button on the ...9 Source Press to toggle through the tabs. For more information, see "Turning Your Projector On" on page 11 and "Turning Your Projector Off" on the remote control to the screen, then it does not appear square. Press to adjust image distortion caused by tilting the projector (±16 degrees). 8 Resync Press...
... an item is selected, the color changes to the Exit tab and press the button on the control panel or the Menu button on the remote control to a setting. 7 Keystone adjustment If your image is not perpendicular to make a selection. In the submenus, press the or button on the ...9 Source Press to toggle through the tabs. For more information, see "Turning Your Projector On" on page 11 and "Turning Your Projector Off" on the remote control to the screen, then it does not appear square. Press to adjust image distortion caused by tilting the projector (±16 degrees). 8 Resync Press...
Owner's Manual
Page 18
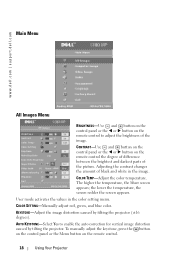
... the values in the image. To manually adjust the keystone, press the button on the control panel or the Menu button on the remote control. 18 Using Your Projector The higher the temperature, the bluer screen appears; Adjusting the contrast changes the amount of black and white...menu. KEYSTONE-Adjust the image distortion caused by tilting the projector. www.dell.com | support.dell.com Main Menu All Images Menu BRIGHTNESS-Use and button on the control panel or the or button on the remote control to enable the auto correction for vertical image distortion caused by tilting...
... the values in the image. To manually adjust the keystone, press the button on the control panel or the Menu button on the remote control. 18 Using Your Projector The higher the temperature, the bluer screen appears; Adjusting the contrast changes the amount of black and white...menu. KEYSTONE-Adjust the image distortion caused by tilting the projector. www.dell.com | support.dell.com Main Menu All Images Menu BRIGHTNESS-Use and button on the control panel or the or button on the remote control to enable the auto correction for vertical image distortion caused by tilting...

Owner's Manual
Page 19
...display. VGA cable and the the computer has a resolution less than XGA - S-Video cable - Audio Menu VOLUME-Press the button on the remote control, the Auto Keystone will do once. WHITE INTENSITY-Select 0 to maximize the color reproduction and 10 to change the color performance of ...the following : - DEGAMMA-Adjust between 1 and 6 to maximize the brightness. Composite cable • 16:9 - button on the remote control to decrease the volume and press the button on the control panel or the + button on how the projector is 0. The input source scales...
...display. VGA cable and the the computer has a resolution less than XGA - S-Video cable - Audio Menu VOLUME-Press the button on the remote control, the Auto Keystone will do once. WHITE INTENSITY-Select 0 to maximize the color reproduction and 10 to change the color performance of ...the following : - DEGAMMA-Adjust between 1 and 6 to maximize the brightness. Composite cable • 16:9 - button on the remote control to decrease the volume and press the button on the control panel or the + button on how the projector is 0. The input source scales...
Owner's Manual
Page 20
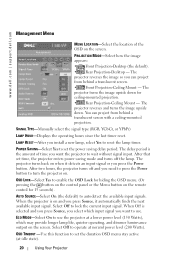
The projector turns back on the remote control for ceiling-mounted projection. • Rear Projection-Ceiling Mount - OSD LOCK-Select Yes to enable the OSD Lock for hiding the OSD menu. (Or ... Off to reset the lamp timer. The projector reverses the image so you can project from behind a translucent screen with a ceiling-mounted projection. www.dell.com | support.dell.com Management Menu MENU LOCATION-Select the location of time you want to turn the projector on the screen. The projector turns the image...
The projector turns back on the remote control for ceiling-mounted projection. • Rear Projection-Ceiling Mount - OSD LOCK-Select Yes to enable the OSD Lock for hiding the OSD menu. (Or ... Off to reset the lamp timer. The projector reverses the image so you can project from behind a translucent screen with a ceiling-mounted projection. www.dell.com | support.dell.com Management Menu MENU LOCATION-Select the location of time you want to turn the projector on the screen. The projector turns the image...
Owner's Manual
Page 21
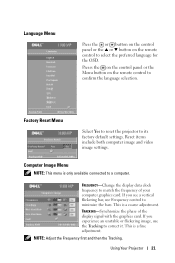
...menu is only available connected to minimize the bars. Language Menu Press the or button on the control panel or the or button on the remote control to confirm the language selection. NOTE: Adjust the Frequency first and then the Tracking. Presss the on the control panel or the ...Menu button on the remote control to select the preferred language for the OSD. If you see a vertical flickering bar, use the Tracking to correct it. TRACKING-Synchronize the...
...menu is only available connected to minimize the bars. Language Menu Press the or button on the control panel or the or button on the remote control to confirm the language selection. NOTE: Adjust the Frequency first and then the Tracking. Presss the on the control panel or the ...Menu button on the remote control to select the preferred language for the OSD. If you see a vertical flickering bar, use the Tracking to correct it. TRACKING-Synchronize the...

Owner's Manual
Page 22
... the button on the control panel or the button on the remote control to decrease the amount of color in the image and press the button the control panel or the button on the remote control to the right. www.dell.com | support.dell.com HOR. POSITION-Press the button on the control panel... or the button on the remote control to adjust the horizontal position of the image to the left and press...
... the button on the control panel or the button on the remote control to decrease the amount of color in the image and press the button the control panel or the button on the remote control to the right. www.dell.com | support.dell.com HOR. POSITION-Press the button on the control panel... or the button on the remote control to adjust the horizontal position of the image to the left and press...
Owner's Manual
Page 24
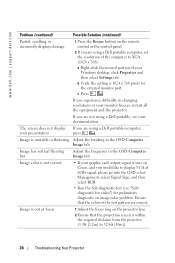
... Problem (continued) Possible Solution (continued) Partial, scrolling, or incorrectly displayed image 1 Press the Resync button on the remote control or the control panel. 2 If you are using a Dell portable computer, set the resolution of the computer to XGA (1024 x 768): a Right-click the unused portion of ... test pattern are correct. If you would like to 32.8ft [10m]). 24 Troubleshooting Your Projector If you are not using a Dell portable computer, your Windows desktop, click Properties and then select Settings tab. Image is unstable or flickering Adjust the tracking in the ...
... Problem (continued) Possible Solution (continued) Partial, scrolling, or incorrectly displayed image 1 Press the Resync button on the remote control or the control panel. 2 If you are using a Dell portable computer, set the resolution of the computer to XGA (1024 x 768): a Right-click the unused portion of ... test pattern are correct. If you would like to 32.8ft [10m]). 24 Troubleshooting Your Projector If you are not using a Dell portable computer, your Windows desktop, click Properties and then select Settings tab. Image is unstable or flickering Adjust the tracking in the ...
Owner's Manual
Page 25
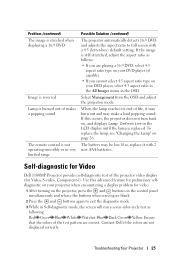
... the colors are not displayed correctly. To replace the lamp, see "Changing the Lamp" on page 26. Self-diagnostic for Video Dell 1100MP Projector provides self-diagnostic test of the test pattern are correct. Ensure that the colors of the projector video display (for Video, S-video, Component-i)....the OSD. Problem (continued) The image is streched when displaying a 16:9 DVD Image is reversed Lamp is burned out of makes a popping sound The remote control is not operating smoothly or in Self-diagnostic mode, the screen will run a seven-color-cycle test as follows: • If you are ...
... the colors are not displayed correctly. To replace the lamp, see "Changing the Lamp" on page 26. Self-diagnostic for Video Dell 1100MP Projector provides self-diagnostic test of the test pattern are correct. Ensure that the colors of the projector video display (for Video, S-video, Component-i)....the OSD. Problem (continued) The image is streched when displaying a 16:9 DVD Image is reversed Lamp is burned out of makes a popping sound The remote control is not operating smoothly or in Self-diagnostic mode, the screen will run a seven-color-cycle test as follows: • If you are ...

Owner's Manual
Page 28
www.dell.com | support.dell.com Audio Noise Level Weight Dimensions (W x H x D) Environmental Regulatory I/O Connectors 1 speaker, 2 Watts RMS 34dB(A) Full-on mode, 32dB(A) Eco-mode 4.85 lbs (2.2 kgs) External 9.9 x 3.96 x 8.4 ± 0....: one composite video RCA and one S-video USB input: one USB connector Audio input: one phone jack (diameter 3.5mm) One mini-DIN RS232 for wired remote projector control from PC 28 Specifications
www.dell.com | support.dell.com Audio Noise Level Weight Dimensions (W x H x D) Environmental Regulatory I/O Connectors 1 speaker, 2 Watts RMS 34dB(A) Full-on mode, 32dB(A) Eco-mode 4.85 lbs (2.2 kgs) External 9.9 x 3.96 x 8.4 ± 0....: one composite video RCA and one S-video USB input: one USB connector Audio input: one phone jack (diameter 3.5mm) One mini-DIN RS232 for wired remote projector control from PC 28 Specifications

Owner's Manual
Page 55
... means that are illuminated. Backlit (Backlight)-Refers to as Y'Pb'Pr' for analog component and Y'Cb'Cr' for comparing projectors. These components are referred to a remote control, or a projector control panel, that has buttons and controls that the width of the original image. Compressed SVGA-To project an 800x600 image to...
... means that are illuminated. Backlit (Backlight)-Refers to as Y'Pb'Pr' for analog component and Y'Cb'Cr' for comparing projectors. These components are referred to a remote control, or a projector control panel, that has buttons and controls that the width of the original image. Compressed SVGA-To project an 800x600 image to...

Owner's Manual
Page 57
Maximum Distance-The distance from the projector's control panel and also the remote control. Maximum Image Size-The largest image a projector can throw in a fully darkened room. These lamps output a very "hot" temperature light, similar to send video ...
Maximum Distance-The distance from the projector's control panel and also the remote control. Maximum Image Size-The largest image a projector can throw in a fully darkened room. These lamps output a very "hot" temperature light, similar to send video ...

Owner's Manual
Page 59
... cable, 9 Connection with Commercial RS232 control box, 10 Connection with PC, 10 D-sub to D-sub cable, 8 D-sub to HDTV/Component cable, 8 Installation for wired RS232 remote control, 9 Power cord, 8-10 Professional Installation Options, 9 RS232 cable, 10 S-video cable, 9 To Computer, 8 USB to USB cable, 8 Connection Ports Audio input connector, 7 Composite video...
... cable, 9 Connection with Commercial RS232 control box, 10 Connection with PC, 10 D-sub to D-sub cable, 8 D-sub to HDTV/Component cable, 8 Installation for wired RS232 remote control, 9 Power cord, 8-10 Professional Installation Options, 9 RS232 cable, 10 S-video cable, 9 To Computer, 8 USB to USB cable, 8 Connection Ports Audio input connector, 7 Composite video...

Owner's Manual
Page 60
..., 21 Tracking, 21 Language, 21 Management, 20 Video Image, 22 P Powering On/Off the Projector Powering Off the Projector, 11 Powering On the Projector, 11 R Remote Control, 6, 16 RS232 Pin Assignment RS232 Protocol, 29 Communication Settings, 29 60 Index Control Command Syntax, 29 Control Commands List, 30 S Specifications Audio, 28 Brightness..., 27 Projection Lens, 27 Projection Screen Size, 27 Regulatory, 28 RS232 Pin Assignment, 29 Uniformity, 27 V. Frequency, 27 Video Compatibility, 27 Weight, 28 support contacting Dell, 33
..., 21 Tracking, 21 Language, 21 Management, 20 Video Image, 22 P Powering On/Off the Projector Powering Off the Projector, 11 Powering On the Projector, 11 R Remote Control, 6, 16 RS232 Pin Assignment RS232 Protocol, 29 Communication Settings, 29 60 Index Control Command Syntax, 29 Control Commands List, 30 S Specifications Audio, 28 Brightness..., 27 Projection Lens, 27 Projection Screen Size, 27 Regulatory, 28 RS232 Pin Assignment, 29 Uniformity, 27 V. Frequency, 27 Video Compatibility, 27 Weight, 28 support contacting Dell, 33


