User Manual
Page 2
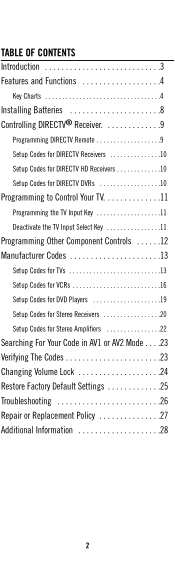
TABLE OF CONTENTS Introduction 3 Features and Functions 4 Key Charts 4 Installing Batteries 8 Controlling DIRECTV® Receiver 9 Programming DIRECTV Remote 9 Setup Codes for DIRECTV Receivers 10 Setup Codes for DIRECTV HD Receivers 10 Setup Codes for DIRECTV DVRs 10 Programming to Control Your TV 11 Programming the TV Input Key 11 Deactivate the TV Input Select Key 11 Programming...
TABLE OF CONTENTS Introduction 3 Features and Functions 4 Key Charts 4 Installing Batteries 8 Controlling DIRECTV® Receiver 9 Programming DIRECTV Remote 9 Setup Codes for DIRECTV Receivers 10 Setup Codes for DIRECTV HD Receivers 10 Setup Codes for DIRECTV DVRs 10 Programming to Control Your TV 11 Programming the TV Input Key 11 Deactivate the TV Input Select Key 11 Programming...
User Manual
Page 3
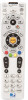
...batteries are replaced Before using your DIRECTV Universal Remote Control, you to consolidate the clutter of older or discon- Moreover, its features. 3 Please follow the instructions detailed in this guide to -use unit that will control four components, including a DIRECTV Receiver, TV, and two ...start enjoying its sophisticated technology allows you may need to program it to operate with your DIRECTV Universal Remote Control so you will not have an exclusive DIRECTV® Universal Remote Control that 's packed with features such as: z Four-position slide switch for easy component...
...batteries are replaced Before using your DIRECTV Universal Remote Control, you to consolidate the clutter of older or discon- Moreover, its features. 3 Please follow the instructions detailed in this guide to -use unit that will control four components, including a DIRECTV Receiver, TV, and two ...start enjoying its sophisticated technology allows you may need to program it to operate with your DIRECTV Universal Remote Control so you will not have an exclusive DIRECTV® Universal Remote Control that 's packed with features such as: z Four-position slide switch for easy component...

User Manual
Page 8
Obtain two (2) new AA alkaline batteries. marks in the battery case, then insert them. 3. On the back of the remote control, push down on until battery door clicks into place. 8 Match their + and - marks to the + and - INSTALLING BATTERIES - + - + 1. Slide the cover back on the door (as shown), slide the battery cover off, and remove the used batteries. 2.
Obtain two (2) new AA alkaline batteries. marks in the battery case, then insert them. 3. On the back of the remote control, push down on until battery door clicks into place. 8 Match their + and - marks to the + and - INSTALLING BATTERIES - + - + 1. Slide the cover back on the door (as shown), slide the battery cover off, and remove the used batteries. 2.
User Manual
Page 9
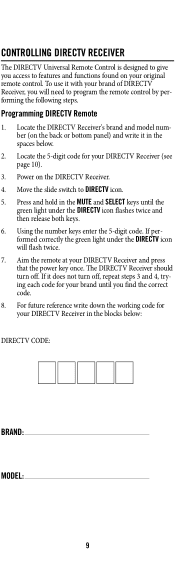
...and SELECT keys until you find the correct code. 8. Locate the DIRECTV Receiver's brand and model num- Aim the remote at your DIRECTV Receiver (see page 10). 3. Move the slide switch to program the remote control by performing the following steps. Power on the back or bottom... your brand until the green light under the DIRECTV icon will need to DIRECTV icon. 5. For future reference write down the working code for your brand of DIRECTV Receiver, you will flash twice. 7. CONTROLLING DIRECTV RECEIVER The DIRECTV Universal Remote Control is designed to give you access to ...
...and SELECT keys until you find the correct code. 8. Locate the DIRECTV Receiver's brand and model num- Aim the remote at your DIRECTV Receiver (see page 10). 3. Move the slide switch to program the remote control by performing the following steps. Power on the back or bottom... your brand until the green light under the DIRECTV icon will need to DIRECTV icon. 5. For future reference write down the working code for your brand of DIRECTV Receiver, you will flash twice. 7. CONTROLLING DIRECTV RECEIVER The DIRECTV Universal Remote Control is designed to give you access to ...
User Manual
Page 11
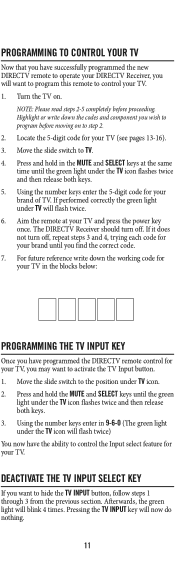
... should turn off . Using the number keys enter in the blocks below: PROGRAMMING THE TV INPUT KEY Once you have programmed the DIRECTV remote control for your TV, you may want to hide the TV INPUT button, follow steps 1 through 3 from the previous section. PROGRAMMING TO ...CONTROL YOUR TV Now that you have successfully programmed the new DIRECTV remote to operate your DIRECTV Receiver, you will want to program this remote to control the Input select feature for your TV. Highlight or write down the working code for your TV (see...
... should turn off . Using the number keys enter in the blocks below: PROGRAMMING THE TV INPUT KEY Once you have programmed the DIRECTV remote control for your TV, you may want to hide the TV INPUT button, follow steps 1 through 3 from the previous section. PROGRAMMING TO ...CONTROL YOUR TV Now that you have successfully programmed the new DIRECTV remote to operate your DIRECTV Receiver, you will want to program this remote to control the Input select feature for your TV. Highlight or write down the working code for your TV (see...
User Manual
Page 12
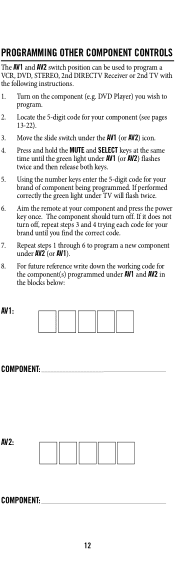
... the slide switch under TV will flash twice. 6. Using the number keys enter the 5-digit code for your brand of component being programmed. Aim the remote at the same time until you wish to program a new component under AV1 and AV2 in the blocks below: AV1: COMPONENT: AV2: COMPONENT: 12 If... turn off . Turn on the component (e.g. PROGRAMMING OTHER COMPONENT CONTROLS The AV1 and AV2 switch position can be used to program a VCR, DVD, STEREO, 2nd DIRECTV Receiver or 2nd TV with the following instructions. 1.
... the slide switch under TV will flash twice. 6. Using the number keys enter the 5-digit code for your brand of component being programmed. Aim the remote at the same time until you wish to program a new component under AV1 and AV2 in the blocks below: AV1: COMPONENT: AV2: COMPONENT: 12 If... turn off . Turn on the component (e.g. PROGRAMMING OTHER COMPONENT CONTROLS The AV1 and AV2 switch position can be used to program a VCR, DVD, STEREO, 2nd DIRECTV Receiver or 2nd TV with the following instructions. 1.
User Manual
Page 23
...3. Move the slide switch to the component 7. Enter in 9-9-0 (The green light under the selected switch flashes twice and then release both keys. 4. Point the remote at the same time until the TV or component turns off , stop pressing the CHAN S key. NOTE: If the light flashes 3 times before the TV... to the next code and power is transmitted to the AV1, AV2 or TV position. 3. VERIFYING THE CODES If you have setup the DIRECTV Universal Remote Control using the SEARCHING FOR YOUR CODE PROCEDURE, you can try a code search. Write this part of the code is not available. Press and ...
...3. Move the slide switch to the component 7. Enter in 9-9-0 (The green light under the selected switch flashes twice and then release both keys. 4. Point the remote at the same time until the TV or component turns off , stop pressing the CHAN S key. NOTE: If the light flashes 3 times before the TV... to the next code and power is transmitted to the AV1, AV2 or TV position. 3. VERIFYING THE CODES If you have setup the DIRECTV Universal Remote Control using the SEARCHING FOR YOUR CODE PROCEDURE, you can try a code search. Write this part of the code is not available. Press and ...
User Manual
Page 24
... VOL and MUTE may control the volume only on your TV or other components, regardless of which position the switch is under the DIRECTV icon flashes twice and release both keys. 3. Using the number keys, enter in 9-9-3 (the green light will flash twice). 24 To Lock Volume to lock ... component selected above the slide switch. Now the VOL and MUTE keys will flash 4 times). 5. Repeat step 4 four more times for the final digit. This remote can be programmed so that the VOL and MUTE keys work ONLY for the component selected by the slide switch position. Press and hold the...
... VOL and MUTE may control the volume only on your TV or other components, regardless of which position the switch is under the DIRECTV icon flashes twice and release both keys. 3. Using the number keys, enter in 9-9-3 (the green light will flash twice). 24 To Lock Volume to lock ... component selected above the slide switch. Now the VOL and MUTE keys will flash 4 times). 5. Repeat step 4 four more times for the final digit. This remote can be programmed so that the VOL and MUTE keys work ONLY for the component selected by the slide switch position. Press and hold the...

User Manual
Page 25
RESTORE FACTORY DEFAULT SETTINGS To reset all the functions of the remote control to the factory defaults (the original, out of the box setting), follow these steps. 1. Press and hold the MUTE and SELECT keys at the same time until the green light flashes twice and then release both keys 2. Using the number keys, enter in 9-8-1 (the green light will flash 4 times). 25
RESTORE FACTORY DEFAULT SETTINGS To reset all the functions of the remote control to the factory defaults (the original, out of the box setting), follow these steps. 1. Press and hold the MUTE and SELECT keys at the same time until the green light flashes twice and then release both keys 2. Using the number keys, enter in 9-8-1 (the green light will flash 4 times). 25
User Manual
Page 26
... SOLUTION: Try all home entertainment components can be operated with an infrared remote control. SOLUTION: Make sure you are aiming the DIRECTV® Universal Remote Control at top of remote does not blink when you press a key. PROBLEM: Remote control does not turn on Sony or Sharp TV/VCR Combo. SOLUTION: ...Try replacing the batteries (see page 12). PROBLEM: The DIRECTV Universal Remote Control does not control home entertainment component or commands are not recognized properly. Some combo units may require both a TV code ...
... SOLUTION: Try all home entertainment components can be operated with an infrared remote control. SOLUTION: Make sure you are aiming the DIRECTV® Universal Remote Control at top of remote does not blink when you press a key. PROBLEM: Remote control does not turn on Sony or Sharp TV/VCR Combo. SOLUTION: ...Try replacing the batteries (see page 12). PROBLEM: The DIRECTV Universal Remote Control does not control home entertainment component or commands are not recognized properly. Some combo units may require both a TV code ...
User Manual
Page 27
..., provided that: a. NOR SHALL CUSTOMER RELY ON ANY SUCH INFORMATION OR ADVICE. UNDER NO CIRCUMSTANCES, INCLUDING NEGLIGENCE, SHALL DIRECTV OR ANYONE ELSE INVOLVED IN ADMINISTERING, DISTRIBUTING, OR PROVIDING THE DIRECTV UNIVERSAL REMOTE CONTROL BE LIABLE FOR ANY INDIRECT, INCIDENTAL, SPECIAL OR CONSEQUENTIAL DAMAGES, INCLUDING, WITHOUT LIMITATION, LOSS OF REVENUES OR INABILITY TO USE...
..., provided that: a. NOR SHALL CUSTOMER RELY ON ANY SUCH INFORMATION OR ADVICE. UNDER NO CIRCUMSTANCES, INCLUDING NEGLIGENCE, SHALL DIRECTV OR ANYONE ELSE INVOLVED IN ADMINISTERING, DISTRIBUTING, OR PROVIDING THE DIRECTV UNIVERSAL REMOTE CONTROL BE LIABLE FOR ANY INDIRECT, INCIDENTAL, SPECIAL OR CONSEQUENTIAL DAMAGES, INCLUDING, WITHOUT LIMITATION, LOSS OF REVENUES OR INABILITY TO USE...
User Manual
Page 28
...mechanical, magnetic, optical, manual, or otherwise, without prior written permission of DIRECTV, Inc. For help . 28 No part of the FCC Rules. M2081A for use with the URC2081, DIRECTV Universal Remote Control. 12/04 COMPLIANCE WITH FCC RULES AND REGULATIONS This equipment has been...connected. • Consult the dealer or an experienced radio/TV technician for the battery cover, may cause harmful interference to your DIRECTV Universal Remote Control. This equipment generates, uses and can be reproduced, transmitted, transcribed, stored in any retrieval system, or translated to radio...
...mechanical, magnetic, optical, manual, or otherwise, without prior written permission of DIRECTV, Inc. For help . 28 No part of the FCC Rules. M2081A for use with the URC2081, DIRECTV Universal Remote Control. 12/04 COMPLIANCE WITH FCC RULES AND REGULATIONS This equipment has been...connected. • Consult the dealer or an experienced radio/TV technician for the battery cover, may cause harmful interference to your DIRECTV Universal Remote Control. This equipment generates, uses and can be reproduced, transmitted, transcribed, stored in any retrieval system, or translated to radio...


