
User Guide
Page 2
... XM Satellite Radio 5 About Delphi 5 Safety and Care information 6 What's in the box 8 XpressRC functions 9 Remote control functions 10 5-way navigation knob 11 Vehicle Installation 12 Step 1: Mount the XM Antenna 13 Step 2: Install the vent or swivel mount . . 16 Step 3: Connect your XpressRC 18 Step 4: Turning on your XpressRC 20 Activation 21 Using your XpressRC 23 Listening to XM 24 View a category 25 Direct channel entry 25 Jump to the previous channel 26 Set your favorite channels 26...
... XM Satellite Radio 5 About Delphi 5 Safety and Care information 6 What's in the box 8 XpressRC functions 9 Remote control functions 10 5-way navigation knob 11 Vehicle Installation 12 Step 1: Mount the XM Antenna 13 Step 2: Install the vent or swivel mount . . 16 Step 3: Connect your XpressRC 18 Step 4: Turning on your XpressRC 20 Activation 21 Using your XpressRC 23 Listening to XM 24 View a category 25 Direct channel entry 25 Jump to the previous channel 26 Set your favorite channels 26...
User Guide
Page 5
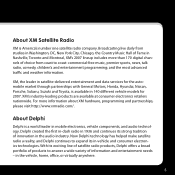
..., is America's number one satellite radio company. Broadcasting live daily from coast to answer a wide variety of information and entertainment needs - For more than 170 digital channels of innovation in the audio industry. Delphi created the first in-dash radio in 1936 and continues its exciting line of satellite radio products, Delphi offers a broad portfolio of products to coast: commercial-free music, premier sports, news...
..., is America's number one satellite radio company. Broadcasting live daily from coast to answer a wide variety of information and entertainment needs - For more than 170 digital channels of innovation in the audio industry. Delphi created the first in-dash radio in 1936 and continues its exciting line of satellite radio products, Delphi offers a broad portfolio of products to coast: commercial-free music, premier sports, news...
User Guide
Page 17
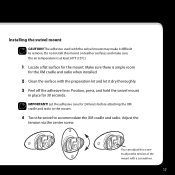
.... 3 Peel off the adhesive liner. Do not install this screw to remove. Make sure there is at least 60°F (15°C). 1 Locate a flat surface for 24 hours before attaching the XM cradle and radio to the mount. 4 Turn the swivel to accommodate the XM cradle and radio. Let the adhesive cure for the mount. Adjust the tension via the center screw...
.... 3 Peel off the adhesive liner. Do not install this screw to remove. Make sure there is at least 60°F (15°C). 1 Locate a flat surface for 24 hours before attaching the XM cradle and radio to the mount. 4 Turn the swivel to accommodate the XM cradle and radio. Let the adhesive cure for the mount. Adjust the tension via the center screw...
User Guide
Page 18
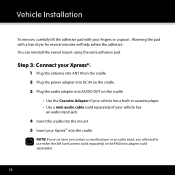
... a built-in cassette player. • Use a mini audio cable (sold separately). 18 Vehicle Installation To remove, carefully lift the adhesive pad with a hair dryer for several minutes will need to use either the XM SureConnect (sold separately) or the FM Direct adapter (sold separately) if your vehicle has an audio input jack. 4 Insert the cradle into the mount. 5 Insert your XpressRC into the cradle. You...
... a built-in cassette player. • Use a mini audio cable (sold separately). 18 Vehicle Installation To remove, carefully lift the adhesive pad with a hair dryer for several minutes will need to use either the XM SureConnect (sold separately) or the FM Direct adapter (sold separately) if your vehicle has an audio input jack. 4 Insert the cradle into the mount. 5 Insert your XpressRC into the cradle. You...
User Guide
Page 20
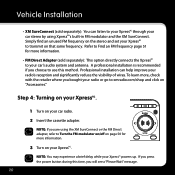
... of wires. If you press the power button during this method. Vehicle Installation • XM SureConnect (sold separately): This option directly connects the XpressRC to your radio or go to use this time, you are using XpressRC's built-in FM modulator and the XM SureConnect. Simply find an unused FM frequency on the stereo and set your XpressRC to transmit on your XpressRC. 1 Turn on that same frequency. Step 4: Turning on your car radio...
... of wires. If you press the power button during this method. Vehicle Installation • XM SureConnect (sold separately): This option directly connects the XpressRC to your radio or go to use this time, you are using XpressRC's built-in FM modulator and the XM SureConnect. Simply find an unused FM frequency on the stereo and set your XpressRC to transmit on your XpressRC. 1 Turn on that same frequency. Step 4: Turning on your car radio...
User Guide
Page 22
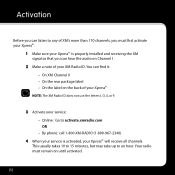
... rear package label • On the label on until activated. 22 Your radio must first activate your XpressRC. 1 Make sure your XpressRC is properly installed and receiving the XM signal so that you must remain on the back of your XM Radio ID. You can hear the audio on Channel 1. 2 Make a note of your XpressRC NOTE: The XM Radio ID does not use the letters I, O, S, or F. 3 Activate your XpressRC will receive all channels...
... rear package label • On the label on until activated. 22 Your radio must first activate your XpressRC. 1 Make sure your XpressRC is properly installed and receiving the XM signal so that you must remain on the back of your XM Radio ID. You can hear the audio on Channel 1. 2 Make a note of your XpressRC NOTE: The XM Radio ID does not use the letters I, O, S, or F. 3 Activate your XpressRC will receive all channels...
User Guide
Page 48
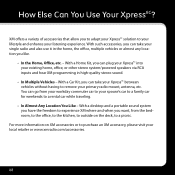
... can plug your XpressRC into your existing home, office, or other stereo system/powered speakers via RCA inputs and hear XM programming in the home, the office, multiple vehicles or almost any location you to adapt your XpressRC solution to your lifestyle and enhance your primary radio mount, antenna, etc. With a Car Kit, you can take your single radio and also use it in high-quality stereo sound. •...
... can plug your XpressRC into your existing home, office, or other stereo system/powered speakers via RCA inputs and hear XM programming in the home, the office, multiple vehicles or almost any location you to adapt your XpressRC solution to your lifestyle and enhance your primary radio mount, antenna, etc. With a Car Kit, you can take your single radio and also use it in high-quality stereo sound. •...
User Guide
Page 51
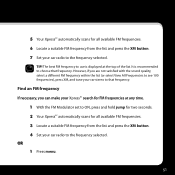
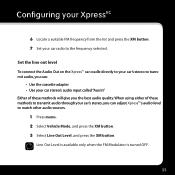
... the XM button. 7 Set your car radio to the frequency selected. Find an FM frequency If necessary, you are not satisfied with the sound quality, select a different FM frequency within the list (or select View All Frequencies to see 100 frequencies), press XM, and tune your car radio to the frequency selected. OR 1 Press menu. 51 5 Your XpressRC automatically scans for all available FM frequencies. 6 Locate a suitable FM frequency from the list and press the XM button. 4 Set your car stereo...
... the XM button. 7 Set your car radio to the frequency selected. Find an FM frequency If necessary, you are not satisfied with the sound quality, select a different FM frequency within the list (or select View All Frequencies to see 100 frequencies), press XM, and tune your car radio to the frequency selected. OR 1 Press menu. 51 5 Your XpressRC automatically scans for all available FM frequencies. 6 Locate a suitable FM frequency from the list and press the XM button. 4 Set your car stereo...
User Guide
Page 53
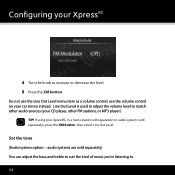
... transmit audio through your car radio to match other audio sources. 1 Press menu. 2 Select Vehicle Mode, and press the XM button. 3 Select Line Out Level, and press the XM button. Line Out Level is available only when the FM Modulator is turned OFF. 53 Set the line out level To connect the Audio Out on the XpressRC car cradle directly to your car's stereo to transmit audio, you can: • Use the cassette adapter • Use your car stereo's audio input called "Aux In...
... transmit audio through your car radio to match other audio sources. 1 Press menu. 2 Select Vehicle Mode, and press the XM button. 3 Select Line Out Level, and press the XM button. Line Out Level is available only when the FM Modulator is turned OFF. 53 Set the line out level To connect the Audio Out on the XpressRC car cradle directly to your car's stereo to transmit audio, you can: • Use the cassette adapter • Use your car stereo's audio input called "Aux In...
User Guide
Page 54
... adjust the bass and treble to suit the kind of music you're listening to. 54 Line Out Level is used to adjust the volume level to increase or decrease the level. 5 Press the XM button. If using your car stereo instead. TIP! Set the tone (Audio system option -- use the Line Out Level menu item as a volume control; Configuring your XpressRC 4 Turn the knob to match other audio sources (your CD player, other FM stations, or MP3 player). audio...
... adjust the bass and treble to suit the kind of music you're listening to. 54 Line Out Level is used to adjust the volume level to increase or decrease the level. 5 Press the XM button. If using your car stereo instead. TIP! Set the tone (Audio system option -- use the Line Out Level menu item as a volume control; Configuring your XpressRC 4 Turn the knob to match other audio sources (your CD player, other FM stations, or MP3 player). audio...
User Guide
Page 56
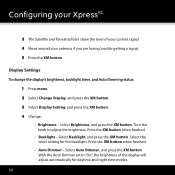
... Satellite and Terrestrial bars show the level of the display will adjust automatically for the backlight. Press the XM button when finished. • Backlight - Select Auto Dimmer, and press the XM button. Select the timer setting for daytime and night time modes. 56 With the Auto Dimmer set to adjust the brightness. Select Brightness, and press the XM button. Turn the knob to "On", the brightness of your current signal. 4 Move around your antenna...
... Satellite and Terrestrial bars show the level of the display will adjust automatically for the backlight. Press the XM button when finished. • Backlight - Select Auto Dimmer, and press the XM button. Select the timer setting for daytime and night time modes. 56 With the Auto Dimmer set to adjust the brightness. Select Brightness, and press the XM button. Turn the knob to "On", the brightness of your current signal. 4 Move around your antenna...
User Guide
Page 58
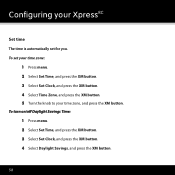
To turn on/off Daylight Savings Time: 1 Press menu. 2 Select Set Time, and press the XM button. 3 Select Set Clock, and press the XM button. 4 Select Daylight Savings, and press the XM button. 58 To set your time zone: 1 Press menu. 2 Select Set Time, and press the XM button. 3 Select Set Clock, and press the XM button. 4 Select Time Zone, and press the XM button. 5 Turn the knob to your XpressRC Set time The time is automatically set for you. Configuring your time zone, and press the XM button.
To turn on/off Daylight Savings Time: 1 Press menu. 2 Select Set Time, and press the XM button. 3 Select Set Clock, and press the XM button. 4 Select Daylight Savings, and press the XM button. 58 To set your time zone: 1 Press menu. 2 Select Set Time, and press the XM button. 3 Select Set Clock, and press the XM button. 4 Select Time Zone, and press the XM button. 5 Turn the knob to your XpressRC Set time The time is automatically set for you. Configuring your time zone, and press the XM button.

User Guide
Page 59
5 Turn the knob to show time using a 24-hour clock 6 Press the XM button. 59 To change the format of the time: 1 Press menu. 2 Select Set Time, and press the XM button. 3 Select Set Clock, and press the XM button. 4 Select Hour Mode, and press the XM button. 5 Turn the knob to: • 12 to show time using a standard clock • 24 to : • On if your area participates in Daylight Savings Time • Off if your area does not participate in Daylight Savings Time 6 Press the XM button.
5 Turn the knob to show time using a 24-hour clock 6 Press the XM button. 59 To change the format of the time: 1 Press menu. 2 Select Set Time, and press the XM button. 3 Select Set Clock, and press the XM button. 4 Select Hour Mode, and press the XM button. 5 Turn the knob to: • 12 to show time using a standard clock • 24 to : • On if your area participates in Daylight Savings Time • Off if your area does not participate in Daylight Savings Time 6 Press the XM button.

User Guide
Page 60
... can change this so you must manually turn the radio on/off each time. 1 Press menu. 2 Select Set Time, and press the XM button. 3 Select Automatic Power, and press the XM button. 4 Turn the knob to: • On to have your radio turn on automatically when it is plugged in • Off to turn it on automatically when it is plugged in and receiving power. With XpressRC in 5 Press the XM button. TIP! Configuring your XpressRC Automatic power...
... can change this so you must manually turn the radio on/off each time. 1 Press menu. 2 Select Set Time, and press the XM button. 3 Select Automatic Power, and press the XM button. 4 Turn the knob to: • On to have your radio turn on automatically when it is plugged in • Off to turn it on automatically when it is plugged in and receiving power. With XpressRC in 5 Press the XM button. TIP! Configuring your XpressRC Automatic power...
User Guide
Page 66
... this on , to a south-facing window. Turn XpressRC off, then on the screen: No signal Antenna Try this Make sure the XM antenna is mounted outside of time. If required, replace with a 1-amp fuse only. Move your vehicle, check the 12V adapter fuse by unscrewing the ribbed end of the 12V adapter. If you are using XpressRC in an underground garage, you should receive a signal after it is not...
... this on , to a south-facing window. Turn XpressRC off, then on the screen: No signal Antenna Try this Make sure the XM antenna is mounted outside of time. If required, replace with a 1-amp fuse only. Move your vehicle, check the 12V adapter fuse by unscrewing the ribbed end of the 12V adapter. If you are using XpressRC in an underground garage, you should receive a signal after it is not...
User Guide
Page 67
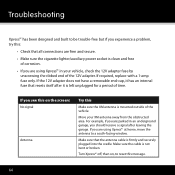
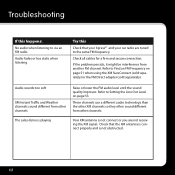
If this happens: XpressRC shuts off unexpectedly You do not receive all cables between your XpressRC and your stereo system for a firm and secure connection. Tune to another channel. If you have not yet activated your XpressRC with the latest encryption code. OR You may be trying to tune to Activation on the screen: Off Air Loading Updating - Turn off after the selected length of time. The information may...
If this happens: XpressRC shuts off unexpectedly You do not receive all cables between your XpressRC and your stereo system for a firm and secure connection. Tune to another channel. If you have not yet activated your XpressRC with the latest encryption code. OR You may be trying to tune to Activation on the screen: Off Air Loading Updating - Turn off after the selected length of time. The information may...
User Guide
Page 68
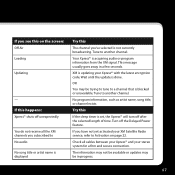
... frequency. Refer to Find an FM Frequency on page 53. The sales demo is playing Your XM antenna is not obstructed. 68 If the problem persists, it might be interference from another FM channel. Refer to Setting the Line Out Level on page 51 when using the XM SureConnect (sold separately) or the FM Direct adapter (sold separately). Check all cables for a firm and secure connection...
... frequency. Refer to Find an FM Frequency on page 53. The sales demo is playing Your XM antenna is not obstructed. 68 If the problem persists, it might be interference from another FM channel. Refer to Setting the Line Out Level on page 51 when using the XM SureConnect (sold separately) or the FM Direct adapter (sold separately). Check all cables for a firm and secure connection...

User Guide
Page 71
.... Your Satellite Radio receiver is packaged with the respective content and data service providers. The software is licensed solely for waste disposal when discarding packaging and electronic appliances. The music, talk, news, entertainment, data, and other content on the Services are prohibited from any export of this or any other software contained in an XM Radio is explicitly...
.... Your Satellite Radio receiver is packaged with the respective content and data service providers. The software is licensed solely for waste disposal when discarding packaging and electronic appliances. The music, talk, news, entertainment, data, and other content on the Services are prohibited from any export of this or any other software contained in an XM Radio is explicitly...

User Guide
Page 72
... of application or installation 72 This device complies with permanently attached ferrite beads. can void the user's authority to operate this equipment does cause harmful interference to correct the interference by XM Satellite Radio Inc. Operation is connected. • Consult the dealer or an experienced radio/TV technician for help. These limits are designed to Part 15 of the affected receiver. • Increase...
... of application or installation 72 This device complies with permanently attached ferrite beads. can void the user's authority to operate this equipment does cause harmful interference to correct the interference by XM Satellite Radio Inc. Operation is connected. • Consult the dealer or an experienced radio/TV technician for help. These limits are designed to Part 15 of the affected receiver. • Increase...

User Guide
Page 73
... be repaired or replaced with new or with respect to each "Product") to be responsible for any packaging, labels or other literature provided with a Product, (ii) installation of Delphi's operating instructions as its sole obligation under this warranty. Warranty Delphi Limited Consumer Warranty Delphi Product and Service Solutions ("Delphi") warrants all XM Satellite Radio Products sold by Delphi (each Product is inconsistent with Delphi's written instructions...
... be repaired or replaced with new or with respect to each "Product") to be responsible for any packaging, labels or other literature provided with a Product, (ii) installation of Delphi's operating instructions as its sole obligation under this warranty. Warranty Delphi Limited Consumer Warranty Delphi Product and Service Solutions ("Delphi") warrants all XM Satellite Radio Products sold by Delphi (each Product is inconsistent with Delphi's written instructions...


