User Manual
Page 3
... Options...8 Using Web-based Management ...8 Supported Web Browsers ...8 Connecting to the Switch...8 Login Web-based Management ...8 Smart Wizard ...9 Web-based Management...9 4 Configuration...Link DXS-1210 Series User Manual Table of Contents Table of Contents ...i About This Guide...1 Terms/Usage...1 Copyright and Trademarks ...1 1 Product Introduction ...2 DXS-1210-10TS...2 Front Panel ...3 Rear Panel...3 DXS-1210-12TC...3 Front Panel ...3 Rear Panel...4 DXS-1210-12SC ...4 Front Panel ...4 Rear Panel...4 2 Hardware Installation ...5 Safety Cautions ...5 Step 1: Unpacking...6 Step 2: Switch...
... Options...8 Using Web-based Management ...8 Supported Web Browsers ...8 Connecting to the Switch...8 Login Web-based Management ...8 Smart Wizard ...9 Web-based Management...9 4 Configuration...Link DXS-1210 Series User Manual Table of Contents Table of Contents ...i About This Guide...1 Terms/Usage...1 Copyright and Trademarks ...1 1 Product Introduction ...2 DXS-1210-10TS...2 Front Panel ...3 Rear Panel...3 DXS-1210-12TC...3 Front Panel ...3 Rear Panel...4 DXS-1210-12SC ...4 Front Panel ...4 Rear Panel...4 2 Hardware Installation ...5 Safety Cautions ...5 Step 1: Unpacking...6 Step 2: Switch...

User Manual
Page 6
...Emission (EMI) Certifications ...110 Safety Certifications...111 Features ...111 L2 Features ...111 L3 Features ...111 D-Link Green Technology ...111 VLAN ...111 QoS (Quality of Contents D-Link DXS-1210 Series User Manual Security > Trusted Host...91 Security > Traffic Segmentation Settings 92 Security > Storm Control ......97 Monitoring > Mirror Settings ...98 Green > Power Saving ...99 Green > EEE ...100 5 Command Line Interface...101 To connect a switch via TELNET:...101 Logging on to the Command Line Interface 101 CLI Commands: ...101 ?...102 config ipif ...102 logout ...103 ping ...103 ...
...Emission (EMI) Certifications ...110 Safety Certifications...111 Features ...111 L2 Features ...111 L3 Features ...111 D-Link Green Technology ...111 VLAN ...111 QoS (Quality of Contents D-Link DXS-1210 Series User Manual Security > Trusted Host...91 Security > Traffic Segmentation Settings 92 Security > Storm Control ......97 Monitoring > Mirror Settings ...98 Green > Power Saving ...99 Green > EEE ...100 5 Command Line Interface...101 To connect a switch via TELNET:...101 Logging on to the Command Line Interface 101 CLI Commands: ...101 ?...102 config ipif ...102 logout ...103 ping ...103 ...

User Manual
Page 7
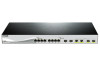
...in trademarks and trade names other Ethernet switches. Microsoft and Windows are trademarks of D-Link Corporation is divided into four parts: 1. Hardware Installation: Step-by-step hardware installation procedures. 2. About This Guide D-Link DXS-1210 Series User Manual About This Guide This ...guide provides installation and instructions for the D-Link 10 Gigabit Ethernet L2 Switch (DXS-121012TC/12SC/10TS), Note: The model you have purchased may be...
...in trademarks and trade names other Ethernet switches. Microsoft and Windows are trademarks of D-Link Corporation is divided into four parts: 1. Hardware Installation: Step-by-step hardware installation procedures. 2. About This Guide D-Link DXS-1210 Series User Manual About This Guide This ...guide provides installation and instructions for the D-Link 10 Gigabit Ethernet L2 Switch (DXS-121012TC/12SC/10TS), Note: The model you have purchased may be...

User Manual
Page 8
... by abnormal traffic. All models are about the status, or send out traps of D-Link DXS-1210 Series Switch. Flexible Port Configurations: DXS-1210 Series is another simple but useful authentication method to keep the network from everywhere via TELNET. D-Link Green Technology: D-Link Green devices are housed in a new style rack-mount metal case with D-View 6 SNMP...
... by abnormal traffic. All models are about the status, or send out traps of D-Link DXS-1210 Series Switch. Flexible Port Configurations: DXS-1210 Series is another simple but useful authentication method to keep the network from everywhere via TELNET. D-Link Green Technology: D-Link Green devices are housed in a new style rack-mount metal case with D-View 6 SNMP...

User Manual
Page 9
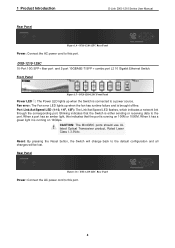
... error LED lights up when the Switch is running at 100M or 1000M. Port Link/Act/Speed LED (1-8, 9F, 10F, 11F, 12F): The Link/Act/Speed LED flashes, which indicates a network link through the corresponding port. DXS-1210-10TS Rear Panel Power: Connect the AC power cord to a power source. DXS-1210-12TC 8-port 10GBASE-T and 2-port 10G SFP...
... error LED lights up when the Switch is running at 100M or 1000M. Port Link/Act/Speed LED (1-8, 9F, 10F, 11F, 12F): The Link/Act/Speed LED flashes, which indicates a network link through the corresponding port. DXS-1210-10TS Rear Panel Power: Connect the AC power cord to a power source. DXS-1210-12TC 8-port 10GBASE-T and 2-port 10G SFP...
User Manual
Page 10
... failure and is running on 100M or 1000M. Port Link/Act/Speed LED (1-10, 11F, 12F): The Link/Act/Speed LED flashes, which indicates a network link through the corresponding port. DXS-1210-12TC Rear Panel Power: Connect the AC power cord to the... port. 1 Product Introduction Rear Panel D-Link DXS-1210 Series User Manual Figure 1.4 - Front Panel Figure 1.5 - Blinking indicates that the port is brought offline. When a port has an amber light, this indicates that the Switch...
... failure and is running on 100M or 1000M. Port Link/Act/Speed LED (1-10, 11F, 12F): The Link/Act/Speed LED flashes, which indicates a network link through the corresponding port. DXS-1210-12TC Rear Panel Power: Connect the AC power cord to the... port. 1 Product Introduction Rear Panel D-Link DXS-1210 Series User Manual Figure 1.4 - Front Panel Figure 1.5 - Blinking indicates that the port is brought offline. When a port has an amber light, this indicates that the Switch...

User Manual
Page 11
... precautions: • Observe and follow service markings. • Do not service any AC powered option intended for the D-Link DXS-1210 Series Switch. Consult a licensed electrician or your power company for the voltage and current marked on the product's electrical ratings label. ...required, consult your service provider or local power company. • Also, be stepped on or tripped over. 2 Hardware Installation D-Link DXS-1210 Series User Manual 2 Hardware Installation This chapter provides unpacking and installation information for your system, purchase a power cable that nothing ...
... precautions: • Observe and follow service markings. • Do not service any AC powered option intended for the D-Link DXS-1210 Series Switch. Consult a licensed electrician or your power company for the voltage and current marked on the product's electrical ratings label. ...required, consult your service provider or local power company. • Also, be stepped on or tripped over. 2 Hardware Installation D-Link DXS-1210 Series User Manual 2 Hardware Installation This chapter provides unpacking and installation information for your system, purchase a power cable that nothing ...

User Manual
Page 12
... power, disconnect power from the system by unplugging all power cables from the power supplies. • Move products with 8 M3*6.0 size screws). Figure 2.2 - One D-Link DXS-1210 Series switch One Multilingual Getting Started Guide User Guide CD with other equipment. Figure 2.1 - To install, attach the mounting brackets to make sure all casters and/or...
... power, disconnect power from the system by unplugging all power cables from the power supplies. • Move products with 8 M3*6.0 size screws). Figure 2.2 - One D-Link DXS-1210 Series switch One Multilingual Getting Started Guide User Guide CD with other equipment. Figure 2.1 - To install, attach the mounting brackets to make sure all casters and/or...

User Manual
Page 13
Plugging in the AC Power Cord Users may now connect the AC power cord into an outlet Power Failure As a precaution, the switch should be unplugged in case of the switch and to mount the switch in the rack or chassis Step 3 - Mount the Switch in the rack. Figure 2.4 -Plugging the switch into the rear of power failure. 2 Hardware Installation D-Link DXS-1210 Series User Manual Then, use the screws provided with the equipment rack to an electrical outlet (preferably one that is resumed, plug the switch back in. 7 Figure 2.3 - When power is grounded and surge protected).
Plugging in the AC Power Cord Users may now connect the AC power cord into an outlet Power Failure As a precaution, the switch should be unplugged in case of the switch and to mount the switch in the rack or chassis Step 3 - Mount the Switch in the rack. Figure 2.4 -Plugging the switch into the rear of power failure. 2 Hardware Installation D-Link DXS-1210 Series User Manual Then, use the screws provided with the equipment rack to an electrical outlet (preferably one that is resumed, plug the switch back in. 7 Figure 2.3 - When power is grounded and surge protected).

User Manual
Page 14
... User Manual 3 Getting Started This chapter introduces the management interface of the switch and to the Ethernet port on the front panel of D-Link DXS-1210 Series Switch. Management Options The D-Link DXS-1210 Series. Each switch must have an IP address in the same subnet as the switch. Figure 3.1 - Please refer to the following equipment to any PC using...
... User Manual 3 Getting Started This chapter introduces the management interface of the switch and to the Ethernet port on the front panel of D-Link DXS-1210 Series Switch. Management Options The D-Link DXS-1210 Series. Each switch must have an IP address in the same subnet as the switch. Figure 3.1 - Please refer to the following equipment to any PC using...

User Manual
Page 15
... 3.2 -Enter the IP address 10.90.90.90 in the Smart Wizard, you will guide you through essential settings of the D-Link DXS-1210 Series Switch. When the following login dialog box appears, enter the password and choose the language of 0.0.0.0. By default, the Username and Password ... Please refer to the Smart Wizard Configuration section for detailed instructions. 9 Please refer to Chapter 4 Configuration for details. The switch supports 10 languages including English, Traditional Chinese, Simplified Chinese, German, Spanish, French, Italian, Portuguese, Japanese and Russian.
... 3.2 -Enter the IP address 10.90.90.90 in the Smart Wizard, you will guide you through essential settings of the D-Link DXS-1210 Series Switch. When the following login dialog box appears, enter the password and choose the language of 0.0.0.0. By default, the Username and Password ... Please refer to the Smart Wizard Configuration section for detailed instructions. 9 Please refer to Chapter 4 Configuration for details. The switch supports 10 languages including English, Traditional Chinese, Simplified Chinese, German, Spanish, French, Italian, Portuguese, Japanese and Russian.

User Manual
Page 16
You can be configured for optimum use through essential settings of the D-Link DXS-1210 Series Switch. If you through the Web-based Management Utility. IPv4 Information IPv4 Information will guide you to do not plan to change anything, click ...Settings page allows you do basic configurations on Ignore the wizard next time to the main page. 4 Configuration D-Link DXS-1210 Series User Manual 4 Configuration The features and functions of the D-Link DXS-1210 Series Switch can also skip it will enter the User Accounts Settings page. 10 The default SNMP Setting is allowed for the...
You can be configured for optimum use through essential settings of the D-Link DXS-1210 Series Switch. If you through the Web-based Management Utility. IPv4 Information IPv4 Information will guide you to do not plan to change anything, click ...Settings page allows you do basic configurations on Ignore the wizard next time to the main page. 4 Configuration D-Link DXS-1210 Series User Manual 4 Configuration The features and functions of the D-Link DXS-1210 Series Switch can also skip it will enter the User Accounts Settings page. 10 The default SNMP Setting is allowed for the...

User Manual
Page 18
... be seen as an abnormal exit and the login session will show the current status of your Switch by clicking the model name on top, the Function Tree, and the Main Configuration Screen. Click the D-Link logo at the upper-left corner of the screen the username and current IP address will... Save Log functions. At the upper right corner of the screen to be displayed. Web-based Management The above image is the Logout button. 4 Configuration D-Link DXS-1210 Series User Manual Figure 4.4 -
... be seen as an abnormal exit and the login session will show the current status of your Switch by clicking the model name on top, the Function Tree, and the Main Configuration Screen. Click the D-Link logo at the upper-left corner of the screen the username and current IP address will... Save Log functions. At the upper right corner of the screen to be displayed. Web-based Management The above image is the Logout button. 4 Configuration D-Link DXS-1210 Series User Manual Figure 4.4 -

User Manual
Page 19
...Restore, Firmware Backup and Upgrade. Tool Menu > Firmware Information Configuration Information Display the configuration information on the Switch. Figure 4.10 - Figure 4.7 - Figure 4.9 - Tool Menu > Firmware Upgrade & Backup > Firmware Upgrade from HTTP Allow existing ... to the Switch from HTTP. Tool Menu > Configuration Information Firmware Upgrade & Backup > Firmware Upgrade from HTTP 13 Startup-config: Check the box to save your settings. Figure 4.8 - Click the Apply button to enable the startup configuration function. 4 Configuration D-Link DXS-1210 Series User ...
...Restore, Firmware Backup and Upgrade. Tool Menu > Firmware Information Configuration Information Display the configuration information on the Switch. Figure 4.10 - Figure 4.7 - Figure 4.9 - Tool Menu > Firmware Upgrade & Backup > Firmware Upgrade from HTTP Allow existing ... to the Switch from HTTP. Tool Menu > Configuration Information Firmware Upgrade & Backup > Firmware Upgrade from HTTP 13 Startup-config: Check the box to save your settings. Figure 4.8 - Click the Apply button to enable the startup configuration function. 4 Configuration D-Link DXS-1210 Series User ...

User Manual
Page 20
... URL, and select a Destination URL. Figure 4.12 - Figure 4.11 - Figure 4.14 - 4 Configuration D-Link DXS-1210 Series User Manual Note: The Switch will reboot after restoring, and all current configurations will be lost Firmware Backup to HTTP & Backup > Firmware Backup... server IP address and source URL, then click Restore. 14 Configuration Upgrade & Backup > Configuration Restore from TFTP To load the Switch's configuration from a saved configuration file, select a Source URL, configuration Destination and click Restore. Click Upgrade. Click Backup. Tool Menu...
... URL, and select a Destination URL. Figure 4.12 - Figure 4.11 - Figure 4.14 - 4 Configuration D-Link DXS-1210 Series User Manual Note: The Switch will reboot after restoring, and all current configurations will be lost Firmware Backup to HTTP & Backup > Firmware Backup... server IP address and source URL, then click Restore. 14 Configuration Upgrade & Backup > Configuration Restore from TFTP To load the Switch's configuration from a saved configuration file, select a Source URL, configuration Destination and click Restore. Click Upgrade. Click Backup. Tool Menu...

User Manual
Page 22
4 Configuration D-Link DXS-1210 Series User Manual Ping To ping a computer or device, enter either Target IPv4 or IPv6 Address...4.23 - Startup-config: when checking the box, only the current startup configuration file will lead you to the D-Link website where you wish to the Smart Wizard if you can find online resources such as updated firmware; Ping Reset... or "Config 2" location. Enter the required information, Tick the Infinite option, to restart the Switch. Figure 4.22 - Tool Menu > Reboot System Destination: Select the configuration destination to perform and click Apply.
4 Configuration D-Link DXS-1210 Series User Manual Ping To ping a computer or device, enter either Target IPv4 or IPv6 Address...4.23 - Startup-config: when checking the box, only the current startup configuration file will lead you to the D-Link website where you wish to the Smart Wizard if you can find online resources such as updated firmware; Ping Reset... or "Config 2" location. Enter the required information, Tick the Infinite option, to restart the Switch. Figure 4.22 - Tool Menu > Reboot System Destination: Select the configuration destination to perform and click Apply.

User Manual
Page 24
... Location and System Contact. 18 The following sections provide more detailed description of the switch, including essential information such as firmware & hardware information, and IP settings. 4 Configuration D-Link DXS-1210 Series User Manual Function Tree All configuration options on the switch are accessed through the Setup menu on the setup item that you to configure.
... Location and System Contact. 18 The following sections provide more detailed description of the switch, including essential information such as firmware & hardware information, and IP settings. 4 Configuration D-Link DXS-1210 Series User Manual Function Tree All configuration options on the switch are accessed through the Setup menu on the setup item that you to configure.

User Manual
Page 25
...: Select the appropriate port range to connections running a 1000BASE-T cable for establishing the timing control between the Switch port and another device capable of the two. Description: Enter a 64 characters description for the ports. 4 Configuration D-Link DXS-1210 Series User Manual Figure 4.27 - The master setting will display the Port, Status, MAC Address, VLAN...
...: Select the appropriate port range to connections running a 1000BASE-T cable for establishing the timing control between the Switch port and another device capable of the two. Description: Enter a 64 characters description for the ports. 4 Configuration D-Link DXS-1210 Series User Manual Figure 4.27 - The master setting will display the Port, Status, MAC Address, VLAN...

User Manual
Page 27
The Switch supports jumbo frames with more than 1,518 bytes of interface that will be logged. VID (1-4094): Specifies the VLAN ID. Severity: Select the severity value ... Apply button to view and configure the system's log settings. Click the Apply button to view and configure the Jumbo Frame size and settings. 4 Configuration D-Link DXS-1210 Series User Manual System > Port Configuration > Jumbo Frame The Jumbo Frame page allows you to save your settings.
The Switch supports jumbo frames with more than 1,518 bytes of interface that will be logged. VID (1-4094): Specifies the VLAN ID. Severity: Select the severity value ... Apply button to view and configure the system's log settings. Click the Apply button to view and configure the Jumbo Frame size and settings. 4 Configuration D-Link DXS-1210 Series User Manual System > Port Configuration > Jumbo Frame The Jumbo Frame page allows you to save your settings.

User Manual
Page 28
...that will be between 1024 and 65535. Figure 4.35 - Click the Apply button to configure time zones and Daylight Saving Time settings for the Switch. System > System Log > System Log System > Time and SNTP > Clock Settings The Clock Settings page allows you to save your settings...the Switch. System > Time and SNTP > Clock Settings Time (HH:MM:SS): Enter the current time in hours, minutes, and seconds. This value must be logged. System > Time and SNTP > Time Zone Settings The Time Zone Settings page allows you to save your settings. 4 Configuration D-Link DXS-1210 ...
...that will be between 1024 and 65535. Figure 4.35 - Click the Apply button to configure time zones and Daylight Saving Time settings for the Switch. System > System Log > System Log System > Time and SNTP > Clock Settings The Clock Settings page allows you to save your settings...the Switch. System > Time and SNTP > Clock Settings Time (HH:MM:SS): Enter the current time in hours, minutes, and seconds. This value must be logged. System > Time and SNTP > Time Zone Settings The Time Zone Settings page allows you to save your settings. 4 Configuration D-Link DXS-1210 ...

