User Manual
Page 2
... registered trademarks of their respective companies. Copyright © 2009 by D-Link Systems, Inc. This publication may not be reproduced, in whole or in the United States or other company or product names mentioned herein are trademarks or registered trademarks of such revisions or changes. All other countries. D-Link DWM-152 User Manual 2 All rights reserved.
... registered trademarks of their respective companies. Copyright © 2009 by D-Link Systems, Inc. This publication may not be reproduced, in whole or in the United States or other company or product names mentioned herein are trademarks or registered trademarks of such revisions or changes. All other countries. D-Link DWM-152 User Manual 2 All rights reserved.

User Manual
Page 3
Table of Contents Preface 2 Manual Revisions 2 Trademarks 2 Introduction 5 Features 5 Product Overview 6 Package Contents 6 System Requirements 6 Hardware Overview 7 LED Indicator Information 8 Installation 9 SIM Card Installation 9 MicroSD Card Installation 10 Software Installation ... Exporting Contacts to vCards 24 SIM Management 25 SIM Information 25 Enabling or Disabling a PIN Code 26 Changing a PIN Code 27 Unlocking a PIN Code 27 D-Link DWM-152 User Manual 3
Table of Contents Preface 2 Manual Revisions 2 Trademarks 2 Introduction 5 Features 5 Product Overview 6 Package Contents 6 System Requirements 6 Hardware Overview 7 LED Indicator Information 8 Installation 9 SIM Card Installation 9 MicroSD Card Installation 10 Software Installation ... Exporting Contacts to vCards 24 SIM Management 25 SIM Information 25 Enabling or Disabling a PIN Code 26 Changing a PIN Code 27 Unlocking a PIN Code 27 D-Link DWM-152 User Manual 3

User Manual
Page 4
Profile Settings 28 Band Settings 28 Network Selection 29 Call Settings 30 Missed Calls 30 Startup Options 31 Version Information 31 Troubleshooting 32 Glossary 33 Technical Specifications 36 D-Link DWM-152 User Manual 4
Profile Settings 28 Band Settings 28 Network Selection 29 Call Settings 30 Missed Calls 30 Startup Options 31 Version Information 31 Troubleshooting 32 Glossary 33 Technical Specifications 36 D-Link DWM-152 User Manual 4

User Manual
Page 5
... users with a computer to connect to 1000 outgoing SMS (depending on SIM card capacity) • Control incoming calls with forwarding, busy tone, or continuous ringing D-Link DWM-152 User Manual 5
... users with a computer to connect to 1000 outgoing SMS (depending on SIM card capacity) • Control incoming calls with forwarding, busy tone, or continuous ringing D-Link DWM-152 User Manual 5

User Manual
Page 7
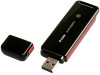
Section 1 - Product Overview Hardware Overview Status Indicator A multi-colored LED indicates connection status information. D-Link DWM-152 User Manual 7 MicroSD Card Slot Accepts a MicroSD card (up to a computer. SIM Card Slot Accepts a standard SIM Card. USB Port Connects the DWM-152 to 8GB).
Section 1 - Product Overview Hardware Overview Status Indicator A multi-colored LED indicates connection status information. D-Link DWM-152 User Manual 7 MicroSD Card Slot Accepts a MicroSD card (up to a computer. SIM Card Slot Accepts a standard SIM Card. USB Port Connects the DWM-152 to 8GB).

User Manual
Page 8
Section 1 - Registered Solid Device Initializing / No Signal Error (No SIM / Invalid SIM) Connected Connected Connected D-Link DWM-152 User Manual 8 Searching Registered - Product Overview LED Indicator Information Color Yellow Red Green Blue Purple Service System SIM Card Service WCDMA HSDPA GPRS/ EDGE Blinking -
Section 1 - Registered Solid Device Initializing / No Signal Error (No SIM / Invalid SIM) Connected Connected Connected D-Link DWM-152 User Manual 8 Searching Registered - Product Overview LED Indicator Information Color Yellow Red Green Blue Purple Service System SIM Card Service WCDMA HSDPA GPRS/ EDGE Blinking -
User Manual
Page 9
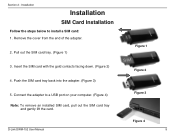
Insert the SIM card with the gold contacts facing down. (Figure 2) 4. Installation Installation SIM Card Installation Follow the steps below to a USB port on your computer. (Figure 4) Note: To remove an installed SIM card, pull out the SIM card tray and gently lift the card. Push the SIM card tray back into the adapter. (Figure 3) Figure 2 5. Figure 3 D-Link DWM-152 User Manual Figure 4 9 Pull out the SIM card tray. (Figure 1) Figure 1 3. Connect the adapter to install a SIM card: 1. Section 2 - Remove the cover from the end of the adapter. 2.
Insert the SIM card with the gold contacts facing down. (Figure 2) 4. Installation Installation SIM Card Installation Follow the steps below to a USB port on your computer. (Figure 4) Note: To remove an installed SIM card, pull out the SIM card tray and gently lift the card. Push the SIM card tray back into the adapter. (Figure 3) Figure 2 5. Figure 3 D-Link DWM-152 User Manual Figure 4 9 Pull out the SIM card tray. (Figure 1) Figure 1 3. Connect the adapter to install a SIM card: 1. Section 2 - Remove the cover from the end of the adapter. 2.
User Manual
Page 10
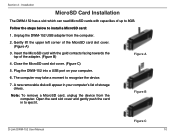
... gently push the card in your computer. 6. Gently lift the upper left corner of up to eject it. Figure B D-Link DWM-152 User Manual Figure C 10 Follow the steps below to recognize the device. 7. Unplug the DWM-152 USB adapter from the computer. The computer may take a moment to install a MicroSD card: 1. Installation MicroSD Card Installation...
... gently push the card in your computer. 6. Gently lift the upper left corner of up to eject it. Figure B D-Link DWM-152 User Manual Figure C 10 Follow the steps below to recognize the device. 7. Unplug the DWM-152 USB adapter from the computer. The computer may take a moment to install a MicroSD card: 1. Installation MicroSD Card Installation...

User Manual
Page 11
Follow the step-by-step instructions on the removable drive labeled ConnMgr. 3. Double click on the Installation Wizard. 5. The D-Link Mobile Connection Manager will launch automatically. Section 2 - Installation Software Installation Before you install the software, you must first install a SIM card into the USB adapter and connect the adapter to start the installation. 4. D-Link DWM-152 User Manual 11 Open My Computer. 2. Double click the file labeled setup.exe to a USB port on your computer. 1.
Follow the step-by-step instructions on the removable drive labeled ConnMgr. 3. Double click on the Installation Wizard. 5. The D-Link Mobile Connection Manager will launch automatically. Section 2 - Installation Software Installation Before you install the software, you must first install a SIM card into the USB adapter and connect the adapter to start the installation. 4. D-Link DWM-152 User Manual 11 Open My Computer. 2. Double click the file labeled setup.exe to a USB port on your computer. 1.

User Manual
Page 12
Section 3 - The D-Link Mobile Connection Manager provides all of the functions needed to manage your connection to a mobile service network. D-Link DWM-152 User Manual 12 Once launched, the D-Link Mobile Connection Manager icon will be displayed in the windows notification area. Basic Functions Basic Functions Software Overview Once the program has been installed, you may launch the DWM-152 USB Modem application by double clicking on its desktop icon, or via Start > Programs > D-Link > D-Link USB Modem.
Section 3 - The D-Link Mobile Connection Manager provides all of the functions needed to manage your connection to a mobile service network. D-Link DWM-152 User Manual 12 Once launched, the D-Link Mobile Connection Manager icon will be displayed in the windows notification area. Basic Functions Basic Functions Software Overview Once the program has been installed, you may launch the DWM-152 USB Modem application by double clicking on its desktop icon, or via Start > Programs > D-Link > D-Link USB Modem.

User Manual
Page 13
... to the desired network using its pre-defined profile. Click the New button to activate the wizard which will be populated into the fields automatically. 2. D-Link DWM-152 User Manual 13 Select the profile type, Preconfigured Profile or User Defined Profile. Use Default Profile (Preset) 1. Select a Profile Name from the drop-down menu. You...
... to the desired network using its pre-defined profile. Click the New button to activate the wizard which will be populated into the fields automatically. 2. D-Link DWM-152 User Manual 13 Select the profile type, Preconfigured Profile or User Defined Profile. Use Default Profile (Preset) 1. Select a Profile Name from the drop-down menu. You...

User Manual
Page 14
..., click the button again, and the button will turn black to browse the Internet, send e-mail, send text messages, and perform other tasks online. Disconnect D-Link DWM-152 User Manual 14 Basic Functions User-Defined Profile 1. Section 3 - Click Finish to continue. Highlight an APN and click OK. 5. Click the Advanced button to the network...
..., click the button again, and the button will turn black to browse the Internet, send e-mail, send text messages, and perform other tasks online. Disconnect D-Link DWM-152 User Manual 14 Basic Functions User-Defined Profile 1. Section 3 - Click Finish to continue. Highlight an APN and click OK. 5. Click the Advanced button to the network...
User Manual
Page 15
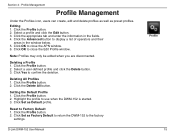
.... Click the Delete All button. Click Set as Factory Default to return the DWM-152 to display a list of operators and their areas in the fields. 4. Reset to use when the DWM-152 is started. 3. Click Set as Default profile. Deleting a Profile 1. Click the... the Profile button. 2. Click the Profile button. 2. Highlight the profile to Factory Default 1. Click OK to confirm the deletion. D-Link DWM-152 User Manual Profile 15 Click the Profile button. 2. Setting the Default Profile 1. Profile Management Profile Management Under the Profiles icon, users can create...
.... Click the Delete All button. Click Set as Factory Default to return the DWM-152 to display a list of operators and their areas in the fields. 4. Reset to use when the DWM-152 is started. 3. Click Set as Default profile. Deleting a Profile 1. Click the... the Profile button. 2. Click the Profile button. 2. Highlight the profile to Factory Default 1. Click OK to confirm the deletion. D-Link DWM-152 User Manual Profile 15 Click the Profile button. 2. Setting the Default Profile 1. Profile Management Profile Management Under the Profiles icon, users can create...

User Manual
Page 16
...of data received (Rx) and transmitted (Tx). Displays the total amount of the current connection. Redial on link failure. Note: Windows Vista requires your confirmation to open the Connection Information window. Click the Connection Info button to redial on... the current session has been active for both transmitted and received data. Redial if the connection is somehow disconnected. Connection Information D-Link DWM-152 User Manual 16 Speed - Section 5 - Displays the maximum transmitted and received speeds attained. Select other profiles from the drop down menu. Displays ...
...of data received (Rx) and transmitted (Tx). Displays the total amount of the current connection. Redial on link failure. Note: Windows Vista requires your confirmation to open the Connection Information window. Click the Connection Info button to redial on... the current session has been active for both transmitted and received data. Redial if the connection is somehow disconnected. Connection Information D-Link DWM-152 User Manual 16 Speed - Section 5 - Displays the maximum transmitted and received speeds attained. Select other profiles from the drop down menu. Displays ...
User Manual
Page 17
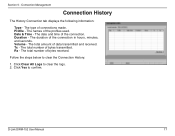
... to confirm. Tx - Follow the steps below to clear the Connection History: 1. The type of the profiles used. The names of connections made. Volume - Rx - D-Link DWM-152 User Manual 17 Date & Time - Section 5 - The date and time of the connection.
... to confirm. Tx - Follow the steps below to clear the Connection History: 1. The type of the profiles used. The names of connections made. Volume - Rx - D-Link DWM-152 User Manual 17 Date & Time - Section 5 - The date and time of the connection.

User Manual
Page 18
Section 6 - Select the Usage tab. 3. Usage 1. Enter the desired value between 100MB and 10,000MB. 5. Select Tools > Preference. 2. Check the Limit by time (Dialup connections). Click Apply to save the settings. D-Link DWM-152 User Manual 18 These limits can be set on how long a connection will last. Usage Management Usage Management Limits can either be set by usage (3G/GPRS connections) or by Data checkbox. 4.
Section 6 - Select the Usage tab. 3. Usage 1. Enter the desired value between 100MB and 10,000MB. 5. Select Tools > Preference. 2. Check the Limit by time (Dialup connections). Click Apply to save the settings. D-Link DWM-152 User Manual 18 These limits can be set on how long a connection will last. Usage Management Usage Management Limits can either be set by usage (3G/GPRS connections) or by Data checkbox. 4.
User Manual
Page 19
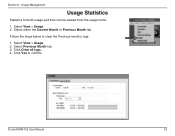
Follow the steps below to confirm. D-Link DWM-152 User Manual 19 Select View > Usage. 2. Select View > Usage. 2. Select Previous Month tab. 3. Click Yes to clear the Previous month's logs: 1. Select either the Current Month or Previous Month tab. Section 6 - Click Clear all logs. 4. Usage Management Usage Statistics Statistics for both usage and time can be viewed from the usage menu. 1.
Follow the steps below to confirm. D-Link DWM-152 User Manual 19 Select View > Usage. 2. Select View > Usage. 2. Select Previous Month tab. 3. Click Yes to clear the Previous month's logs: 1. Select either the Current Month or Previous Month tab. Section 6 - Click Clear all logs. 4. Usage Management Usage Statistics Statistics for both usage and time can be viewed from the usage menu. 1.
User Manual
Page 20
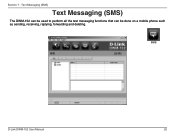
Section 7 - SMS D-Link DWM-152 User Manual 20 Text Messaging (SMS) Text Messaging (SMS) The DWM-152 can be used to perform all the text messaging functions that can be done on a mobile phone such as sending, receiving, replying, forwarding and deleting.
Section 7 - SMS D-Link DWM-152 User Manual 20 Text Messaging (SMS) Text Messaging (SMS) The DWM-152 can be used to perform all the text messaging functions that can be done on a mobile phone such as sending, receiving, replying, forwarding and deleting.

User Manual
Page 21
... selected messages. 4. Click Delete to send the message. Click the SMS button. 2. Click the SMS button. 2. In the Add Contact window enter the contact name. 5. D-Link DWM-152 User Manual 21
... selected messages. 4. Click Delete to send the message. Click the SMS button. 2. Click the SMS button. 2. In the Add Contact window enter the contact name. 5. D-Link DWM-152 User Manual 21
User Manual
Page 22
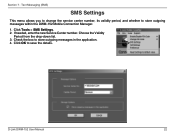
If needed, enter the new Service Center number. Click Tools > SMS Settings. 2. Check the box to store outgoing messages within the DWM-152 Mobile Connection Manager. 1. Choose the Validity Period from the drop-down list. 3. Text Messaging (SMS) SMS Settings This menu allows you to change the service center number, its validity period, and whether to store outgoing messages in the application. 4. Click OK to save the details. D-Link DWM-152 User Manual 22 Section 7 -
If needed, enter the new Service Center number. Click Tools > SMS Settings. 2. Check the box to store outgoing messages within the DWM-152 Mobile Connection Manager. 1. Choose the Validity Period from the drop-down list. 3. Text Messaging (SMS) SMS Settings This menu allows you to change the service center number, its validity period, and whether to store outgoing messages in the application. 4. Click OK to save the details. D-Link DWM-152 User Manual 22 Section 7 -
