
Product Manual
Page 4
... local area network (LAN). Introduction The D-LINK DVG-1402S Broadband Phone Service VoIP Router links traditional telephony networks to share a single Internet connection. One Ethernet port is for a DSL/Cable Modem or other wide area network (WAN) devices, and the others are for LAN users, allowing multiple users to IP networks with conventional telephony devices such...
... local area network (LAN). Introduction The D-LINK DVG-1402S Broadband Phone Service VoIP Router links traditional telephony networks to share a single Internet connection. One Ethernet port is for a DSL/Cable Modem or other wide area network (WAN) devices, and the others are for LAN users, allowing multiple users to IP networks with conventional telephony devices such...

Product Manual
Page 6
Features & Benefits Two analog RJ-11 phone connectors One 10/100Mbps WAN port for connecting to a DSL/Cable Modem or other WAN devices Four 10/100Mbps LAN ports for connecting to a local network IP address assignment using DHCP (Dynamic Host Configuration Protocol) or static configuration Remote software download/update Supports IP sharing to allow multiple users to access the Internet via a single IP address Supports Caller ID Supports QoS to guarantee voice quality Optional features may be supported by your service provider such as call waiting, caller ID, and voicemail. 6
Features & Benefits Two analog RJ-11 phone connectors One 10/100Mbps WAN port for connecting to a DSL/Cable Modem or other WAN devices Four 10/100Mbps LAN ports for connecting to a local network IP address assignment using DHCP (Dynamic Host Configuration Protocol) or static configuration Remote software download/update Supports IP sharing to allow multiple users to access the Internet via a single IP address Supports Caller ID Supports QoS to guarantee voice quality Optional features may be supported by your service provider such as call waiting, caller ID, and voicemail. 6

Product Manual
Page 10
...'s IP settings to DHCP (to automatically be assigned an IP address from the DVG-1402S) ...regardless of what type of your service provider requires a MAC address, skip this section and refer to an available electrical outlet (Wall Socket or Surge Protector). 12. Configuring the DVG-1402S... you must configure your DVG-1402S. Getting Started (continued) Connecting the DVG-1402S Directly to the following... you will need to continue on the DVG-1402S. 11. If you must follow the... use PPPoE as their method of the DVG-1402S with a PPPoE or DHCP connection, you...
...'s IP settings to DHCP (to automatically be assigned an IP address from the DVG-1402S) ...regardless of what type of your service provider requires a MAC address, skip this section and refer to an available electrical outlet (Wall Socket or Surge Protector). 12. Configuring the DVG-1402S... you must configure your DVG-1402S. Getting Started (continued) Connecting the DVG-1402S Directly to the following... you will need to continue on the DVG-1402S. 11. If you must follow the... use PPPoE as their method of the DVG-1402S with a PPPoE or DHCP connection, you...

Product Manual
Page 15
... of a Router 17. Also be sure to change your computer's IP settings to DHCP (to automatically be assigned an IP address from the DVG1402S) regardless of what type of internet connection you have a PPPoE connection, you have . (Please refer to the following section. Configuring the DVG-1402S for detailed ... Press the Enter or Return key. 15 Getting Started (continued) Connecting the DVG-1402S in or turn on to your cable service provider does not require a MAC address, setup of the DVG-1402S with your DVG-1402S and PC. If you will need to continue on the power switch). 19....
... of a Router 17. Also be sure to change your computer's IP settings to DHCP (to automatically be assigned an IP address from the DVG1402S) regardless of what type of internet connection you have a PPPoE connection, you have . (Please refer to the following section. Configuring the DVG-1402S for detailed ... Press the Enter or Return key. 15 Getting Started (continued) Connecting the DVG-1402S in or turn on to your cable service provider does not require a MAC address, setup of the DVG-1402S with your DVG-1402S and PC. If you will need to continue on the power switch). 19....
Product Manual
Page 20
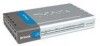
Be sure to change your computer's IP settings to DHCP (to automatically be assigned an IP address from the DVG-1402S) regardless of what type of the Power Adapter to an available electrical outlet (Wall Socket or Surge Protector). 17. Restart your NIC card's manual for detailed information.) Installation behind a router is already configured to the...
Be sure to change your computer's IP settings to DHCP (to automatically be assigned an IP address from the DVG-1402S) regardless of what type of the Power Adapter to an available electrical outlet (Wall Socket or Surge Protector). 17. Restart your NIC card's manual for detailed information.) Installation behind a router is already configured to the...

Product Manual
Page 21
...-based management module (see the next section for more information) and click on the network device you use to connect to set up the DVG-1402S, follow the steps below. 1. The physical address listed is your system's MAC address. The physical address listed is your system's MAC address.... Open a Web browser and type in the IP address of the PC that was originally registered with the cable Internet provider. Go to System Preferences > Network and click on Configure WAN Port...
...-based management module (see the next section for more information) and click on the network device you use to connect to set up the DVG-1402S, follow the steps below. 1. The physical address listed is your system's MAC address. The physical address listed is your system's MAC address.... Open a Web browser and type in the IP address of the PC that was originally registered with the cable Internet provider. Go to System Preferences > Network and click on Configure WAN Port...
Product Manual
Page 22
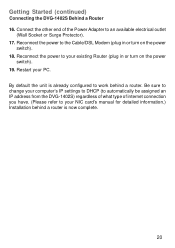
... LAN via its LAN port. The screen at right will use a Web browser to configure the VoIP Router you must make sure it 's default IP. 192 . 168 . 15 . 15 255 . 255 . 255 . 0 Set your PC's IP address to 192.168.15.15 and the subnet mask to 255.255.255.0. In order to... use the manual IP (default is not enabled on your computer, be sure to assign a static IP address to the VoIP Router. Web-based Management Prior to using your Web browser for Web-based management, if DHCP is 192...
... LAN via its LAN port. The screen at right will use a Web browser to configure the VoIP Router you must make sure it 's default IP. 192 . 168 . 15 . 15 255 . 255 . 255 . 0 Set your PC's IP address to 192.168.15.15 and the subnet mask to 255.255.255.0. In order to... use the manual IP (default is not enabled on your computer, be sure to assign a static IP address to the VoIP Router. Web-based Management Prior to using your Web browser for Web-based management, if DHCP is 192...
Product Manual
Page 24
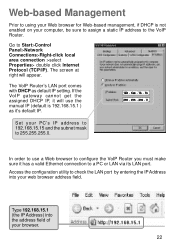
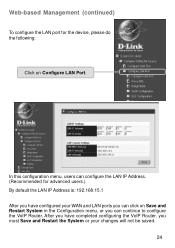
In this configuration menu, users can configure the LAN IP Address. (Recommended for the device, please do the following: Click on Save and Restart System in the Configuration menu, or you can click on Configure LAN Port. After you have configured your changes will not be saved. 24 Web-based Management (continued) To configure the LAN port for advanced users.) By default the LAN IP Address is: 192.168.15.1 After you have completed configuring the VoIP Router, you must Save and Restart the System or your WAN and LAN ports you can continue to configure the VoIP Router.
In this configuration menu, users can configure the LAN IP Address. (Recommended for the device, please do the following: Click on Save and Restart System in the Configuration menu, or you can click on Configure LAN Port. After you have configured your changes will not be saved. 24 Web-based Management (continued) To configure the LAN port for advanced users.) By default the LAN IP Address is: 192.168.15.1 After you have completed configuring the VoIP Router, you must Save and Restart the System or your WAN and LAN ports you can continue to configure the VoIP Router.

Product Manual
Page 25
Click Save to save the settings. 25 Enter the Proxy DNS IP address if instructed by your service provider. Web-based Management (continued) Configure LAN Port > Proxy DNS State - Click Save to turn NAT on or off for the Proxy DNS function. This toggles Enable and Disable for Static Public IP assignment. Proxy DNS IP Address - This toggles On and Off to save the settings. Configure LAN Port > Bridge Mode Bridge Mode -
Click Save to save the settings. 25 Enter the Proxy DNS IP address if instructed by your service provider. Web-based Management (continued) Configure LAN Port > Proxy DNS State - Click Save to turn NAT on or off for the Proxy DNS function. This toggles Enable and Disable for Static Public IP assignment. Proxy DNS IP Address - This toggles On and Off to save the settings. Configure LAN Port > Bridge Mode Bridge Mode -

Product Manual
Page 26
... clients. Some LANs may require using leased IP addresses, to translate hostnames into network, subnet, and host parts. This specifies the amount of unassigned IP addresses. WIN Server IP - enter the IP address of contiguous, IP addresses above the base IP Address above. Domain Name - The items ...on this window are to be divided into IP addresses or vice-versa. Netmask - The netmask has...
... clients. Some LANs may require using leased IP addresses, to translate hostnames into network, subnet, and host parts. This specifies the amount of unassigned IP addresses. WIN Server IP - enter the IP address of contiguous, IP addresses above the base IP Address above. Domain Name - The items ...on this window are to be divided into IP addresses or vice-versa. Netmask - The netmask has...

Product Manual
Page 27
...) Configure LAN Port > DHCP Configuration > Static IP Assignment The Static IP Assignment functions in the previous section. IP Address - This is the static IP address to be assigned to those in the Dynamic IP Assignment, in much the same way as the Dynamic IP Assignment. Click the edit icon on the window ...above to access the second Static IP Assignment window: The items on next screen. Choose the index number that a particular IP address can be assigned. MAC Address - This specifies the physical address of its NIC which must be entered on ...
...) Configure LAN Port > DHCP Configuration > Static IP Assignment The Static IP Assignment functions in the previous section. IP Address - This is the static IP address to be assigned to those in the Dynamic IP Assignment, in much the same way as the Dynamic IP Assignment. Click the edit icon on the window ...above to access the second Static IP Assignment window: The items on next screen. Choose the index number that a particular IP address can be assigned. MAC Address - This specifies the physical address of its NIC which must be entered on ...

Product Manual
Page 29
... protocol packet you would like to edit (Form 1 to save the settings. 29 Click Save to 6). Choose the protocol either TCP or UDP. Server IP - Global Port Range Enter the designated TCP or UDP protocol port number for the Virtual Server Configuration function. Enter the... IP address of the local designated host computer or device. Local Port Range - State - Web-based Management (continued) Configure LAN Port > NAT Configuration > Virtual Server ...
... protocol packet you would like to edit (Form 1 to save the settings. 29 Click Save to 6). Choose the protocol either TCP or UDP. Server IP - Global Port Range Enter the designated TCP or UDP protocol port number for the Virtual Server Configuration function. Enter the... IP address of the local designated host computer or device. Local Port Range - State - Web-based Management (continued) Configure LAN Port > NAT Configuration > Virtual Server ...

Product Manual
Page 30
... - Click the edit icon on this window to enable or disable the DMZ. Select to access the second Dynamic NAT window: 30 Enter the IP address of the DMZ host. The DMZ (Demilitarized Zone) allows a single computer to be exposed to view the current Dynamic NAT settings. By default the ...
... - Click the edit icon on this window to enable or disable the DMZ. Select to access the second Dynamic NAT window: 30 Enter the IP address of the DMZ host. The DMZ (Demilitarized Zone) allows a single computer to be exposed to view the current Dynamic NAT settings. By default the ...

Product Manual
Page 31
...of packets you would like to edit (Form 1 to Global addresses. Enter the end designated IP address for the particular range of packets you wish to redirect to Global addresses. Enter the end designated IP address for the particular range of packets you wish to redirect to local addresses. Web-based... Management (continued) Configure LAN Port > NAT Configuration > Dynamic NAT (continued) The items on this window are described below: Index - Enter the beginning designated IP address for the particular range of packets you wish to redirect to save the settings. 31 Global...
...of packets you would like to edit (Form 1 to Global addresses. Enter the end designated IP address for the particular range of packets you wish to redirect to Global addresses. Enter the end designated IP address for the particular range of packets you wish to redirect to local addresses. Web-based... Management (continued) Configure LAN Port > NAT Configuration > Dynamic NAT (continued) The items on this window are described below: Index - Enter the beginning designated IP address for the particular range of packets you wish to redirect to save the settings. 31 Global...

Product Manual
Page 32
... - Click the edit icon on this window to access the second Static NAT window: The items on this index. Click Save to 6). Enter the designated IP address for the packet you would like to edit (Form 1 to save the settings. 32 Web-based Management (continued) Configure LAN Port > NAT Configuration > Static... NAT This window allows you wish to redirect to a Global address. Choose the index number that you wish to redirect to a Local address. Global IP Address - Enter the designated IP address for the packet you to view the current Static NAT settings.
... - Click the edit icon on this window to access the second Static NAT window: The items on this index. Click Save to 6). Enter the designated IP address for the packet you would like to edit (Form 1 to save the settings. 32 Web-based Management (continued) Configure LAN Port > NAT Configuration > Static... NAT This window allows you wish to redirect to a Global address. Choose the index number that you wish to redirect to a Local address. Global IP Address - Enter the designated IP address for the packet you to view the current Static NAT settings.

Product Manual
Page 34
...) Configure LAN Port > RIP > Static Route Configuration (continued) The items on this window are routed. Enable or disable the route. Gateway - Interface - Type in the IP Address of the gateway used for traffic destined for the static route. State - Type in an appropriate subnet mask that allows the static route to...
...) Configure LAN Port > RIP > Static Route Configuration (continued) The items on this window are routed. Enable or disable the route. Gateway - Interface - Type in the IP Address of the gateway used for traffic destined for the static route. State - Type in an appropriate subnet mask that allows the static route to...

Product Manual
Page 35
...) Firewall Rules Firewall Rules is an advance feature used to save the settings. Click the edit icon on the window above to access the third IP Filter window, shown on the window above to enable or disable the listed Firewall rules sets. Click Save button to deny or allow traffic from...
...) Firewall Rules Firewall Rules is an advance feature used to save the settings. Click the edit icon on the window above to access the third IP Filter window, shown on the window above to enable or disable the listed Firewall rules sets. Click Save button to deny or allow traffic from...

Product Manual
Page 36
...specified; Protocol- Web-based Management (continued) Firewall Rules (continued) Comment- Type in an appropriate identifying comment for the rule. Type in the source IP Address and select the Subnet Mask to that protocol type. Pass or BlockSelect Pass or Block to filter. Direction- Select IGMP, TCP, UDP or ... Select a range of ports to pass or block packets of ports to the Start Port if there is specified, this defines a range of that IP Address. Use the following guide to define the port or port range (Start Port and End Port): < : specifies the port numbers less than ...
...specified; Protocol- Web-based Management (continued) Firewall Rules (continued) Comment- Type in an appropriate identifying comment for the rule. Type in the source IP Address and select the Subnet Mask to that protocol type. Pass or BlockSelect Pass or Block to filter. Direction- Select IGMP, TCP, UDP or ... Select a range of ports to pass or block packets of ports to the Start Port if there is specified, this defines a range of that IP Address. Use the following guide to define the port or port range (Start Port and End Port): < : specifies the port numbers less than ...

Product Manual
Page 38
... can be filtered. This toggles Disable and Enable for both PPTP (Point-to save the settings. Click the Save button to -Point Tunneling Protocol), IPSec (IP Security), and L2TP (Layer 2 Tunneling Protocol). Enter the MAC address of the client that you have many VPN clients on this index. This is the...
... can be filtered. This toggles Disable and Enable for both PPTP (Point-to save the settings. Click the Save button to -Point Tunneling Protocol), IPSec (IP Security), and L2TP (Layer 2 Tunneling Protocol). Enter the MAC address of the client that you have many VPN clients on this index. This is the...

Product Manual
Page 41
... the reset is what you purchased the device. Then perform a Restart System on Reset to Factory Default to reset the NV-RAM to redefine the IP settings for the device in NVRAM will be absolutely certain that were present when you want to do. Click on the device. After these three.... 41 Note: After performing the Factory Reset, make sure to the default values that this is done, all of the device's settings stored in the IP Configuration menu.
... the reset is what you purchased the device. Then perform a Restart System on Reset to Factory Default to reset the NV-RAM to redefine the IP settings for the device in NVRAM will be absolutely certain that were present when you want to do. Click on the device. After these three.... 41 Note: After performing the Factory Reset, make sure to the default values that this is done, all of the device's settings stored in the IP Configuration menu.


