Product Manual
Page 20
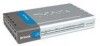
...automatically be assigned an IP address from the DVG-1402S) regardless of what type of the Power Adapter to an available electrical outlet (Wall Socket or Surge Protector). 17. Getting Started (continued) Connecting the DVG-1402S Behind a Router 16. Reconnect the power to your existing Router (plug in or ...turn on the power switch). 18. Reconnect the power to the Cable/DSL Modem (plug in or turn on the power switch). 19. By default the unit is now complete...
...automatically be assigned an IP address from the DVG-1402S) regardless of what type of the Power Adapter to an available electrical outlet (Wall Socket or Surge Protector). 17. Getting Started (continued) Connecting the DVG-1402S Behind a Router 16. Reconnect the power to your existing Router (plug in or ...turn on the power switch). 18. Reconnect the power to the Cable/DSL Modem (plug in or turn on the power switch). 19. By default the unit is now complete...

Product Manual
Page 21
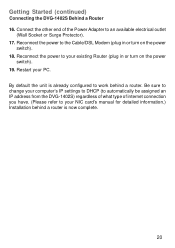
...users: Go to Start > Run > command. Click the Ethernet button. Open a Web browser and type in the upper left hand corner of the DVG-1402S (default is 192.168.15.1). In the MAC Cloning field, enter your system. For Windows 98/Me users: Go to Start> Run > cmd. Write down... menu. 5. Select DHCP from step 2). 6. For Mac users: Click the Apple icon in the IP address of the screen. The physical address listed is your system's MAC address. The physical address listed is your system's MAC address. The following format...
...users: Go to Start > Run > command. Click the Ethernet button. Open a Web browser and type in the upper left hand corner of the DVG-1402S (default is 192.168.15.1). In the MAC Cloning field, enter your system. For Windows 98/Me users: Go to Start> Run > cmd. Write down... menu. 5. Select DHCP from step 2). 6. For Mac users: Click the Apple icon in the IP address of the screen. The physical address listed is your system's MAC address. The physical address listed is your system's MAC address. The following format...
Product Manual
Page 22
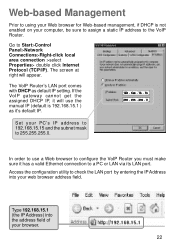
... to 192.168.15.15 and the subnet mask to 255.255.255.0. Go to configure the VoIP Router you must make sure it 's default IP. 192 . 168 . 15 . 15 255 . 255 . 255 . 0 Set your web browser address field. Web-based Management Prior to using your Web browser for Web-based ...management, if DHCP is 192.168.15.1 ) as default IP setting. Access the configuration utility to check the LAN port by entering the IP Address into the address field of your computer, be sure to assign a static IP address to the VoIP Router. The screen at right will use a Web browser to Start...
... to 192.168.15.15 and the subnet mask to 255.255.255.0. Go to configure the VoIP Router you must make sure it 's default IP. 192 . 168 . 15 . 15 255 . 255 . 255 . 0 Set your web browser address field. Web-based Management Prior to using your Web browser for Web-based ...management, if DHCP is 192.168.15.1 ) as default IP setting. Access the configuration utility to check the LAN port by entering the IP Address into the address field of your computer, be sure to assign a static IP address to the VoIP Router. The screen at right will use a Web browser to Start...
Product Manual
Page 24
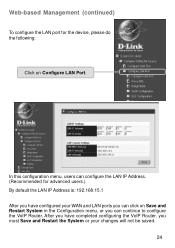
After you have configured your changes will not be saved. 24 Web-based Management (continued) To configure the LAN port for advanced users.) By default the LAN IP Address is: 192.168.15.1 After you have completed configuring the VoIP Router, you must Save and Restart the System or your WAN and LAN ports you can continue to configure the VoIP Router. In this configuration menu, users can configure the LAN IP Address. (Recommended for the device, please do the following: Click on Save and Restart System in the Configuration menu, or you can click on Configure LAN Port.
After you have configured your changes will not be saved. 24 Web-based Management (continued) To configure the LAN port for advanced users.) By default the LAN IP Address is: 192.168.15.1 After you have completed configuring the VoIP Router, you must Save and Restart the System or your WAN and LAN ports you can continue to configure the VoIP Router. In this configuration menu, users can configure the LAN IP Address. (Recommended for the device, please do the following: Click on Save and Restart System in the Configuration menu, or you can click on Configure LAN Port.

Product Manual
Page 26
...leave blank. Leased Time - Click Save to be used by the DHCP clients. Start IP Address -This is the range of time (in the 32-bit address which are described below: Default Gateway - This specifies the Domain Name System server, used for the network and subnet ...parts, and zeros for the host part. Domain Name - Netmask - State - This specifies the amount of contiguous, IP addresses above the base IP Address above. Web-based ...
...leave blank. Leased Time - Click Save to be used by the DHCP clients. Start IP Address -This is the range of time (in the 32-bit address which are described below: Default Gateway - This specifies the Domain Name System server, used for the network and subnet ...parts, and zeros for the host part. Domain Name - Netmask - State - This specifies the amount of contiguous, IP addresses above the base IP Address above. Web-based ...

Product Manual
Page 30
... exposed to view the current Dynamic NAT settings. Click Save to enable or disable the DMZ. DMZ Host IP Address - Select to save the settings. Enter the IP address of the DMZ host. By default the DMZ is disabled. Click the edit icon on this window to access the second Dynamic NAT window...
... exposed to view the current Dynamic NAT settings. Click Save to enable or disable the DMZ. DMZ Host IP Address - Select to save the settings. Enter the IP address of the DMZ host. By default the DMZ is disabled. Click the edit icon on this window to access the second Dynamic NAT window...

Product Manual
Page 41
... reset the NV-RAM to the default values that this is complete. 41 Click on the device. After these three procedures are performed, your Factory Reset is what you purchased the device. Once the reset is done, all of the device's settings stored in the IP Configuration menu. Web-based Management (continued... a Factory Reset, be erased and restored to values present when the device was purchased. Note: After performing the Factory Reset, make sure to redefine the IP settings for the device in NVRAM will be absolutely certain that were present when you want to do.
... reset the NV-RAM to the default values that this is complete. 41 Click on the device. After these three procedures are performed, your Factory Reset is what you purchased the device. Once the reset is done, all of the device's settings stored in the IP Configuration menu. Web-based Management (continued... a Factory Reset, be erased and restored to values present when the device was purchased. Note: After performing the Factory Reset, make sure to redefine the IP settings for the device in NVRAM will be absolutely certain that were present when you want to do.


