Product Manual
Page 7
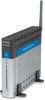
...is the IP address you will enter into the Address field of IP addresses the DSL-G604T will assign are ready to 192.168.1.254. Once you have to computers on the LAN when DHCP is admin. One straight-through a web browser you will be changed later. The default Username...subnet mask used by default, to other secure place, in the future. LAN IP addresses for your DSL-G604T ADSL Router: Username This is admin. LAN Subnet Mask for DHCP service on your DSL-G604T ADSL Router. Packing List Open the shipping carton and carefully remove all items. Make sure that you...
...is the IP address you will enter into the Address field of IP addresses the DSL-G604T will assign are ready to 192.168.1.254. Once you have to computers on the LAN when DHCP is admin. One straight-through a web browser you will be changed later. The default Username...subnet mask used by default, to other secure place, in the future. LAN IP addresses for your DSL-G604T ADSL Router: Username This is admin. LAN Subnet Mask for DHCP service on your DSL-G604T ADSL Router. Packing List Open the shipping carton and carefully remove all items. Make sure that you...
Product Manual
Page 19
... the subnet mask is 255.0.0.0, the default management Username is admin and the default Password is valid. Use a ballpoint or paperclip to make sure the connection is admin. Power on . If the Ethernet port is connected to a working device, check the Ethernet Link/Act LED indicators to gently push down the reset button.
... the subnet mask is 255.0.0.0, the default management Username is admin and the default Password is valid. Use a ballpoint or paperclip to make sure the connection is admin. Power on . If the Ethernet port is connected to a working device, check the Ethernet Link/Act LED indicators to gently push down the reset button.
Product Manual
Page 28
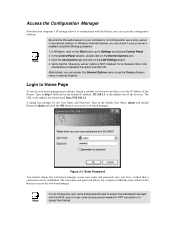
... server" option is NOT checked. Type in the Internet settings. Login to Home Page To use a proxy server in the default User Name admin and default Password admin and click the OK button to the IP address of the browser. Figure 3-1. Note Do not confuse the user name and password used to...
... server" option is NOT checked. Type in the Internet settings. Login to Home Page To use a proxy server in the default User Name admin and default Password admin and click the OK button to the IP address of the browser. Figure 3-1. Note Do not confuse the user name and password used to...
Product Manual
Page 31
If you are in from the pull-down menu and click Next. Choose the time zone you wish to return to the previous menu during the setup process, click the Back button. Note The default User Name admin used for Router management cannot be changed. Set the system time of the Router.
If you are in from the pull-down menu and click Next. Choose the time zone you wish to return to the previous menu during the setup process, click the Back button. Note The default User Name admin used for Router management cannot be changed. Set the system time of the Router.
Product Manual
Page 37
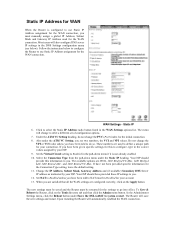
...IP Address assignment for the WAN connection. Your ISP should provide this to configure, type in the pull-down menu under Force the DSL-G604T to Enabled in the correct values assigned by your connection. The Router will automatically establish the WAN connection. Upon restarting the Router will...Pvc0) index for the initial connection. 8. The available options are configured correctly, click on the Tools directory tab and then click the Admin menu button. When you see below to configure the Router to use Static IP Address assignment for the WAN connection, you have been told...
...IP Address assignment for the WAN connection. Your ISP should provide this to configure, type in the pull-down menu under Force the DSL-G604T to Enabled in the correct values assigned by your connection. The Router will automatically establish the WAN connection. Upon restarting the Router will...Pvc0) index for the initial connection. 8. The available options are configured correctly, click on the Tools directory tab and then click the Admin menu button. When you see below to configure the Router to use Static IP Address assignment for the WAN connection, you have been told...
Product Manual
Page 38
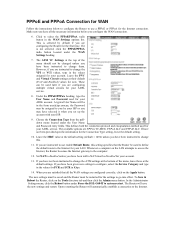
.... When you are instructed to use a PPPoE or PPPoA for your ISP. 9. In the Administrator Settings menu, click the Reboot button under Force the DSL-G604T to use enable Default Route, this . 11. Make sure you have all the WAN settings are PPPoA VC-MUX, PPPoA LLC and PPPoE LLC. Leave...method used for your ADSL service. If have been instructed to change them. Whenever a computer on the Tools directory tab and then click the Admin menu button. If you have selected it is selected by your ADSL account. If you have not been provided specific information for now. To Save...
.... When you are instructed to use a PPPoE or PPPoA for your ISP. 9. In the Administrator Settings menu, click the Reboot button under Force the DSL-G604T to use enable Default Route, this . 11. Make sure you have all the WAN settings are PPPoA VC-MUX, PPPoA LLC and PPPoE LLC. Leave...method used for your ADSL service. If have been instructed to change them. Whenever a computer on the Tools directory tab and then click the Admin menu button. If you have selected it is selected by your ADSL account. If you have not been provided specific information for now. To Save...
Product Manual
Page 39
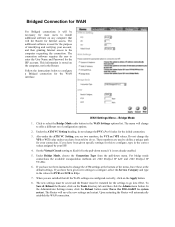
...the user to configure, select the Service Category and type in the values for PCR and SCR in Kbps. 7. Also under Force the DSL-G604T to go into effect. Under Bridge Mode, choose the Connection Type from the pull-down menu if it is not already enabled. 5. If...Bridge Mode 1. For bridge mode connections the available encapsulation methods are configured correctly, click on the Tools directory tab and then click the Admin menu button. This information is used to configure a Bridged connection for the WAN interface. Set the Virtual Circuit setting to install additional software...
...the user to configure, select the Service Category and type in the values for PCR and SCR in Kbps. 7. Also under Force the DSL-G604T to go into effect. Under Bridge Mode, choose the Connection Type from the pull-down menu if it is not already enabled. 5. If...Bridge Mode 1. For bridge mode connections the available encapsulation methods are configured correctly, click on the Tools directory tab and then click the Admin menu button. This information is used to configure a Bridged connection for the WAN interface. Set the Virtual Circuit setting to install additional software...
Product Manual
Page 41
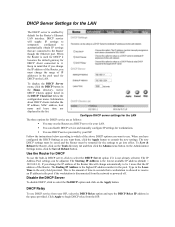
... may use the Router as you change automatically to select the No DHCP option and click on the Tools directory tab and then click the Admin menu button. Follow the instructions below the configuration menu. To Save & Reboot the Router, click on the Apply button. DHCP Server Settings for the LAN...
... may use the Router as you change automatically to select the No DHCP option and click on the Tools directory tab and then click the Admin menu button. Follow the instructions below the configuration menu. To Save & Reboot the Router, click on the Apply button. DHCP Server Settings for the LAN...

Product Manual
Page 61
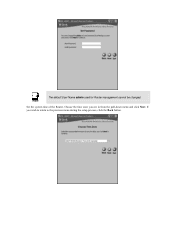
... new password. Be sure to save the new setting (see above) is also used to access the Router web manager, click the Admin button in this cannot be certain you have typed it correctly. To enable remote management of the Router, select the Enabled radio button ...for management. The System User Name (Login Name) remains "admin", this directory. Administrator Settings Menu Enable Remote Web Management and Telnet Access The Administrator Settings menu (see below). These menus are described below )....
... new password. Be sure to save the new setting (see above) is also used to access the Router web manager, click the Admin button in this cannot be certain you have typed it correctly. To enable remote management of the Router, select the Enabled radio button ...for management. The System User Name (Login Name) remains "admin", this directory. Administrator Settings Menu Enable Remote Web Management and Telnet Access The Administrator Settings menu (see below). These menus are described below )....

