Product Manual
Page 5
... with the DP-G301, for information about configuring the print server's ports.) The Print Server also supports web configuration permitting users to communicate. (For example, if your Print Server's IP Address is 192...IP Address should be configured using the PS Admin program or the print server's Telnet interface. (See the PS Admin User's Guide, available on its front panel. The Print Server also supports configuration and management via the Telnet protocol for networks without Windows-compatible systems. External Features Port Connectors The DP-G301's parallel...
... with the DP-G301, for information about configuring the print server's ports.) The Print Server also supports web configuration permitting users to communicate. (For example, if your Print Server's IP Address is 192...IP Address should be configured using the PS Admin program or the print server's Telnet interface. (See the PS Admin User's Guide, available on its front panel. The Print Server also supports configuration and management via the Telnet protocol for networks without Windows-compatible systems. External Features Port Connectors The DP-G301's parallel...

Product Manual
Page 11
... Please note that you can access and control the Print Server's configuration through four links on the top of the DP-G301. Using a CAT5 cable, connect the DP-G301 to the Ethernet-adapter equipped computer in your web ...browser and type http://192.168.0.10 in the same segment for the two devices to the product information, you will appear (see below). Open your network that the PC's IP Address must correspond with the Print Server's IP Address in the address...
... Please note that you can access and control the Print Server's configuration through four links on the top of the DP-G301. Using a CAT5 cable, connect the DP-G301 to the Ethernet-adapter equipped computer in your web ...browser and type http://192.168.0.10 in the same segment for the two devices to the product information, you will appear (see below). Open your network that the PC's IP Address must correspond with the Print Server's IP Address in the address...

Product Manual
Page 12
...continued) Home Click on the Home tab from the tools bar of the main screen to display information about the print server, including the firmware version, MAC/IP address, and the "up time" can monitor the networking status in this field, including the network connection, speed...status, and the status of your printing tasks, etc. Ethernet Status: You can be found in this field. Home > System As shown below, the System displays the status of your print server, printer and network. Device Status: Information about the DP-G301's System Status and Printer Status. ...
...continued) Home Click on the Home tab from the tools bar of the main screen to display information about the print server, including the firmware version, MAC/IP address, and the "up time" can monitor the networking status in this field, including the network connection, speed...status, and the status of your printing tasks, etc. Ethernet Status: You can be found in this field. Home > System As shown below, the System displays the status of your print server, printer and network. Device Status: Information about the DP-G301's System Status and Printer Status. ...

Product Manual
Page 15
Users Printing Log: The items in the left column to display the user's information. Using the Web Configuration (continued) Home > User Click the User button in this field display the user(s) information, which include the user(s) Mac address, IP address, name, and status of printing tasks. 15
Users Printing Log: The items in the left column to display the user's information. Using the Web Configuration (continued) Home > User Click the User button in this field display the user(s) information, which include the user(s) Mac address, IP address, name, and status of printing tasks. 15
Product Manual
Page 20
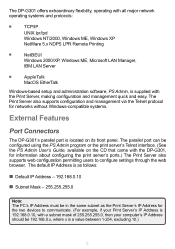
... menu (Level 1 or Level 2). MAC Rendezvous: This option allows you to enable or disable UPnP mode. LPT Chooser Name: Display the print server name. When you choose Manually Assign, you should enter the related information in the box. AppleTalk Enter the AppleTalk Zone name in the following...) Configuration > Network TCP/IP This field contains three options that you want the print server associated with in this field. Microsoft Network Enter the name of the Workgroup that allow you to configure the TCP/IP setting: IP Address: This option allows you to enable ...
... menu (Level 1 or Level 2). MAC Rendezvous: This option allows you to enable or disable UPnP mode. LPT Chooser Name: Display the print server name. When you choose Manually Assign, you should enter the related information in the box. AppleTalk Enter the AppleTalk Zone name in the following...) Configuration > Network TCP/IP This field contains three options that you want the print server associated with in this field. Microsoft Network Enter the name of the Workgroup that allow you to configure the TCP/IP setting: IP Address: This option allows you to enable ...

Product Manual
Page 29
... to communicate. (For example, if your Print Server's IP Address is 192.168.0.10, with a subnet mask of the DP-G301. Note: The PC's IP Address must be in the same subnet as the Print Server's IP Address for Windows XP Open the web browser, and type in the IP Address of 255.255.255.0, then your computer's IP Address should be 192.168.0.x, where x is...
... to communicate. (For example, if your Print Server's IP Address is 192.168.0.10, with a subnet mask of the DP-G301. Note: The PC's IP Address must be in the same subnet as the Print Server's IP Address for Windows XP Open the web browser, and type in the IP Address of 255.255.255.0, then your computer's IP Address should be 192.168.0.x, where x is...

Product Manual
Page 32
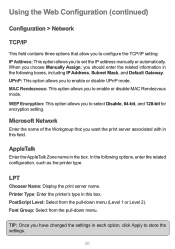
TCP/IP Printing for Windows XP (continued) When you select TCP/IP Protocol at the Network window, the screen below appears. (We recommend that you keep the default settings as shown.) If you need to make changes, make sure to click Apply after you have made the changes. (You may wish to make a note of the IP address.) 32
TCP/IP Printing for Windows XP (continued) When you select TCP/IP Protocol at the Network window, the screen below appears. (We recommend that you keep the default settings as shown.) If you need to make changes, make sure to click Apply after you have made the changes. (You may wish to make a note of the IP address.) 32
Product Manual
Page 35
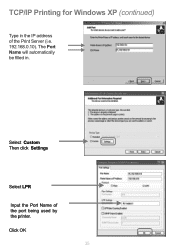
Click OK 35 Select Custom Then click Settings Select LPR Input the Port Name of the Print Server (i.e. 192.168.0.10). The Port Name will automatically be filled in the IP address of the port being used by the printer. TCP/IP Printing for Windows XP (continued) Type in .
Click OK 35 Select Custom Then click Settings Select LPR Input the Port Name of the Print Server (i.e. 192.168.0.10). The Port Name will automatically be filled in the IP address of the port being used by the printer. TCP/IP Printing for Windows XP (continued) Type in .

Product Manual
Page 38
TCP/IP Printing for Windows 2000 Open the Web browser, and type in the same subnet as the Print Server's IP Address for the two devices to communicate. (For example, if your Print Server's IP Address is a value between 1-254, excluding 10.) 38 Note: The PC's IP Address must be 192.168.0.x, where x is 192.168.0.10, with a subnet mask of 255.255.255.0, then your computer's IP Address should be in the IP Address of the DP-G301. For example, type http://192.168.0.10 into the Location or Address field. Press the Enter or (Return) Key.
TCP/IP Printing for Windows 2000 Open the Web browser, and type in the same subnet as the Print Server's IP Address for the two devices to communicate. (For example, if your Print Server's IP Address is a value between 1-254, excluding 10.) 38 Note: The PC's IP Address must be 192.168.0.x, where x is 192.168.0.10, with a subnet mask of 255.255.255.0, then your computer's IP Address should be in the IP Address of the DP-G301. For example, type http://192.168.0.10 into the Location or Address field. Press the Enter or (Return) Key.
Product Manual
Page 41
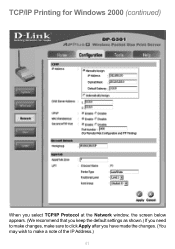
TCP/IP Printing for Windows 2000 (continued) When you select TCP/IP Protocol at the Network window, the screen below appears. (We recommend that you keep the default settings as shown.) If you need to make changes, make sure to click Apply after you have made the changes. (You may wish to make a note of the IP Address.) 41
TCP/IP Printing for Windows 2000 (continued) When you select TCP/IP Protocol at the Network window, the screen below appears. (We recommend that you keep the default settings as shown.) If you need to make changes, make sure to click Apply after you have made the changes. (You may wish to make a note of the IP Address.) 41

Product Manual
Page 44
TCP/IP Printing for Windows 2000 (continued) Click Next Type in the IP address of the Print Server in . Click Next Select "Custom" Then click on Settings. 44 The Port Name field will automatically be filled in the Printer Name or IP Address field.
TCP/IP Printing for Windows 2000 (continued) Click Next Type in the IP address of the Print Server in . Click Next Select "Custom" Then click on Settings. 44 The Port Name field will automatically be filled in the Printer Name or IP Address field.
Product Manual
Page 49
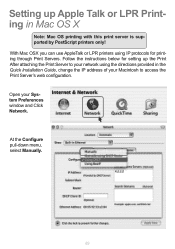
Setting up the Print After attaching the Print Server to your network using IP protocols for setting up Apple Talk or LPR Printing in the Quick Installation Guide, change the IP address of your System Preferences window and Click Network. At the Configure pull-down menu, select Manually. 49 ...With Mac OSX you can use AppleTalk or LPR printers using the directions provided in Mac OS X Note: Mac OS printing with this print server is supported...
Setting up the Print After attaching the Print Server to your network using IP protocols for setting up Apple Talk or LPR Printing in the Quick Installation Guide, change the IP address of your System Preferences window and Click Network. At the Configure pull-down menu, select Manually. 49 ...With Mac OSX you can use AppleTalk or LPR printers using the directions provided in Mac OS X Note: Mac OS printing with this print server is supported...

Product Manual
Page 50
Setting up Apple Talk or LPR Printing in this window and check Make AppleTalk Active. 50 Manually change your IP Address to 102.168.0.x, where x is any number between 1 and 254 (except 10 which is 192.168.0.10. Select the AppleTalk tab in Mac OS X (continued) The default IP address of the Print Server is the IP Address of the Print Server.) The IP Addresses and Subnet Mask shown here are examples only.
Setting up Apple Talk or LPR Printing in this window and check Make AppleTalk Active. 50 Manually change your IP Address to 102.168.0.x, where x is any number between 1 and 254 (except 10 which is 192.168.0.10. Select the AppleTalk tab in Mac OS X (continued) The default IP address of the Print Server is the IP Address of the Print Server.) The IP Addresses and Subnet Mask shown here are examples only.

Product Manual
Page 53
... dialog box. U1 In the Queue Name field, type in the Port Name of the Print Server into the LPR Printer's Address field. The Port Name illustrated here is complete. 53 Click Print to the Print Server. Type the IP Address of the PostScript printer that was just selected. In the Queue Name field, type...
... dialog box. U1 In the Queue Name field, type in the Port Name of the Print Server into the LPR Printer's Address field. The Port Name illustrated here is complete. 53 Click Print to the Print Server. Type the IP Address of the PostScript printer that was just selected. In the Queue Name field, type...

Product Manual
Page 54
...one of the computers on one of the Print Server's ports is unique among all of the network printers in Setting up the Print Server for AppleTalk printing: Make sure the AppleTalk protocol is enabled in your Macintosh. Change the IP address on your network to 192.168.0.x, where x... AppleTalk network protocol is not divided into AppleTalk zones, you will need to specify which zone the Print Server should locate the Print Server in the same zone as most of the DP-G301. Select the Network tab and scroll to the bottom to the AppleTalk protocol section. ...
...one of the computers on one of the Print Server's ports is unique among all of the network printers in Setting up the Print Server for AppleTalk printing: Make sure the AppleTalk protocol is enabled in your Macintosh. Change the IP address on your network to 192.168.0.x, where x... AppleTalk network protocol is not divided into AppleTalk zones, you will need to specify which zone the Print Server should locate the Print Server in the same zone as most of the DP-G301. Select the Network tab and scroll to the bottom to the AppleTalk protocol section. ...

Product Manual
Page 65
To verify the IP address, please do the following: Right-click on your network must have the same Workgroup name. Click OK How to find your IP Address in Windows XP The computers connected to your network must be in the task bar. Click Status 65 Networking Basics (continued) How to assign a Name to your Computer In this window, enter the Computer name. Select Workgroup and enter the name of the Workgroup. All computers on the Local Area Connection icon in the same IP address range.
To verify the IP address, please do the following: Right-click on your network must have the same Workgroup name. Click OK How to find your IP Address in Windows XP The computers connected to your network must be in the task bar. Click Status 65 Networking Basics (continued) How to assign a Name to your Computer In this window, enter the Computer name. Select Workgroup and enter the name of the Workgroup. All computers on the Local Area Connection icon in the same IP address range.

Product Manual
Page 66
... Basics (continued) How to find your IP Address in Windows XP This window will appear. Click the Support tab Click Close Assigning a Static IP Address in Windows XP/2000 Note: DHCP-capable routers will automatically assign IP addresses to the computers on the network, using a DHCP...-capable router you will not need to assign a static IP address, please follow these instructions: Go to assign static IP addresses. If you are not using a DHCP capable router, or you are using DHCP (Dynamic Host Configuration ...
... Basics (continued) How to find your IP Address in Windows XP This window will appear. Click the Support tab Click Close Assigning a Static IP Address in Windows XP/2000 Note: DHCP-capable routers will automatically assign IP addresses to the computers on the network, using a DHCP...-capable router you will not need to assign a static IP address, please follow these instructions: Go to assign static IP addresses. If you are not using a DHCP capable router, or you are using DHCP (Dynamic Host Configuration ...

Product Manual
Page 67
Networking Basics (continued) Assigning a Static IP Address in Windows XP/2000 Double-click Network Connections Right-click Local Area Connections Double-click Properties 67
Networking Basics (continued) Assigning a Static IP Address in Windows XP/2000 Double-click Network Connections Right-click Local Area Connections Double-click Properties 67
Product Manual
Page 68
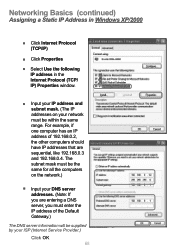
... Use the following IP address in the Internet Protocol (TCP/ IP) Properties window. Input your IP address and subnet mask. (The IP addresses on the network.) Input your DNS server addresses. (Note: If you must be supplied by your network must enter the IP address of 192.168.0.2, the other computers should have IP addresses that are entering a DNS server, you are...
... Use the following IP address in the Internet Protocol (TCP/ IP) Properties window. Input your IP address and subnet mask. (The IP addresses on the network.) Input your DNS server addresses. (Note: If you must be supplied by your network must enter the IP address of 192.168.0.2, the other computers should have IP addresses that are entering a DNS server, you are...


