
Product Manual
Page 2
... WAN Interface Settings - Contents Introduction 6 Features and Benefits 6 Introduction to Firewalls 6 Introduction to Local Area Networking 7 LEDs ...8 Physical Connections 8 Package Contents 9 System Requirements 9 Managing D-Link DFL-200 10 Resetting the DFL-200 10 Administration Settings 11 Administrative Access 11 Add ping access to an interface 12 Add Admin access to an interface 12 Add Read-only...
... WAN Interface Settings - Contents Introduction 6 Features and Benefits 6 Introduction to Firewalls 6 Introduction to Local Area Networking 7 LEDs ...8 Physical Connections 8 Package Contents 9 System Requirements 9 Managing D-Link DFL-200 10 Resetting the DFL-200 10 Administration Settings 11 Administrative Access 11 Add ping access to an interface 12 Add Admin access to an interface 12 Add Read-only...
Product Manual
Page 4
... DNS Relayer 58 Tools 59 Ping ...59 Ping Example 59 Dynamic DNS 60 Add Dynamic DNS Settings 60 Backup 61 Exporting the DFL-200's Configuration 61 Restoring the DFL-200's Configuration 61 Restart/Reset 62 Restoring system settings to factory defaults 63 Upgrade 64 Upgrade Firmware 64 4 Advanced Settings 50 Limit MTU...50 IKE Mode...
... DNS Relayer 58 Tools 59 Ping ...59 Ping Example 59 Dynamic DNS 60 Add Dynamic DNS Settings 60 Backup 61 Exporting the DFL-200's Configuration 61 Restoring the DFL-200's Configuration 61 Restart/Reset 62 Restoring system settings to factory defaults 63 Upgrade 64 Upgrade Firmware 64 4 Advanced Settings 50 Limit MTU...50 IKE Mode...
Product Manual
Page 8
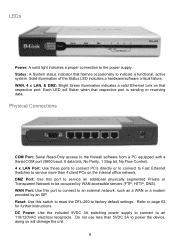
...external network, such as a WAN or a modem provided by WAN accessible servers (FTP, HTTP, DNS). WAN, 4 x LAN, & DMZ: Bright Green illumination indicates a valid Ethernet Link on the internal office network. Physical Connections COM Port: Serial Read-Only access to the firewall software from a PC equipped with a Serial COM port (9600... or to connect to Fast Ethernet Switches to service more than 5VDC 3A to indicate a functional, active system. WAN Port: Use this switch to reset the DFL-200 to be occupied by an ISP. Status: A System status indicator that respective port.
...external network, such as a WAN or a modem provided by WAN accessible servers (FTP, HTTP, DNS). WAN, 4 x LAN, & DMZ: Bright Green illumination indicates a valid Ethernet Link on the internal office network. Physical Connections COM Port: Serial Read-Only access to the firewall software from a PC equipped with a Serial COM port (9600... or to connect to Fast Ethernet Switches to service more than 5VDC 3A to indicate a functional, active system. WAN Port: Use this switch to reset the DFL-200 to be occupied by an ISP. Status: A System status indicator that respective port.

Product Manual
Page 10
... reload it, making the new changes take effect by choosing the time from the dropdown menu. Resetting the DFL-200 To reset the DFL-200 to factory default settings simply press down and hold the reset button for 15 seconds with the unit powered on. Managing D-Link DFL-200 When a change is restarting with 192.168.1.1 on the LAN interface.
... reload it, making the new changes take effect by choosing the time from the dropdown menu. Resetting the DFL-200 To reset the DFL-200 to factory default settings simply press down and hold the reset button for 15 seconds with the unit powered on. Managing D-Link DFL-200 When a change is restarting with 192.168.1.1 on the LAN interface.

Product Manual
Page 62
Step 1. Click Restart Unit and the unit will restart. 62 Choose if you want to do a quick or full restart. Step 2. Restart/Reset Restarting the DFL-200 Follow these steps restart the DFL-200.
Step 1. Click Restart Unit and the unit will restart. 62 Choose if you want to do a quick or full restart. Step 2. Restart/Reset Restarting the DFL-200 Follow these steps restart the DFL-200.

Product Manual
Page 63
... to complete basic connectivity configurations. You can be accessed via its original configuration, including resetting interface addresses. Follow these steps to reset the DFL-200 to factory default settings using the Reset button located at the rear of the Wizard to reset. Step 2. Using a paperclip or some other rigid small diameter object push in and hold...
... to complete basic connectivity configurations. You can be accessed via its original configuration, including resetting interface addresses. Follow these steps to reset the DFL-200 to factory default settings using the Reset button located at the rear of the Wizard to reset. Step 2. Using a paperclip or some other rigid small diameter object push in and hold...


