
Product Manual
Page 1
A1 (December, 1998) 6DES3224..02 Printed In Taiwan RECYCLABLE DES-3224 10/100 Auto Negotiation Switch User's Guide Rev.
A1 (December, 1998) 6DES3224..02 Printed In Taiwan RECYCLABLE DES-3224 10/100 Auto Negotiation Switch User's Guide Rev.

Product Manual
Page 7
... ...4 Local Console Management 4 Telnet Management...4 D-View/ SNMP Management 4 Updating Firmware ...5 2...6 Installing the DES-3224 ...6 Unpacking the DES-3224 6 Installation Options ...6 Power On ...7 3...8 Connecting the DES-3224 to the Network 8 Cable Specifications ...8 Ports...10 MDI-II Port ...10 MDI-X Port...10 RS-232 Port...10 DES-3224 to DES-3224 Connection 11 Connecting the DES-3224 to the DES-5024 and Hubs 11 4...12 v
... ...4 Local Console Management 4 Telnet Management...4 D-View/ SNMP Management 4 Updating Firmware ...5 2...6 Installing the DES-3224 ...6 Unpacking the DES-3224 6 Installation Options ...6 Power On ...7 3...8 Connecting the DES-3224 to the Network 8 Cable Specifications ...8 Ports...10 MDI-II Port ...10 MDI-X Port...10 RS-232 Port...10 DES-3224 to DES-3224 Connection 11 Connecting the DES-3224 to the DES-5024 and Hubs 11 4...12 v

Product Manual
Page 8
LEDs...12 DES-3224 LED Panel...13 Speed/ Link/ Activity LED 13 5...15 Managing the DES-3224 ...15 Local Console Management 15 Telnet ...16 Log In ...17 Help Message...18 Panel Conventions...19 Console Program...20 System Configuration 20 User Account Management 20 Switch Port 1-8, 9-16, 17-24 Configuration 20 Spanning Tree ... 30 User Account Management 33 User Account Change Menu 33 Create New User ...33 Delete Users ...35 Change Password ...37 Switch Port Configuration 38 Switch Port Configuration Menu 38 Spanning Tree Configuration 40 STA Operation Levels 40 Table of Contents vi
LEDs...12 DES-3224 LED Panel...13 Speed/ Link/ Activity LED 13 5...15 Managing the DES-3224 ...15 Local Console Management 15 Telnet ...16 Log In ...17 Help Message...18 Panel Conventions...19 Console Program...20 System Configuration 20 User Account Management 20 Switch Port 1-8, 9-16, 17-24 Configuration 20 Spanning Tree ... 30 User Account Management 33 User Account Change Menu 33 Create New User ...33 Delete Users ...35 Change Password ...37 Switch Port Configuration 38 Switch Port Configuration Menu 38 Spanning Tree Configuration 40 STA Operation Levels 40 Table of Contents vi
Product Manual
Page 9
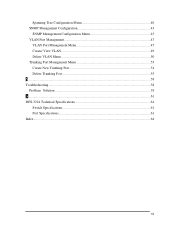
Spanning Tree Configuration Menu 40 SNMP Management Configuration 43 SNMP Management Configuration Menu 43 VLAN Port Management 47 VLAN Port Management Menu 47 Create/ View VLAN...49 Delete VLAN Menu ...50 Trunking Port Management Menu 53 Create New Trunking Port 54 Delete Trunking Port 55 6...58 Troubleshooting ...58 Problem Solution ...58 A...61 DES-3224 Technical Specifications 61 Switch Specifications 61 Port Specifications...61 Index ...64 vii
Spanning Tree Configuration Menu 40 SNMP Management Configuration 43 SNMP Management Configuration Menu 43 VLAN Port Management 47 VLAN Port Management Menu 47 Create/ View VLAN...49 Delete VLAN Menu ...50 Trunking Port Management Menu 53 Create New Trunking Port 54 Delete Trunking Port 55 6...58 Troubleshooting ...58 Problem Solution ...58 A...61 DES-3224 Technical Specifications 61 Switch Specifications 61 Port Specifications...61 Index ...64 vii

Product Manual
Page 11
... are covered. Organization Chapter 1, Introduction, gives a physical and functional overview of the D-Link DES-3224 10/100 Auto Negotiation Switch. Chapter 5, Managing the DES-3224, covers all the menus and configurations available. About This Guide 1 It describes the features of the DES-3224. Chapter 2, Installing DES-3224, covers installing and powering on our web site at www.dlink.com. Chapter...
... are covered. Organization Chapter 1, Introduction, gives a physical and functional overview of the D-Link DES-3224 10/100 Auto Negotiation Switch. Chapter 5, Managing the DES-3224, covers all the menus and configurations available. About This Guide 1 It describes the features of the DES-3224. Chapter 2, Installing DES-3224, covers installing and powering on our web site at www.dlink.com. Chapter...

Product Manual
Page 12
... thousand active MAC address table entries per device with other switches and hubs on medium sized networks as part of the DES-3224. The DES-3224 is designed for management at a glance. 10/100 Auto Negotiation Switch User's Guide 1 Introduction This chapter gives a physical and...8226; The DES-3224 supports SNMP for RFC 1213, RFC 1757, and RFC 1493. • VLAN support for eight broadcast domains. • Port Trunking support for bandwidth aggregation between two DES-3224 switches. Most of the DES-3224 • Management Methods • Updating Firmware Features The DES-3224 has the...
... thousand active MAC address table entries per device with other switches and hubs on medium sized networks as part of the DES-3224. The DES-3224 is designed for management at a glance. 10/100 Auto Negotiation Switch User's Guide 1 Introduction This chapter gives a physical and...8226; The DES-3224 supports SNMP for RFC 1213, RFC 1757, and RFC 1493. • VLAN support for eight broadcast domains. • Port Trunking support for bandwidth aggregation between two DES-3224 switches. Most of the DES-3224 • Management Methods • Updating Firmware Features The DES-3224 has the...

Product Manual
Page 13
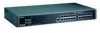
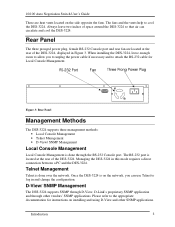
...Their purpose is to allow you to monitor the operation and performance of the DES-3224 at the rear of the DES-3224. LED Panel MDI-Uplink port MDI-X ports Figure 1: DES-3224 Front Panel All 24 MDI-X ports on the DES-3224can be used for connecting to hubs. You cannot use both the MDI..., displayed in Figure 2, located on each side of the DES-3224. All LEDs are used for attaching the mounting brackets. The holes are located on when the DES-3224 is powered up. Figure 2: Side Panel Introduction 3 10/100 Auto Negotiation Switch User's Guide The MDI-II port is used as an ...
...Their purpose is to allow you to monitor the operation and performance of the DES-3224 at the rear of the DES-3224. LED Panel MDI-Uplink port MDI-X ports Figure 1: DES-3224 Front Panel All 24 MDI-X ports on the DES-3224can be used for connecting to hubs. You cannot use both the MDI..., displayed in Figure 2, located on each side of the DES-3224. All LEDs are used for attaching the mounting brackets. The holes are located on when the DES-3224 is powered up. Figure 2: Side Panel Introduction 3 10/100 Auto Negotiation Switch User's Guide The MDI-II port is used as an ...
Product Manual
Page 14
...to allow you can circulate and cool the DES-3224. Managing the DES-3224 in and change the configuration. Telnet Management Telnet is done through other SNMP applications. D-View/ SNMP Management The DES-3224 supports SNMP through D-View, D-Link's proprietary SNMP application and through the RS-... Local Console Management Local Console Management is done over the network. Introduction 4 10/100 Auto Negotiation Switch User's Guide There are located at the rear of the DES-3224. The fans and the vents help to log in this mode requires a direct connection between a ...
...to allow you can circulate and cool the DES-3224. Managing the DES-3224 in and change the configuration. Telnet Management Telnet is done through other SNMP applications. D-View/ SNMP Management The DES-3224 supports SNMP through D-View, D-Link's proprietary SNMP application and through the RS-... Local Console Management Local Console Management is done over the network. Introduction 4 10/100 Auto Negotiation Switch User's Guide There are located at the rear of the DES-3224. The fans and the vents help to log in this mode requires a direct connection between a ...

Product Manual
Page 16
You should never be stretched • Leave at least two inches around the DES-3224 for ventilation The following checklist: • DES-3224 10/100 Auto Negotiation Switch • RS-232 DCE serial cable • Two mounting brackets and eight screws • Four rubber ... cut cable as needed for network connections • Crimpers to register the DES-3224 immediately. 10/100 Auto Negotiation Switch User's Guide 2 Installing the DES-3224 This chapter covers the following: • Unpacking the DES-3224 • Installation options and instructions • Powering on the following tools...
You should never be stretched • Leave at least two inches around the DES-3224 for ventilation The following checklist: • DES-3224 10/100 Auto Negotiation Switch • RS-232 DCE serial cable • Two mounting brackets and eight screws • Four rubber ... cut cable as needed for network connections • Crimpers to register the DES-3224 immediately. 10/100 Auto Negotiation Switch User's Guide 2 Installing the DES-3224 This chapter covers the following: • Unpacking the DES-3224 • Installation options and instructions • Powering on the following tools...

Product Manual
Page 17
... cord and verify that the DES-3224 is no on when you would like to place it is a problem. The DES-3224 can be placed in an EIA standard size, 19 inch rack. The DES-3224 powers on / off switch. Contact D-Link Systems, Inc. 10/100 Auto Negotiation Switch User's Guide Desktop/ Shelf ...Installation Follow these steps to install the DES-3224 on the desktop/shelf where you...
... cord and verify that the DES-3224 is no on when you would like to place it is a problem. The DES-3224 can be placed in an EIA standard size, 19 inch rack. The DES-3224 powers on / off switch. Contact D-Link Systems, Inc. 10/100 Auto Negotiation Switch User's Guide Desktop/ Shelf ...Installation Follow these steps to install the DES-3224 on the desktop/shelf where you...

Product Manual
Page 18
...the following : • Cable Specifications • Ports • Connecting the DES-3224 to another DES-3224 • Connecting the DES-3224 to other switches and hubs This section deals with making cables and connecting the DES-3224 to work the wires must be used when connecting to the floor when ... the correct pin arrangement and that the proper cables be arranged correctly inside the sheath. 10/100 Auto Negotiation Switch User's Guide 3 Connecting the DES-3224 to the Network This chapter covers the following guidelines when handling cables: • Do not stretch or bend ...
...the following : • Cable Specifications • Ports • Connecting the DES-3224 to another DES-3224 • Connecting the DES-3224 to other switches and hubs This section deals with making cables and connecting the DES-3224 to work the wires must be used when connecting to the floor when ... the correct pin arrangement and that the proper cables be arranged correctly inside the sheath. 10/100 Auto Negotiation Switch User's Guide 3 Connecting the DES-3224 to the Network This chapter covers the following guidelines when handling cables: • Do not stretch or bend ...

Product Manual
Page 19
Table 2: Cable Requirements shows the cable specifications. Figure 4: Cable Diagram Table 2: Cable Requirements Ethernet Type 10BASE-T 100BASE-TX Cable Required Category 3, 4, or 5 STP/UTP cable Category 5 STP/ UTP cable Cable Length 100 m (328 ft.) 100 m (328 ft.) Connecting the DES-3224 to work properly. See Figure 4 for the DES-3224 to the Network 9 10/100 Auto Negotiation Switch User's Guide must use the correct pin arrangement in order for an example of straight through and crossover cable.
Table 2: Cable Requirements shows the cable specifications. Figure 4: Cable Diagram Table 2: Cable Requirements Ethernet Type 10BASE-T 100BASE-TX Cable Required Category 3, 4, or 5 STP/UTP cable Category 5 STP/ UTP cable Cable Length 100 m (328 ft.) 100 m (328 ft.) Connecting the DES-3224 to work properly. See Figure 4 for the DES-3224 to the Network 9 10/100 Auto Negotiation Switch User's Guide must use the correct pin arrangement in order for an example of straight through and crossover cable.

Product Manual
Page 20
... the appropriate cable configuration for serial communication. Plug one end of the cable into the MDI-II Uplink port, if appropriate, or any of the DES-3224. 10/100 Auto Negotiation Switch User's Guide Ports There are three types of 12 MDI-X ports. MDI-X Port MDI-X ports are crossover ports. Table 3: Cable Connections...
... the appropriate cable configuration for serial communication. Plug one end of the cable into the MDI-II Uplink port, if appropriate, or any of the DES-3224. 10/100 Auto Negotiation Switch User's Guide Ports There are three types of 12 MDI-X ports. MDI-X Port MDI-X ports are crossover ports. Table 3: Cable Connections...

Product Manual
Page 21
... each type of the DES-3224 by increasing the bandwidth. Connecting the DES-3224 to connect DES-3224s together: MDI-II uplink port or MDI-X ports. Connecting the DES-3224 to the DES-5024 and Hubs You can connect the DES-3224 to other switches and hubs on how to use with the DES-5016 and DES-5024. The DES-3224 and the DES-5024 are two...
... each type of the DES-3224 by increasing the bandwidth. Connecting the DES-3224 to connect DES-3224s together: MDI-II uplink port or MDI-X ports. Connecting the DES-3224 to the DES-5024 and Hubs You can connect the DES-3224 to other switches and hubs on how to use with the DES-5016 and DES-5024. The DES-3224 and the DES-5024 are two...
Product Manual
Page 22
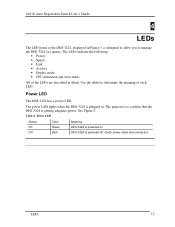
... 5. The LEDs indicate the following: • Power • Speed • Link • Activity • Duplex mode • CPU utilization and error status All of each LED. The power LED lights when the DES-3224 is powered off, check power cable and connection LEDs 12 Table 4: Power LED... Status On Color Green Meaning DES-3224 is powered on Off Dark DES-3224 is plugged in. 10/100 Auto Negotiation Switch User's Guide 4 LEDs The LED panel of the DES-3224, displayed in Figure 5, is designed to allow you to confirm that the DES-3224 is getting adequate power. The purpose...
... 5. The LEDs indicate the following: • Power • Speed • Link • Activity • Duplex mode • CPU utilization and error status All of each LED. The power LED lights when the DES-3224 is powered off, check power cable and connection LEDs 12 Table 4: Power LED... Status On Color Green Meaning DES-3224 is powered on Off Dark DES-3224 is plugged in. 10/100 Auto Negotiation Switch User's Guide 4 LEDs The LED panel of the DES-3224, displayed in Figure 5, is designed to allow you to confirm that the DES-3224 is getting adequate power. The purpose...

Product Manual
Page 23
...port. The 10 Mbps/ 100 Mbps LED indicates the speed the port is working at 100 Mbps, link is up and data is off, check the connection. 10/100 Auto Negotiation Switch User's Guide DES-3224 LED Panel The LED panel of the port. Half duplex means that there is plugged in Figure ...receiving data at 100 Mbps. Full/ Half LED The Full/Half LED indicates the duplex mode of the DES-3224 displayed in . LEDs 13 See Table 6: DES-3224 Full/ Half LED. See Table 5: DES-3224 Speed/ Link/ Act LED. The LED flashes amber when the port is transmitting or receiving data at 10 Mbps. No...
...port. The 10 Mbps/ 100 Mbps LED indicates the speed the port is working at 100 Mbps, link is up and data is off, check the connection. 10/100 Auto Negotiation Switch User's Guide DES-3224 LED Panel The LED panel of the port. Half duplex means that there is plugged in Figure ...receiving data at 100 Mbps. Full/ Half LED The Full/Half LED indicates the duplex mode of the DES-3224 displayed in . LEDs 13 See Table 6: DES-3224 Full/ Half LED. See Table 5: DES-3224 Speed/ Link/ Act LED. The LED flashes amber when the port is transmitting or receiving data at 10 Mbps. No...

Product Manual
Page 24
... amber. The LED increments from left to the right they are, the greater the utilization of error. The farther to right. 10/100 Auto Negotiation Switch User's Guide Table 6: DES-3224 Full/ Half LED Status Color Meaning On Green Port is in Full Duplex Off Dark Port is an error on the...
... amber. The LED increments from left to the right they are, the greater the utilization of error. The farther to right. 10/100 Auto Negotiation Switch User's Guide Table 6: DES-3224 Full/ Half LED Status Color Meaning On Green Port is in Full Duplex Off Dark Port is an error on the...
Product Manual
Page 25
... the male end of the RS-232 serial cable provided with the DES-3224 to other documentation if you are at the rear of the DES-3224. 2. Follow these steps to manage the DES-3224. 10/100 Auto Negotiation Switch User's Guide 5 Managing the DES-3224 This chapter shows the menus used to appropriate documentation for installing and using...
... the male end of the RS-232 serial cable provided with the DES-3224 to other documentation if you are at the rear of the DES-3224. 2. Follow these steps to manage the DES-3224. 10/100 Auto Negotiation Switch User's Guide 5 Managing the DES-3224 This chapter shows the menus used to appropriate documentation for installing and using...

Product Manual
Page 26
... any of your choice. The User Name and Password are case sensitive. • User Name: D-Link • Default Password: D-Link 5. Follow these steps to the DES-3224, you can manage the DES-3224 via Telnet session. Run Telnet. 3. 10/100 Auto Negotiation Switch User's Guide • Parity: None • Stop bits: 1 • Flow Control: None • Enable...
... any of your choice. The User Name and Password are case sensitive. • User Name: D-Link • Default Password: D-Link 5. Follow these steps to the DES-3224, you can manage the DES-3224 via Telnet session. Run Telnet. 3. 10/100 Auto Negotiation Switch User's Guide • Parity: None • Stop bits: 1 • Flow Control: None • Enable...

Product Manual
Page 27
...; Default User Name: D-Link • Default Password: D-Link The MAC Address at the bottom of the screen cannot be changed. For security, you to log into the DES-3224 for the first time: Enter the default User Name and Password and press Enter. Managing the DES-3224 17 Figure 6: Log In... Follow these steps to the DES-3224. All management methods require you should change the default User Name and Password. 10/100 Auto Negotiation Switch User's Guide Log In The Log In panel, displayed in...
...; Default User Name: D-Link • Default Password: D-Link The MAC Address at the bottom of the screen cannot be changed. For security, you to log into the DES-3224 for the first time: Enter the default User Name and Password and press Enter. Managing the DES-3224 17 Figure 6: Log In... Follow these steps to the DES-3224. All management methods require you should change the default User Name and Password. 10/100 Auto Negotiation Switch User's Guide Log In The Log In panel, displayed in...


