User Guide
Page 7
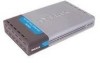
TABLE OF CONTENTS 0 ABOUT THIS GUIDE IX PURPOSE ...IX TERMS/USAGE IX OVERVIEW OF THIS USER'S GUIDE X 1 INTRODUCTION 1 FAST ETHERNET TECHNOLOGY 1 SWITCHING TECHNOLOGY 2 FEATURES ...3 Performance features 4 2 UNPACKING AND SETUP 6 UNPACKING 6 SETUP ...7 DESKTOP OR SHELF INSTALLATION 7 WALL INSTALLATION (DES-1004 8 RACK INSTALLATION (DES-1008 9 POWER ON 11 DES-1004 11 DES-1008 11 LED Indicators 11 Power Failure 12 3 IDENTIFYING EXTERNAL COMPONENTS 13 FRONT PANEL 13 The DES-1008 Cable Organizer 14 REAR PANEL 14 DES-1004 14 DES-1008 15 About This Guide vii
TABLE OF CONTENTS 0 ABOUT THIS GUIDE IX PURPOSE ...IX TERMS/USAGE IX OVERVIEW OF THIS USER'S GUIDE X 1 INTRODUCTION 1 FAST ETHERNET TECHNOLOGY 1 SWITCHING TECHNOLOGY 2 FEATURES ...3 Performance features 4 2 UNPACKING AND SETUP 6 UNPACKING 6 SETUP ...7 DESKTOP OR SHELF INSTALLATION 7 WALL INSTALLATION (DES-1004 8 RACK INSTALLATION (DES-1008 9 POWER ON 11 DES-1004 11 DES-1008 11 LED Indicators 11 Power Failure 12 3 IDENTIFYING EXTERNAL COMPONENTS 13 FRONT PANEL 13 The DES-1008 Cable Organizer 14 REAR PANEL 14 DES-1004 14 DES-1008 15 About This Guide vii
User Guide
Page 10
...45 receptacle/connector and the straight and crossover cable connector. 10/100 Fast Ethernet Switch User's Guide Overview of the Switch. ♦ Appendix B, RJ-45 Pin Specification. Helps you can connect the DES-1004/ DES-1008 to your Ethernet network. ♦ Appendix A, Technical Specifications. Lists the...this User's Guide ♦ Chapter 1, Introduction. Describes the front panel, rear panel and LED indicators of the Switch. ♦ Chapter 3, Identifying External Components. x About This Guide Describes the Switch and its features. ♦ Chapter 2, Unpacking and Setup.
...45 receptacle/connector and the straight and crossover cable connector. 10/100 Fast Ethernet Switch User's Guide Overview of the Switch. ♦ Appendix B, RJ-45 Pin Specification. Helps you can connect the DES-1004/ DES-1008 to your Ethernet network. ♦ Appendix A, Technical Specifications. Lists the...this User's Guide ♦ Chapter 1, Introduction. Describes the front panel, rear panel and LED indicators of the Switch. ♦ Chapter 3, Identifying External Components. x About This Guide Describes the Switch and its features. ♦ Chapter 2, Unpacking and Setup.
User Guide
Page 12
...way of eliminating problems of increasing the total network capacity available to users on each other segments. Switching LAN technology is automatically forwarded by the switch, without interfering with each . Routers have also been used to expand your Fast Ethernet network beyond...cabling and adapter cards. A switch increases capacity and decreases network loading by higher latencies. This allows the total network capacity to be divided into different collision domains, making it possible to split parts of a router and the setup and maintenance required make routers ...
...way of eliminating problems of increasing the total network capacity available to users on each other segments. Switching LAN technology is automatically forwarded by the switch, without interfering with each . Routers have also been used to expand your Fast Ethernet network beyond...cabling and adapter cards. A switch increases capacity and decreases network loading by higher latencies. This allows the total network capacity to be divided into different collision domains, making it possible to split parts of a router and the setup and maintenance required make routers ...
User Guide
Page 16
... adhesive backing ♦ Wall Mount Kit (DES-1004 only) which includes: two tapping screws and two plastic anchors If any item is found missing or damaged, please contact your local D-Link Reseller for the Switches. 10/100 Fast Ethernet Switch User's Guide 2 2 UNPACKING AND SETUP This chapter provides unpacking and setup information for replacement. 6 Unpacking and...
... adhesive backing ♦ Wall Mount Kit (DES-1004 only) which includes: two tapping screws and two plastic anchors If any item is found missing or damaged, please contact your local D-Link Reseller for the Switches. 10/100 Fast Ethernet Switch User's Guide 2 2 UNPACKING AND SETUP This chapter provides unpacking and setup information for replacement. 6 Unpacking and...
User Guide
Page 17
...'s Guide Setup The setup of the Switch can be performed using the following steps: ♦ The surface must be within 1.82 meters (6 feet) of the device. Attach these cushioning feet on the bottom at least 1.2 Kg for the DES-1004 and 2.5 KG for the DES-1008. ♦ The power ...outlet should be first attached. Desktop or Shelf Installation When installing the Switch on the Switch. Unpacking and Setup 7
...'s Guide Setup The setup of the Switch can be performed using the following steps: ♦ The surface must be within 1.82 meters (6 feet) of the device. Attach these cushioning feet on the bottom at least 1.2 Kg for the DES-1004 and 2.5 KG for the DES-1008. ♦ The power ...outlet should be first attached. Desktop or Shelf Installation When installing the Switch on the Switch. Unpacking and Setup 7
User Guide
Page 18
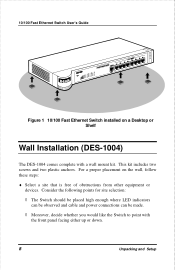
... two plastic anchors. For a proper placement on a Desktop or Shelf Wall Installation (DES-1004) The DES-1004 comes complete with the front panel facing either up or down. 8 Unpacking and Setup Consider the following points for site selection: ◊ The Switch should be placed high enough where LED indicators can be observed and cable...
... two plastic anchors. For a proper placement on a Desktop or Shelf Wall Installation (DES-1004) The DES-1004 comes complete with the front panel facing either up or down. 8 Unpacking and Setup Consider the following points for site selection: ◊ The Switch should be placed high enough where LED indicators can be observed and cable...
User Guide
Page 19
... placed in a wiring closet with excessive torque. Unpacking and Setup 9 Do not drill these holes too deep. ♦ Insert the plastic anchors into the holes in the wall and secure them with the screws provided. To install, attach the mounting brackets on the switch's front panel (one on the bottom of the... in the screws provided with the wall mount kit into the plastic anchors. The mounting brackets for the DES-1008 are an optional item and must be sticking out. ♦ Gently, place the Switch onto the wall with the front panel facing up or down by sliding the screws into the provided...
... placed in a wiring closet with excessive torque. Unpacking and Setup 9 Do not drill these holes too deep. ♦ Insert the plastic anchors into the holes in the wall and secure them with the screws provided. To install, attach the mounting brackets on the switch's front panel (one on the bottom of the... in the screws provided with the wall mount kit into the plastic anchors. The mounting brackets for the DES-1008 are an optional item and must be sticking out. ♦ Gently, place the Switch onto the wall with the front panel facing up or down by sliding the screws into the provided...
User Guide
Page 20
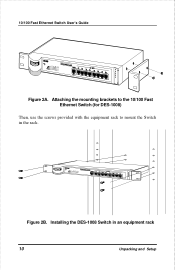
Installing the DES-1008 Switch in the rack. Figure 2B. Attaching the mounting brackets to the 10/100 Fast Ethernet Switch (for DES-1008) Then, use the screws provided with the equipment rack to mount the Switch in an equipment rack 10 Unpacking and Setup 10/100 Fast Ethernet Switch User's Guide Figure 2A.
Installing the DES-1008 Switch in the rack. Figure 2B. Attaching the mounting brackets to the 10/100 Fast Ethernet Switch (for DES-1008) Then, use the screws provided with the equipment rack to mount the Switch in an equipment rack 10 Unpacking and Setup 10/100 Fast Ethernet Switch User's Guide Figure 2A.
User Guide
Page 21
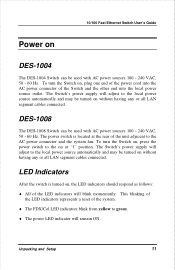
...of the LED indicators will remain ON. To turn the Switch on, press the power switch to the AC power connector and the system fan. DES-1008 The DES-1008 Switch can be used with AC power sources 100 - 240 VAC, 50 - 60 Hz. The Switch's power supply will adjust to the local power source ... adjust to the local power source automatically and may be turned on without having any or all LAN segment cables connected. Unpacking and Setup 11 To turn the Switch on, plug one end of the power cord into the AC power connector of the unit adjacent to the on or "1" position. ...
...of the LED indicators will remain ON. To turn the Switch on, press the power switch to the AC power connector and the system fan. DES-1008 The DES-1008 Switch can be used with AC power sources 100 - 240 VAC, 50 - 60 Hz. The Switch's power supply will adjust to the local power source ... adjust to the local power source automatically and may be turned on without having any or all LAN segment cables connected. Unpacking and Setup 11 To turn the Switch on, plug one end of the power cord into the AC power connector of the unit adjacent to the on or "1" position. ...

User Guide
Page 22
For the DES-1004, disconnect the power cord from the local power source, and for the DES-1008, press the power switch to the off or "0" position. At all times, avoid leaving the Switch ON after the occurrence of a power failure. 10/100 Fast Ethernet Switch User's Guide Power Failure As a precaution, the Switch should be turned OFF in case of a power failure. 12 Unpacking and Setup When power is resumed, turn the Switch ON.
For the DES-1004, disconnect the power cord from the local power source, and for the DES-1008, press the power switch to the off or "0" position. At all times, avoid leaving the Switch ON after the occurrence of a power failure. 10/100 Fast Ethernet Switch User's Guide Power Failure As a precaution, the Switch should be turned OFF in case of a power failure. 12 Unpacking and Setup When power is resumed, turn the Switch ON.
User Guide
Page 41
10/100 Fast Ethernet Switch User's Guide RAM Buffer 27 Rear Panel 14 RJ-45 Pin Specification 28 S segments 2 Setup 7 Storage Temperature 26 Store and forward 4 straight cable 29 switch 2 Switch to Switch (other devices)22 Switching LAN technology ........ 3 Switching Technology 2 System Fan 15 T Transmission Method 27 U Unpacking 6 Uplink/ MDI-II 4 V ventilation 7 W Wall Installation (DES-1004)..... 8 Weight 27 Index 31
10/100 Fast Ethernet Switch User's Guide RAM Buffer 27 Rear Panel 14 RJ-45 Pin Specification 28 S segments 2 Setup 7 Storage Temperature 26 Store and forward 4 straight cable 29 switch 2 Switch to Switch (other devices)22 Switching LAN technology ........ 3 Switching Technology 2 System Fan 15 T Transmission Method 27 U Unpacking 6 Uplink/ MDI-II 4 V ventilation 7 W Wall Installation (DES-1004)..... 8 Weight 27 Index 31


