

Operation Manual
Page 1
LEHR | ALL RIGHTS RESERVED 2008-2009 OPERATOR'S MANUAL PROPANE POWERED LINE TRIMMER 16.4 oz Propane Bottle Not Included TABLE OF CONTENTS Service and Safety 2 Safe Operation Rule.s 3 Understanding Your Trimme...r 4 Assembly 5 Oil Information 6 Understanding Propan.e 7 Installing the Propane Canist.e..r 8 Installing Attachment.s 9 Starting / Stopping 10 Operation 11 Maintenance 12 Cleaning and Storage 19 Troubleshooting 19 Speci¯cations 20 Warranty...
LEHR | ALL RIGHTS RESERVED 2008-2009 OPERATOR'S MANUAL PROPANE POWERED LINE TRIMMER 16.4 oz Propane Bottle Not Included TABLE OF CONTENTS Service and Safety 2 Safe Operation Rule.s 3 Understanding Your Trimme...r 4 Assembly 5 Oil Information 6 Understanding Propan.e 7 Installing the Propane Canist.e..r 8 Installing Attachment.s 9 Starting / Stopping 10 Operation 11 Maintenance 12 Cleaning and Storage 19 Troubleshooting 19 Speci¯cations 20 Warranty...
Operation Manual
Page 2
...parts. DO NOT RETURN THE UNIT TO THE RETAILER. SERVICE AND SAFETY S LEHR ECO-TRIMMER IMPORTANT SAFETY INSTRUCTIONS DU 4-CYCLE PROPANE TRIMMER READ ALL INSTRUCTION BEFORE OPERATING • Ne For service call 1-866-941-LEHR in the United States, to in obtain a list of authorized service dealers... near you. • Inspect the unit before use metal-reinforced line, wire or rope....
...parts. DO NOT RETURN THE UNIT TO THE RETAILER. SERVICE AND SAFETY S LEHR ECO-TRIMMER IMPORTANT SAFETY INSTRUCTIONS DU 4-CYCLE PROPANE TRIMMER READ ALL INSTRUCTION BEFORE OPERATING • Ne For service call 1-866-941-LEHR in the United States, to in obtain a list of authorized service dealers... near you. • Inspect the unit before use metal-reinforced line, wire or rope....

Operation Manual
Page 3
These are marked as a trimmer. Keep the engine and muffler free ... keep proper footing and bal - children. Keep a firm grip on both trimming lines extended, and the proper line installed. Wear ear/hearing protection when operating this tool for this • Do not touch...unit has a clutch. Do not run the unit inside a building where vapor may become entangled with propane canister attached inside a closed room or build - Do not operate before starting . Do not operate ...check for damage. SAVE THESE INSTRUCTIONS LEHR | ALL RIGHTS RESERVED 2008-2009 3
These are marked as a trimmer. Keep the engine and muffler free ... keep proper footing and bal - children. Keep a firm grip on both trimming lines extended, and the proper line installed. Wear ear/hearing protection when operating this tool for this • Do not touch...unit has a clutch. Do not run the unit inside a building where vapor may become entangled with propane canister attached inside a closed room or build - Do not operate before starting . Do not operate ...check for damage. SAVE THESE INSTRUCTIONS LEHR | ALL RIGHTS RESERVED 2008-2009 3
Operation Manual
Page 4
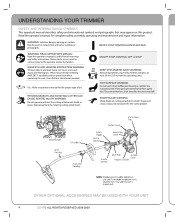
Failure to do not touch the line cutting blade. Wear eye protection meeting ANSI Z87.1...WARNING: Keep all warnings and safety instructions. OTHER OPTIONAL ACCESSORIES MAY BE USED WITH YOUR UNIT 4 LEHR | ALL RIGHTS RESERVED 2008-2009 WARNING: Indicates danger, warning or caution. THROWN OBJECTS AND ROTATING ...Read the operator's manual for complete safety, assembly, operating and maintenance and repair information. UNDERSTANDING YOUR TRIMMER SAFETY AND INTERNATIONAL SYMBOLS This operator's manual describes safety and international symbols and pictographs that may get extremely...
Failure to do not touch the line cutting blade. Wear eye protection meeting ANSI Z87.1...WARNING: Keep all warnings and safety instructions. OTHER OPTIONAL ACCESSORIES MAY BE USED WITH YOUR UNIT 4 LEHR | ALL RIGHTS RESERVED 2008-2009 WARNING: Indicates danger, warning or caution. THROWN OBJECTS AND ROTATING ...Read the operator's manual for complete safety, assembly, operating and maintenance and repair information. UNDERSTANDING YOUR TRIMMER SAFETY AND INTERNATIONAL SYMBOLS This operator's manual describes safety and international symbols and pictographs that may get extremely...

Operation Manual
Page 8
.... 9B). tive plastic cap over tighten. It may cause damage to the trimmer and potentially result in a dangerous leak. WARNING: EXTREMELY FLAMMABLE FIRE/ EXPLOSION ...stops. Fig. 9A Canister Clamp 8 LEHR | ALL RIGHTS RESERVED 2008-2009 WARNING: PROPANE IS EXTREMELY FLAMMABLE. DO NOT SMOKE. INSTALLING THE PROPANE CANISTER USE THE CORRECT PROPANE CANISTER Always use the smaller diameter canisters...of propane as it . Insert the threaded end of fuel line components are the correct canisters (Fig. 8). Insert the propane con- nector onto the threaded end of empty propane ...
.... 9B). tive plastic cap over tighten. It may cause damage to the trimmer and potentially result in a dangerous leak. WARNING: EXTREMELY FLAMMABLE FIRE/ EXPLOSION ...stops. Fig. 9A Canister Clamp 8 LEHR | ALL RIGHTS RESERVED 2008-2009 WARNING: PROPANE IS EXTREMELY FLAMMABLE. DO NOT SMOKE. INSTALLING THE PROPANE CANISTER USE THE CORRECT PROPANE CANISTER Always use the smaller diameter canisters...of propane as it . Insert the threaded end of fuel line components are the correct canisters (Fig. 8). Insert the propane con- nector onto the threaded end of empty propane ...
Operation Manual
Page 9
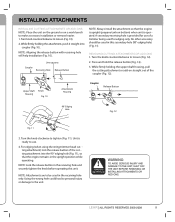
...installation (Fig. 10). A secondary receiving hole is provided for use . 4. Line up parts Coupler Receiving Hole Release Button NOTE: Always install the attachment so that... 11 3. For edging (when using the string trimmer head cut ting attachment into coupler (Fig. 10). While rmly holding the upper shaft housing, pull the cutting attachment or add-on straight...hole (Fig. 11), so that the engine is upright (propane tank on a work bench to make accessory installation or removal easier. 1. LEHR | ALL RIGHTS RESERVED 2008-2009 9 INSTALLING ATTACHMENTS INSTALLING CUTTING...
...installation (Fig. 10). A secondary receiving hole is provided for use . 4. Line up parts Coupler Receiving Hole Release Button NOTE: Always install the attachment so that... 11 3. For edging (when using the string trimmer head cut ting attachment into coupler (Fig. 10). While rmly holding the upper shaft housing, pull the cutting attachment or add-on straight...hole (Fig. 11), so that the engine is upright (propane tank on a work bench to make accessory installation or removal easier. 1. LEHR | ALL RIGHTS RESERVED 2008-2009 9 INSTALLING ATTACHMENTS INSTALLING CUTTING...
Operation Manual
Page 11
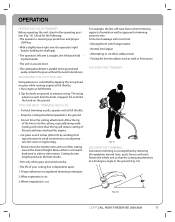
...need to the ground (Fig. 16). 30° Fig. 16 LEHR | ALL RIGHTS RESERVED 2008-2009 11 ADVANCING THE CUTTING LINE String advance is at the desired height. Tap the knob on the ... against a foundation wall as walls or fence posts HOLDING THE TRIMMER Fig. 15 DECORATIVE TRIMMING Decorative trimming is cut For example, the line will reduce cutting ef ficiency and may overload the engine... proper clothing. • With a slightly-bent right arm, the operator's right hand is holding the shaft grip. • The operator's left arm is straight, the left hand hold the knob on ground to...
...need to the ground (Fig. 16). 30° Fig. 16 LEHR | ALL RIGHTS RESERVED 2008-2009 11 ADVANCING THE CUTTING LINE String advance is at the desired height. Tap the knob on the ... against a foundation wall as walls or fence posts HOLDING THE TRIMMER Fig. 15 DECORATIVE TRIMMING Decorative trimming is cut For example, the line will reduce cutting ef ficiency and may overload the engine... proper clothing. • With a slightly-bent right arm, the operator's right hand is holding the shaft grip. • The operator's left arm is straight, the left hand hold the knob on ground to...
Operation Manual
Page 15
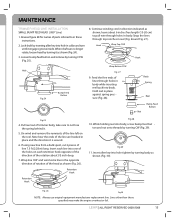
... 30). Insert each line into body, screw bump feed but ton and nut onto threads by turning it as shown, leave about 6 inches free length (15-20 cm) to in place and the direction it . 5. While holding reel into one of the holes on the reel. LEHR | ALL RIGHT RESERVED...collar and turn until it engages groove inside. Trimmer Head Body Spring Reel Bump Feed Button Nut Fig.25 4. Lines other than those speci ed may make the engine overheat or fail. MAINTENANCE TRIMMER HEAD LINE INSTALLATION SMALL BUMP FEED HEAD (.080" Line) 1. Lock shaft by inserting allen key into hole in body while...
... 30). Insert each line into body, screw bump feed but ton and nut onto threads by turning it as shown, leave about 6 inches free length (15-20 cm) to in place and the direction it . 5. While holding reel into one of the holes on the reel. LEHR | ALL RIGHT RESERVED...collar and turn until it engages groove inside. Trimmer Head Body Spring Reel Bump Feed Button Nut Fig.25 4. Lines other than those speci ed may make the engine overheat or fail. MAINTENANCE TRIMMER HEAD LINE INSTALLATION SMALL BUMP FEED HEAD (.080" Line) 1. Lock shaft by inserting allen key into hole in body while...
Operation Manual
Page 16
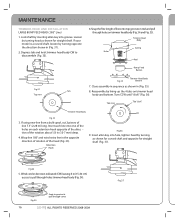
...tab and twist trimmer head body CW to pull through cover 16 LEHR | ALL RIGHTS RESERVED 2008-2009 Fig.3 7 If using new line from a bulk spool, cut 2 pieces of lines into hole, tighten head by turning as shown in sequence as shown for curved shaft and opposite for straight shaft. Loosen by... access to pull through holes on trimmer head body and bottom. If your model is a curved shaft, loosen by lining up the 4 tabs on trimmer head body (Fig. 34 and Fig. 35). Insert each line into groove. Turn CCW until "click" (Fig. 36). Trimmer Head Body Holes Spring Reel Bump ...
...tab and twist trimmer head body CW to pull through cover 16 LEHR | ALL RIGHTS RESERVED 2008-2009 Fig.3 7 If using new line from a bulk spool, cut 2 pieces of lines into hole, tighten head by turning as shown in sequence as shown for curved shaft and opposite for straight shaft. Loosen by... access to pull through holes on trimmer head body and bottom. If your model is a curved shaft, loosen by lining up the 4 tabs on trimmer head body (Fig. 34 and Fig. 35). Insert each line into groove. Turn CCW until "click" (Fig. 36). Trimmer Head Body Holes Spring Reel Bump ...
Operation Manual
Page 17
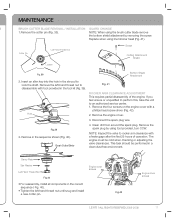
... of operation. Disconnect the spark plug wire. Engine cover screws Fig.42 Engine cover screws LEHR | All Rights Reserved 2008-2009 17 Insert an allen key into the hole in the shroud.... 1. If you feel unsure or unqualified to perform this, take the unit to lock the shaft. Hole 2. Clean dirt from around the spark plug. Remove the spark plug by removing the... the engine. NOTE: When using the brush cutter blade remove the bottom shield attachment by using line trimmer head (Fig. 41). Cotter Pin Left-Hand Thread Nut Screw Cutting Attachment Sheild Loosen Fig....
... of operation. Disconnect the spark plug wire. Engine cover screws Fig.42 Engine cover screws LEHR | All Rights Reserved 2008-2009 17 Insert an allen key into the hole in the shroud.... 1. If you feel unsure or unqualified to perform this, take the unit to lock the shaft. Hole 2. Clean dirt from around the spark plug. Remove the spark plug by removing the... the engine. NOTE: When using the brush cutter blade remove the bottom shield attachment by using line trimmer head (Fig. 41). Cotter Pin Left-Hand Thread Nut Screw Cutting Attachment Sheild Loosen Fig....


