

Operation Manual
Page 1
LEHR | ALL RIGHTS RESERVED 2008-2009 OPERATOR'S MANUAL PROPANE POWERED LINE TRIMMER 16.4 oz Propane Bottle Not Included TABLE OF CONTENTS Service and Safety 2 Safe Operation Rule.s 3 Understanding Your Trimme...r 4 Assembly 5 Oil Information 6 Understanding Propan.e 7 Installing the Propane Canist.e..r 8 Installing Attachment.s 9 Starting / Stopping 10 Operation 11 Maintenance 12 Cleaning and Storage 19 Troubleshooting 19 Speci¯cations 20...
LEHR | ALL RIGHTS RESERVED 2008-2009 OPERATOR'S MANUAL PROPANE POWERED LINE TRIMMER 16.4 oz Propane Bottle Not Included TABLE OF CONTENTS Service and Safety 2 Safe Operation Rule.s 3 Understanding Your Trimme...r 4 Assembly 5 Oil Information 6 Understanding Propan.e 7 Installing the Propane Canist.e..r 8 Installing Attachment.s 9 Starting / Stopping 10 Operation 11 Maintenance 12 Cleaning and Storage 19 Troubleshooting 19 Speci¯cations 20...
Operation Manual
Page 2
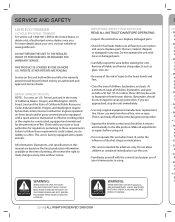
SERVICE AND SAFETY S LEHR ECO-TRIMMER IMPORTANT SAFETY INSTRUCTIONS DU 4-CYCLE PROPANE TRIMMER READ ALL INSTRUCTION BEFORE OPERATING • Ne For service call 1-866-941-LEHR in the United States, to in obtain a list of California (Public Resources approached, stop the unit ...SERVICE. • W • Carefully inspect the area before using . • Ke in place and secure. u For more details about your trimmer prior to the idle position. Make sure all adjustments or repairs before starting the unit. Do not operate the unit with a spark arrestor. •...
SERVICE AND SAFETY S LEHR ECO-TRIMMER IMPORTANT SAFETY INSTRUCTIONS DU 4-CYCLE PROPANE TRIMMER READ ALL INSTRUCTION BEFORE OPERATING • Ne For service call 1-866-941-LEHR in the United States, to in obtain a list of California (Public Resources approached, stop the unit ...SERVICE. • W • Carefully inspect the area before using . • Ke in place and secure. u For more details about your trimmer prior to the idle position. Make sure all adjustments or repairs before starting the unit. Do not operate the unit with a spark arrestor. •...

Operation Manual
Page 3
... or go barefoot. If it rotates. arrestor. ance. • Never douse or squirt the unit with propane canister attached inside a closed room or build - SAVE THESE INSTRUCTIONS LEHR | ALL RIGHTS RESERVED 2008-2009 3 Wear ear/hearing protection when operating this • Do not touch ... unit with a foreign object, stop the cutting attach - • Keep these instructions. them to them these instructions. These are marked as a trimmer. Be in a dry area, locked up or up . • Be sure the cutting attachment is not in a well ventilated outdoor area. ...
... or go barefoot. If it rotates. arrestor. ance. • Never douse or squirt the unit with propane canister attached inside a closed room or build - SAVE THESE INSTRUCTIONS LEHR | ALL RIGHTS RESERVED 2008-2009 3 Wear ear/hearing protection when operating this • Do not touch ... unit with a foreign object, stop the cutting attach - • Keep these instructions. them to them these instructions. These are marked as a trimmer. Be in a dry area, locked up or up . • Be sure the cutting attachment is not in a well ventilated outdoor area. ...
Operation Manual
Page 4
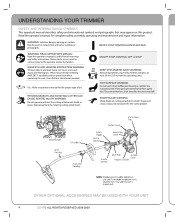
...or STOP KEEP SYSTANDERS AWAY WARNING: Keep all warnings and safety instructions. OTHER OPTIONAL ACCESSORIES MAY BE USED WITH YOUR UNIT 4 LEHR | ALL RIGHTS RESERVED 2008-2009 THROWN OBJECTS AND ROTATING CUTTER CAN CAUSE SEVERE INJURY WARNING: Do not operate without the cutting... attachment shield in conjunction with other symbols or pictographs. UNDERSTANDING YOUR TRIMMER SAFETY AND INTERNATIONAL SYMBOLS This operator's manual describes safety and international symbols and pictographs that may get extremely hot from the ...
...or STOP KEEP SYSTANDERS AWAY WARNING: Keep all warnings and safety instructions. OTHER OPTIONAL ACCESSORIES MAY BE USED WITH YOUR UNIT 4 LEHR | ALL RIGHTS RESERVED 2008-2009 THROWN OBJECTS AND ROTATING CUTTER CAN CAUSE SEVERE INJURY WARNING: Do not operate without the cutting... attachment shield in conjunction with other symbols or pictographs. UNDERSTANDING YOUR TRIMMER SAFETY AND INTERNATIONAL SYMBOLS This operator's manual describes safety and international symbols and pictographs that may get extremely hot from the ...
Operation Manual
Page 5
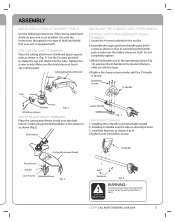
...LEHR | ALL RIGHTS RESERVED 2008-2009 5 Use the 2 screws provided to the type of shaft and shield that your unit is equipped with. Attaching Screws D-Handle Cap Washer Fig. 1 Attaching Screws FOR STRAIGHT SHAFT TRIMMERS Place the cutting attachment shield onto the shaft ...parts evenly over the tube in place. Shaft Mount Lower Handle Fig. 3 CURVED SHAFT TRIMMERS 1. Installing the D-Handle (non detachable model). 2. Tighten the screws evenly. Do not completely tighten. 3.While holding the unit in (Fig. 1). FOR CURVED SHAFT TRIMMERS Place the cutting attachment shield and spacer...
...LEHR | ALL RIGHTS RESERVED 2008-2009 5 Use the 2 screws provided to the type of shaft and shield that your unit is equipped with. Attaching Screws D-Handle Cap Washer Fig. 1 Attaching Screws FOR STRAIGHT SHAFT TRIMMERS Place the cutting attachment shield onto the shaft ...parts evenly over the tube in place. Shaft Mount Lower Handle Fig. 3 CURVED SHAFT TRIMMERS 1. Installing the D-Handle (non detachable model). 2. Tighten the screws evenly. Do not completely tighten. 3.While holding the unit in (Fig. 1). FOR CURVED SHAFT TRIMMERS Place the cutting attachment shield and spacer...

Operation Manual
Page 7
...7. Read and follow appliance instructions. Turn trimmer o and let cool. 2. IN CASE OF FIRE 1. Let cylinder burn out. * Green Key- UNDERSTANDING PROPANE SAFETY WARNINGS FOR PROPANE UNITS NOTE: Use propane only in well ventilated areas. Always remove the propane canister from any time the smell of escaping...identi ed, turn unit o and get fresh air quickly. 2. They can ignite leaking gas. 4. Hand tighten only. Never use . LEHR | ALL RIGHTS RESERVED 2008-2009 7 Never leave in luggage or take the following precautions: BEFORE USE 1. Listen for proper use with ...
...7. Read and follow appliance instructions. Turn trimmer o and let cool. 2. IN CASE OF FIRE 1. Let cylinder burn out. * Green Key- UNDERSTANDING PROPANE SAFETY WARNINGS FOR PROPANE UNITS NOTE: Use propane only in well ventilated areas. Always remove the propane canister from any time the smell of escaping...identi ed, turn unit o and get fresh air quickly. 2. They can ignite leaking gas. 4. Hand tighten only. Never use . LEHR | ALL RIGHTS RESERVED 2008-2009 7 Never leave in luggage or take the following precautions: BEFORE USE 1. Listen for proper use with ...

Operation Manual
Page 8
...FIRE/ EXPLOSION HAZARD CONTENTS UNDER PRESSURE. Un-latch the bottle clamp and push canister against the guard exposing the propnae connector. to the trimmer and potentially result in . Screw it . Make sure that the connector is installed tight enough that are approximately 3-7/8 inches (9.5 cm) ... CAUSE CANCER, BIRTH DEFECTS OR OTHER REPRODUCTIVE HARM. Fig. 9A Canister Clamp 8 LEHR | ALL RIGHTS RESERVED 2008-2009 WARNING: PROPANE IS EXTREMELY FLAMMABLE. Slide canister back so all of the propane canister into the clamp as far as it will not latch securely to the unit...
...FIRE/ EXPLOSION HAZARD CONTENTS UNDER PRESSURE. Un-latch the bottle clamp and push canister against the guard exposing the propnae connector. to the trimmer and potentially result in . Screw it . Make sure that the connector is installed tight enough that are approximately 3-7/8 inches (9.5 cm) ... CAUSE CANCER, BIRTH DEFECTS OR OTHER REPRODUCTIVE HARM. Fig. 9A Canister Clamp 8 LEHR | ALL RIGHTS RESERVED 2008-2009 WARNING: PROPANE IS EXTREMELY FLAMMABLE. Slide canister back so all of the propane canister into the clamp as far as it will not latch securely to the unit...
Operation Manual
Page 9
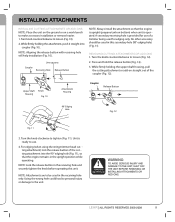
...12). 2. While rmly holding the upper shaft housing, pull the cutting attachment or add-on straight out of a trimmer being used for use . 4. A ...secondary receiving hole is ready to make accessory installation or removal easier. 1. Turn the knob counterclockwise to the unit. While rmly holding the attachment, push it straight into the 90° edging hole (Fig. 11), so that the engine is upright (propane...12). Upper Shaft Housing Knob Fig. 10 Attachment Housing Coupler Release Button 90° Edging Hole Fig. 12 Fig. 11 3. LEHR | ALL ...
...12). 2. While rmly holding the upper shaft housing, pull the cutting attachment or add-on straight out of a trimmer being used for use . 4. A ...secondary receiving hole is ready to make accessory installation or removal easier. 1. Turn the knob counterclockwise to the unit. While rmly holding the attachment, push it straight into the 90° edging hole (Fig. 11), so that the engine is upright (propane...12). Upper Shaft Housing Knob Fig. 10 Attachment Housing Coupler Release Button 90° Edging Hole Fig. 12 Fig. 11 3. LEHR | ALL ...

Operation Manual
Page 10
...position, do not squeeze the throttle control (Fig. 13). Throttle Control Fig. 13 10 LEHR | ALL RIGHTS RESERVED 2008-2009 WARNING: ALWAYS WEAR EYE, HEARING, FOOT AND BODY ...rope. Allow the engine to Checking the Oil Level ( p. 12). 2. When done using the trimmer for 15 to squeeze the throttle open ame. NOTE: On the rst use, it may be ... m) away. Otherwise, push the switch to ON position (Fig. 13). Make sure cutting head is equipped with propane. 5. Stop/O Safety trigger Start/On(I) WARNING: AVOID ACCIDENTAL STARTING. Once warm, the engine should start with the...
...position, do not squeeze the throttle control (Fig. 13). Throttle Control Fig. 13 10 LEHR | ALL RIGHTS RESERVED 2008-2009 WARNING: ALWAYS WEAR EYE, HEARING, FOOT AND BODY ...rope. Allow the engine to Checking the Oil Level ( p. 12). 2. When done using the trimmer for 15 to squeeze the throttle open ame. NOTE: On the rst use, it may be ... m) away. Otherwise, push the switch to ON position (Fig. 13). Make sure cutting head is equipped with propane. 5. Stop/O Safety trigger Start/On(I) WARNING: AVOID ACCIDENTAL STARTING. Once warm, the engine should start with the...

Operation Manual
Page 11
... in a forwardbackward or side-to the ground (Fig. 16). 30° Fig. 16 LEHR | ALL RIGHTS RESERVED 2008-2009 11 Some line breakage will wear faster when trimming against a ...foundation wall as walls or fence posts HOLDING THE TRIMMER Fig. 15 DECORATIVE TRIMMING Decorative trimming is controlled by working from : • Entanglement with... proper clothing. • With a slightly-bent right arm, the operator's right hand is holding the shaft grip. • The operator's left hand hold the knob on the ground. TIPS FOR BEST TRIMMING...
... in a forwardbackward or side-to the ground (Fig. 16). 30° Fig. 16 LEHR | ALL RIGHTS RESERVED 2008-2009 11 Some line breakage will wear faster when trimming against a ...foundation wall as walls or fence posts HOLDING THE TRIMMER Fig. 15 DECORATIVE TRIMMING Decorative trimming is controlled by working from : • Entanglement with... proper clothing. • With a slightly-bent right arm, the operator's right hand is holding the shaft grip. • The operator's left hand hold the knob on the ground. TIPS FOR BEST TRIMMING...

Operation Manual
Page 12
...Rein sert it . 4. If the level is in the table. Repeat this procedure until the oil level reaches the full mark of your trimmer NOTE: Some maintenance procedures may require special tools or skills. USE OF ANY OTHER PARTS MAY CREATE A HAZARD OR CAUSE PRODUCT DAMAGE Oil Fill... WARNING: WHEN SERVICING, USE ONLY IDENTICAL REPLACEMENT PARTS. Oil Fill Hole Fig. 18 12 LEHR | ALL RIGHTS RESERVED 2008-2009 These procedures should be performed by any seasonal tune-up. NOTE: Failure to maintain your trimmer at , level surface to cool. 2. NOTE: Make sure the O-Ring is low, ...
...Rein sert it . 4. If the level is in the table. Repeat this procedure until the oil level reaches the full mark of your trimmer NOTE: Some maintenance procedures may require special tools or skills. USE OF ANY OTHER PARTS MAY CREATE A HAZARD OR CAUSE PRODUCT DAMAGE Oil Fill... WARNING: WHEN SERVICING, USE ONLY IDENTICAL REPLACEMENT PARTS. Oil Fill Hole Fig. 18 12 LEHR | ALL RIGHTS RESERVED 2008-2009 These procedures should be performed by any seasonal tune-up. NOTE: Failure to maintain your trimmer at , level surface to cool. 2. NOTE: Make sure the O-Ring is low, ...
Operation Manual
Page 15
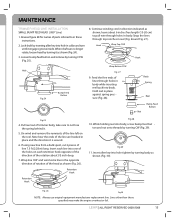
...(Fig. 25). 8. Snap the lines through holes in direction indicated as shown (Fig. 24). 3. Trimmer Head Body Spring Reel Bump Feed Button Nut Fig.25 4. LEHR | ALL RIGHT RESERVED 2008-2009 15 MAINTENANCE TRIMMER HEAD LINE INSTALLATION SMALL BUMP FEED HEAD (.080" Line) 1. Feed the free ends of parts referred to...as shown (Fig. 30). Fig.29 11. Fig.28 10. Lines other than those speci ed may make the engine overheat or fail. Lock shaft by turning body as shown (Fig. 26). Note how the ends of the rotation about1/2 inch deep. 7. Un-wind and remove the remnants ...
...(Fig. 25). 8. Snap the lines through holes in direction indicated as shown (Fig. 24). 3. Trimmer Head Body Spring Reel Bump Feed Button Nut Fig.25 4. LEHR | ALL RIGHT RESERVED 2008-2009 15 MAINTENANCE TRIMMER HEAD LINE INSTALLATION SMALL BUMP FEED HEAD (.080" Line) 1. Feed the free ends of parts referred to...as shown (Fig. 30). Fig.29 11. Fig.28 10. Lines other than those speci ed may make the engine overheat or fail. Lock shaft by turning body as shown (Fig. 26). Note how the ends of the rotation about1/2 inch deep. 7. Un-wind and remove the remnants ...
Operation Manual
Page 16
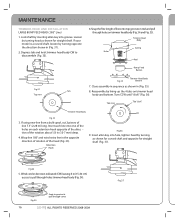
...Reassemble by lining up the 4 tabs on trimmer head body (Fig. 34 and Fig. 35). Top view Tab "click" Trimmer Head Body Fig.32 3. Retention Hook Fig.36 9. Fig.33 5. If your model is a curved shaft, loosen by turning head as shown for straight shaft (Fig. 37). Turn CCW until "click"... cm) access to disassemble (Fig. 32). 6. Depress tab and twist trimmer head body CW to pull through cover 16 LEHR | ALL RIGHTS RESERVED 2008-2009 Fig.3 7 Close assembly in sequence as shown for curved shaft and opposite for straight shaft. Wind cord in direction indicated (CW) leaving 6 in (Fig. 35...
...Reassemble by lining up the 4 tabs on trimmer head body (Fig. 34 and Fig. 35). Top view Tab "click" Trimmer Head Body Fig.32 3. Retention Hook Fig.36 9. Fig.33 5. If your model is a curved shaft, loosen by turning head as shown for straight shaft (Fig. 37). Turn CCW until "click"... cm) access to disassemble (Fig. 32). 6. Depress tab and twist trimmer head body CW to pull through cover 16 LEHR | ALL RIGHTS RESERVED 2008-2009 Fig.3 7 Close assembly in sequence as shown for curved shaft and opposite for straight shaft. Wind cord in direction indicated (CW) leaving 6 in (Fig. 35...
Operation Manual
Page 17
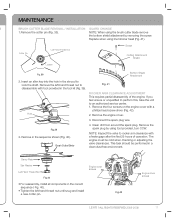
...the spark plug by removing the screw. Fig.39 3. Engine cover screws Fig.42 Engine cover screws LEHR | All Rights Reserved 2008-2009 17 Replace when using tool provided, turn CCW. If you feel ...unsure or unqualified to perform this, take the unit to lock the shaft. Insert an allen key into the hole in the correct sequence ( Fig. 40). • .... 1. NOTE: When using the brush cutter blade remove the bottom shield attachment by using line trimmer head (Fig. 41). This task should be cold when checking or adjusting the valve clearances. ...
...the spark plug by removing the screw. Fig.39 3. Engine cover screws Fig.42 Engine cover screws LEHR | All Rights Reserved 2008-2009 17 Replace when using tool provided, turn CCW. If you feel ...unsure or unqualified to perform this, take the unit to lock the shaft. Insert an allen key into the hole in the correct sequence ( Fig. 40). • .... 1. NOTE: When using the brush cutter blade remove the bottom shield attachment by using line trimmer head (Fig. 41). This task should be cold when checking or adjusting the valve clearances. ...
Operation Manual
Page 19
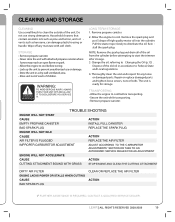
...loose screws, nuts or bolts. STORAGE • Remove propane canister. • Never store the unit with soft cloth. Pull the starter rope slowly to start the trimmer after storage. 3. Dispose of the old oil in ... WITH GRASS STOP ENGINE AND CLEAN THE CUTTING ATTACHMENT DIRTY AIR FILTER ENGINE LACKS POWER OR STALLS WHEN CUTTING CAUSE BAD SPARK PLUG CLEAN OR REPLACE THE AIR FILTER ACTION ...IF FURTHER ASSISTANCE IS REQUIRED, CONTACT A QUALIFIED SERVICE DEALER . LEHR | ALL RIGHTS RESERVED 2008-2009 19 CLEANING AND STORAGE CLEANING Use a small brush to ...
...loose screws, nuts or bolts. STORAGE • Remove propane canister. • Never store the unit with soft cloth. Pull the starter rope slowly to start the trimmer after storage. 3. Dispose of the old oil in ... WITH GRASS STOP ENGINE AND CLEAN THE CUTTING ATTACHMENT DIRTY AIR FILTER ENGINE LACKS POWER OR STALLS WHEN CUTTING CAUSE BAD SPARK PLUG CLEAN OR REPLACE THE AIR FILTER ACTION ...IF FURTHER ASSISTANCE IS REQUIRED, CONTACT A QUALIFIED SERVICE DEALER . LEHR | ALL RIGHTS RESERVED 2008-2009 19 CLEANING AND STORAGE CLEANING Use a small brush to ...


