Operation Manual
Page 1
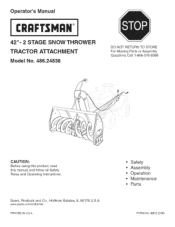
Sears, Roebuck and Co., Hoffman Estates, IL 60179 U.S.A. www sears.corn/craftsman PRINTED iN U.S.A. Operator's Manual CRQFTSNQ°N 42"= 2 STAGE SNOW THROWER TRACTOR ATTACHMENT Model No. 486.24838 DO NOT RETURN TO STORE For Missing Parts or Assembly Questions Call 1-866-576-8388 CAUTION: Before using this product, read this manual and follow all Safety Rules and Operating instructions. Safety Assembly Operation Maintenance Parts FORM NO. 49812 (2/06)
Sears, Roebuck and Co., Hoffman Estates, IL 60179 U.S.A. www sears.corn/craftsman PRINTED iN U.S.A. Operator's Manual CRQFTSNQ°N 42"= 2 STAGE SNOW THROWER TRACTOR ATTACHMENT Model No. 486.24838 DO NOT RETURN TO STORE For Missing Parts or Assembly Questions Call 1-866-576-8388 CAUTION: Before using this product, read this manual and follow all Safety Rules and Operating instructions. Safety Assembly Operation Maintenance Parts FORM NO. 49812 (2/06)
Operation Manual
Page 3
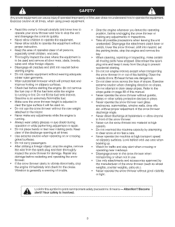
...plug to prevent accidenta_ starting engine. * Do not operate equipment without the rear weight attached to the snow thrower when transporting or when not in place. Keep clear of this manual. Use extreme caution when operating on . Look behind and use care when backing up • Watch... remove the wire from the spark plug and then thor,3ughly inspect the snow thrower for traffic and stay alert when crossing or operating near roadways. • Disengage power to the tractor. Never operate the snow thrower without proper instruction. Refer to clear steep slopes. Do not overload the ...
...plug to prevent accidenta_ starting engine. * Do not operate equipment without the rear weight attached to the snow thrower when transporting or when not in place. Keep clear of this manual. Use extreme caution when operating on . Look behind and use care when backing up • Watch... remove the wire from the spark plug and then thor,3ughly inspect the snow thrower for traffic and stay alert when crossing or operating near roadways. • Disengage power to the tractor. Never operate the snow thrower without proper instruction. Refer to clear steep slopes. Do not overload the ...
Operation Manual
Page 7
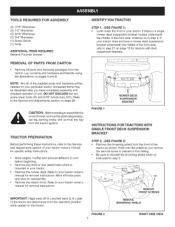
... section on page 29 CAUTION: Before starting to assemble the snow thrower, remove the spark plug wire(s), set the parking brake and remove the key from the tractor ignition TRACTOR PREPARATION Before performing these instructions, refer to the Service and Adjustments section of your tractor owner's manual for specific safety instructions. • Allow engine, muffler and...
... section on page 29 CAUTION: Before starting to assemble the snow thrower, remove the spark plug wire(s), set the parking brake and remove the key from the tractor ignition TRACTOR PREPARATION Before performing these instructions, refer to the Service and Adjustments section of your tractor owner's manual for specific safety instructions. • Allow engine, muffler and...
Operation Manual
Page 9
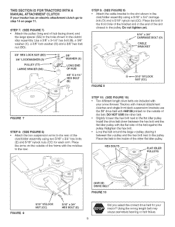
THIS SECTION IS FOR TRACTORS WITH A MANUAL ATTACHMENT CLUTCH If your tractor? DO NOT USE the other fiat idler pulley. Using the wrong length belt may cause premature bearing or belt failure. 9 STEP 7: (SEE FIGURE 7) • Attach ... outside of the frame with the notches 1othe rear STEP 10: (SEE FIGURE 10) • Two different length drive belts are included with your snow thrower Tractors with manual attachment clutches and single front deck suspension brackets use the 56" drive belt with the flat side o1 the belt against the pulley. BEX BOLTS...
THIS SECTION IS FOR TRACTORS WITH A MANUAL ATTACHMENT CLUTCH If your tractor? DO NOT USE the other fiat idler pulley. Using the wrong length belt may cause premature bearing or belt failure. 9 STEP 7: (SEE FIGURE 7) • Attach ... outside of the frame with the notches 1othe rear STEP 10: (SEE FIGURE 10) • Two different length drive belts are included with your snow thrower Tractors with manual attachment clutches and single front deck suspension brackets use the 56" drive belt with the flat side o1 the belt against the pulley. BEX BOLTS...
Operation Manual
Page 15
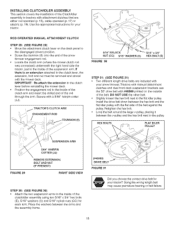
...the belt against the pulley. INSTALLING CLUTCH/IDLER ASSEMBLY This section covers the installation of the Clutch/Idler assembly to tractors with your snow thrower. Tractors with manual attachment clutches and dual front deck suspension brackets use the 55" drive belt with the flat side of the suspension... Screw the trunnion (11)onto the end of the snow thrower engagement rod. • Locate the c_utcl_arm (where the mower clutch rod was connected) underneath the right hand side the tractor, iust to the inside of the belt. ROD OPERATED MANUAL ATTACHMENT CLUTCH STEP 29: (SEE FIGURE 29) •...
...the belt against the pulley. INSTALLING CLUTCH/IDLER ASSEMBLY This section covers the installation of the Clutch/Idler assembly to tractors with your snow thrower. Tractors with manual attachment clutches and dual front deck suspension brackets use the 55" drive belt with the flat side of the suspension... Screw the trunnion (11)onto the end of the snow thrower engagement rod. • Locate the c_utcl_arm (where the mower clutch rod was connected) underneath the right hand side the tractor, iust to the inside of the belt. ROD OPERATED MANUAL ATTACHMENT CLUTCH STEP 29: (SEE FIGURE 29) •...
Operation Manual
Page 17
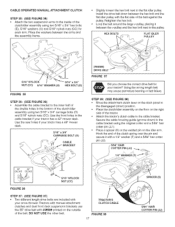
...) i 1/4" WASHER (T) 5/16" NYLOCK NUT (CC) FIGURE 36 STEP 37: (SEE FIGURE 37) • Two different length drive belts are included with your snow thrower Tractors with manual attachment clutcl_es and dual front deck suspension brackets use the 55" drive belt with #46989 pdnted on the outside of the...half of the clutch/idler assembly using two 5/16" x 3/4" hex bolts (E), 5/16" washers (U) and 5/16" nylock nuts (CO) for your tractor has a 42" mower deck. Using the wrong length belt may cause premature bearing or belt failure STEP 38: (SEE FIGURE 38) ° Move the attachment clutch lever...
...) i 1/4" WASHER (T) 5/16" NYLOCK NUT (CC) FIGURE 36 STEP 37: (SEE FIGURE 37) • Two different length drive belts are included with your snow thrower Tractors with manual attachment clutcl_es and dual front deck suspension brackets use the 55" drive belt with #46989 pdnted on the outside of the...half of the clutch/idler assembly using two 5/16" x 3/4" hex bolts (E), 5/16" washers (U) and 5/16" nylock nuts (CO) for your tractor has a 42" mower deck. Using the wrong length belt may cause premature bearing or belt failure STEP 38: (SEE FIGURE 38) ° Move the attachment clutch lever...
Operation Manual
Page 21
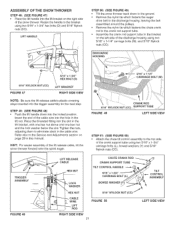
LIFT HANDLE \, STEP 50: (SEE FIGURE 49) • Tilt the snow thrower back down into the slot in the lift bracket, with one bex nut...crank rod support tube. • Assemble the crank rod support tube to the bracket on page 29 in this manual. Insert the end of the cable wire into the hole in the cable wire. Refer also to the top ... x 1-1/4" carriage bolts (M), and 5/16" Nylock nuts (CO). HINT: For easier assembly of the lift release cable, tilt the snow thrower forward onto the spiral auger •• CRANK ROD 5t16" NYLOCK NUT (CC) .SUPPORT TUBE FIGURE 49 LEFT SIDE ViEW STEP 51...
LIFT HANDLE \, STEP 50: (SEE FIGURE 49) • Tilt the snow thrower back down into the slot in the lift bracket, with one bex nut...crank rod support tube. • Assemble the crank rod support tube to the bracket on page 29 in this manual. Insert the end of the cable wire into the hole in the cable wire. Refer also to the top ... x 1-1/4" carriage bolts (M), and 5/16" Nylock nuts (CO). HINT: For easier assembly of the lift release cable, tilt the snow thrower forward onto the spiral auger •• CRANK ROD 5t16" NYLOCK NUT (CC) .SUPPORT TUBE FIGURE 49 LEFT SIDE ViEW STEP 51...
Operation Manual
Page 27
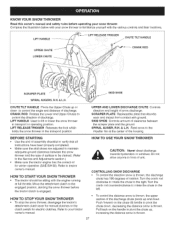
KNOW YOUR SNOW THROWER Read this owner's manual and safety rules before the tractor clutch is engaged HOWTO STOP YOUR SNOW THROWER * To stop the snow thrower, disengage the tractor's attachment cEutch ]ever for manual clutches or the clutch switch for winter operation (SAE 5W-30). LIFT HANDLE UPPER ... plate and the ground SPIRAL AUGER, R.H. & L.H. CONTROLLING SNOW DISCHARGE To control the direction snow is thrown, the upper section of assembly checklist to your tractor owner's manual HOW TO USE YOUR SNOW THROWER CAUTION: Never direct discharge towards bystanders or windows Do not...
KNOW YOUR SNOW THROWER Read this owner's manual and safety rules before the tractor clutch is engaged HOWTO STOP YOUR SNOW THROWER * To stop the snow thrower, disengage the tractor's attachment cEutch ]ever for manual clutches or the clutch switch for winter operation (SAE 5W-30). LIFT HANDLE UPPER ... plate and the ground SPIRAL AUGER, R.H. & L.H. CONTROLLING SNOW DISCHARGE To control the direction snow is thrown, the upper section of assembly checklist to your tractor owner's manual HOW TO USE YOUR SNOW THROWER CAUTION: Never direct discharge towards bystanders or windows Do not...
Operation Manual
Page 30
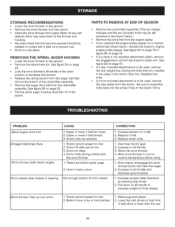
... Spiral augers don't turn Clogged discharge chute Snow thrower stalls tractor engine CAUSE 1. STORAGE RECOMMENDATIONS * Lower the snow thrower to the ground. * Remove the snow thrower from the tractor. * Clean the snow thrower thoroughly Wash off of the tractor PARTS TO REMOVE AT END OF SEASON Remove...the engine pulley. Replace shear bolts 1. Raise the snow thrower 4. Upper or lower V belt too loose 2. Use lower tractor gear 2. If you replaced the engine pulley keeper on a manual attachment clutch tractor, reinsta{l the tractor's odgina] engine pulley keeper See figure 33 on page...
... Spiral augers don't turn Clogged discharge chute Snow thrower stalls tractor engine CAUSE 1. STORAGE RECOMMENDATIONS * Lower the snow thrower to the ground. * Remove the snow thrower from the tractor. * Clean the snow thrower thoroughly Wash off of the tractor PARTS TO REMOVE AT END OF SEASON Remove...the engine pulley. Replace shear bolts 1. Raise the snow thrower 4. Upper or lower V belt too loose 2. Use lower tractor gear 2. If you replaced the engine pulley keeper on a manual attachment clutch tractor, reinsta{l the tractor's odgina] engine pulley keeper See figure 33 on page...

Operation Manual
Page 35
... 5 Washer, Nylon 2 Housing, Bearing 38 24393 39 24281 1 Bracket, Chute Crank 1 Bracket, Idler 40 49933 2 Shoulder Bolt, Round Head 41 88367 1 Hanger Bracket Assembly, L.H 42 85450 43 41576 44 44377 1 Hanger Bracket Assembly, RB. 2 Hex Bolt, 3/8-16 x 1-3/4" 1 Hex Bolt, 3/8-24 x 1" 45 784-5594 1 Bracket, Cable 46 748-0929...V Type 4" 1 Pulley, V Type 1 Hex Bolt, 5/16-18 x 1-1/2" 1 Screw, 1/4-14x8/8" 3 Chute Keeper 6 Hex Bolt, 1/4-20 x 1" 1 Chute, Lower 2 Washer, 3/8" 6 Hex Lock Nut, 3/8-16 Flanged 1 Owner's Manual 35 REPAIR PARTS FOR MODEL 486.24838 42" SNOWTHROWER REE NO PART NO.
... 5 Washer, Nylon 2 Housing, Bearing 38 24393 39 24281 1 Bracket, Chute Crank 1 Bracket, Idler 40 49933 2 Shoulder Bolt, Round Head 41 88367 1 Hanger Bracket Assembly, L.H 42 85450 43 41576 44 44377 1 Hanger Bracket Assembly, RB. 2 Hex Bolt, 3/8-16 x 1-3/4" 1 Hex Bolt, 3/8-24 x 1" 45 784-5594 1 Bracket, Cable 46 748-0929...V Type 4" 1 Pulley, V Type 1 Hex Bolt, 5/16-18 x 1-1/2" 1 Screw, 1/4-14x8/8" 3 Chute Keeper 6 Hex Bolt, 1/4-20 x 1" 1 Chute, Lower 2 Washer, 3/8" 6 Hex Lock Nut, 3/8-16 Flanged 1 Owner's Manual 35 REPAIR PARTS FOR MODEL 486.24838 42" SNOWTHROWER REE NO PART NO.

Operation Manual
Page 40
... LLC vc _,_Lje de commerce / _u Marque d_pos_e de Seals Brands. LLC © Sears BrarTds. For the replacement parts, accessories and owner's manuals that you need to do-it ! LLC onty) www.sears.com To purchase a protection or maintenance agreement (Canada) 1-800-827-6655 (U.S.A.) agreement... (U.S.A.) on -line for the location of all major brand appliances, lawn and garden equipment, or heating and cooling systems, no matter who made it, no matter who sold it -yourself. and Canada) www.sears...
... LLC vc _,_Lje de commerce / _u Marque d_pos_e de Seals Brands. LLC © Sears BrarTds. For the replacement parts, accessories and owner's manuals that you need to do-it ! LLC onty) www.sears.com To purchase a protection or maintenance agreement (Canada) 1-800-827-6655 (U.S.A.) agreement... (U.S.A.) on -line for the location of all major brand appliances, lawn and garden equipment, or heating and cooling systems, no matter who made it, no matter who sold it -yourself. and Canada) www.sears...


