Craftsman 24838 Support Question
Craftsman 24838 Support Question
Find answers below for this question about Craftsman 24838 - 42 in. Lawn Tractor Snow Thrower.Need a Craftsman 24838 manual? We have 1 online manual for this item!
Question posted by ealight on July 27th, 2015
Service/ Repair Manual
I just bought a craftsman rear engine riding mower model no 247.290001 and I need to have a repair manual for it. Where can I get one?
Current Answers
Answer #1: Posted by TechSupport101 on July 27th, 2015 6:38 PM
TechSupport101

Member since:
May 24th, 2013 Points: 12,171,305

Member since:
May 24th, 2013 Points: 12,171,305
A stand-alone Service Manual is not made publicly available but the manual here offers maintenance, service & adjustment, troubleshooting, repair parts list or illustration sections which should be close.
Related Craftsman 24838 Manual Pages
Operation Manual - Page 1
...)
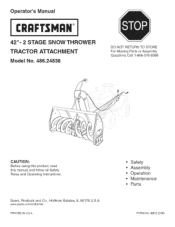
Operator's Manual
CRQFTSNQ°N
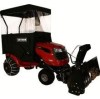
42"= 2 STAGE SNOW THROWER TRACTOR ATTACHMENT Model No. 486.24838
DO NOT RETURN TO STORE For Missing Parts or Assembly Questions Call 1-866-576-8388
CAUTION: Before using this product, read this manual and follow all Safety Rules and Operating instructions.
Sears, Roebuck and Co., Hoffman Estates, IL 60179 U.S.A. www sears.corn/craftsman PRINTED iN...
Operation Manual - Page 2
...reference
MODEL NUMBER: SERIAL NUMBER: DATE OF PURCHASE:
2
48624838 Tl_is warranty gives you specific legal rigl_ts, and you may be found on a decal attached to the snow thrower.
... repair (or replacement if repair proves impossible).
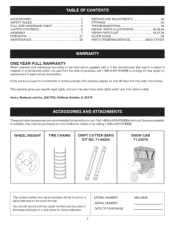
WHEEL WEIGHT
TiRE CHAINS
DRIFT CUTTER BARS KIT NO. 71-88294
SNOW CAB 71-24276
The model number and serial numbers will be purchased at most Craftsman ...
Operation Manual - Page 3
... or hot Do not fill the fuel tank indoors Gasoline is generally a warning of the snow throweL
Never run the snow thrower into neutral, set the parking brake, stop the engine, remove the wire from the spark plug and then thor,3ughly inspect the snow thrower for damage Repair any adjustments or inspections Take all times. Anypoweer...
Operation Manual - Page 7
... on page 29
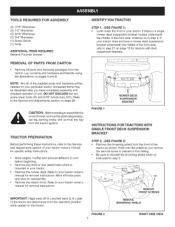
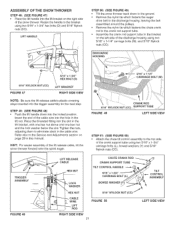
CAUTION: Before starting to assemble the snow thrower, remove the spark plug wire(s), set the parking brake and remove the key from the tractor ignition
TRACTOR PREPARATION
Before performing these instructions, refer to the Service and Adjustments section of your tractor does not have a mower deck suspension bracket underneath the middle of the front...
Operation Manual - Page 9
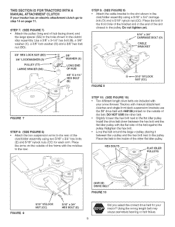
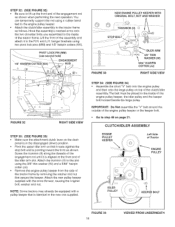
... with #48138 printed on the outside ol the belt. THIS SECTION IS FOR TRACTORS WITH A MANUAL ATTACHMENT CLUTCH If your tractor? STEP 7: (SEE FIGURE 7) • Attach the pulley (long end of...the frame with the notches 1othe rear
STEP 10: (SEE FIGURE 10) • Two different length drive belts are included with
your snow thrower Tractors with manual attachment clutches and single front deck ...
Operation Manual - Page 11
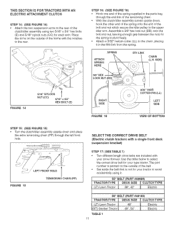
...is not for your snow thrower. THIS SECTION IS FOR TRACTORS WITH AN ELECTRIC ATTACHMENT CLUTCH
STEP 14: (SEE FIGURE 14) Attach the two suspension arms to the rear of the clutch/..." E ][ CLUTECleHctriTcYPE
56" BELT (PART #48138)
T(LRTA) CLTaOwRn TTraYcPtoEr (GT) Garden Tractor TABLE 1 11
DECK48"SIZE l CLUTECleHctTriYcPE
48", 54"
Electric
SPRING
ATTACH SPRING HERE
5TH LINK
CHAIN
(L.N.
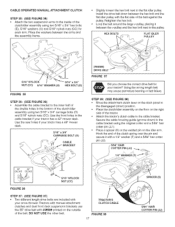
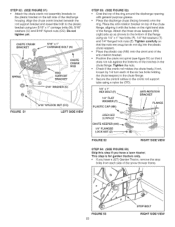
Operation Manual - Page 15
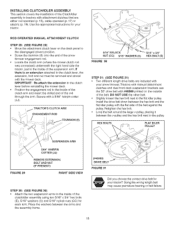
... of the belt. Tractors with manual attachment clutches and dual front deck suspension brackets use the 55" drive belt with #46989 printed on the dash pane{ to
the disengaged (down) position. • Screw the trunnion (11)onto the end of the snow
thrower engagement rod. • Locate the c_utcl_arm (where the mower clutch rod
was...
Operation Manual - Page 16
... (MM)
"
(use second hole)
\
1/8" HAIRPIN COTTER
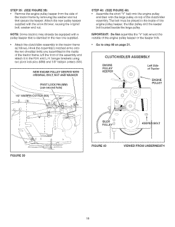
. NOTE: Some tractors may already be placed to step 48 on page 21.
CLUTCH/IDLER
ASSEMBLY
ENGINE
Left Bide
IDLER PULLEY
c_
\
/
_ KEEPER BOLT
FIGURE 34 18
VIEWED FROM UNDERNEATH The belt must be equipped with the snow thrower, reusing the original bolt, washer and nut.
ROD
i
/
FIGURE...
Operation Manual - Page 17
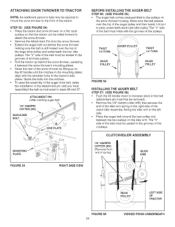
...SEE FIGURE 37) • Two different length drive belts are included with
your snow thrower Tractors with manual attachment clutcl_es and dual front deck suspension brackets use the 55" drive belt with...5/16" washers (U) and 5/16" nylock nuts (CO) for your tractor has a 42" mower deck. Use the rear holes if your tractor has a 46" mower deck
5/16" x 3/4" CARRIAGE BOLT (O)
' __
CABLE
(#46989...
Operation Manual - Page 18
... keeper Attach the new pulley keeper supplied with the snow thrower, reusing the original bolt, washer and nut.
NOTE: Some tractors may already be placed to the inside of the tractor frame. STEP 39: (SEE FIGURE 39) * Remove the engine pulley keeper from the side of
the tractor frame by removing the washer and nut that...
Operation Manual - Page 19
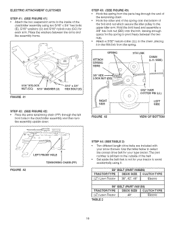
...cotter (LL) to the chain, placing it
55" CELT (PART #46989)
TRACTOR TYPE
DECK SiZE j_ CLUTCH TYPE
(LT) Lawn Tractor
38", 42", 46" _
Electric
56" BELT (PART #48188)
T(LRTA) CLTaOwnR TTraYcPtoEr ...42
TENSIONING CHAIN (PP)
STEP 44: (SEE TABLE 2)
Two different length drive belts are included with your snow thrower• Use the table below to select the correct drive belt for your tractor...
Operation Manual - Page 21
... washer below the s_ot.Tighten the nuts, adjusting them to eliminate slack in this manual. Fasten the handle to the bracket
on page 29 in the cable wire. Insert the end of the snow thrower. Refer also to the Service and Adjustments section on the left side of the lift release cable, tilt the...
Operation Manual - Page 22
This step is for garden tractors only. • If you have a (GT) Garden Tractor, remove timestop
bolts from each of the six hex bolts holding the ...
FIGURE 52
RIGHT SiDE ViEW
STEP 54: (SEE FIGURE 53) Skip this step if you have a lawn tractor. If not, loosen by 1/4 turn each side o1 the snow thrower frame•
FIGURE 53 22
STOP BOLT RIGHT SIDE ViEW STEP 52: (SEE FIGURE 51) •...
Operation Manual - Page 23
.... STEP 58: (SEE FIGURE 84) * Place the tractor and snow thrower on a flat_ level
surface so that secures the
end of the idler arm spring to the left side.
* Place the auger belt around the rear pulley and between the snow thrower's mounting plates.
* Raise timerear of the snow thrower by lifting up on the lift handle until...
Operation Manual - Page 24
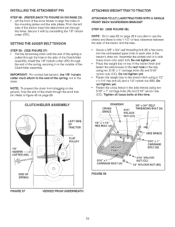
....
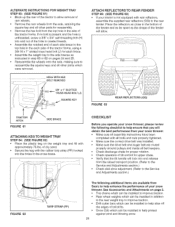
• Place the weight tray on top of the tractor hitch and fasten the side braces to the rear hole in the side of the C{utch/Idbr assembly install ...snow blower to figure 45 on page 20. From the left side of the tractor insert the attachment pin through the end of the chain though the pivot lock pin. CLUTCH/IDLER
ASSEMBLY
ATTACHING WEIGHT TRAY TO TRACTOR
ATTACHING TO (LT) LAWN TRACTORS...
Operation Manual - Page 26
...raised transport position. (Refer to the Service and Adjustments section.) • Check skid shoe adjustment (Refer to the Service and Adjustments section.)
FIGURE 62
TARP STRAP...tractor to allow .
\
FIGURE 63
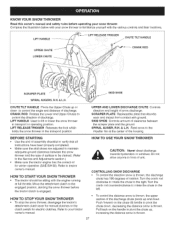
REAR REFLECTORS (QQ)
CHECKLIST
Before you operate your snow thrower, please review the following checklist to help ensure that you will obtain the best performance from your snow thrower...
Operation Manual - Page 27
... chute to the right Turn the crank md counterclockwise to rotate the chute to the Service and Adjustments section ) * Make sure the tractor engine has the correct oil
for electdc clutches Refer to your tractor
owner's
manual
HOW TO USE YOUR SNOW THROWER
CAUTION: Never direct discharge towards bystanders or windows Do not allow anyone in the...
Operation Manual - Page 28
...engine speedFormaximumsnowremovaal nddischarge, maintainhighenginerp.m (fullthrottle)It is excessive.
28 Onthesecondpass,overlapthefirstenoughto allow the snow thrower...rear wheel weights to improve traction
• Before the first snowfall, remove all stones, sticks and other objects which could become hidden by the snow... 11
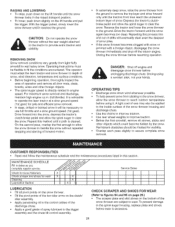
Service Dates
! ' tI lI it A light coat of the snow thrower housing ...
Operation Manual - Page 29
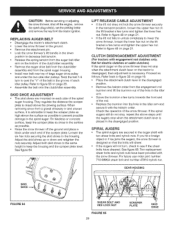
... the disengaged position
SPIRAL AUGERS
, The spiral augers are mounted on page 21
CLUTCH DISENGAGEMENT
ADJUSTMENT
(For tractors with engagement rod clutches only. REPLACING AUGER BELT
• Disengage the tractor's attachment clutch. • Lower the snow thrower to see if the shear bolts have sheared See figure 65 Two replacement shear bolts and nyiock...
Operation Manual - Page 30
... the sides of the tractor draw bar Retighten the bolts. • If a front mounted attachment is to be used , remove the rear weight tray, leaving the bolts that front of skid shoe is lower than the rear
3O Allow snow thrower to cool to
outdoor temperature before using
1 Stop engine, disengage the snow thrower clutch and clear the...
Similar Questions

Craftsman Snow Thrower. Will A 247 Model Fit Onto A 24838 Model? Thank You
(Posted by thewoodenangel 8 years ago)

Unable To Find User Manual For Riding Mower Ztl 7000 Model 247.25001
sold by Sears approximately 2 1/2 years ago
sold by Sears approximately 2 1/2 years ago
(Posted by ajphelaner 8 years ago)

Craftsman Snow Thrower Attachment Won't Lift
(Posted by BKapigg 10 years ago)

Snow Thrower Attachment
Can a 42 inch snow thrower attachment from a 1997 Sears lawn tractor be made to fit on a 2004 25 hp ...
Can a 42 inch snow thrower attachment from a 1997 Sears lawn tractor be made to fit on a 2004 25 hp ...
(Posted by harryaldrich 12 years ago)
Snow Thrower Won't Lift Off The Ground
I have a 42" 2 stage snow thrower attached to a lawn tractor Model 917.272246. The first year or t...
I have a 42" 2 stage snow thrower attached to a lawn tractor Model 917.272246. The first year or t...
(Posted by donpam 13 years ago)