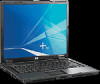
Limited Warranty and Technical Support
Page 5
... original product drivers, latest updates and software fixes, Limited Warranty information, and product documentation. „ Open an online service event with an HP Support Specialist: If you find a variety of services available online to help you call your location, repair the computer, and deliver the repaired computer to your questions and resolve problems-24 hours a day, 7 days a week. Product number, serial number, model name, and model number - Operating system...
... original product drivers, latest updates and software fixes, Limited Warranty information, and product documentation. „ Open an online service event with an HP Support Specialist: If you find a variety of services available online to help you call your location, repair the computer, and deliver the repaired computer to your questions and resolve problems-24 hours a day, 7 days a week. Product number, serial number, model name, and model number - Operating system...
HP Compaq notebook single image white paper
Page 3
... external peripherals and remove all files, including the most recent version, install the latest system ROM BIOS. 3 If you have the most recent version. The latest HP Support Software CD containing updated drivers and deliverables described in the order provided. Proper OS License for users who have the proper license to ensure that violates Microsoft license agreements. Start the system using the current operating...
... external peripherals and remove all files, including the most recent version, install the latest system ROM BIOS. 3 If you have the most recent version. The latest HP Support Software CD containing updated drivers and deliverables described in the order provided. Proper OS License for users who have the proper license to ensure that violates Microsoft license agreements. Start the system using the current operating...
HP Compaq notebook single image white paper
Page 5
...make the Multibay the first boot device on models configured with Bluetooth) Required component (on the nc8200. 2. Table 1 Minimum Versions of Microsoft Windows Professional. See Table 1 for complete installation instructions. 3. Software installation Perform the following steps before manually installing Windows XP Professional: 1. Removal procedures are available in ROM BIOS to properly set up the networking components of Necessary Drivers and Enhancements (along with recommended installation order) Software Components System Enhancements Intel Chipset Installation Utility...
...make the Multibay the first boot device on models configured with Bluetooth) Required component (on the nc8200. 2. Table 1 Minimum Versions of Microsoft Windows Professional. See Table 1 for complete installation instructions. 3. Software installation Perform the following steps before manually installing Windows XP Professional: 1. Removal procedures are available in ROM BIOS to properly set up the networking components of Necessary Drivers and Enhancements (along with recommended installation order) Software Components System Enhancements Intel Chipset Installation Utility...
HP Compaq notebook single image white paper
Page 9
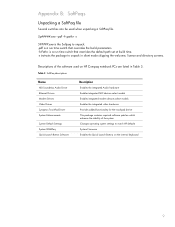
...default path set at build time. -s instructs the package to match HP defaults System Firmware Enables the Quick Launch Buttons on HP Compaq notebook PCs are listed in silent mode skipping the welcome, license and directory screens. Table 3 SoftPaq descriptions Name ADI SoundMax Audio Driver Ethernet Drivers Modem Drivers Video Drivers Synaptics TouchPad Driver System Enhancements System Default Settings System ROMPaq Quick Launch Button Software Description Enables the integrated Audio hardware Enables integrated NIC devices select models Enables integrated modem devices select models...
...default path set at build time. -s instructs the package to match HP defaults System Firmware Enables the Quick Launch Buttons on HP Compaq notebook PCs are listed in silent mode skipping the welcome, license and directory screens. Table 3 SoftPaq descriptions Name ADI SoundMax Audio Driver Ethernet Drivers Modem Drivers Video Drivers Synaptics TouchPad Driver System Enhancements System Default Settings System ROMPaq Quick Launch Button Software Description Enables the integrated Audio hardware Enables integrated NIC devices select models Enables integrated modem devices select models...

Hardware and Software Guide
Page 4
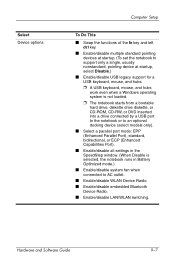
Contents Default Power Settings 2-9 Turning the Notebook or Display On or Off 2-10 Initiating or Resuming from Standby 2-11 Initiating or Restoring from Hibernation 2-12 Using Emergency Shutdown Procedures 2-14 Power Options 2-14 Accessing the Power Options Properties 2-15 Displaying the Power Meter Icon 2-15 Setting or Changing a Power Scheme 2-16 Using a Security Password 2-16 Processor Performance Controls 2-17 Battery Packs 2-19 Identifying Battery Packs 2-20 Inserting or Removing a Primary Battery Pack. . . . 2-21 Charging Battery Packs 2-23 Charging a New Battery Pack...
Contents Default Power Settings 2-9 Turning the Notebook or Display On or Off 2-10 Initiating or Resuming from Standby 2-11 Initiating or Restoring from Hibernation 2-12 Using Emergency Shutdown Procedures 2-14 Power Options 2-14 Accessing the Power Options Properties 2-15 Displaying the Power Meter Icon 2-15 Setting or Changing a Power Scheme 2-16 Using a Security Password 2-16 Processor Performance Controls 2-17 Battery Packs 2-19 Identifying Battery Packs 2-20 Inserting or Removing a Primary Battery Pack. . . . 2-21 Charging Battery Packs 2-23 Charging a New Battery Pack...

Hardware and Software Guide
Page 80
Pointing Devices and Keyboard Hotkey and Shortcut Key Quick Reference Function Key Combination Key Combination to Activate to Deactivate Function Function Initiate standby fn+f3 Power/standby button Switch between notebook display fn+f4 and external display fn+f4 View battery information fn+f8 fn+f8 Decrease screen brightness fn+f9 Not applicable Increase screen brightness fn+f10 Not applicable Display system information fn+esc fn+esc Hardware and Software Guide 3-7
Pointing Devices and Keyboard Hotkey and Shortcut Key Quick Reference Function Key Combination Key Combination to Activate to Deactivate Function Function Initiate standby fn+f3 Power/standby button Switch between notebook display fn+f4 and external display fn+f4 View battery information fn+f8 fn+f8 Decrease screen brightness fn+f9 Not applicable Increase screen brightness fn+f10 Not applicable Display system information fn+esc fn+esc Hardware and Software Guide 3-7

Hardware and Software Guide
Page 83
... Devices and Keyboard Decreasing Screen Brightness (fn+f9) Press fn+f9 to increase screen brightness. Hold down the hotkey to display information about system hardware components and software version numbers. Using Hotkeys with External Keyboards The following table describes how certain hotkeys are used on external keyboards: Notebook Keys External Keyboard Keys fn+esc scroll lock+scroll lock+esc* fn+f4 scroll lock+scroll lock+f4* fn+f8 scroll lock+scroll lock+f8* *Pressing the scroll lock 2 times on the notebook keyboard. 3-10 Hardware and Software Guide Displaying...
... Devices and Keyboard Decreasing Screen Brightness (fn+f9) Press fn+f9 to increase screen brightness. Hold down the hotkey to display information about system hardware components and software version numbers. Using Hotkeys with External Keyboards The following table describes how certain hotkeys are used on external keyboards: Notebook Keys External Keyboard Keys fn+esc scroll lock+scroll lock+esc* fn+f4 scroll lock+scroll lock+f4* fn+f8 scroll lock+scroll lock+f8* *Pressing the scroll lock 2 times on the notebook keyboard. 3-10 Hardware and Software Guide Displaying...

Hardware and Software Guide
Page 157
... 802.11 or Bluetooth wireless devices, you have a wireless notebook. ■ An 802.11 wireless notebook can connect to the illustration that most notebook models. Hardware and Software Guide 6-1 6 Wireless If your notebook is equipped with your notebook may vary by geographical region and by model. Your notebook has a button that can be used to enable and disable 802.11 and Bluetooth wireless devices and an associated light to indicate the state of the wireless devices. ✎ Components included...
... 802.11 or Bluetooth wireless devices, you have a wireless notebook. ■ An 802.11 wireless notebook can connect to the illustration that most notebook models. Hardware and Software Guide 6-1 6 Wireless If your notebook is equipped with your notebook may vary by geographical region and by model. Your notebook has a button that can be used to enable and disable 802.11 and Bluetooth wireless devices and an associated light to indicate the state of the wireless devices. ✎ Components included...
Hardware and Software Guide
Page 178
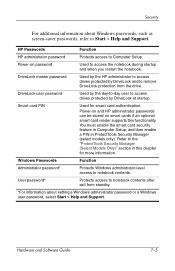
... Function Administrator password* Protects Windows administrator-level access to Computer Setup. User password* Protects access to notebook contents after exit from the drive. HP Passwords Function HP administrator password Protects access to notebook contents. Power-on and HP administrator passwords can be stored on password Used to access drives protected by DriveLock at startup. Refer to remove DriveLock protection from standby. *For information about Windows passwords, such as screen-saver passwords, refer to Start > Help and Support. Hardware and Software Guide...
... Function Administrator password* Protects Windows administrator-level access to Computer Setup. User password* Protects access to notebook contents after exit from the drive. HP Passwords Function HP administrator password Protects access to notebook contents. Power-on and HP administrator passwords can be stored on password Used to access drives protected by DriveLock at startup. Refer to remove DriveLock protection from standby. *For information about Windows passwords, such as screen-saver passwords, refer to Start > Help and Support. Hardware and Software Guide...
Hardware and Software Guide
Page 180
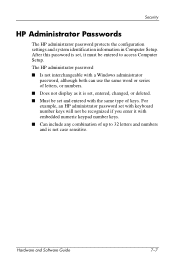
... HP administrator password set with keyboard number keys will not be set , entered, changed, or deleted. ■ Must be recognized if you enter it is not case sensitive. The HP administrator password ■ Is not interchangeable with a Windows administrator password, although both can use the same word or series of letters, or numbers. ■ Does not display as it with the same type of up to access Computer Setup.
... HP administrator password set with keyboard number keys will not be set , entered, changed, or deleted. ■ Must be recognized if you enter it is not case sensitive. The HP administrator password ■ Is not interchangeable with a Windows administrator password, although both can use the same word or series of letters, or numbers. ■ Does not display as it with the same type of up to access Computer Setup.

Hardware and Software Guide
Page 182
... is turned on password, type the password in the New password and Verify new password fields, and then press f10. Use the arrow keys to 32 letters and numbers and is not case sensitive. Hardware and Software Guide 7-9 To manage the password: 1. A power-on password ■ Does not display as it with keyboard number keys will not be set and entered with the same type of the notebook. Security Power-On Passwords A power-on password is displayed in Computer Setup. Open Computer Setup by turning...
... is turned on password, type the password in the New password and Verify new password fields, and then press f10. Use the arrow keys to 32 letters and numbers and is not case sensitive. Hardware and Software Guide 7-9 To manage the password: 1. A power-on password ■ Does not display as it with keyboard number keys will not be set and entered with the same type of the notebook. Security Power-On Passwords A power-on password is displayed in Computer Setup. Open Computer Setup by turning...
Hardware and Software Guide
Page 186
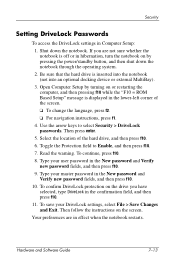
... hard drive is displayed in Computer Setup: 1. Toggle the Protection field to select Security > DriveLock passwords. Type your DriveLock settings, select File > Save Changes and Exit. Then follow the instructions on or restarting the computer, and then pressing f10 while the "F10 = ROM Based Setup" message is inserted into the notebook (not into an optional docking device or external MultiBay). 3. Security Setting DriveLock Passwords To access the DriveLock settings...
... hard drive is displayed in Computer Setup: 1. Toggle the Protection field to select Security > DriveLock passwords. Type your DriveLock settings, select File > Save Changes and Exit. Then follow the instructions on or restarting the computer, and then pressing f10 while the "F10 = ROM Based Setup" message is inserted into the notebook (not into an optional docking device or external MultiBay). 3. Security Setting DriveLock Passwords To access the DriveLock settings...

Hardware and Software Guide
Page 204
... screen. To enable bootable media in USB drives or in drives inserted into an optional docking device (select models only), use the arrow keys to select File > Save Changes and Exit. To enable a NIC, select the Security menu > Device Security, and then select Internal network adapter boot. 3. To save your preferences and exit Computer Setup, use the arrow keys to a Preboot eXecution Environment (PXE) or Remote Program Load (RPL) server during startup without using...
... screen. To enable bootable media in USB drives or in drives inserted into an optional docking device (select models only), use the arrow keys to select File > Save Changes and Exit. To enable a NIC, select the Security menu > Device Security, and then select Internal network adapter boot. 3. To save your preferences and exit Computer Setup, use the arrow keys to a Preboot eXecution Environment (PXE) or Remote Program Load (RPL) server during startup without using...

Hardware and Software Guide
Page 205
... startup sequence, consider the following: ■ When the notebook restarts after the boot order has been changed, it considers only the first of each type of device in the hard drive bay becomes drive D. ■ Starting up from a NIC does not affect logical drive designations because no drive letter is connected to an optional docking device (select models only) that contains a hard drive. However, if there are treated like external USB devices...
... startup sequence, consider the following: ■ When the notebook restarts after the boot order has been changed, it considers only the first of each type of device in the hard drive bay becomes drive D. ■ Starting up from a NIC does not affect logical drive designations because no drive letter is connected to an optional docking device (select models only) that contains a hard drive. However, if there are treated like external USB devices...
Hardware and Software Guide
Page 215
... devices at startup. (To set the notebook to support only a single, usually nonstandard, pointing device at startup, select Disable.) ■ Enable/disable USB legacy support for a USB keyboard, mouse, and hubs. ❐ A USB keyboard, mouse, and hubs work even when a Windows operating system is not loaded. ❐ The notebook starts from a bootable hard drive, diskette drive diskette, or CD-ROM, CD-RW, or DVD inserted into a drive connected by a USB port to the notebook or to an optional docking device (select models only). ■ Select a parallel port mode...
... devices at startup. (To set the notebook to support only a single, usually nonstandard, pointing device at startup, select Disable.) ■ Enable/disable USB legacy support for a USB keyboard, mouse, and hubs. ❐ A USB keyboard, mouse, and hubs work even when a Windows operating system is not loaded. ❐ The notebook starts from a bootable hard drive, diskette drive diskette, or CD-ROM, CD-RW, or DVD inserted into a drive connected by a USB port to the notebook or to an optional docking device (select models only). ■ Select a parallel port mode...

Hardware and Software Guide
Page 222
.... Identify the BIOS update that provides software for your hard drive where the BIOS update will need this path when you want to reliable external power using the AC adapter. b. Software Update and Recovery Downloading a BIOS Update Ä CAUTION: To prevent damage to the computer or an unsuccessful installation, download and install a BIOS update only when the computer is running on battery power, docked in an optional docking device, or connected to an optional power source. During the download and installation: ■...
.... Identify the BIOS update that provides software for your hard drive where the BIOS update will need this path when you want to reliable external power using the AC adapter. b. Software Update and Recovery Downloading a BIOS Update Ä CAUTION: To prevent damage to the computer or an unsuccessful installation, download and install a BIOS update only when the computer is running on battery power, docked in an optional docking device, or connected to an optional power source. During the download and installation: ■...
Hardware and Software Guide
Page 244
... (network) jack 1-20, 1-22, 5-38 ROM determining current version of 3-10 ROMPaq 11-3 S screen saver 2-34 scroll lock key 3-10 scrolling regions, TouchPad 1-6, 3-2 Secure Digital (SD) MemoryCard 1-13, 5-17 security cable lock, connecting 7-27 security cable slot 1-16, 1-17 security features 7-1 security features on notebook Computer Setup 7-3 security passwords 2-16 serial number, computer 11-2 serial number, notebook 1-27, 9-4 serial port 1-18 Service Tag 1-27 Setup utility accessing 9-2 Advanced menu 9-6 enabling bootable devices 8-4 File menu 9-4 restoring default settings 9-3 Security menu...
... (network) jack 1-20, 1-22, 5-38 ROM determining current version of 3-10 ROMPaq 11-3 S screen saver 2-34 scroll lock key 3-10 scrolling regions, TouchPad 1-6, 3-2 Secure Digital (SD) MemoryCard 1-13, 5-17 security cable lock, connecting 7-27 security cable slot 1-16, 1-17 security features 7-1 security features on notebook Computer Setup 7-3 security passwords 2-16 serial number, computer 11-2 serial number, notebook 1-27, 9-4 serial port 1-18 Service Tag 1-27 Setup utility accessing 9-2 Advanced menu 9-6 enabling bootable devices 8-4 File menu 9-4 restoring default settings 9-3 Security menu...
HP Compaq nx6110, nc6110, nx6120 and nc6120 Notebook PCs - Maintenance and Service Guide
Page 55
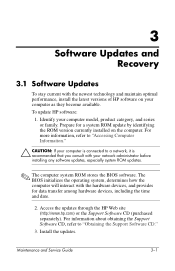
Prepare for data transfer among hardware devices, including the time and date. 2. Maintenance and Service Guide 3-1 3 Software Updates and Recovery 3.1 Software Updates To stay current with your network administrator before installing any software updates, especially system ROM updates. ✎ The computer system ROM stores the BIOS software. For more information, refer to "Accessing Computer Information." Ä CAUTION: If your computer is connected to "Obtaining the Support Software CD." 3. Access the updates through the HP Web site...
Prepare for data transfer among hardware devices, including the time and date. 2. Maintenance and Service Guide 3-1 3 Software Updates and Recovery 3.1 Software Updates To stay current with your network administrator before installing any software updates, especially system ROM updates. ✎ The computer system ROM stores the BIOS software. For more information, refer to "Accessing Computer Information." Ä CAUTION: If your computer is connected to "Obtaining the Support Software CD." 3. Access the updates through the HP Web site...
HP Compaq nx6110, nc6110, nx6120 and nc6120 Notebook PCs - Maintenance and Service Guide
Page 59
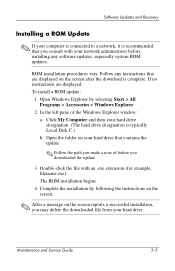
... any software updates, especially system ROM updates. Complete the installation by selecting Start > All Programs > Accessories > Windows Explorer. 2. If no instructions are displayed on the screen after the download is typically Local Disk C.) b. Double-click the file with your hard drive. Maintenance and Service Guide 3-5 ROM installation procedures vary. The ROM installation begins. 4. Software Updates and Recovery Installing a ROM Update ✎ If your computer is connected to a network, it is recommended that are displayed: To install a ROM update: 1. Open the folder...
... any software updates, especially system ROM updates. Complete the installation by selecting Start > All Programs > Accessories > Windows Explorer. 2. If no instructions are displayed on the screen after the download is typically Local Disk C.) b. Double-click the file with your hard drive. Maintenance and Service Guide 3-5 ROM installation procedures vary. The ROM installation begins. 4. Software Updates and Recovery Installing a ROM Update ✎ If your computer is connected to a network, it is recommended that are displayed: To install a ROM update: 1. Open the folder...

HP Compaq nx6110, nc6110, nx6120 and nc6120 Notebook PCs - Maintenance and Service Guide
Page 236
... screw listing C-1 security cable slot 1-13 serial connector module removal 6-55 spare part number 4-9, 4-24, 6-55 serial connector module cable 4-15 serial number 3-2, 4-1, 6-1 serial port location 1-9 pin assignments A-3 service considerations 5-2 snapshot 3-8 SoftPaq 3-3 software reinstalling or repairing 3-12, 3-14, 3-16 ROMPaq 3-3 SoftPaq 3-3 support CD 3-3 System Restore 3-9 updates 3-3 updating 3-1 speaker location 1-6 removal 6-43 spare part number 4-9, 4-24, 6-43 specifications battery pack 7-8 CD-ROM drive 7-14 computer 7-1 display 7-3, 7-4, 7-5 DVD/CD-RW Combo Drive 7-10 DVD±...
... screw listing C-1 security cable slot 1-13 serial connector module removal 6-55 spare part number 4-9, 4-24, 6-55 serial connector module cable 4-15 serial number 3-2, 4-1, 6-1 serial port location 1-9 pin assignments A-3 service considerations 5-2 snapshot 3-8 SoftPaq 3-3 software reinstalling or repairing 3-12, 3-14, 3-16 ROMPaq 3-3 SoftPaq 3-3 support CD 3-3 System Restore 3-9 updates 3-3 updating 3-1 speaker location 1-6 removal 6-43 spare part number 4-9, 4-24, 6-43 specifications battery pack 7-8 CD-ROM drive 7-14 computer 7-1 display 7-3, 7-4, 7-5 DVD/CD-RW Combo Drive 7-10 DVD±...


