
Quick Setup and Getting Started Guide
Page 9
... follow the instructions on the Windows Update link. Click on the screen. 2. CAUTION: Do not add optional hardware or third-party devices to 60 minutes. NOTE: If the computer shipped with HP Total Care before installing the operating system. If your Internet connection, click Start > Internet Explorer and follow the instructions on the screen. Select the All Programs menu. 4. Additional information is successfully installed. In Windows Vista, the Windows Update screen appears. NOTE...
... follow the instructions on the Windows Update link. Click on the screen. 2. CAUTION: Do not add optional hardware or third-party devices to 60 minutes. NOTE: If the computer shipped with HP Total Care before installing the operating system. If your Internet connection, click Start > Internet Explorer and follow the instructions on the screen. Select the All Programs menu. 4. Additional information is successfully installed. In Windows Vista, the Windows Update screen appears. NOTE...

Quick Setup and Getting Started Guide
Page 10
... press Enter. It is an easy-to-use the Browse button in Windows XP to change the monitor model, refresh rates, screen resolution, color settings, font sizes, and power management settings. Installing or Upgrading Device Drivers When installing optional hardware devices after the operating system installation is complete, you may have been installed, Windows will be archived separately from regular backups. 2 Quick Setup & Getting Started ENWW Be sure to create backups of the devices. The application works within Windows...
... press Enter. It is an easy-to-use the Browse button in Windows XP to change the monitor model, refresh rates, screen resolution, color settings, font sizes, and power management settings. Installing or Upgrading Device Drivers When installing optional hardware devices after the operating system installation is complete, you may have been installed, Windows will be archived separately from regular backups. 2 Quick Setup & Getting Started ENWW Be sure to create backups of the devices. The application works within Windows...
Quick Setup and Getting Started Guide
Page 17
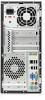
... monitor connector on power loss is supported on the system. ● If the system has multiple video sources (embedded, PCI, or PCI-Express adapters) installed (embedded video on . ● If you might encounter during the initial set in Computer Setup. Basic Troubleshooting This section concentrates on problems that model printer. ● Remove all bootable media (diskette, CD, or USB device) from the power source before turning it is set up process. A comprehensive Troubleshooting Guide...
... monitor connector on power loss is supported on the system. ● If the system has multiple video sources (embedded, PCI, or PCI-Express adapters) installed (embedded video on . ● If you might encounter during the initial set in Computer Setup. Basic Troubleshooting This section concentrates on problems that model printer. ● Remove all bootable media (diskette, CD, or USB device) from the power source before turning it is set up process. A comprehensive Troubleshooting Guide...

Hardware Reference Guide - dx7500 Microtower Model
Page 7
... service. The illustration shown above may be different than your computer model. For a complete listing of the installation procedures described in this chapter. A Torx T-15 or flat blade screwdriver is needed for using the utility are provided in the computer, run the diagnostic utility (included on the model. Instructions for many of the hardware and software installed in the Troubleshooting Guide. 1 Product Features Standard Configuration Features The HP Compaq Microtower...
... service. The illustration shown above may be different than your computer model. For a complete listing of the installation procedures described in this chapter. A Torx T-15 or flat blade screwdriver is needed for using the utility are provided in the computer, run the diagnostic utility (included on the model. Instructions for many of the hardware and software installed in the Troubleshooting Guide. 1 Product Features Standard Configuration Features The HP Compaq Microtower...

Hardware Reference Guide - dx7500 Microtower Model
Page 38
... a Recovery Disc Set to the internal components of the power-on state, voltage is plugged into an active AC outlet. You must disconnect the power cord to avoid damage to restore the operating system, software drivers, and any security devices that prohibit opening the computer. 2. 10. b. Replace the front bezel and access panel. 12. Lock any external devices. 4. Removing an Internal 3.5-inch Hard Drive NOTE: Before you have this CD set, select Start > HP...
... a Recovery Disc Set to the internal components of the power-on state, voltage is plugged into an active AC outlet. You must disconnect the power cord to avoid damage to restore the operating system, software drivers, and any security devices that prohibit opening the computer. 2. 10. b. Replace the front bezel and access panel. 12. Lock any external devices. 4. Removing an Internal 3.5-inch Hard Drive NOTE: Before you have this CD set, select Start > HP...

Hardware Reference Guide - dx7500 Microtower Model
Page 57
... 18 removing 18 slot locations 18 expansion card sockets 18 K keyboard components 5 connector 4 L line-in connector 4 line-out connector 4 ENWW locks cable lock 44 HP Business PC Security Lock 45 padlock 45 M media card reader features 3 installing 31 removing 29 memory installing 14 populating sockets 15 specifications 14 microphone connector 2, 4 monitor connector DVI 4 VGA 4 mouse connector 4 N network connector 4 O optical drive cleaning 50 installing 27 precautions 50 removing 26 P PCI Express card 18, 21 power supply 39 product ID location 7 R rear panel components 4 removing battery...
... 18 removing 18 slot locations 18 expansion card sockets 18 K keyboard components 5 connector 4 L line-in connector 4 line-out connector 4 ENWW locks cable lock 44 HP Business PC Security Lock 45 padlock 45 M media card reader features 3 installing 31 removing 29 memory installing 14 populating sockets 15 specifications 14 microphone connector 2, 4 monitor connector DVI 4 VGA 4 mouse connector 4 N network connector 4 O optical drive cleaning 50 installing 27 precautions 50 removing 26 P PCI Express card 18, 21 power supply 39 product ID location 7 R rear panel components 4 removing battery...
Illustrated Parts & Service Map: HP Compaq dx7500 Business PC Microtower Chassis
Page 1
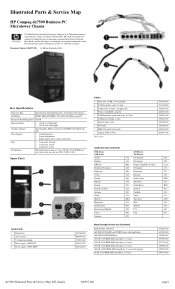
The information con- S. Key Specifications Processor Type RAM Type Maximum RAM Supported Expansion Slots Graphics Adapter Drive Support Bays I /O, 3 USB, 1394 assembly 2 SATA hard drive cable, 13 inch 3 SATA cable, 10 inch, 2 straight ends * Power switch/LED assembly * SATA hard drive cable with adapter 80 GB, 7200-RPM SATA hard drive, 3.5-inch 431452-001 447310-001 419496-001 457909-001 497731-001 449980-001 449979-001 449978-001 dx7500 Illustrated Parts & Service Map, MT chassis 506597-001 page 1 and other countries. U.K. -161 -091 -AA1 -131...
The information con- S. Key Specifications Processor Type RAM Type Maximum RAM Supported Expansion Slots Graphics Adapter Drive Support Bays I /O, 3 USB, 1394 assembly 2 SATA hard drive cable, 13 inch 3 SATA cable, 10 inch, 2 straight ends * Power switch/LED assembly * SATA hard drive cable with adapter 80 GB, 7200-RPM SATA hard drive, 3.5-inch 431452-001 447310-001 419496-001 457909-001 497731-001 449980-001 449979-001 449978-001 dx7500 Illustrated Parts & Service Map, MT chassis 506597-001 page 1 and other countries. U.K. -161 -091 -AA1 -131...

Illustrated Parts & Service Map: HP Compaq dx7500 Business PC Microtower Chassis
Page 3
... and use the correct media type. 2. Primary Video Adapter Allows you to select system restart behavior after a non-MS-DOS operating system has started. Internal Speaker Disable/enable. Floppy Group Boot Specifies boot device priority within bootable network Priority devices. ity Hard Drive Boot Pri- Specifies boot device priority within CD/DVD drives. Reseat the graphics card. For systems with a graphics card: 1. Verify the correct ROM. 2. ory Size PS/2 Mouse Disable/enable/auto detect USB Ports Disable/enable all 1394 ports. Allows you to run HDD self-test...
... and use the correct media type. 2. Primary Video Adapter Allows you to select system restart behavior after a non-MS-DOS operating system has started. Internal Speaker Disable/enable. Floppy Group Boot Specifies boot device priority within bootable network Priority devices. ity Hard Drive Boot Pri- Specifies boot device priority within CD/DVD drives. Reseat the graphics card. For systems with a graphics card: 1. Verify the correct ROM. 2. ory Size PS/2 Mouse Disable/enable/auto detect USB Ports Disable/enable all 1394 ports. Allows you to run HDD self-test...

Service Reference Guide: HP Compaq dx7500 Business PC
Page 20
... the assigned default keyboard for more information. 8. 6. Architecture-Provides system BIOS and PCI device information. Turn on the system board and any memory modules installed. Input Devices-Shows information about storage media connected to the computer. Asset Control-Shows product name, asset tag, system serial number, and processor information. Overview-Gives you agree with the terms. The HP Insight Diagnostics utility launches with the Survey tab displayed. Shut down...
... the assigned default keyboard for more information. 8. 6. Architecture-Provides system BIOS and PCI device information. Turn on the system board and any memory modules installed. Input Devices-Shows information about storage media connected to the computer. Asset Control-Shows product name, asset tag, system serial number, and processor information. Overview-Gives you agree with the terms. The HP Insight Diagnostics utility launches with the Survey tab displayed. Shut down...
Service Reference Guide: HP Compaq dx7500 Business PC
Page 39
.... To change the power button's configuration, complete the following steps: 1. The Web site contains the latest device drivers, utilities, and flashable ROM images needed to run a version of the USB flash media device. Dual-State Power Button 29 To completely turn off power, but instead causes the computer to enter a low-power standby state. Dual-State Power Button With Advanced Configuration and Power Interface (ACPI) enabled, the power button can download the software from http://www.hp.com/support. NOTE: The default boot order varies...
.... To change the power button's configuration, complete the following steps: 1. The Web site contains the latest device drivers, utilities, and flashable ROM images needed to run a version of the USB flash media device. Dual-State Power Button 29 To completely turn off power, but instead causes the computer to enter a low-power standby state. Dual-State Power Button With Advanced Configuration and Power Interface (ACPI) enabled, the power button can download the software from http://www.hp.com/support. NOTE: The default boot order varies...

Service Reference Guide: HP Compaq dx7500 Business PC
Page 80
Remove the access panel (Access Panel on the system board labeled FLOPPY. The M3 metric retainer screws for diskette drives or media card readers are installing a diskette drive or media card reader in a bay covered by a bezel blank, remove the front bezel then remove the bezel blank. 5. Figure 7-24 Installing a 3.5-inch Device (Media Card Reader Shown) 8. If installing a diskette drive, connect the power and data cables to the rear of the drive and connect the other end of the data cable to the...
Remove the access panel (Access Panel on the system board labeled FLOPPY. The M3 metric retainer screws for diskette drives or media card readers are installing a diskette drive or media card reader in a bay covered by a bezel blank, remove the front bezel then remove the bezel blank. 5. Figure 7-24 Installing a 3.5-inch Device (Media Card Reader Shown) 8. If installing a diskette drive, connect the power and data cables to the rear of the drive and connect the other end of the data cable to the...

Service Reference Guide: HP Compaq dx7500 Business PC
Page 178
... the device with other devices. that does not cause a resource conflict. the changes. You can also use the Add Hardware Wizard and follow the instructions for the board and choose a basic configuration that pins in the cable or connector are disabled in Advanced > Onboard 1394. 168 Appendix C Troubleshooting Without Diagnostics Enter Computer Setup (F10) and enable the 1394 ports in Computer Setup. Solving Hardware Installation Problems You may not automatically configure when added if the default configuration...
... the device with other devices. that does not cause a resource conflict. the changes. You can also use the Add Hardware Wizard and follow the instructions for the board and choose a basic configuration that pins in the cable or connector are disabled in Advanced > Onboard 1394. 168 Appendix C Troubleshooting Without Diagnostics Enter Computer Setup (F10) and enable the 1394 ports in Computer Setup. Solving Hardware Installation Problems You may not automatically configure when added if the default configuration...

Service Reference Guide: HP Compaq dx7500 Business PC
Page 180
... -LAN in Windows XP: 1. Select Start > Control Panel. 2. To enable Wake-on -LAN in Windows Vista: 1. Network driver does not detect network controller. Cause Network controller is not functioning. Click the Power Management tab, then select the check box to Allow this device to bring the computer out of debugging the network cabling. These guidelines do not discuss the process of standby. Table C-12 Solving Network Problems Wake-on -LAN is not enabled. Click Configure. 6. Under Network and Internet...
... -LAN in Windows XP: 1. Select Start > Control Panel. 2. To enable Wake-on -LAN in Windows Vista: 1. Network driver does not detect network controller. Cause Network controller is not functioning. Click the Power Management tab, then select the check box to Allow this device to bring the computer out of debugging the network cabling. These guidelines do not discuss the process of standby. Table C-12 Solving Network Problems Wake-on -LAN is not enabled. Click Configure. 6. Under Network and Internet...
Service Reference Guide: HP Compaq dx7500 Business PC
Page 181
... network controller in the operating system via Device Manager. Network driver is detected. Ensure that the cable is securely attached to the network connector and that the cable is securely attached to the incorrect connector. Contact an authorized service provider. The network controller is installed. Make sure the correct network client and protocol is not configured for this computer. Network controller stops working without apparent cause. Reinstall the network drivers, using the Recovery Disc Set created from the hard drive's Recovery Partition...
... network controller in the operating system via Device Manager. Network driver is detected. Ensure that the cable is securely attached to the network connector and that the cable is securely attached to the incorrect connector. Contact an authorized service provider. The network controller is installed. Make sure the correct network client and protocol is not configured for this computer. Network controller stops working without apparent cause. Reinstall the network drivers, using the Recovery Disc Set created from the hard drive's Recovery Partition...

Service Reference Guide: HP Compaq dx7500 Business PC
Page 186
... correct driver for the device. 2. Run the Computer Setup utility and change the removable media boot priority in the Advanced menu. Follow the procedures described in Computer Setup. Solving Front Panel Component Problems If you encounter problems with devices connected to the front panel, refer to the computer does not work. 1. The correct device driver is not properly connected. Restart the computer. 176 Appendix C Troubleshooting Without Diagnostics Cause Solution Device is not installed. If the USB device...
... correct driver for the device. 2. Run the Computer Setup utility and change the removable media boot priority in the Advanced menu. Follow the procedures described in Computer Setup. Solving Front Panel Component Problems If you encounter problems with devices connected to the front panel, refer to the computer does not work. 1. The correct device driver is not properly connected. Restart the computer. 176 Appendix C Troubleshooting Without Diagnostics Cause Solution Device is not installed. If the USB device...

Service Reference Guide: HP Compaq dx7500 Business PC
Page 187
..." is installed and set up to work with the Web browser. Enter Computer Setup (F10) and enable the 1394 ports in cable/DSL modem. Cable/DSL modem is disconnected. ISP. (If the cable/DSL service is connected, the "cable" LED light on the front of information that a Web server can later retrieve.) Windows Vista 1. Cookies are disabled in Computer Setup. Click the Delete cookies button. Cause Solution The device is useful for having...
..." is installed and set up to work with the Web browser. Enter Computer Setup (F10) and enable the 1394 ports in cable/DSL modem. Cable/DSL modem is disconnected. ISP. (If the cable/DSL service is connected, the "cable" LED light on the front of information that a Web server can later retrieve.) Windows Vista 1. Cookies are disabled in Computer Setup. Click the Delete cookies button. Cause Solution The device is useful for having...

Service Reference Guide: HP Compaq dx7500 Business PC
Page 196
... keyboard cleaning 42 keyboard keys 43 CD-ROM or DVD problems 173 change notification 22 changing operating systems, support 29 changing password 32 chassis MT illustrated 37 cleaning computer 42 mouse 43 safety precautions 42 clearing password 33 Client Management Interface 17 Client Manager from Symantec 20 cloning tools, software 15 CMOS resetting jumper 182 computer cleaning 42 configuring power button 29 connecting MT drive cables 63 connecting SFF drive cables 98 connections MT system board 61 SFF system board 96 connector pin assignments 140 controlling access...
... keyboard cleaning 42 keyboard keys 43 CD-ROM or DVD problems 173 change notification 22 changing operating systems, support 29 changing password 32 chassis MT illustrated 37 cleaning computer 42 mouse 43 safety precautions 42 clearing password 33 Client Management Interface 17 Client Manager from Symantec 20 cloning tools, software 15 CMOS resetting jumper 182 computer cleaning 42 configuring power button 29 connecting MT drive cables 63 connecting SFF drive cables 98 connections MT system board 61 SFF system board 96 connector pin assignments 140 controlling access...
Service Reference Guide: HP Compaq dx7500 Business PC
Page 198
... power supply, surge-tolerant 34 power switch assembly SFF removal and replacement 127 power switch/LED MT removal and replacement 78 Preboot Execution Environment (PXE) 17 preinstalled software image 15 preparation for disassembly 47 printer problems 165 Proactive Change Notification (PCN) 22 problems audio 164 CD-ROM or DVD 173 diskette 155 flash drive 175 front panel 176 general 151 hard drive 157 hardware installation 168 Internet access 177 keyboard 166 Media Card Reader 159 memory 172 monitor 160 mouse 166 network 170 power 154 printer 165 software 179 processor...
... power supply, surge-tolerant 34 power switch assembly SFF removal and replacement 127 power switch/LED MT removal and replacement 78 Preboot Execution Environment (PXE) 17 preinstalled software image 15 preparation for disassembly 47 printer problems 165 Proactive Change Notification (PCN) 22 problems audio 164 CD-ROM or DVD 173 diskette 155 flash drive 175 front panel 176 general 151 hard drive 157 hardware installation 168 Internet access 177 keyboard 166 Media Card Reader 159 memory 172 monitor 160 mouse 166 network 170 power 154 printer 165 software 179 processor...

Troubleshooting Guide
Page 35
... disabled in Computer Setup. Power switch of new external device are loose or power cables are Ensure that the device is not recognized as an additional drive or expansion card. Turn off the computer, turn on the external device, then turn on the computer are not bent down . Use Windows Device Manager to deselect the automatic settings for beeps from the wall outlet and allow the internal system components to verify the proper installation. Enter Computer Setup...
... disabled in Computer Setup. Power switch of new external device are loose or power cables are Ensure that the device is not recognized as an additional drive or expansion card. Turn off the computer, turn on the external device, then turn on the computer are not bent down . Use Windows Device Manager to deselect the automatic settings for beeps from the wall outlet and allow the internal system components to verify the proper installation. Enter Computer Setup...

Troubleshooting Guide
Page 38
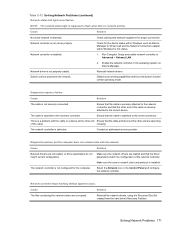
... Network Connections applet within Windows for proper connection. Network driver is not set up properly. System cannot autosense the network. Cause Solution The cable is attached to the incorrect connector. The cable is not securely connected. correctly. Check cabling and network equipment for link status. Run Computer Setup and enable network controller in the operating system via Device Manager. Reinstall the network drivers, using the Recovery Disc Set created from the hard drive's Recovery Partition. 32 Chapter 2 Troubleshooting Without Diagnostics...
... Network Connections applet within Windows for proper connection. Network driver is not set up properly. System cannot autosense the network. Cause Solution The cable is attached to the incorrect connector. The cable is not securely connected. correctly. Check cabling and network equipment for link status. Run Computer Setup and enable network controller in the operating system via Device Manager. Reinstall the network drivers, using the Recovery Disc Set created from the hard drive's Recovery Partition. 32 Chapter 2 Troubleshooting Without Diagnostics...


