

End User License Agreement
Page 2
floppy disk, CD or DVD) or an equivalent solution delivered in any Microsoft operating system software contained in this EULA. 7. After upgrading, you must first be used for restoring the ... and international treaty provisions. Any transfer must agree to all component parts, media, printed materials, this EULA, and if applicable, the Certificate of a hard disk drive-based solution, an external media-based recovery solution (e.g. Prior to do so is mandated under applicable law notwithstanding this limitation or it is expressly provided...
floppy disk, CD or DVD) or an equivalent solution delivered in any Microsoft operating system software contained in this EULA. 7. After upgrading, you must first be used for restoring the ... and international treaty provisions. Any transfer must agree to all component parts, media, printed materials, this EULA, and if applicable, the Certificate of a hard disk drive-based solution, an external media-based recovery solution (e.g. Prior to do so is mandated under applicable law notwithstanding this limitation or it is expressly provided...
Backup and Recovery - Windows Vista
Page 8
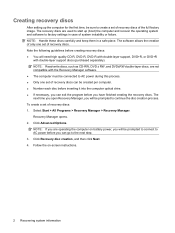
..., and then click Next. 4. Note the following guidelines before creating recovery discs: ● You will need high quality CD-R, DVD-R, DVD-R with double-layer support, DVD+R, or DVD+R with the Recovery Manager software. ● The computer must be connected to AC power during this process. ● Only one...The next time you open Recovery Manager, you will be created per computer. ● Number each disc before inserting it into the computer optical drive. ● If necessary, you can go to the next step. 3. Creating recovery discs After setting up (boot) the computer and recover...
..., and then click Next. 4. Note the following guidelines before creating recovery discs: ● You will need high quality CD-R, DVD-R, DVD-R with double-layer support, DVD+R, or DVD+R with the Recovery Manager software. ● The computer must be connected to AC power during this process. ● Only one...The next time you open Recovery Manager, you will be created per computer. ● Number each disc before inserting it into the computer optical drive. ● If necessary, you can go to the next step. 3. Creating recovery discs After setting up (boot) the computer and recover...
Setup Utility - Windows Vista and XP
Page 10
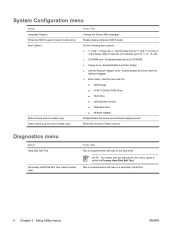
... ● f10 and f12 Delay (sec.)―Set the delay for : ● USB Floppy ● ATAPI CD/DVD ROM Drive ● Hard drive ● USB Diskette on the hard drive. Diagnostics menu Select Hard Disk Self Test Secondary Hard Disk Self Test (select models only) To Do This Run a ...comprehensive self-test on Key ● USB Hard drive ● Network adapter Enable/disable the Quick Launch Button tapping sound. System Configuration menu Select Language Support Enhanced SATA support (select models only)...
... ● f10 and f12 Delay (sec.)―Set the delay for : ● USB Floppy ● ATAPI CD/DVD ROM Drive ● Hard drive ● USB Diskette on the hard drive. Diagnostics menu Select Hard Disk Self Test Secondary Hard Disk Self Test (select models only) To Do This Run a ...comprehensive self-test on Key ● USB Hard drive ● Network adapter Enable/disable the Quick Launch Button tapping sound. System Configuration menu Select Language Support Enhanced SATA support (select models only)...

Drives - Windows Vista
Page 5
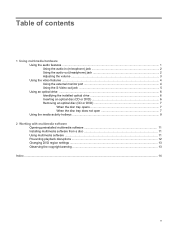
Table of contents 1 Identifying installed drives 2 Handling drives 3 Using an optical drive Inserting an optical disc (CD or DVD 4 Removing an optical disc (CD or DVD 5 When the disc tray opens ...5 When the disc tray does not open 5 4 Improving hard drive performance Using Disk Defragmenter ...7 Using Disk Cleanup ...7 5 Replacing the hard drive Index ...11 v
Table of contents 1 Identifying installed drives 2 Handling drives 3 Using an optical drive Inserting an optical disc (CD or DVD 4 Removing an optical disc (CD or DVD 5 When the disc tray opens ...5 When the disc tray does not open 5 4 Improving hard drive performance Using Disk Defragmenter ...7 Using Disk Cleanup ...7 5 Replacing the hard drive Index ...11 v
Drives - Windows Vista
Page 9
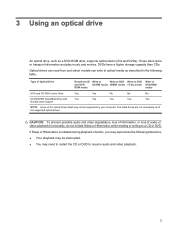
...If Sleep or Hibernation is initiated during playback of a disc, you may need to restart the CD or DVD to DVD-RAM media DVD and CD-RW Combo Drive Yes Yes No No No 8X DVD±RW SuperMulti Drive with Yes Yes Yes Yes Yes Double-Layer support NOTE: Some of the supported optical...: To prevent possible audio and video degradation, loss of information, or loss of Optical Drive Read from and select models can read from CD Write to Write to DVD Write to DVD and DVD- Type of audio or video playback functionality, do not initiate Sleep or Hibernation while reading or writing to...
...If Sleep or Hibernation is initiated during playback of a disc, you may need to restart the CD or DVD to DVD-RAM media DVD and CD-RW Combo Drive Yes Yes No No No 8X DVD±RW SuperMulti Drive with Yes Yes Yes Yes Yes Double-Layer support NOTE: Some of the supported optical...: To prevent possible audio and video degradation, loss of information, or loss of Optical Drive Read from and select models can read from CD Write to Write to DVD Write to DVD and DVD- Type of audio or video playback functionality, do not initiate Sleep or Hibernation while reading or writing to...
Drives - Windows Vista
Page 10
... button (1) on the computer. 2. It prompts you to select how you want to release the disc tray. 3. Turn on the drive bezel to use the media content. 4 Chapter 3 Using an optical drive Gently press the disc (3) down onto the tray spindle until the disc snaps into place. 6. Inserting an optical disc (CD...
... button (1) on the computer. 2. It prompts you to select how you want to release the disc tray. 3. Turn on the drive bezel to use the media content. 4 Chapter 3 Using an optical drive Gently press the disc (3) down onto the tray spindle until the disc snaps into place. 6. Inserting an optical disc (CD...
Drives - Windows Vista
Page 11
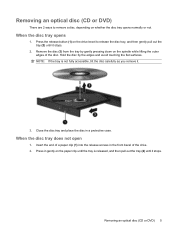
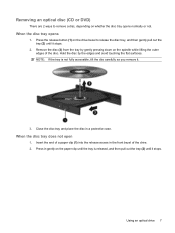
... on the paper clip until the tray is not fully accessible, tilt the disc carefully as you remove it. 3. Removing an optical disc (CD or DVD) 5 Hold the disc by gently pressing down on whether the disc tray opens normally or not. NOTE: If the tray is released, and then pull... tray does not open 1. Remove the disc (3) from the tray by the edges and avoid touching the flat surfaces. Removing an optical disc (CD or DVD) There are 2 ways to release the disc tray, and then gently pull out the tray (2) until it stops. 2. Press the release button (1) on the...
... on the paper clip until the tray is not fully accessible, tilt the disc carefully as you remove it. 3. Removing an optical disc (CD or DVD) 5 Hold the disc by gently pressing down on whether the disc tray opens normally or not. NOTE: If the tray is released, and then pull... tray does not open 1. Remove the disc (3) from the tray by the edges and avoid touching the flat surfaces. Removing an optical disc (CD or DVD) There are 2 ways to release the disc tray, and then gently pull out the tray (2) until it stops. 2. Press the release button (1) on the...

Drives - Windows Vista
Page 17
optical drive O optical disc inserting 4 removing 5 optical drive 3 S software Disk Cleanup 7 Disk Defragmenter 7 DVD inserting 4 removing 5 DVD drive 3 H hard disk drive installing 9 removing 8 replacing 8 hard drive installing 9 removing 8 replacing 8 M maintenance Disk Cleanup 7 Disk Defragmenter 7 Index 11 Index A airport security devices 2 C CD inserting 4 removing 5 CD drive 3 D Disk Cleanup software 7 Disk Defragmenter software 7 disk performance 7 drives caring for 2 hard 8, 9 optical 3 See also hard drive;
optical drive O optical disc inserting 4 removing 5 optical drive 3 S software Disk Cleanup 7 Disk Defragmenter 7 DVD inserting 4 removing 5 DVD drive 3 H hard disk drive installing 9 removing 8 replacing 8 hard drive installing 9 removing 8 replacing 8 M maintenance Disk Cleanup 7 Disk Defragmenter 7 Index 11 Index A airport security devices 2 C CD inserting 4 removing 5 CD drive 3 D Disk Cleanup software 7 Disk Defragmenter software 7 disk performance 7 drives caring for 2 hard 8, 9 optical 3 See also hard drive;
Pointing Devices and Keyboard - Windows Vista
Page 12
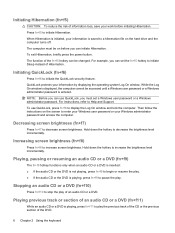
...previous track of the CD or the previous section of the DVD. 6 Chapter 2 Using the keyboard The function of the fn+f5 hotkey can set a Windows user password or a Windows administrator password. The computer must be on the hard drive and the computer turns off. Playing previous track or section ...of an audio CD or a DVD (fn+f11) While an audio CD or a DVD is playing, press fn+f9 to stop the play of an audio CD or...
...previous track of the CD or the previous section of the DVD. 6 Chapter 2 Using the keyboard The function of the fn+f5 hotkey can set a Windows user password or a Windows administrator password. The computer must be on the hard drive and the computer turns off. Playing previous track or section ...of an audio CD or a DVD (fn+f11) While an audio CD or a DVD is playing, press fn+f9 to stop the play of an audio CD or...
Multimedia - Windows Vista
Page 5
... video features ...4 Using the external monitor port 4 Using the S-Video-out jack 5 Using an optical drive ...6 Identifying the installed optical drive 6 Inserting an optical disc (CD or DVD 6 Removing an optical disc (CD or DVD 7 When the disc tray opens 7 When the disc tray does not open 7 Using the media activity... with multimedia software Opening preinstalled multimedia software 11 Installing multimedia software from a disc 11 Using multimedia software ...11 Preventing playback disruptions ...12 Changing DVD region settings ...13 Observing the copyright warning ...13 Index ...14 v
... video features ...4 Using the external monitor port 4 Using the S-Video-out jack 5 Using an optical drive ...6 Identifying the installed optical drive 6 Inserting an optical disc (CD or DVD 6 Removing an optical disc (CD or DVD 7 When the disc tray opens 7 When the disc tray does not open 7 Using the media activity... with multimedia software Opening preinstalled multimedia software 11 Installing multimedia software from a disc 11 Using multimedia software ...11 Preventing playback disruptions ...12 Changing DVD region settings ...13 Observing the copyright warning ...13 Index ...14 v
Multimedia - Windows Vista
Page 12
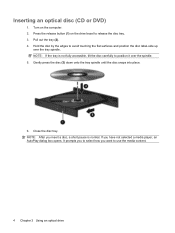
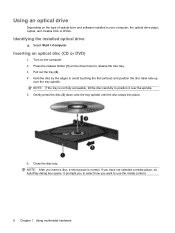
... edges to select how you have not selected a media player, an AutoPlay dialog box opens. Identifying the installed optical drive ▲ Select Start > Computer. Inserting an optical disc (CD or DVD) 1. Gently press the disc (3) down onto the tray spindle until the disc snaps into place. 6. Turn on ...the drive bezel to release the disc tray. 3. If you want to position it over the tray spindle. Pull out the tray (2). ...
... edges to select how you have not selected a media player, an AutoPlay dialog box opens. Identifying the installed optical drive ▲ Select Start > Computer. Inserting an optical disc (CD or DVD) 1. Gently press the disc (3) down onto the tray spindle until the disc snaps into place. 6. Turn on ...the drive bezel to release the disc tray. 3. If you want to position it over the tray spindle. Pull out the tray (2). ...
Multimedia - Windows Vista
Page 13
.... 2. Close the disc tray and place the disc in gently on the drive bezel to remove a disc, depending on the spindle while lifting the outer edges of the drive. 2. Insert the end of a paper clip (1) into the release access... in the front bezel of the disc. Using an optical drive 7 Remove the disc (3) from the tray by the edges and avoid touching the flat surfaces. When... disc carefully as you remove it. 3. Removing an optical disc (CD or DVD) There are 2 ways to release the disc tray, and then gently pull out the tray (2) until it stops.
.... 2. Close the disc tray and place the disc in gently on the drive bezel to remove a disc, depending on the spindle while lifting the outer edges of the drive. 2. Insert the end of a paper clip (1) into the release access... in the front bezel of the disc. Using an optical drive 7 Remove the disc (3) from the tray by the edges and avoid touching the flat surfaces. When... disc carefully as you remove it. 3. Removing an optical disc (CD or DVD) There are 2 ways to release the disc tray, and then gently pull out the tray (2) until it stops.
Multimedia - Windows Vista
Page 16
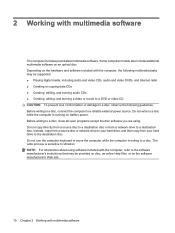
...power. NOTE: For information about using . Do not write to the destination disc. Instead, copy from a source disc or network drive to your hard drive to a disc while the computer is sensitive to a disc. 2 Working with the computer, refer to the software manufacturer's instructions ...that may be supported: ● Playing digital media, including audio and video CDs, audio and video DVDs, and Internet radio ● Creating or ...
...power. NOTE: For information about using . Do not write to the destination disc. Instead, copy from a source disc or network drive to your hard drive to a disc while the computer is sensitive to a disc. 2 Working with the computer, refer to the software manufacturer's instructions ...that may be supported: ● Playing digital media, including audio and video CDs, audio and video DVDs, and Internet radio ● Creating or ...

Multimedia - Windows Vista
Page 19
...In the left pane, click Device Manager. Changing DVD region settings Most DVDs that contain copyrighted files also contain region codes. You can be prompted for your DVD drive. Make the desired changes on the DVD drive. Changing DVD region settings 13 CAUTION: The region settings on ...copyright laws, to Windows online Help for tasks such as installing applications, running utilities, or changing Windows settings. Right-click the DVD drive for such purposes. To change region settings, and then click Properties. 5. Do not use this computer for which you select ...
...In the left pane, click Device Manager. Changing DVD region settings Most DVDs that contain copyrighted files also contain region codes. You can be prompted for your DVD drive. Make the desired changes on the DVD drive. Changing DVD region settings 13 CAUTION: The region settings on ...copyright laws, to Windows online Help for tasks such as installing applications, running utilities, or changing Windows settings. Right-click the DVD drive for such purposes. To change region settings, and then click Properties. 5. Do not use this computer for which you select ...
Multimedia - Windows Vista
Page 20
... 4 multimedia software described 10 using 11 mute button 1, 3 O optical disc inserting 6 removing 7 writing to 10 optical drive playing 12 protecting 10 P ports external monitor 4 programs multimedia 10 using 11 projector, connecting 4 protecting playback 12 R region codes, DVD 13 S S-Video-out jack 5 software multimedia 10 using 11 speakers 1 T TV 2 V VCR 2 volume down button...
... 4 multimedia software described 10 using 11 mute button 1, 3 O optical disc inserting 6 removing 7 writing to 10 optical drive playing 12 protecting 10 P ports external monitor 4 programs multimedia 10 using 11 projector, connecting 4 protecting playback 12 R region codes, DVD 13 S S-Video-out jack 5 software multimedia 10 using 11 speakers 1 T TV 2 V VCR 2 volume down button...


