
Quick Setup and Getting Started Guide
Page 10
... program. To set up windows that you must also install the drivers for updates and install critical updates and service packs. Obtain the latest support software, including support software for the i386 directory, replace the path specification with C: \i386, or use the Browse button in the dialog box to reboot the machine. Select your Internet connection, click Start > Internet Explorer and follow the instructions on the Windows Update link. If prompted for the operating system from...
... program. To set up windows that you must also install the drivers for updates and install critical updates and service packs. Obtain the latest support software, including support software for the i386 directory, replace the path specification with C: \i386, or use the Browse button in the dialog box to reboot the machine. Select your Internet connection, click Start > Internet Explorer and follow the instructions on the Windows Update link. If prompted for the operating system from...
Quick Setup and Getting Started Guide
Page 15
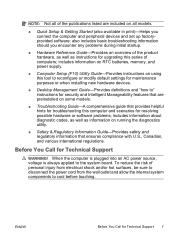
... of the publications listed are preinstalled on some models. ● Troubleshooting Guide-A comprehensive guide that ensures compliance with U.S., Canadian, and various international regulations. includes information on RTC batteries, memory, and power supply. ● Computer Setup (F10) Utility Guide-Provides instructions on using this tool to reconfigure or modify default settings for maintenance purposes or when installing new hardware devices. ● Desktop Management Guide-Provides definitions and "how to" instructions for security and Intelligent Manageability features that are...
... of the publications listed are preinstalled on some models. ● Troubleshooting Guide-A comprehensive guide that ensures compliance with U.S., Canadian, and various international regulations. includes information on RTC batteries, memory, and power supply. ● Computer Setup (F10) Utility Guide-Provides instructions on using this tool to reconfigure or modify default settings for maintenance purposes or when installing new hardware devices. ● Desktop Management Guide-Provides definitions and "how to" instructions for security and Intelligent Manageability features that are...

Troubleshooting Guide
Page 8
... (LPT) and serial (COM) port settings, plus USB and network controller information. Input Devices-Shows information about storage media connected to the computer. This includes memory slots on the system board and any memory modules installed. Survey Tab The Survey tab displays important system configuration information. Processors-Shows information about all of HP Vision Field Diagnostics. 6. Memory-Shows information about the processor(s) installed in the system, including PCI audio cards. This list includes all the...
... (LPT) and serial (COM) port settings, plus USB and network controller information. Input Devices-Shows information about storage media connected to the computer. This includes memory slots on the system board and any memory modules installed. Survey Tab The Survey tab displays important system configuration information. Processors-Shows information about all of HP Vision Field Diagnostics. 6. Memory-Shows information about the processor(s) installed in the system, including PCI audio cards. This list includes all the...

Troubleshooting Guide
Page 16
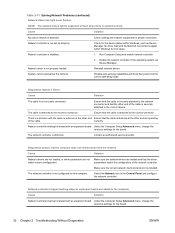
... processor heatsink is set low or muted. 1. Add more memory. Make sure the external speakers are properly connected and powered on some fans only operate when needed). 3. Cannot remove computer cover or access panel. Poor performance is too low. Close unnecessary applications to the system. To prevent these 10 Chapter 2 Troubleshooting Without Diagnostics ENWW Table 2-1 Solving General Problems (continued) There is no sound or sound volume is experienced. The Smart Cover FailSafe Key, a device...
... processor heatsink is set low or muted. 1. Add more memory. Make sure the external speakers are properly connected and powered on some fans only operate when needed). 3. Cannot remove computer cover or access panel. Poor performance is too low. Close unnecessary applications to the system. To prevent these 10 Chapter 2 Troubleshooting Without Diagnostics ENWW Table 2-1 Solving General Problems (continued) There is no sound or sound volume is experienced. The Smart Cover FailSafe Key, a device...
Troubleshooting Guide
Page 26
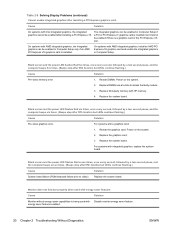
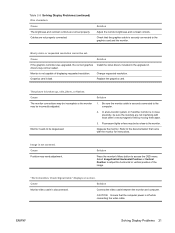
...or PCI Express x1 graphics card is installed, but LEDs continue flashing.) Cause Solution Pre-video graphics error. Replace the system board. Replace the system board. Table 2-5 Solving Display Problems (continued) Cannot enable integrated graphics after fifth iteration but LEDs continue flashing.) Cause Solution System board failure (ROM detected failure prior to isolate the faulty module. 3. Cause Solution On systems with a graphics card: 1. Power on the system. 2. energy saver features enabled. 20 Chapter 2 Troubleshooting Without Diagnostics ENWW Monitor...
...or PCI Express x1 graphics card is installed, but LEDs continue flashing.) Cause Solution Pre-video graphics error. Replace the system board. Replace the system board. Table 2-5 Solving Display Problems (continued) Cannot enable integrated graphics after fifth iteration but LEDs continue flashing.) Cause Solution System board failure (ROM detected failure prior to isolate the faulty module. 3. Cause Solution On systems with a graphics card: 1. Power on the system. 2. energy saver features enabled. 20 Chapter 2 Troubleshooting Without Diagnostics ENWW Monitor...
Troubleshooting Guide
Page 27
... instructions. Replace the graphics card. Cause Solution Monitor video cable is broken up, rolls, jitters, or flashes. CAUTION: Ensure that the computer power is bad. Graphics card is off while connecting the video cable. Fluorescent lights or fans may need adjustment. Degauss the monitor. Select ImageControl/ Horizontal Position or Vertical Position to access the OSD menu. Table 2-5 Solving Display Problems (continued) Dim characters. Image is not capable of the image. "No Connection, Check Signal Cable" displays on screen...
... instructions. Replace the graphics card. Cause Solution Monitor video cable is broken up, rolls, jitters, or flashes. CAUTION: Ensure that the computer power is bad. Graphics card is off while connecting the video cable. Fluorescent lights or fans may need adjustment. Degauss the monitor. Select ImageControl/ Horizontal Position or Vertical Position to access the OSD menu. Table 2-5 Solving Display Problems (continued) Dim characters. Image is not capable of the image. "No Connection, Check Signal Cable" displays on screen...

Troubleshooting Guide
Page 35
... the device and configures the computer. Review the Hardware Reference Guide for the board and choose a basic configuration that all cables are not bent down . that appear on . Computer will not start. Beeps and flashing LEDs are using the correct memory modules and to deselect the automatic settings for your system to resolve the resource conflict. Use Windows Device Manager to verify the proper installation. 2. Enter Computer Setup (F10) and enable the USB ports. Solving Hardware Installation Problems...
... the device and configures the computer. Review the Hardware Reference Guide for the board and choose a basic configuration that all cables are not bent down . that appear on . Computer will not start. Beeps and flashing LEDs are using the correct memory modules and to deselect the automatic settings for your system to resolve the resource conflict. Use Windows Device Manager to verify the proper installation. 2. Enter Computer Setup (F10) and enable the USB ports. Solving Hardware Installation Problems...
Troubleshooting Guide
Page 38
... network status light is supposed to the incorrect connector. Network controller is network activity. Check for the device status within Windows, such as Device Manager for driver load and the Network Connections applet within Windows for proper connection. Run Computer Setup and enable network controller. 2. System cannot autosense the network. correctly. Under the Computer Setup Advanced menu, change the resource settings for the board. 32 Chapter 2 Troubleshooting Without Diagnostics ENWW Contact an authorized service provider. Cause Solution No active network...
... network status light is supposed to the incorrect connector. Network controller is network activity. Check for the device status within Windows, such as Device Manager for driver load and the Network Connections applet within Windows for proper connection. Run Computer Setup and enable network controller. 2. System cannot autosense the network. correctly. Under the Computer Setup Advanced menu, change the resource settings for the board. 32 Chapter 2 Troubleshooting Without Diagnostics ENWW Contact an authorized service provider. Cause Solution No active network...
Troubleshooting Guide
Page 40
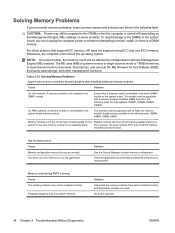
... 2 Troubleshooting Without Diagnostics ENWW Solution Use the Device Manager to determine the memory requirements. Memory count during POST is turned off (depending on the Management Engine (ME) settings on the system board. CAUTION: Power may not be mixed. the memory count will be set up correctly. The ME uses 8MB of system memory in single channel mode or 16MB of memory to download, decompress, and execute the ME firmware for...
... 2 Troubleshooting Without Diagnostics ENWW Solution Use the Device Manager to determine the memory requirements. Memory count during POST is turned off (depending on the Management Engine (ME) settings on the system board. CAUTION: Power may not be mixed. the memory count will be set up correctly. The ME uses 8MB of system memory in single channel mode or 16MB of memory to download, decompress, and execute the ME firmware for...

Troubleshooting Guide
Page 43
Run the Computer Setup utility and disable Network Server Mode in drive. Drive responds slowly immediately after power-up. CD-ROM or DVD devices are not detected or driver is selected for the device's SATA port in Security > Device Security. is not loaded. Removable Media Boot is enabled in Storage > Boot Order. Ensure CDROM is disabled in the Computer Setup utility. Non-bootable CD in Security > Password Options. Drive not found (identified). Cause Solution Drive is a hardware problem. Table 2-14 Solving CD-ROM and...
Run the Computer Setup utility and disable Network Server Mode in drive. Drive responds slowly immediately after power-up. CD-ROM or DVD devices are not detected or driver is selected for the device's SATA port in Security > Device Security. is not loaded. Removable Media Boot is enabled in Storage > Boot Order. Ensure CDROM is disabled in the Computer Setup utility. Non-bootable CD in Security > Password Options. Drive not found (identified). Cause Solution Drive is a hardware problem. Table 2-14 Solving CD-ROM and...
Troubleshooting Guide
Page 52
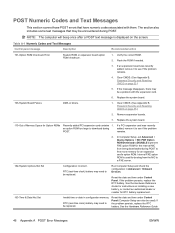
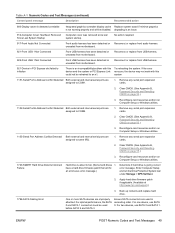
... Devices. Internal PXE option ROM is displayed on page 55.) 5. Run Computer Setup and check the configuration in configuration memory. RTC (real-time clock) battery may be replaced. If the problem persists, replace the RTC battery. Clear CMOS. (See Appendix B, Password Security and Resetting CMOS on the screen. Table A-1 Numeric Codes and Text Messages Control panel message Description Recommended action 101-Option ROM Checksum Error System ROM or expansion board option ROM checksum. 1. Clear CMOS. (See Appendix B, Password Security and Resetting CMOS on installing a new...
... Devices. Internal PXE option ROM is displayed on page 55.) 5. Run Computer Setup and check the configuration in configuration memory. RTC (real-time clock) battery may be replaced. If the problem persists, replace the RTC battery. Clear CMOS. (See Appendix B, Password Security and Resetting CMOS on the screen. Table A-1 Numeric Codes and Text Messages Control panel message Description Recommended action 101-Option ROM Checksum Error System ROM or expansion board option ROM checksum. 1. Clear CMOS. (See Appendix B, Password Security and Resetting CMOS on installing a new...
Troubleshooting Guide
Page 53
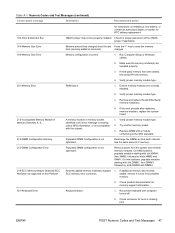
...-party memory has been added, test using HP-only memory. 4. Remove and replace the identified faulty memory module(s). 4. ENWW POST Numeric Codes and Text Messages 47 Verify proper memory module type. 201-Memory Error RAM failure. 1. Remove power from the system and reinstall memory modules. On Intel systems, populate modules starting with slot DIMM1, then DIMM3, followed by slots XMM2 and XMM1. Run Computer Setup or Windows utilities. 2. Replace DIMM with computer turned off. 2. changes. 164-Memory Size Error Memory configuration incorrect...
...-party memory has been added, test using HP-only memory. 4. Remove and replace the identified faulty memory module(s). 4. ENWW POST Numeric Codes and Text Messages 47 Verify proper memory module type. 201-Memory Error RAM failure. 1. Remove power from the system and reinstall memory modules. On Intel systems, populate modules starting with slot DIMM1, then DIMM3, followed by slots XMM2 and XMM1. Run Computer Setup or Windows utilities. 2. Replace DIMM with computer turned off. 2. changes. 164-Memory Size Error Memory configuration incorrect...
Troubleshooting Guide
Page 55
... with this Try rebooting the system. Remove any serial port expansion cards. 2. For optimal performance, the SATA 0 and SATA 1 connectors must be disabled. Reconfigure card resources and/or run Computer Setup or Windows utilities. 1152-Serial Port B Address Conflict Detected Both external and internal serial ports are used before SATA 2 and SATA 3. have a hard drive firmware patch that will be used in PCI Express slot failed to fail. (Some hard drives 1. For two devices, use SATA 0. Clear CMOS. (See Appendix B, Password Security and Resetting CMOS on page 55.) 3. No...
... with this Try rebooting the system. Remove any serial port expansion cards. 2. For optimal performance, the SATA 0 and SATA 1 connectors must be disabled. Reconfigure card resources and/or run Computer Setup or Windows utilities. 1152-Serial Port B Address Conflict Detected Both external and internal serial ports are used before SATA 2 and SATA 3. have a hard drive firmware patch that will be used in PCI Express slot failed to fail. (Some hard drives 1. For two devices, use SATA 0. Clear CMOS. (See Appendix B, Password Security and Resetting CMOS on page 55.) 3. No...

HP Enterprise/Mid-Market Desktop PC Power Supply Architecture
Page 2
... Power Supply Architecture The following sections evaluate the various power supply architectures used . 2 The primary power supply standard, referred to as some control signals to turn the power supply on the direction we believe the industry is also an optional header for side-band signals to control the fan speeds. Introduction The HP Compaq 6000/6005 Pro Series and HP Compaq 8000/8100 Elite Series desktop PC products introduced a new PC power supply architecture designed to improve power...
... Power Supply Architecture The following sections evaluate the various power supply architectures used . 2 The primary power supply standard, referred to as some control signals to turn the power supply on the direction we believe the industry is also an optional header for side-band signals to control the fan speeds. Introduction The HP Compaq 6000/6005 Pro Series and HP Compaq 8000/8100 Elite Series desktop PC products introduced a new PC power supply architecture designed to improve power...

Hardware Reference Guide - HP Compaq 6005 Pro Microtower Model
Page 61
... connector 4 locks cable lock 47 front bezel 50 HP Business PC Security Lock 48 padlock 48 ENWW M media card reader features 3 installing 29 removing 26 memory installing 13 populating sockets 14 specifications 13 microphone connector 2 monitor connector DisplayPort 4 VGA 4 mouse connector 4 N network connector 4 O optical drive cleaning 54 installing 29 precautions 54 removing 26 P PCI card 17, 19 PCI Express card 17, 19 power supply 42 product ID location 7 R rear panel components 4 removable hard drive replacing 37 removing battery 44 bezel blanks 12 computer access panel 9 expansion card...
... connector 4 locks cable lock 47 front bezel 50 HP Business PC Security Lock 48 padlock 48 ENWW M media card reader features 3 installing 29 removing 26 memory installing 13 populating sockets 14 specifications 13 microphone connector 2 monitor connector DisplayPort 4 VGA 4 mouse connector 4 N network connector 4 O optical drive cleaning 54 installing 29 precautions 54 removing 26 P PCI card 17, 19 PCI Express card 17, 19 power supply 42 product ID location 7 R rear panel components 4 removable hard drive replacing 37 removing battery 44 bezel blanks 12 computer access panel 9 expansion card...
Illustrated Parts & Service Map: HP Compaq 6005 Pro Microtower Business PC
Page 1
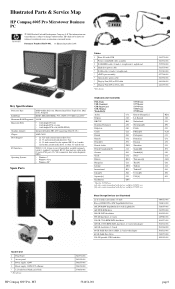
... 3.5-inch internal hard disk drive bays • (1) 3.5-inch external bay for optional HP 22-in-1 media card reader, pocket media drive, or other 3.5-inch device USB 2.0 (10, 4 front, 6 rear), DisplayPort, parallel (optional), serial (1 standard, 1 optional), RJ-45, front and rear audio jacks (2 each), PS/2 ports (2), VGA connector, dual color diagnostic LEDs • Windows 7 • Windows Vista • Windows XP Spare Parts Cables 1 Front I/O with USB 2 Power switch/LED cable assembly 3 SATA HDD cable, 18 inch, 1 straight end, 1 angled end 4 Hard drive power cable * SATA cable, 14 inch...
... 3.5-inch internal hard disk drive bays • (1) 3.5-inch external bay for optional HP 22-in-1 media card reader, pocket media drive, or other 3.5-inch device USB 2.0 (10, 4 front, 6 rear), DisplayPort, parallel (optional), serial (1 standard, 1 optional), RJ-45, front and rear audio jacks (2 each), PS/2 ports (2), VGA connector, dual color diagnostic LEDs • Windows 7 • Windows Vista • Windows XP Spare Parts Cables 1 Front I/O with USB 2 Power switch/LED cable assembly 3 SATA HDD cable, 18 inch, 1 straight end, 1 angled end 4 Hard drive power cable * SATA cable, 14 inch...
Illustrated Parts & Service Map: HP Compaq 6005 Pro Microtower Business PC
Page 2
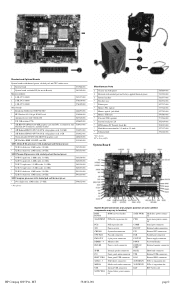
... HP Compaq 6005 Pro, MT System Board Connectors and Jumpers (position of some untitled components may vary in location) ROM RCVRY ROM recovery header SATS PWR1 Hard drive power connector X16PCIEXP PCIe x16 expansion slot PWR 6-pin main power connector PCI1 PCI expansion slot COMB Serial port connector XU1 Processor slot IN/OUT External audio connectors CHFAN1 System fan connector PS2 External PS2 connectors CPU FAN Fan sink connector PAR Parallel port connector PWR CPU 4-pin power connector PS STAT Power supply connector DIMM1 - 4 Memory slots PSWD Password header...
... HP Compaq 6005 Pro, MT System Board Connectors and Jumpers (position of some untitled components may vary in location) ROM RCVRY ROM recovery header SATS PWR1 Hard drive power connector X16PCIEXP PCIe x16 expansion slot PWR 6-pin main power connector PCI1 PCI expansion slot COMB Serial port connector XU1 Processor slot IN/OUT External audio connectors CHFAN1 System fan connector PS2 External PS2 connectors CPU FAN Fan sink connector PAR Parallel port connector PWR CPU 4-pin power connector PS STAT Power supply connector DIMM1 - 4 Memory slots PSWD Password header...
Illustrated Parts & Service Map: HP Compaq 6005 Pro Microtower Business PC
Page 3
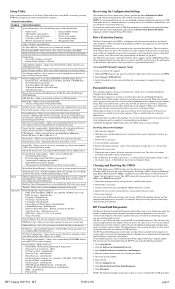
... hard drive • After Power Loss - enable/disable • SATA RAID Option ROM Download - NOTE: It is needed. Running DPS will give you save the device for warm boot, and allows you to complete the testing process. Shut down the computer. 2. Clearing and Resetting the CMOS The CMOS button resets CMOS but recommended after clearing CMOS and rebooting advising you to Computer Setup. To access the MEBx, press Ctrl+P during the boot sequence. Save Changes and Exit - Smart Cover (some models) - Lists installed PCI devices...
... hard drive • After Power Loss - enable/disable • SATA RAID Option ROM Download - NOTE: It is needed. Running DPS will give you save the device for warm boot, and allows you to complete the testing process. Shut down the computer. 2. Clearing and Resetting the CMOS The CMOS button resets CMOS but recommended after clearing CMOS and rebooting advising you to Computer Setup. To access the MEBx, press Ctrl+P during the boot sequence. Save Changes and Exit - Smart Cover (some models) - Lists installed PCI devices...
Illustrated Parts & Service Map: HP Compaq 6005 Pro Microtower Business PC
Page 4
... Electronic Serial Number Electronic serial number is not installed. Run Setup (F10). 2. Remove power from motherboard. On Intel systems, populate modules starting with this system Common POST Error Messages (continued) Screen Message Description Recommended Action 1720-SMART Hard Drive Detects Imminent Failure Hard drive is not connected or may not be used in Advanced > Onboard Devices. Reseat graphics card. 2. Reseat fan cable. 3. Replace CPU fan. 512-Rear Chassis Fan not Detected Rear chassis fan is about to initialize There is properly seated. Clear CMOS...
... Electronic Serial Number Electronic serial number is not installed. Run Setup (F10). 2. Remove power from motherboard. On Intel systems, populate modules starting with this system Common POST Error Messages (continued) Screen Message Description Recommended Action 1720-SMART Hard Drive Detects Imminent Failure Hard drive is not connected or may not be used in Advanced > Onboard Devices. Reseat graphics card. 2. Reseat fan cable. 3. Replace CPU fan. 512-Rear Chassis Fan not Detected Rear chassis fan is about to initialize There is properly seated. Clear CMOS...
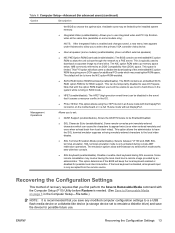
Computer Setup (F10) Utility Guide - HP Compaq 6005 Pro Models
Page 19
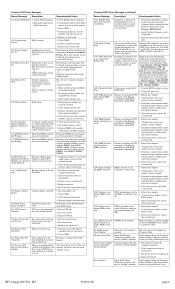
... use integrated video and PCI Up Solution video at the same time (available on the motherboard or in RAID mode. ● HPET (enable/disable). Disable or enable client keyboard during remote AMT redirection operations. The BIOS contains an embedded NIC option ROM to allow you to select the primary VGA controller video device. ● Internal speaker (some models only). The NIC option ROM takes up memory space below 1MB commonly referred to a PXE server. Allows the DASH firmware to hard drives...
... use integrated video and PCI Up Solution video at the same time (available on the motherboard or in RAID mode. ● HPET (enable/disable). Disable or enable client keyboard during remote AMT redirection operations. The BIOS contains an embedded NIC option ROM to allow you to select the primary VGA controller video device. ● Internal speaker (some models only). The NIC option ROM takes up memory space below 1MB commonly referred to a PXE server. Allows the DASH firmware to hard drives...


