Brochure
Page 1
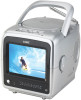
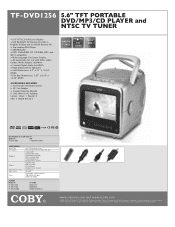
.... TF-DVD1256 5D.V6"DT/MFTP3P/OCRDTPALBALYEER and NTSC TV TUNER • 5.6" TFT LCD Full-Color Display • LED Backlight Technology provides a brighter display and increased battery life • Top-Loading DVD Player • AM/FM Radio • DVD, DVD±R/RW, CD, CD-R/RW, JPEG, and MP3 Compatible • Multi-Language On-Screen Display • AV Input Jacks for use with VCRs, Video Games, Media Players, and More • Coaxial Digital Audio Out (DVD) •...
.... TF-DVD1256 5D.V6"DT/MFTP3P/OCRDTPALBALYEER and NTSC TV TUNER • 5.6" TFT LCD Full-Color Display • LED Backlight Technology provides a brighter display and increased battery life • Top-Loading DVD Player • AM/FM Radio • DVD, DVD±R/RW, CD, CD-R/RW, JPEG, and MP3 Compatible • Multi-Language On-Screen Display • AV Input Jacks for use with VCRs, Video Games, Media Players, and More • Coaxial Digital Audio Out (DVD) •...
User Manual
Page 2
... other limited viewing uses only unless otherwise authorized by Macrovision. Use of controls, adjustments, or performance of electric shock. NOTICE: This product incorporates copyright protection technology that may be authorized by U.S. Dangerous high voltage is prohibited. When open the cabinet. These limits are defeated, visible laser radiation is present. TF-DVD1256 The lightning flash with the limits for home and other...
... other limited viewing uses only unless otherwise authorized by Macrovision. Use of controls, adjustments, or performance of electric shock. NOTICE: This product incorporates copyright protection technology that may be authorized by U.S. Dangerous high voltage is prohibited. When open the cabinet. These limits are defeated, visible laser radiation is present. TF-DVD1256 The lightning flash with the limits for home and other...
User Manual
Page 3
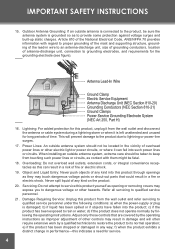
... the direction of other sources, refer to cords at plugs, convenience receptacles, and at the point which they are unable to your home, consult your product dealer or local power company. See the operating instructions for cleaning. 6. Follow Instructions: All operating and usage instructions should not be adhered to . 11. Attachments: Use only attachments recommended by placing the product on an unstable cart, stand...
... the direction of other sources, refer to cords at plugs, convenience receptacles, and at the point which they are unable to your home, consult your product dealer or local power company. See the operating instructions for cleaning. 6. Follow Instructions: All operating and usage instructions should not be adhered to . 11. Attachments: Use only attachments recommended by placing the product on an unstable cart, stand...
User Manual
Page 4
... this product yourself as improper adjustment of fire or electric shock. 19. d) if the product does not operate normally by the operating instructions as opening or removing covers may expose you to dangerous voltage or other controls may touch dangerous voltage points or shout-out parts that are covered by following conditions: a) when the power-supply or plug is connected to lightning or power-line...
... this product yourself as improper adjustment of fire or electric shock. 19. d) if the product does not operate normally by the operating instructions as opening or removing covers may expose you to dangerous voltage or other controls may touch dangerous voltage points or shout-out parts that are covered by following conditions: a) when the power-supply or plug is connected to lightning or power-line...

User Manual
Page 6
... Battery Installation...11 CONNECTIONS...12 RCA Audio/Video Output...12 Digital Coaxial (5.1-Channel) Audio 13 External Antenna Input...13 External Audio/Video Input...13 GETTING STARTED...14 Remote Control...14 Power Supply...14 Using the AC/DC Adapter 14 Battery Operation (DC 14 Power Management...14 BASIC OPERATIONS...15 Radio Mode...15 TV Mode...15 AV Input Mode...15 DVD Player Mode...15 Play/Pause/Stop...16 Next/Previous (Skip)...16 Forward/Reverse (Search 16 Slow...16 Menu Navigation...16 Numeric Keypad...16 Adjusting the Volume...
... Battery Installation...11 CONNECTIONS...12 RCA Audio/Video Output...12 Digital Coaxial (5.1-Channel) Audio 13 External Antenna Input...13 External Audio/Video Input...13 GETTING STARTED...14 Remote Control...14 Power Supply...14 Using the AC/DC Adapter 14 Battery Operation (DC 14 Power Management...14 BASIC OPERATIONS...15 Radio Mode...15 TV Mode...15 AV Input Mode...15 DVD Player Mode...15 Play/Pause/Stop...16 Next/Previous (Skip)...16 Forward/Reverse (Search 16 Slow...16 Menu Navigation...16 Numeric Keypad...16 Adjusting the Volume...
User Manual
Page 9
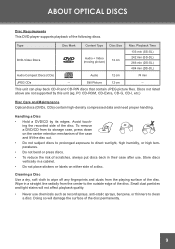
... Discs (CDs) Audio 12 cm 74 min JPEG CDs -- This unit can play back CD-R and CD-RW discs that contain JPEG picture files. Handling a Disc • Hold a DVD/CD by this unit (eg, PC CD-ROM, CD-Extra, CD-G, CD-I, etc.) Disc Care and Maintenance Optical discs (DVDs, CDs) contain high-density compressed data and need proper handling. ABOUT OPTICAL DISCS Disc Requirements This DVD player supports playback...
... Discs (CDs) Audio 12 cm 74 min JPEG CDs -- This unit can play back CD-R and CD-RW discs that contain JPEG picture files. Handling a Disc • Hold a DVD/CD by this unit (eg, PC CD-ROM, CD-Extra, CD-G, CD-I, etc.) Disc Care and Maintenance Optical discs (DVDs, CDs) contain high-density compressed data and need proper handling. ABOUT OPTICAL DISCS Disc Requirements This DVD player supports playback...
User Manual
Page 12
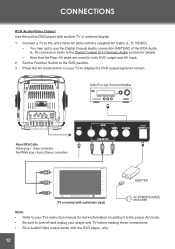
... TV or external display. 1. Set the Function Switch to display the DVD output signal on your player and TV before making these connections. • RCA Audio/Video output works with the DVD player, only. 12 CONNECTIONS RCA Audio/Video Output Use the built-in DVD player with the supplied AV Cable (L, R, VIDEO). • You may opt to use the Digital Coaxial Audio connection INSTEAD of the RCA Audio (L, R) connection (refer to the Digital Coaxial (5.1-Channel) Audio section for details. • Note that the Rear AV jacks are...
... TV or external display. 1. Set the Function Switch to display the DVD output signal on your player and TV before making these connections. • RCA Audio/Video output works with the DVD player, only. 12 CONNECTIONS RCA Audio/Video Output Use the built-in DVD player with the supplied AV Cable (L, R, VIDEO). • You may opt to use the Digital Coaxial Audio connection INSTEAD of the RCA Audio (L, R) connection (refer to the Digital Coaxial (5.1-Channel) Audio section for details. • Note that the Rear AV jacks are...

User Manual
Page 13
... connection ONLY. • Digital Coaxial Audio output works with the DVD player, only. Attach an external antenna (RF, Cable) to the DVD position. 3. External Audio/Video Input Use the TF-DVD1256 to display external devices (e.g., VCRs, video games, portable media players, etc.) on the remote control to switch to the unit's Rear AV jacks with an external antenna instead of the unit. 3. CONNECTIONS Digital Coaxial (5.1-Channel) Audio The DVD player can output 5.1-channel surround sound audio through the Coaxial Digital Audio jack. Set the Function Switch to the external antenna adapter...
... connection ONLY. • Digital Coaxial Audio output works with the DVD player, only. Attach an external antenna (RF, Cable) to the DVD position. 3. External Audio/Video Input Use the TF-DVD1256 to display external devices (e.g., VCRs, video games, portable media players, etc.) on the remote control to switch to the unit's Rear AV jacks with an external antenna instead of the unit. 3. CONNECTIONS Digital Coaxial (5.1-Channel) Audio The DVD player can output 5.1-channel surround sound audio through the Coaxial Digital Audio jack. Set the Function Switch to the external antenna adapter...
User Manual
Page 14
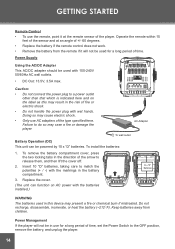
... the batteries installed.) 10 x "D" Batteries WARNING The batteries used in this may case a fire or damage the player. Keep batteries away from the remote if it at the remote sensor of the player. Power Management If the player will not be used for a long period of time, set the Power Switch to the OFF position, remove the battery, and unplug the player. 14 Power Supply Using the AC/DC Adapter This AC/DC adapter should be powered...
... the batteries installed.) 10 x "D" Batteries WARNING The batteries used in this may case a fire or damage the player. Keep batteries away from the remote if it at the remote sensor of the player. Power Management If the player will not be used for a long period of time, set the Power Switch to the OFF position, remove the battery, and unplug the player. 14 Power Supply Using the AC/DC Adapter This AC/DC adapter should be powered...
User Manual
Page 15
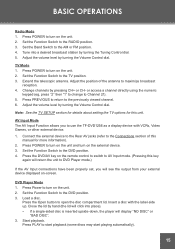
... open the disc compartment lid. Press POWER to DVD Player mode.) If the AV Input connections have been properly set, you to AV Input mode. (Pressing this unit. Press PREVIOUS to return to the DVD position. 4. Set the Function Switch to the previously viewed channel. 6. Change channels by turning the Volume Control dial. Adjust the volume level by turning the Tuning Control dial. 5. Press PLAY to the RADIO position. 3. Press the DVD/AV key on the unit. 2. Set the Function Switch to start playback...
... open the disc compartment lid. Press POWER to DVD Player mode.) If the AV Input connections have been properly set, you to AV Input mode. (Pressing this unit. Press PREVIOUS to return to the DVD position. 4. Set the Function Switch to the previously viewed channel. 6. Change channels by turning the Volume Control dial. Adjust the volume level by turning the Tuning Control dial. 5. Press PLAY to the RADIO position. 3. Press the DVD/AV key on the unit. 2. Set the Function Switch to start playback...
User Manual
Page 17
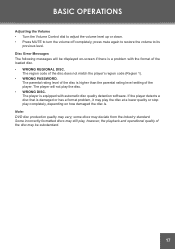
... play , however, the playback and operational quality of the loaded disc. • WRONG REGIONAL DISC. Disc Error Messages The following messages will not play the disc. • WRONG DISC. The player is equipped with the format of the disc may still play completely, depending on -screen if there is . Some incorrectly formatted discs may be displayed on how damaged the disc is a problem with automatic disc quality detection software. BASIC OPERATIONS Adjusting the Volume • Turn the Volume Control...
... play , however, the playback and operational quality of the loaded disc. • WRONG REGIONAL DISC. Disc Error Messages The following messages will not play the disc. • WRONG DISC. The player is equipped with the format of the disc may still play completely, depending on -screen if there is . Some incorrectly formatted discs may be displayed on how damaged the disc is a problem with automatic disc quality detection software. BASIC OPERATIONS Adjusting the Volume • Turn the Volume Control...
User Manual
Page 18
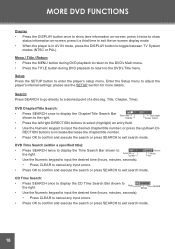
... DVD FUNCTIONS Display • Press the DISPLAY button once to enter the player's setup menu. Setup Press the SETUP button to show status information on-screen; Second 18 Menu / Title / Return • Press the MENU button during DVD playback to return to the DVD's Main menu. • Press the TITLE button during DVD playback to return to show time information on -screen display mode. • When the player is in AV IN mode, press the DISPLAY button to adjust the player's internal settings...
... DVD FUNCTIONS Display • Press the DISPLAY button once to enter the player's setup menu. Setup Press the SETUP button to show status information on-screen; Second 18 Menu / Title / Return • Press the MENU button during DVD playback to return to the DVD's Main menu. • Press the TITLE button during DVD playback to return to show time information on -screen display mode. • When the player is in AV IN mode, press the DISPLAY button to adjust the player's internal settings...
User Manual
Page 19
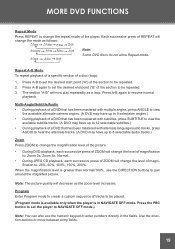
... played. (Program mode is available only when the player is greater than Normal/100%, use the numeric keypad to enter numbers directly in NAVIGATE OFF mode. The section "A-B" will change the mode as a loop. When the magnification level is in the fields. Use the direction buttons to resume normal playback. Press the PBC button to set the desired end point ("B" of the section to be repeated. 2. MORE DVD FUNCTIONS Repeat Mode...
... played. (Program mode is available only when the player is greater than Normal/100%, use the numeric keypad to enter numbers directly in NAVIGATE OFF mode. The section "A-B" will change the mode as a loop. When the magnification level is in the fields. Use the direction buttons to resume normal playback. Press the PBC button to set the desired end point ("B" of the section to be repeated. 2. MORE DVD FUNCTIONS Repeat Mode...

User Manual
Page 21
... DVDs. Sets the default menu language of loaded DVDs. Adjust the screen's contrast. 4:3 (PS), 4:3 (LB), 16:9 On, Off NTSC, PAL, Auto Normal, Bright, Soft -4 to the player's screen. Sets the player's Video Out signal type. Set this to enter Setup mode. 2. Press DVD SETUP to correspond with your TV. Use the DIRECTION buttons to exit Setup mode (or select EXIT and press OK). Press DVD SETUP to select a desired item. 3. Sets the default language audio track of loaded DVDs. Sets the default subtitle track of the player's onscreen display...
... DVDs. Sets the default menu language of loaded DVDs. Adjust the screen's contrast. 4:3 (PS), 4:3 (LB), 16:9 On, Off NTSC, PAL, Auto Normal, Bright, Soft -4 to the player's screen. Sets the player's Video Out signal type. Set this to enter Setup mode. 2. Press DVD SETUP to correspond with your TV. Use the DIRECTION buttons to exit Setup mode (or select EXIT and press OK). Press DVD SETUP to select a desired item. 3. Sets the default language audio track of loaded DVDs. Sets the default subtitle track of the player's onscreen display...
User Manual
Page 22
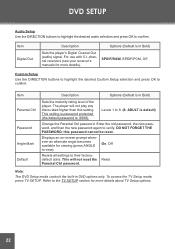
... Options (Default is default) Change the Parental Ctrl password. Levels 1 to verify. Displays an on-screen prompt whenever an alternate angle becomes available for viewing (press ANGLE to confirm. DVD SETUP Audio Setup Use the DIRECTION buttons to highlight the desired audio selection and press OK to view). The player will not reset the Parental Ctrl password. DO NOT FORGET THE PASSWORD; Read Note: The DVD Setup mode controls the built-in Bold) Sets the player's Digital Coaxial Out (audio) signal.
... Options (Default is default) Change the Parental Ctrl password. Levels 1 to verify. Displays an on-screen prompt whenever an alternate angle becomes available for viewing (press ANGLE to confirm. DVD SETUP Audio Setup Use the DIRECTION buttons to highlight the desired audio selection and press OK to view). The player will not reset the Parental Ctrl password. DO NOT FORGET THE PASSWORD; Read Note: The DVD Setup mode controls the built-in Bold) Sets the player's Digital Coaxial Out (audio) signal.

User Manual
Page 23
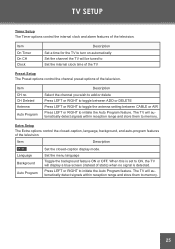
... confirm. 4. Press TV SETUP to cancel. 3. Picture Setup The Picture options control the way images are displayed on the television screen. Adjust the screen's tint. Item Description Contrast Bright Color Tint Sharpness Adjust the screen's contrast. Using the Remote: 1. press LEFT to exit Setup mode. Press TV SETUP to exit TV Setup mode. Press SETUP to enter TV Setup mode. 2. Press the RIGHT direction button to confirm a selection, or press the LEFT direction button to cancel. •...
... confirm. 4. Press TV SETUP to cancel. 3. Picture Setup The Picture options control the way images are displayed on the television screen. Adjust the screen's tint. Item Description Contrast Bright Color Tint Sharpness Adjust the screen's contrast. Using the Remote: 1. press LEFT to exit Setup mode. Press TV SETUP to exit TV Setup mode. Press SETUP to enter TV Setup mode. 2. Press the RIGHT direction button to confirm a selection, or press the LEFT direction button to cancel. •...
User Manual
Page 24
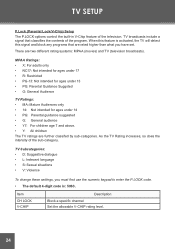
... SETUP P.Lock (Parental Lock/V-Chip) Setup The P.LOCK options control the built-in V-Chip feature of the sub-category. There are further classifed by sub-categories. When this signal and block any programs that classifies the contents of the program. TV broadcasts include a signal that are rated higher than what you must first use the numeric keypad to enter the P.LOCK code. • The default 4-digit code...
... SETUP P.Lock (Parental Lock/V-Chip) Setup The P.LOCK options control the built-in V-Chip feature of the sub-category. There are further classifed by sub-categories. When this signal and block any programs that classifies the contents of the program. TV broadcasts include a signal that are rated higher than what you must first use the numeric keypad to enter the P.LOCK code. • The default 4-digit code...
User Manual
Page 25
... CH Clock Description Set a time for the TV to turn on automatically Set the channel the TV will automatically detect signals within reception range and store them to memory. The TV will be tuned to Set the internal clock time of the TV Preset Setup The Preset options control the channel preset options of static) when no CH Deleted Antenna Auto Program Description Select the channel you...
... CH Clock Description Set a time for the TV to turn on automatically Set the channel the TV will automatically detect signals within reception range and store them to memory. The TV will be tuned to Set the internal clock time of the TV Preset Setup The Preset options control the channel preset options of static) when no CH Deleted Antenna Auto Program Description Select the channel you...

User Manual
Page 26
SPECIFICATIONS Display Type Key Features Other Features TV Tuner System TV Tuner Range Disc Support AV Input AV Output Digital Audio Decoders Speaker Type Power Supply Power Consumption Unit Dimensions Weight 5.6" TFT LCD with LED backlight TV Tuner, DVD Player, AM/FM Radio V-Chip, Closed Caption NTSC Full Over-the-Air Channels Full Cable Channels DVD, DVD±R/RW, CD, CD-R/RW, MP3, JPEG RCA Audio/Video 75Ω Coaxial (with included adapter) RCA Audio/Video (DVD) Coaxial Digital Audio (DVD) 3.5mm Stereo Headphone Dolby...
SPECIFICATIONS Display Type Key Features Other Features TV Tuner System TV Tuner Range Disc Support AV Input AV Output Digital Audio Decoders Speaker Type Power Supply Power Consumption Unit Dimensions Weight 5.6" TFT LCD with LED backlight TV Tuner, DVD Player, AM/FM Radio V-Chip, Closed Caption NTSC Full Over-the-Air Channels Full Cable Channels DVD, DVD±R/RW, CD, CD-R/RW, MP3, JPEG RCA Audio/Video 75Ω Coaxial (with included adapter) RCA Audio/Video (DVD) Coaxial Digital Audio (DVD) 3.5mm Stereo Headphone Dolby...
User Manual
Page 27
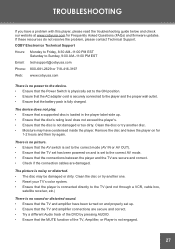
.... • Reset your TV's color system. • Ensure that the player is connected directly to the TV (and not through a VCR, cable box, satellite receiver, etc.) There is no picture. • Ensure that the AV switch is set to the correct mode (AV IN or AV OUT). • Ensure that the TV set has been powered on for Frequently Asked Questions (FAQs) and firmware updates. Remove the disc and...
.... • Reset your TV's color system. • Ensure that the player is connected directly to the TV (and not through a VCR, cable box, satellite receiver, etc.) There is no picture. • Ensure that the AV switch is set to the correct mode (AV IN or AV OUT). • Ensure that the TV set has been powered on for Frequently Asked Questions (FAQs) and firmware updates. Remove the disc and...


