User Guide
Page 15
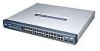
...Options 24-port 10/100 + 2-Port Gigabit Switch with the Switch. If you are using the mini-GBIC port, then connect the mini-GBIC module to the Gigabit port on the bottom of the Switch and then reconnect it. IMPORTANT: Make sure to reset the Switch, remove the power cord from the back of... the Switch. See Figure 3-1. 2. If you need to use the screws supplied with the mounting brackets. ...
...Options 24-port 10/100 + 2-Port Gigabit Switch with the Switch. If you are using the mini-GBIC port, then connect the mini-GBIC module to the Gigabit port on the bottom of the Switch and then reconnect it. IMPORTANT: Make sure to reset the Switch, remove the power cord from the back of... the Switch. See Figure 3-1. 2. If you need to use the screws supplied with the mounting brackets. ...
User Guide
Page 22
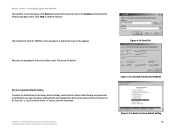
...File Send for SRW224 Figure 4-16: Restore System Default Setting 16 Restore System Default Setting To restore the Switch back to restart the Switch. Continue? [y/ n]. 24-port 10/100 + 2-Port Gigabit Switch with WebView The Send File screen will appear. Figure 4-14: Send File When you are prompted to ...Select the Xmodem protocol from the Protocol drop-down menu. Click Send to Default. Chapter 4: Configuration using the Console Interface Configuring the Switch through the Console Interface Figure 4-15: Xmodem File Send for SRW224 screen will be reset to send the firmware.
...File Send for SRW224 Figure 4-16: Restore System Default Setting 16 Restore System Default Setting To restore the Switch back to restart the Switch. Continue? [y/ n]. 24-port 10/100 + 2-Port Gigabit Switch with WebView The Send File screen will appear. Figure 4-14: Send File When you are prompted to ...Select the Xmodem protocol from the Protocol drop-down menu. Click Send to Default. Chapter 4: Configuration using the Console Interface Configuring the Switch through the Console Interface Figure 4-15: Xmodem File Send for SRW224 screen will be reset to send the firmware.


