User Guide
Page 1
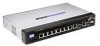
USER GUIDE 8-Port 10/100 Ethernet Switch with Webview Model: SRW208/SRW208G/SRW208L/SRW208P/SRW208MP BUSINESS SERIES
USER GUIDE 8-Port 10/100 Ethernet Switch with Webview Model: SRW208/SRW208G/SRW208L/SRW208P/SRW208MP BUSINESS SERIES

User Guide
Page 2
...your property or product. Online Resources Website addresses in this document are trademarks or registered trademarks of their respective holders. 8-Port 10/100 Ethernet Switch with Webview About This Guide i All rights reserved. Other brands and product names are listed without http:// in the ... these icons: NOTE: This check mark indicates that there is a note of Cisco Systems, Inc. and certain other countries. and/ or its affiliates in front of the web address. Copyright © 2007 Cisco Systems, Inc. WARNING: This exclamation point indicates that there is a caution or...
...your property or product. Online Resources Website addresses in this document are trademarks or registered trademarks of their respective holders. 8-Port 10/100 Ethernet Switch with Webview About This Guide i All rights reserved. Other brands and product names are listed without http:// in the ... these icons: NOTE: This check mark indicates that there is a note of Cisco Systems, Inc. and certain other countries. and/ or its affiliates in front of the web address. Copyright © 2007 Cisco Systems, Inc. WARNING: This exclamation point indicates that there is a caution or...

User Guide
Page 3
... Overview 9 Configuring the HyperTerminal Application 9 Connecting to the Switch through a Telnet Session 9 Configuring the Switch through the Console Interface 10 Switch Main Menu 10 System Configuration Menu 10 Port Status 16 Port Configuration 16 Chapter 5: Advanced Configuration 18 Overview 18 Accessing the...20 Set Time 20 Local Time 20 Daylight Saving 20 SNTP Servers 20 Port Management > Port Settings 20 8-Port 10/100 Ethernet Switch with Webview ii Front Panel 3 SRW208P/SRW208MP - Table of Contents Chapter 1: Introduction 1 Welcome 1 Chapter 2: Product Overview 2 ...
... Overview 9 Configuring the HyperTerminal Application 9 Connecting to the Switch through a Telnet Session 9 Configuring the Switch through the Console Interface 10 Switch Main Menu 10 System Configuration Menu 10 Port Status 16 Port Configuration 16 Chapter 5: Advanced Configuration 18 Overview 18 Accessing the...20 Set Time 20 Local Time 20 Daylight Saving 20 SNTP Servers 20 Port Management > Port Settings 20 8-Port 10/100 Ethernet Switch with Webview ii Front Panel 3 SRW208P/SRW208MP - Table of Contents Chapter 1: Introduction 1 Welcome 1 Chapter 2: Product Overview 2 ...

User Guide
Page 4
...Port Configuration Detail 21 Port Management > Link Aggregation 22 Link Aggregation Detail 22 Port Management > LACP 23 Port Management > PoE Power Settings 23 VLAN Management > Create VLAN 24 Single VLAN 24 VLAN Range 24 VLAN Table 24 VLAN Management > Port Settings 24 VLAN Management > Ports to VLAN 25 VLAN Management > VLAN to Ports 25 Join VLAN Detail 26 VLAN Management...Security > RADIUS 33 Security > TACACS 34 Security > 802.1x Settings 35 Setting Timer 35 Security > Ports Security 35 Security > Multiple Hosts 36 Security > Storm Control 37 QoS 37 QoS > CoS Settings ...
...Port Configuration Detail 21 Port Management > Link Aggregation 22 Link Aggregation Detail 22 Port Management > LACP 23 Port Management > PoE Power Settings 23 VLAN Management > Create VLAN 24 Single VLAN 24 VLAN Range 24 VLAN Table 24 VLAN Management > Port Settings 24 VLAN Management > Ports to VLAN 25 VLAN Management > VLAN to Ports 25 Join VLAN Detail 26 VLAN Management...Security > RADIUS 33 Security > TACACS 34 Security > 802.1x Settings 35 Setting Timer 35 Security > Ports Security 35 Security > Multiple Hosts 36 Security > Storm Control 37 QoS 37 QoS > CoS Settings ...

User Guide
Page 5
...41 Spanning Tree > STP Status 41 Spanning Tree > Global STP 42 Global Setting 42 Bridge Settings 42 Spanning Tree > STP Port Settings 43 Spanning Tree > RSTP Port Settings 43 Spanning Tree > MSTP Properties 44 Spanning Tree > MSTP Instance Settings 45 Spanning Tree > MSTP Interface Settings 45 ...Recipient 51 Admin > User Authentication 52 Admin > Static Address 52 Query 53 Admin > Dynamic Address 53 Query 53 Admin > Logging 53 Admin > Port Mirroring 54 Admin > Cable Test 54 Admin > Save Configuration 55 Via TFTP 55 Via HTTP 55 Backup 55 Admin > Firmware Upgrade 55 Admin >...
...41 Spanning Tree > STP Status 41 Spanning Tree > Global STP 42 Global Setting 42 Bridge Settings 42 Spanning Tree > STP Port Settings 43 Spanning Tree > RSTP Port Settings 43 Spanning Tree > MSTP Properties 44 Spanning Tree > MSTP Instance Settings 45 Spanning Tree > MSTP Interface Settings 45 ...Recipient 51 Admin > User Authentication 52 Admin > Static Address 52 Query 53 Admin > Dynamic Address 53 Query 53 Admin > Logging 53 Admin > Port Mirroring 54 Admin > Cable Test 54 Admin > Save Configuration 55 Via TFTP 55 Via HTTP 55 Backup 55 Admin > Firmware Upgrade 55 Admin >...

User Guide
Page 6
... 75 User Information for Consumer Products Covered by EU Directive 2002/96/EC on Waste Electric and Electronic Equipment (WEEE 76 Appendix G: Contact Information 80 8-Port 10/100 Ethernet Switch with Webview v
... 75 User Information for Consumer Products Covered by EU Directive 2002/96/EC on Waste Electric and Electronic Equipment (WEEE 76 Appendix G: Contact Information 80 8-Port 10/100 Ethernet Switch with Webview v

User Guide
Page 7
... for realtime applications like Voice and Video. The SRW208P and SRW208MP support Automatic Load Sensing - The rich management functionality of the WebView switches includes SNMP, RMON, Telnet, and HTTP Management options, allowing you to expand your network of Ethernet limited for fixed 10/100 Base-T/TX ports. If a specific model number is mentioned, then the...
... for realtime applications like Voice and Video. The SRW208P and SRW208MP support Automatic Load Sensing - The rich management functionality of the WebView switches includes SNMP, RMON, Telnet, and HTTP Management options, allowing you to expand your network of Ethernet limited for fixed 10/100 Base-T/TX ports. If a specific model number is mentioned, then the...

User Guide
Page 8
... of the device connected to it (10Mbps, 100Mbps, or 1000Mbps), and adjust its speed and duplex accordingly. The Fast Ethernet ports support network speeds of the Switch. LINK/ACT (Green) The LINK/ACT LED lights up to indicate a 100Mbps connection on the front panel of 10Mbps or 100Mbps.... LINK/ACT (Green) The LINK/ACT LED lights up to 1000Mbps. 2 It flashes to indicate that the Switch is equipped with the miniGBIC ports. They can operate in half and fullduplex modes. They can be uplinked via fiber to indicate a functional network link through the...
... of the device connected to it (10Mbps, 100Mbps, or 1000Mbps), and adjust its speed and duplex accordingly. The Fast Ethernet ports support network speeds of the Switch. LINK/ACT (Green) The LINK/ACT LED lights up to indicate a 100Mbps connection on the front panel of 10Mbps or 100Mbps.... LINK/ACT (Green) The LINK/ACT LED lights up to 1000Mbps. 2 It flashes to indicate that the Switch is equipped with the miniGBIC ports. They can operate in half and fullduplex modes. They can be uplinked via fiber to indicate a functional network link through the...

User Guide
Page 9
... SYSTEM (Green) The system LED lights up to indicate a functional network link through the corresponding port (1 through 8, G1, or 100LX) with an attached device. Use the Linksys MGBT1, MGBSX1, or MGBLH1 mini-GBIC modules with the Switch. SRW208P/SRW208MP - LINK/ACT (1-8) (Green) The LINK/ACT LED lights up to indicate a device is where...
... SYSTEM (Green) The system LED lights up to indicate a functional network link through the corresponding port (1 through 8, G1, or 100LX) with an attached device. Use the Linksys MGBT1, MGBSX1, or MGBLH1 mini-GBIC modules with the Switch. SRW208P/SRW208MP - LINK/ACT (1-8) (Green) The LINK/ACT LED lights up to indicate a device is where...

User Guide
Page 10
...10Mbps or 100Mbps. ETHERNET 1-8 The Switch is a connection point for a miniGBIC expansion module, so the Switch can connect a serial cable to a PC's serial port for more information. The G1 and G2 RJ-45 ports are located on the corresponding RJ-45 port (G1 through G2). Refer to ...The mini-GBIC (gigabit interface converter) port is equipped with the miniGBIC ports. Back Panel POWER The Power port is where you will connect the AC power. 8-Port 10/100 Ethernet Switch with Webview Product Overview 4 G1-G2 The Gigabit Ethernet ports support network speeds of the device connected...
...10Mbps or 100Mbps. ETHERNET 1-8 The Switch is a connection point for a miniGBIC expansion module, so the Switch can connect a serial cable to a PC's serial port for more information. The G1 and G2 RJ-45 ports are located on the corresponding RJ-45 port (G1 through G2). Refer to ...The mini-GBIC (gigabit interface converter) port is equipped with the miniGBIC ports. Back Panel POWER The Power port is where you will connect the AC power. 8-Port 10/100 Ethernet Switch with Webview Product Overview 4 G1-G2 The Gigabit Ethernet ports support network speeds of the device connected...

User Guide
Page 11
... sources. •• To ensure adequate air flow around the Switch, be sure to Switch Notebook 1U high rack for the Switch and check the environmental restrictions mentioned in a standard-sized, 19-inch 8-Port 10/100 Ethernet Switch with Webview 5 Attach the rubber feet to the Switch. Chapter 3 Installation Chapter 3: Installation Overview This chapter will explain...
... sources. •• To ensure adequate air flow around the Switch, be sure to Switch Notebook 1U high rack for the Switch and check the environmental restrictions mentioned in a standard-sized, 19-inch 8-Port 10/100 Ethernet Switch with Webview 5 Attach the rubber feet to the Switch. Chapter 3 Installation Chapter 3: Installation Overview This chapter will explain...

User Guide
Page 12
...rack should be given to the connection of the equipment to supply connections other side. WARNING: Make sure you . 2. To rack-mount the Switch in a rack should be such that the amount of air flow required for safe operation of the equipment is not achieved due to uneven ...circuit and the effect that a hazardous condition is not compromised. •• Mechanical Loading Mounting of the equipment in Rack Attaching the Brackets 8-Port 10/100 Ethernet Switch with the mounting brackets. Use the appropriate screws (not included) to securely attach the brackets to the...
...rack should be given to the connection of the equipment to supply connections other side. WARNING: Make sure you . 2. To rack-mount the Switch in a rack should be such that the amount of air flow required for safe operation of the equipment is not achieved due to uneven ...circuit and the effect that a hazardous condition is not compromised. •• Mechanical Loading Mounting of the equipment in Rack Attaching the Brackets 8-Port 10/100 Ethernet Switch with the mounting brackets. Use the appropriate screws (not included) to securely attach the brackets to the...

User Guide
Page 13
... will need two suitable screws to plan your installation. Proper Wall-Mount Orientation (Horizontal) NOTE: Linksys is smooth, flat, dry and 8-Port 10/100 Ethernet Switch with the two screws. 5. Ensure that the wall you want to drill precise spacing. Insert a screw into the wall. Place the wall-mount ...slots over the screws and slide the Switch down . Drill two holes into each hole, and leave 3 mm (0.12 in) of its head exposed. 4. The front panel should face either up...
... will need two suitable screws to plan your installation. Proper Wall-Mount Orientation (Horizontal) NOTE: Linksys is smooth, flat, dry and 8-Port 10/100 Ethernet Switch with the two screws. 5. Ensure that the wall you want to drill precise spacing. Insert a screw into the wall. Place the wall-mount ...slots over the screws and slide the Switch down . Drill two holes into each hole, and leave 3 mm (0.12 in) of its head exposed. 4. The front panel should face either up...

User Guide
Page 14
...will also light up on the Switch. 3. Wait a few seconds and then reconnect it. 8-Port 10/100 Ethernet Switch with the Switch. If you use the Switch's console interface to configure the Switch, then connect the supplied serial cable to the Switch's Console port, and tighten the captive retaining...connect a Category 5 Ethernet network cable to one of the numbered ports on the network devices connected to the mini-GBIC port. Connect the other end into an electrical outlet. Power on the Switch. If a port has an active Gigabit connection, then its corresponding Gigabit LED will light...
...will also light up on the Switch. 3. Wait a few seconds and then reconnect it. 8-Port 10/100 Ethernet Switch with the Switch. If you use the Switch's console interface to configure the Switch, then connect the supplied serial cable to the Switch's Console port, and tighten the captive retaining...connect a Category 5 Ethernet network cable to one of the numbered ports on the network devices connected to the mini-GBIC port. Connect the other end into an electrical outlet. Power on the Switch. If a port has an active Gigabit connection, then its corresponding Gigabit LED will light...

User Guide
Page 15
... communicate with Webview HyperTerminal Properties Screen Connecting to the Switch through a Telnet Session 1. Set the serial port settings as follows, then click OK. Configuration can be performed through a telnet connection. Start > Programs > Accessories >...Description Screen 8-Port 10/100 Ethernet Switch with the switch. Enter admin in the next chapter. Chapter 4 Configuration Using the Console Interface Chapter 4: Configuration Using the Console Interface Overview The Switch features a menu-driven console interface for basic configuration of the Switch and management of the ...
... communicate with Webview HyperTerminal Properties Screen Connecting to the Switch through a Telnet Session 1. Set the serial port settings as follows, then click OK. Configuration can be performed through a telnet connection. Start > Programs > Accessories >...Description Screen 8-Port 10/100 Ethernet Switch with the switch. Enter admin in the next chapter. Chapter 4 Configuration Using the Console Interface Chapter 4: Configuration Using the Console Interface Overview The Switch features a menu-driven console interface for basic configuration of the Switch and management of the ...

User Guide
Page 16
... Menu options: 1. Reboot System 0. Main Menu 8-Port 10/100 Ethernet Switch with Webview System Information 10 To navigate through the Console Interface The console screens consist of a series of menus. Management Settings 3. File Management 7. Use the Enter key to select a menu ...when you can check current firmware versions and other general switch information. pressing the Enter key activates the highlighted option. Switch Main Menu The Main Menu screen displays six menu choices: System Configuration Menu, Port Status, Port Configuration, Help, and Log Out. System Information 2....
... Menu options: 1. Reboot System 0. Main Menu 8-Port 10/100 Ethernet Switch with Webview System Information 10 To navigate through the Console Interface The console screens consist of a series of menus. Management Settings 3. File Management 7. Use the Enter key to select a menu ...when you can check current firmware versions and other general switch information. pressing the Enter key activates the highlighted option. Switch Main Menu The Main Menu screen displays six menu choices: System Configuration Menu, Port Status, Port Configuration, Help, and Log Out. System Information 2....

User Guide
Page 17
...Esc key to return to timeout, you can set Serial Port Session Configuration, Telnet Session Configuration, or Secure Telnet (SSH) Configuration. Management Settings Serial Port Configuration On the Serial Port Configuration screen, the Switch's baud rate is displayed. The value is turned on ...diagnostics and loads the operating system for the Switch. When your changes are complete, press the...
...Esc key to return to timeout, you can set Serial Port Session Configuration, Telnet Session Configuration, or Secure Telnet (SSH) Configuration. Management Settings Serial Port Configuration On the Serial Port Configuration screen, the Switch's baud rate is displayed. The value is turned on ...diagnostics and loads the operating system for the Switch. When your changes are complete, press the...

User Guide
Page 18
...screen, you can be modified by navigating to the SSH Server option and using the SPACE bar to the Action menu. The SSH Server Port can select SSH Server Configuration, SSH Server Status, SSH Crypto Key Generation, and SSH Keys Fingerprints. SSH Status SSH Crypto Key Generation ...Edit and press the Enter key to make changes. When your changes. To exit, select Quit and press the Enter key. 8-Port 10/100 Ethernet Switch with Webview 12 SSH Configuation SSH Server Configuration On the SSH Server Configuration screen, the SSH Server can be modified. The SSH Public...
...screen, you can be modified by navigating to the SSH Server option and using the SPACE bar to the Action menu. The SSH Server Port can select SSH Server Configuration, SSH Server Status, SSH Crypto Key Generation, and SSH Keys Fingerprints. SSH Status SSH Crypto Key Generation ...Edit and press the Enter key to make changes. When your changes. To exit, select Quit and press the Enter key. 8-Port 10/100 Ethernet Switch with Webview 12 SSH Configuation SSH Server Configuration On the SSH Server Configuration screen, the SSH Server can be modified. The SSH Public...

User Guide
Page 19
... can administer the user names and passwords of days certification is valid. (Range: 30 - 3650) User & Password Settings 8-Port 10/100 Ethernet Switch with Webview 13 Security Settings The Security Settings screen enables you can also be displayed if they have been generated. To exit,.... (Range: 1 - 64) Country Name Specifies the country name. (Range: 2 - 2) Validity Term Specifies number of those accessing the Switch. Chapter 4 Configuration Using the Console Interface SSH Crypto Key Generation SSH Keys Fingerprints On the SSH Keys Fingerprints screen, the RSA and DSA keys...
... can administer the user names and passwords of days certification is valid. (Range: 30 - 3650) User & Password Settings 8-Port 10/100 Ethernet Switch with Webview 13 Security Settings The Security Settings screen enables you can also be displayed if they have been generated. To exit,.... (Range: 1 - 64) Country Name Specifies the country name. (Range: 2 - 2) Validity Term Specifies number of those accessing the Switch. Chapter 4 Configuration Using the Console Interface SSH Crypto Key Generation SSH Keys Fingerprints On the SSH Keys Fingerprints screen, the RSA and DSA keys...
User Guide
Page 20
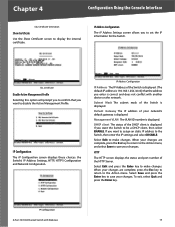
.... Default Gateway The IP address of the Switch is correct and does not conflict with Webview 14 If you want to assign an static IP address to disable the Active Management Profile. HTTP The HTTP screen displays the status and port number of the DHCP client is displayed. ... Show Certificate Use the Show Certificate screen to be a DHCP client, then select ENABLE. SSL Certificate Disable Active Management Profile Selecting this option will prompt you want the Switch to display the internal certificate. If you to the Action menu. To exit, select Quit and press the Enter...
.... Default Gateway The IP address of the Switch is correct and does not conflict with Webview 14 If you want to assign an static IP address to disable the Active Management Profile. HTTP The HTTP screen displays the status and port number of the DHCP client is displayed. ... Show Certificate Use the Show Certificate screen to be a DHCP client, then select ENABLE. SSL Certificate Disable Active Management Profile Selecting this option will prompt you want the Switch to display the internal certificate. If you to the Action menu. To exit, select Quit and press the Enter...


