
User Guide
Page 3
... Business Pro IP Phones Understanding Your Phone's Lines and Buttons Phone Components Softkey Buttons Using Keypad Shortcuts Cisco SPA 500S Attendant Console Caring for Your Phone Chapter 2: Installing Your Phone Before You Begin Phone Connections Connecting the Handset Installing... the Stand (Optional) Mounting the Phone to the Wall (Optional) Reversing the Handset Retention Tab Connecting the Power Connecting Your Phone to the Network Connecting the Phone to the Wireless Network Connecting a PC to Your Phone (Optional) Connecting Wired and Wireless...
... Business Pro IP Phones Understanding Your Phone's Lines and Buttons Phone Components Softkey Buttons Using Keypad Shortcuts Cisco SPA 500S Attendant Console Caring for Your Phone Chapter 2: Installing Your Phone Before You Begin Phone Connections Connecting the Handset Installing... the Stand (Optional) Mounting the Phone to the Wall (Optional) Reversing the Handset Retention Tab Connecting the Power Connecting Your Phone to the Network Connecting the Phone to the Wireless Network Connecting a PC to Your Phone (Optional) Connecting Wired and Wireless...
User Guide
Page 10
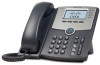
... 50X User Guide (SIP) 3 Unlike traditional phones, Cisco Small Business Pro IP phones require a separate power source. Getting Started Overview of the Cisco Small Business Pro IP Phones 1 Overview of the Cisco Small Business Pro IP Phones The Cisco Small Business Pro IP Phones are full-featured VoIP ...509G Paper labels 128 X 64 monochrome LCD with a handset, headset or over an IP network. Calls can power the phones by using an optional PA100 power adapter. The Cisco Small Business Pro IP phones contain Ethernet ports, or ports that allow them to a switch that provide voice ...
... 50X User Guide (SIP) 3 Unlike traditional phones, Cisco Small Business Pro IP phones require a separate power source. Getting Started Overview of the Cisco Small Business Pro IP Phones 1 Overview of the Cisco Small Business Pro IP Phones The Cisco Small Business Pro IP Phones are full-featured VoIP ...509G Paper labels 128 X 64 monochrome LCD with a handset, headset or over an IP network. Calls can power the phones by using an optional PA100 power adapter. The Cisco Small Business Pro IP phones contain Ethernet ports, or ports that allow them to a switch that provide voice ...
User Guide
Page 17
...Business Pro IP phones are electronic devices that should not be attached to a single IP phone to the IP phone with support for the Cisco Small Business Pro IP phones, providing 32 three-color (red, green, and amber) programmable LEDS, with the attachment arm provided (not shown...). For more information on the Cisco SPA 500S, see Chapter 6, "Using the Cisco SPA 500S Attendant Console." It obtains power directly from the IP phone and does not require a separate power supply. Getting Started Caring for Your Phone 1 The Cisco SPA 500S is a 32-button attendant console for...
...Business Pro IP phones are electronic devices that should not be attached to a single IP phone to the IP phone with support for the Cisco Small Business Pro IP phones, providing 32 three-color (red, green, and amber) programmable LEDS, with the attachment arm provided (not shown...). For more information on the Cisco SPA 500S, see Chapter 6, "Using the Cisco SPA 500S Attendant Console." It obtains power directly from the IP phone and does not require a separate power supply. Getting Started Caring for Your Phone 1 The Cisco SPA 500S is a 32-button attendant console for...
User Guide
Page 18
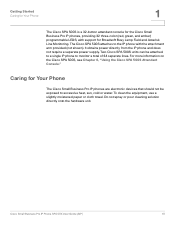
... page 13 • Mounting the Phone to the Wall (Optional), page 14 • Connecting the Power, page 19 • Connecting Your Phone to the Network, page 20 • Connecting a PC to your Cisco Small Business Pro IP Phone and connect it to Your Phone (Optional), page 21 • Connecting ...Wired and Wireless Headsets (Optional), page 21 • Verifying Phone Startup, page 22 • Upgrading Your Phone's Firmware, page 23 Cisco Small Business Pro IP Phone SPA 50X User Guide (SIP) 11 2 Installing Your Phone This chapter describes how to install your network.
... page 13 • Mounting the Phone to the Wall (Optional), page 14 • Connecting the Power, page 19 • Connecting Your Phone to the Network, page 20 • Connecting a PC to your Cisco Small Business Pro IP Phone and connect it to Your Phone (Optional), page 21 • Connecting ...Wired and Wireless Headsets (Optional), page 21 • Verifying Phone Startup, page 22 • Upgrading Your Phone's Firmware, page 23 Cisco Small Business Pro IP Phone SPA 50X User Guide (SIP) 11 2 Installing Your Phone This chapter describes how to install your network.

User Guide
Page 24
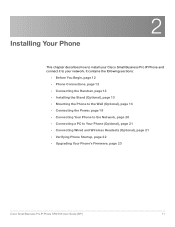
Installing Your Phone Mounting the Phone to the Wall (Optional) Plug in the Ethernet and power cables. 2 Cisco Small Business Pro IP Phone SPA 50X User Guide (SIP) 17
Installing Your Phone Mounting the Phone to the Wall (Optional) Plug in the Ethernet and power cables. 2 Cisco Small Business Pro IP Phone SPA 50X User Guide (SIP) 17
User Guide
Page 26
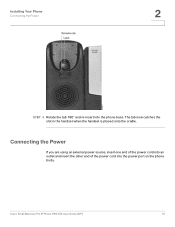
Installing Your Phone Connecting the Power 2 STEP 3 Rotate the tab 180° and re-insert into the power port on the phone body. The tab now catches the slot in the handset when the handset is placed onto the cradle. Connecting the Power If you are using an external power source, insert one end of the power cord into an outlet and insert the other end of the power cord into the phone base. Cisco Small Business Pro IP Phone SPA 50X User Guide (SIP) 19
Installing Your Phone Connecting the Power 2 STEP 3 Rotate the tab 180° and re-insert into the power port on the phone body. The tab now catches the slot in the handset when the handset is placed onto the cradle. Connecting the Power If you are using an external power source, insert one end of the power cord into an outlet and insert the other end of the power cord into the phone base. Cisco Small Business Pro IP Phone SPA 50X User Guide (SIP) 19
User Guide
Page 27
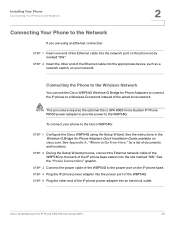
...the Setup Wizard. See Appendix A, "Where to Go From Here," for a list of the WBP54G to the power port on your phone to the Wireless Network You can use the Cisco WBP54G Wireless-G Bridge for Phone Adapters Quick Installation Guide, available on the phone body marked "SW." STEP 3 Connect...the IP phone base station into the network port on cisco.com. STEP 2 Insert the other end of the IP phone power adapter into the power port of the wired local network. Connecting the Phone to the Cisco WBP54G: STEP 1 Configure the Cisco WBP54G using an Ethernet connection: STEP 1 Insert one end...
...the Setup Wizard. See Appendix A, "Where to Go From Here," for a list of the WBP54G to the power port on your phone to the Wireless Network You can use the Cisco WBP54G Wireless-G Bridge for Phone Adapters Quick Installation Guide, available on the phone body marked "SW." STEP 3 Connect...the IP phone base station into the network port on cisco.com. STEP 2 Insert the other end of the IP phone power adapter into the power port of the wired local network. Connecting the Phone to the Cisco WBP54G: STEP 1 Configure the Cisco WBP54G using an Ethernet connection: STEP 1 Insert one end...

User Guide
Page 29
... up sequence. The date, name and number of the LCD screen. Installing Your Phone Verifying Phone Startup 2 Verifying Phone Startup After receiving power and network connectivity, the phone executes a boot-up the handset or pressing the speakerphone button. On models with screens display the...phone display on models with phone line keys). During this sequence, phones with screens, the phone displays the standard menu for the phone. Cisco Small Business Pro IP Phone SPA 50X User Guide (SIP) 22 All of the LCD screen, softkeys are displayed over their associated soft buttons.
... up sequence. The date, name and number of the LCD screen. Installing Your Phone Verifying Phone Startup 2 Verifying Phone Startup After receiving power and network connectivity, the phone executes a boot-up the handset or pressing the speakerphone button. On models with screens display the...phone display on models with phone line keys). During this sequence, phones with screens, the phone displays the standard menu for the phone. Cisco Small Business Pro IP Phone SPA 50X User Guide (SIP) 22 All of the LCD screen, softkeys are displayed over their associated soft buttons.
User Guide
Page 32
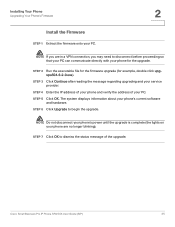
... 3 Click Continue after reading the message regarding upgrading and your phone's current software and hardware. Cisco Small Business Pro IP Phone SPA 50X User Guide (SIP) 25 STEP 5 Click OK. NOTE Do not disconnect your phone's power until the upgrade is complete (the lights on your phone for example, double click upgspa504...
... 3 Click Continue after reading the message regarding upgrading and your phone's current software and hardware. Cisco Small Business Pro IP Phone SPA 50X User Guide (SIP) 25 STEP 5 Click OK. NOTE Do not disconnect your phone's power until the upgrade is complete (the lights on your phone for example, double click upgspa504...
User Guide
Page 85
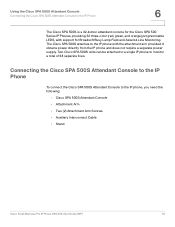
... 500S Attendant Console to the IP Phone To connect the Cisco SPA 500S Attendant Console to monitor a total of 64 separate lines. It obtains power directly from the IP phone and does not require a separate power supply. Two Cisco SPA 500S units can be attached to a single IP phone to the ...IP phone, you need the following: • Cisco SPA 500S Attendant Console • Attachment Arm •...
... 500S Attendant Console to the IP Phone To connect the Cisco SPA 500S Attendant Console to monitor a total of 64 separate lines. It obtains power directly from the IP phone and does not require a separate power supply. Two Cisco SPA 500S units can be attached to a single IP phone to the ...IP phone, you need the following: • Cisco SPA 500S Attendant Console • Attachment Arm •...

User Guide
Page 88
...AUX port on the back of the auxiliary cable to this port. The Cisco SPA 500S is required. no additional power source is powered by the auxiliary cable with the Cisco SPA 500S. Connect the other end of the Cisco SPA 500S. Cisco Small Business Pro IP Phone SPA 50X User Guide (SIP) 81 STEP ...8 Locate the AUX IN port on the back of the auxiliary cable to the Cisco SPA 500S. ...
...AUX port on the back of the auxiliary cable to this port. The Cisco SPA 500S is required. no additional power source is powered by the auxiliary cable with the Cisco SPA 500S. Connect the other end of the Cisco SPA 500S. Cisco Small Business Pro IP Phone SPA 50X User Guide (SIP) 81 STEP ...8 Locate the AUX IN port on the back of the auxiliary cable to the Cisco SPA 500S. ...

User Guide
Page 91
.... STEP 7 Locate the AUX OUT port on the back of the auxiliary cable to this port. The Cisco SPA 500S is required. no additional power source is powered by the auxiliary cable with the Cisco SPA 500S. CAUTION Do not plug a telephone line cord into the AUX port. Use only the auxiliary ...cable provided with the IP phone; Cisco Small Business Pro IP Phone SPA 50X User Guide (SIP) 84 Connect ...
.... STEP 7 Locate the AUX OUT port on the back of the auxiliary cable to this port. The Cisco SPA 500S is required. no additional power source is powered by the auxiliary cable with the Cisco SPA 500S. CAUTION Do not plug a telephone line cord into the AUX port. Use only the auxiliary ...cable provided with the IP phone; Cisco Small Business Pro IP Phone SPA 50X User Guide (SIP) 84 Connect ...


