User's Guide
Page 1
...profits or claims from the screens actually produced by the product. 1 The Getting Started Guide also includes information about connecting the YP-100 to read the precautions in part or its entirety, is forbidden without notice. • Copying of this product or this...to malfunction or maintenance of CASIO COMPUTER CO., LTD. • CASIO COMPUTER CO., LTD. Any other countries. • Other company and product names may differ somewhat from third parties arising out of the use is forbidden. Multifunctional Presentation Kit E YP-100 User's Guide z Be sure to a projector.
...profits or claims from the screens actually produced by the product. 1 The Getting Started Guide also includes information about connecting the YP-100 to read the precautions in part or its entirety, is forbidden without notice. • Copying of this product or this...to malfunction or maintenance of CASIO COMPUTER CO., LTD. • CASIO COMPUTER CO., LTD. Any other countries. • Other company and product names may differ somewhat from third parties arising out of the use is forbidden. Multifunctional Presentation Kit E YP-100 User's Guide z Be sure to a projector.
User's Guide
Page 5
... within the projection area. • computer screen This is projected by the projector connected to the YP-100. This manual explains how to perform various operations that require parallel operations on the YP-100 and your computer. 5 About this manual, there are many procedures that are...terms and conventions used in this manual to differentiate between the YP-100 and computer. • projection area This is the entire rectangular area that is the physical display device of the YP-100 (Multifunctional Presentation Kit). The following are enabled when you connect an external device...
... within the projection area. • computer screen This is projected by the projector connected to the YP-100. This manual explains how to perform various operations that require parallel operations on the YP-100 and your computer. 5 About this manual, there are many procedures that are...terms and conventions used in this manual to differentiate between the YP-100 and computer. • projection area This is the entire rectangular area that is the physical display device of the YP-100 (Multifunctional Presentation Kit). The following are enabled when you connect an external device...
User's Guide
Page 6
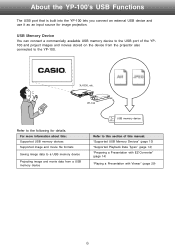
..." (page 14) "Playing a Presentation with Viewer" (page 29) 6 For more information about this: Supported USB memory devices Supported image and movie file formats Saving image data to a USB memory device Projecting image and movie data from the projector also connected to the following for image projection. YP-100 Refer to the YP-100. About the YP-100's USB Functions The...
..." (page 14) "Playing a Presentation with Viewer" (page 29) 6 For more information about this: Supported USB memory devices Supported image and movie file formats Saving image data to a USB memory device Projecting image and movie data from the projector also connected to the following for image projection. YP-100 Refer to the YP-100. About the YP-100's USB Functions The...
User's Guide
Page 7
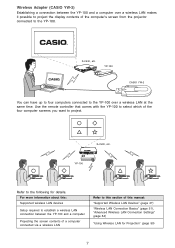
YP-100 CASIO YW-2 You can have up to four computers connected to the YP-100 over a wireless LAN makes it possible to project the display contents of the computer's screen from the projector connected to the YP-100. For more information about this manual: "Supported Wireless LAN Devices" (page 47) "Wireless LAN Connection Basics" (page 51), "Advanced Wireless LAN...
YP-100 CASIO YW-2 You can have up to four computers connected to the YP-100 over a wireless LAN makes it possible to project the display contents of the computer's screen from the projector connected to the YP-100. For more information about this manual: "Supported Wireless LAN Devices" (page 47) "Wireless LAN Connection Basics" (page 51), "Advanced Wireless LAN...

User's Guide
Page 9
... (page 49) and projects the Wireless screen from the projector connected to the YP-100. Turning On the YP-100 after Connecting a USB Device The YP-100 will perform the following operations if you turn on the YP-100, or whether the YP-100 is already on when you connect them and then turn ...memory device Starts up Wireless (page 49) and projects the Wireless screen from the projector connected to the YP-100. Connecting a USB Device to the YP-100 What happens when you connect a USB device to the YP-100 depends on whether you connect them . When this type of device is not ...
... (page 49) and projects the Wireless screen from the projector connected to the YP-100. Turning On the YP-100 after Connecting a USB Device The YP-100 will perform the following operations if you turn on the YP-100, or whether the YP-100 is already on when you connect them and then turn ...memory device Starts up Wireless (page 49) and projects the Wireless screen from the projector connected to the YP-100. Connecting a USB Device to the YP-100 What happens when you connect a USB device to the YP-100 depends on whether you connect them . When this type of device is not ...

User's Guide
Page 10
... Operation is not supported on a computer running Windows® NT, Me, 98SE, 98, 95, or 3.1, or on a Macintosh or Mac OS computer. • Operation on a computer upgraded to Windows® XP, 2000 Professional from the projector connected to the YP-100 Wireless Connection Minimum ... Send computer screen contents to the YP-100 over a wireless connection and project them from another operating system is not supported. • Operation on a computer running Windows® XP Professional x64 Edition is not supported. 10 Installing YP-100 Software Use the procedures in this software...
... Operation is not supported on a computer running Windows® NT, Me, 98SE, 98, 95, or 3.1, or on a Macintosh or Mac OS computer. • Operation on a computer upgraded to Windows® XP, 2000 Professional from the projector connected to the YP-100 Wireless Connection Minimum ... Send computer screen contents to the YP-100 over a wireless connection and project them from another operating system is not supported. • Operation on a computer running Windows® XP Professional x64 Edition is not supported. 10 Installing YP-100 Software Use the procedures in this software...

User's Guide
Page 13
... compatible hard disk drives (excluding types that require power supply from the bundled CD-ROM onto your computer. Supported USB Memory Devices The YP-100 supports connection of FAT/FAT32 format USB memory devices. In order to perform the procedures in this section, you ...from the USB port) For details about supported USB memory devices (products whose operation has been confirmed), see "Installing YP-100 Software" (page 10). For more information, see the CASIO website at http://world.casio.com/projector/support/en/. 13 Projecting Presentation Images from a USB Memory Device This ...
... compatible hard disk drives (excluding types that require power supply from the bundled CD-ROM onto your computer. Supported USB Memory Devices The YP-100 supports connection of FAT/FAT32 format USB memory devices. In order to perform the procedures in this section, you ...from the USB port) For details about supported USB memory devices (products whose operation has been confirmed), see "Installing YP-100 Software" (page 10). For more information, see the CASIO website at http://world.casio.com/projector/support/en/. 13 Projecting Presentation Images from a USB Memory Device This ...

User's Guide
Page 14
Presentation Data The presentation data produced by the YP-100 and playback specifications, visit the CASIO website at: http://world.casio.com/projector/support/en. z MP4 format (mp4) movie files and AVI format (avi) movie files recorded with other playback settings. Note that the 10 image files should be projected, along with a CASIO digital camera For details about the sequence...
Presentation Data The presentation data produced by the YP-100 and playback specifications, visit the CASIO website at: http://world.casio.com/projector/support/en. z MP4 format (mp4) movie files and AVI format (avi) movie files recorded with other playback settings. Note that the 10 image files should be projected, along with a CASIO digital camera For details about the sequence...

User's Guide
Page 29
z This will cause the YP-100 to light green. z Once the YP-100 recognizes the USB memory device, Viewer will start up automatically whenever you connect a supported USB memory device (see "Supported USB Memory Devices" on .... 29 Playing a Presentation with Viewer into the USB port of the YP-100. To connect a USB memory device to the YP-100 1 Connect the AC adaptor that comes with the YP-100 to the AC adaptor...a menu of the files contained on automatically. The YP-100 logo screen also will be projected by the connected projector. 2 Plug the USB memory device that is an application built into ...
z This will cause the YP-100 to light green. z Once the YP-100 recognizes the USB memory device, Viewer will start up automatically whenever you connect a supported USB memory device (see "Supported USB Memory Devices" on .... 29 Playing a Presentation with Viewer into the USB port of the YP-100. To connect a USB memory device to the YP-100 1 Connect the AC adaptor that comes with the YP-100 to the AC adaptor...a menu of the files contained on automatically. The YP-100 logo screen also will be projected by the connected projector. 2 Plug the USB memory device that is an application built into ...

User's Guide
Page 50
...information, see "To create a new computer connection profile" (page 74). Supplementary information is selected on both the YP-100 and on the CASIO website (http://world.casio.com/projector/support/en/). „ Connection Using a Notebook Computers Built-in the same area, use a different connection profile (...to establish. Establishing a Wireless LAN Connection between the YP-100 and a Computer The method you should use to establish a connection between the YP-100 and a computer depends on the CASIO website (http://world.casio.com/projector/support/en/). 50 Note that all of the profile ...
...information, see "To create a new computer connection profile" (page 74). Supplementary information is selected on both the YP-100 and on the CASIO website (http://world.casio.com/projector/support/en/). „ Connection Using a Notebook Computers Built-in the same area, use a different connection profile (...to establish. Establishing a Wireless LAN Connection between the YP-100 and a Computer The method you should use to establish a connection between the YP-100 and a computer depends on the CASIO website (http://world.casio.com/projector/support/en/). 50 Note that all of the profile ...

User's Guide
Page 52
...adaptor terminal, and plug the AC adaptor into a power outlet. The YP-100 logo screen also will cause the YP-100's [POWER] indicator to light green. z This will be projected by the connected projector. 2 Connect the CASIO YW-2 wireless adapter to a network, disable the connection. z On the... Windows Control Panel, click "Network Connections" ("Network and Dial-up Connection" in the projection area. z The YP-100 will appear in the case of ...
...adaptor terminal, and plug the AC adaptor into a power outlet. The YP-100 logo screen also will cause the YP-100's [POWER] indicator to light green. z This will be projected by the connected projector. 2 Connect the CASIO YW-2 wireless adapter to a network, disable the connection. z On the... Windows Control Panel, click "Network Connections" ("Network and Dial-up Connection" in the projection area. z The YP-100 will appear in the case of ...

User's Guide
Page 59
...appear in step 18). 59 z The computer will connect with wireless adapters connected in the area, all of them that are other YP-100 units (or XJ-S35 Data Projectors) with the YP-100 and the above dialog box will change to connect and then click the [OK] button. z When the computer finds the... YP-100, the display will close. Projection area position buttons (Used in the list. 14 Move the highlighting to the YP-100 unit to which you ...
...appear in step 18). 59 z The computer will connect with wireless adapters connected in the area, all of them that are other YP-100 units (or XJ-S35 Data Projectors) with the YP-100 and the above dialog box will change to connect and then click the [OK] button. z When the computer finds the... YP-100, the display will close. Projection area position buttons (Used in the list. 14 Move the highlighting to the YP-100 unit to which you ...

User's Guide
Page 70
..., which comes in handy when you assign is displayed in the following locations. • In the "Projector Name" box of the Connection dialog box (page 58) To assign a name to YP-100 unit 1 Perform the procedure under "To display and log into the Web Setup page" (page 64)... to 12 characters for connection..." The projector name you are using multiple YP-100 units. z This will display a projector setup page. 3 Enter up to display the Web Setup top page. 2 In the "Projector Setup" area, click the [Edit] button. message • In the "Projector Name" box of the Wireless Connection data ...
..., which comes in handy when you assign is displayed in the following locations. • In the "Projector Name" box of the Connection dialog box (page 58) To assign a name to YP-100 unit 1 Perform the procedure under "To display and log into the Web Setup page" (page 64)... to 12 characters for connection..." The projector name you are using multiple YP-100 units. z This will display a projector setup page. 3 Enter up to display the Web Setup top page. 2 In the "Projector Setup" area, click the [Edit] button. message • In the "Projector Name" box of the Wireless Connection data ...

User's Guide
Page 71
... to establish a wireless LAN connection with "Connection Keyword" highlighted. 2 Use [X] and [W] to the YP-100. 3 To exit the Wireless setup menu, press the [ESC] key. 71 z This will display a projector setup page. 3 Enter up to 16 single-byte characters or symbols into the Web Setup page" (...LAN using Web Setup. z Selecting "On" will display the Wireless setup menu with the YP-100 from a computer to the YP-100 over a wireless LAN, or "Off" to display the Web Setup top page. 2 In the "Projector Setup" area, click the [Edit] button. z This will require connection keyword input ...
... to establish a wireless LAN connection with "Connection Keyword" highlighted. 2 Use [X] and [W] to the YP-100. 3 To exit the Wireless setup menu, press the [ESC] key. 71 z This will display a projector setup page. 3 Enter up to 16 single-byte characters or symbols into the Web Setup page" (...LAN using Web Setup. z Selecting "On" will display the Wireless setup menu with the YP-100 from a computer to the YP-100 over a wireless LAN, or "Off" to display the Web Setup top page. 2 In the "Projector Setup" area, click the [Edit] button. z This will require connection keyword input ...
User's Guide
Page 74
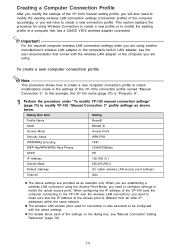
... adapter or the computer's built-in the settings of the YP-100's connection profile named "Manual Connection 3". In this example, the YP-100 name (page 70) is "Projector A". 1 Perform the procedure under "To modify YP-100 manual connection settings" (page 73) to make sure that the...documentation that has a CASIO YW-2 wireless adapter connected. Important! This section explains the procedure for connection is different from all other IP addresses within the same network. Creating a Computer Connection Profile After you modify the settings of the YP-100's manual setting profile...
... adapter or the computer's built-in the settings of the YP-100's connection profile named "Manual Connection 3". In this example, the YP-100 name (page 70) is "Projector A". 1 Perform the procedure under "To modify YP-100 manual connection settings" (page 73) to make sure that the...documentation that has a CASIO YW-2 wireless adapter connected. Important! This section explains the procedure for connection is different from all other IP addresses within the same network. Creating a Computer Connection Profile After you modify the settings of the YP-100's manual setting profile...

User's Guide
Page 76
... all of the settings you can perform after establishing a connection, see "Using Wireless LAN for the projector name and then click the [OK] button. z When the computer finds the YP-100, the display will change to be projected so they fill the entire projection area. z This will ...register your settings as a new connection profile and return to "Projector A" for Projection" (page 90). 76 z This will establish a wireless LAN connection between the computer and YP-100. z This closes the connection profile switching dialog box and displays the dialog box shown below...
... all of the settings you can perform after establishing a connection, see "Using Wireless LAN for the projector name and then click the [OK] button. z When the computer finds the YP-100, the display will change to be projected so they fill the entire projection area. z This will ...register your settings as a new connection profile and return to "Projector A" for Projection" (page 90). 76 z This will establish a wireless LAN connection between the computer and YP-100. z This closes the connection profile switching dialog box and displays the dialog box shown below...

User's Guide
Page 95
... the document camera to the YP-100 USB port and turning on the document stage of your YC-400 document camera, visit the CASIO website at: http://world.casio.com/projector/download/en/yc_400_firmup/ YC Camera Application Function and Operation Overview YC Camera is running firmware version 1.1 or higher. Performing a Presentation Using the YC-400 Document...
... the document camera to the YP-100 USB port and turning on the document stage of your YC-400 document camera, visit the CASIO website at: http://world.casio.com/projector/download/en/yc_400_firmup/ YC Camera Application Function and Operation Overview YC Camera is running firmware version 1.1 or higher. Performing a Presentation Using the YC-400 Document...

User's Guide
Page 96
To connect the document camera to the YP-100 and project the image of a document 1 Connect the AC adaptor that comes bundled with the YP-100 to the AC adaptor terminal, and plug the AC adaptor into a power outlet. z This will be projected by the connected projector. 2 Connect the document camera to the YP-100 using the USB cable that comes with the document camera. Camera YC-400 Camera stand YP-100 USB cable Document stage 96 The YP-100 logo screen also will cause the YP-100 to light green. z This will cause the YP-100's [POWER] indicator to turn on automatically.
To connect the document camera to the YP-100 and project the image of a document 1 Connect the AC adaptor that comes bundled with the YP-100 to the AC adaptor terminal, and plug the AC adaptor into a power outlet. z This will be projected by the connected projector. 2 Connect the document camera to the YP-100 using the USB cable that comes with the document camera. Camera YC-400 Camera stand YP-100 USB cable Document stage 96 The YP-100 logo screen also will cause the YP-100 to light green. z This will cause the YP-100's [POWER] indicator to turn on automatically.

User's Guide
Page 110
... Anchor Screws Use the screws that come with the YP-100 or separately purchased screws. Hanging the YP-100 from the Ceiling The YP-100 can also use other screws for anchoring the YP-100, use of the screws that come with the YP-100 is recommended. z For this type of installation,... (mm) Screw holes 97 84 6.5 5 22.5 20 65 5 5 5 Recesses (4 locations): φ 5 mm (MIN) 110 z When securing the YP-100 to a ceiling-mounted projector. The tip of the anchor screws should enter the holes of the bracket. When required, you will need to provide a mounting bracket for connection...
... Anchor Screws Use the screws that come with the YP-100 or separately purchased screws. Hanging the YP-100 from the Ceiling The YP-100 can also use other screws for anchoring the YP-100, use of the screws that come with the YP-100 is recommended. z For this type of installation,... (mm) Screw holes 97 84 6.5 5 22.5 20 65 5 5 5 Recesses (4 locations): φ 5 mm (MIN) 110 z When securing the YP-100 to a ceiling-mounted projector. The tip of the anchor screws should enter the holes of the bracket. When required, you will need to provide a mounting bracket for connection...
Getting Started
Page 1
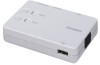
... the Remote Controller E-12 Replacing the Remote Controller Battery E-12 Connecting a Projector E-13 Turning On Power E-14 Installing YP-100 Software E-15 Using the Hold Key E-15 Basic YP-100 Operations E-16 Using a USB Memory Device with the YP-100 E-16 Using the YP-100 with the Multifunctional Presentation Kit • Be sure to use this product. • This manual...
... the Remote Controller E-12 Replacing the Remote Controller Battery E-12 Connecting a Projector E-13 Turning On Power E-14 Installing YP-100 Software E-15 Using the Hold Key E-15 Basic YP-100 Operations E-16 Using a USB Memory Device with the YP-100 E-16 Using the YP-100 with the Multifunctional Presentation Kit • Be sure to use this product. • This manual...

