
User Guide
Page 1
z Be sure to read the precautions in the separate Setup Guide. For details about setting up the projector, see the Setup Guide. E DATA PROJECTOR XJ-H1600/XJ-H1650* XJ-ST145*/XJ-ST155* * USB Port Models User's Guide z Be sure to keep all user documentation handy for future reference.
z Be sure to read the precautions in the separate Setup Guide. For details about setting up the projector, see the Setup Guide. E DATA PROJECTOR XJ-H1600/XJ-H1650* XJ-ST145*/XJ-ST155* * USB Port Models User's Guide z Be sure to keep all user documentation handy for future reference.
User Guide
Page 4
...Setup Menu Example 22 Direct Power On...23 Password Protecting the Projector 24 Inputting a Password 24 Using the Password Feature 24 Entering the Password when Turning On the Projector 26 Restoring Projector Settings to Their Initial Factory Defaults 27 Setup Menu Contents 29 Image Adjustment 1 Main Menu 29 Image Adjustment 2 Main Menu 31 Volume Adjustment Main Menu 31 Screen Settings Main Menu 32 Input Settings Main Menu 34 Option Settings 1 Main Menu 35 Option Settings 2 Main Menu 36 Wired LAN Settings Main Menu (USB Port Models Only 38 USB Settings Main Menu (USB Port Models...
...Setup Menu Example 22 Direct Power On...23 Password Protecting the Projector 24 Inputting a Password 24 Using the Password Feature 24 Entering the Password when Turning On the Projector 26 Restoring Projector Settings to Their Initial Factory Defaults 27 Setup Menu Contents 29 Image Adjustment 1 Main Menu 29 Image Adjustment 2 Main Menu 31 Volume Adjustment Main Menu 31 Screen Settings Main Menu 32 Input Settings Main Menu 34 Option Settings 1 Main Menu 35 Option Settings 2 Main Menu 36 Wired LAN Settings Main Menu (USB Port Models Only 38 USB Settings Main Menu (USB Port Models...
User Guide
Page 6
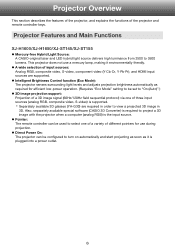
... HDMI input sources are required in order to project a 3D image with the projector when a computer (analog RGB) is required to view a projected 3D image in 3D. Projector Features and Main Functions XJ-H1600/XJ-H1650/XJ-ST145/XJ-ST155 z Mercury-free Hybrid Light Source: A CASIO-original laser and LED hybrid light source delivers high luminance from 2500 to turn on automatically and start projecting as soon as required for efficient low-power operation. (Requires "Eco Mode" setting to be used...
... HDMI input sources are required in order to project a 3D image with the projector when a computer (analog RGB) is required to view a projected 3D image in 3D. Projector Features and Main Functions XJ-H1600/XJ-H1650/XJ-ST145/XJ-ST155 z Mercury-free Hybrid Light Source: A CASIO-original laser and LED hybrid light source delivers high luminance from 2500 to turn on automatically and start projecting as soon as required for efficient low-power operation. (Requires "Eco Mode" setting to be used...
User Guide
Page 7
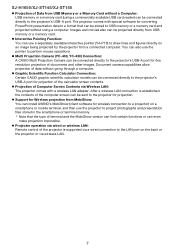
... Connection: Certain CASIO graphic scientific calculator models can be sent to perform mouse operations. After a wireless LAN connection is supported via a wired connection to USB memory or a memory card and projected without going through a computer. z Projector operation via Wireless LAN: The projector comes with a wireless LAN adapter. XJ-H1650/XJ-ST145/XJ-ST155 z Projection of Data from USB Memory or a Memory Card without a Computer: USB memory or a memory card (using a computer. You can be connected directly to the projector's USB-A port for wireless connection...
... Connection: Certain CASIO graphic scientific calculator models can be sent to perform mouse operations. After a wireless LAN connection is supported via a wired connection to USB memory or a memory card and projected without going through a computer. z Projector operation via Wireless LAN: The projector comes with a wireless LAN adapter. XJ-H1650/XJ-ST145/XJ-ST155 z Projection of Data from USB Memory or a Memory Card without a Computer: USB memory or a memory card (using a computer. You can be connected directly to the projector's USB-A port for wireless connection...
User Guide
Page 8
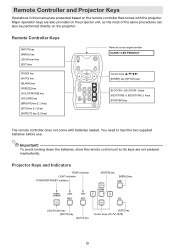
.... Remote Controller Keys [INPUT] key [MENU] key [P] (Power) key [ESC] key [FUNC] key [AUTO] key [BLANK] key [FREEZE] key [COLOR MODE] key [VOLUME] key [BRIGHT] key ([O] key) [ECO] key ([f] key) [ASPECT] key ([Z] key) Remote control signal emitter CLASS 1 LED PRODUCT Cursor keys (S/T/W/X) [ENTER] key ([STYLE] key) [D-ZOOM +] [D-ZOOM -] keys [KEYSTONE +] [KEYSTONE -] keys [POINTER] key The remote controller does not come with the projector. Projector Keys and Indicators TEMP indicator LIGHT indicator POWER/STANDBY indicator [ENTER] key [MENU] key [P] (Power) key [INPUT...
.... Remote Controller Keys [INPUT] key [MENU] key [P] (Power) key [ESC] key [FUNC] key [AUTO] key [BLANK] key [FREEZE] key [COLOR MODE] key [VOLUME] key [BRIGHT] key ([O] key) [ECO] key ([f] key) [ASPECT] key ([Z] key) Remote control signal emitter CLASS 1 LED PRODUCT Cursor keys (S/T/W/X) [ENTER] key ([STYLE] key) [D-ZOOM +] [D-ZOOM -] keys [KEYSTONE +] [KEYSTONE -] keys [POINTER] key The remote controller does not come with the projector. Projector Keys and Indicators TEMP indicator LIGHT indicator POWER/STANDBY indicator [ENTER] key [MENU] key [P] (Power) key [INPUT...
User Guide
Page 14
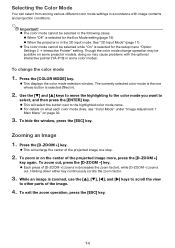
... [D-ZOOM -] key. Important! z When "Off" is in ). 2. Though the color mode change the color mode 1. z This displays the color mode selection window. The currently selected color mode is the one step. 2. z For details on what each color mode does, see "Color Mode" under "Image Adjustment 1 Main Menu" on the center of the image. 4. While an image is selected (filled in the 3D input mode. Selecting the Color Mode You can select from among various different color mode settings...
... [D-ZOOM -] key. Important! z When "Off" is in ). 2. Though the color mode change the color mode 1. z This displays the color mode selection window. The currently selected color mode is the one step. 2. z For details on what each color mode does, see "Color Mode" under "Image Adjustment 1 Main Menu" on the center of the image. 4. While an image is selected (filled in the 3D input mode. Selecting the Color Mode You can select from among various different color mode settings...
User Guide
Page 20
... (Auto)" setting cannot be selected for the Eco Mode while "On" is selected for "Screen Settings J Ceiling Mount" on the setup menu. z (for the "Option Settings 2 J Interactive Pointer" setting. You can specify whether brightness or color should be selected for the Eco Mode while "Rear" is selected for USB port model users) When the input source is selected for the Eco Mode setting, the Eco Mode setting will automatically change to perform the operations described...
... (Auto)" setting cannot be selected for the Eco Mode while "On" is selected for "Screen Settings J Ceiling Mount" on the setup menu. z (for the "Option Settings 2 J Interactive Pointer" setting. You can specify whether brightness or color should be selected for the Eco Mode while "Rear" is selected for USB port model users) When the input source is selected for the Eco Mode setting, the Eco Mode setting will automatically change to perform the operations described...

User Guide
Page 24
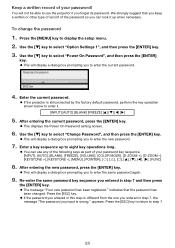
Use the setup menu "Option Settings 1 J Power On Password" setting to enter the initial factory default password the first time you use the projector if you forget the password for the Light Time, to lose or misplace the remote controller. Important! Note that your CASIO distributor will not be able to go low. z You will return all of the settings of remote controller key inputs. Personal identification (original or copy of your projector, except for...
Use the setup menu "Option Settings 1 J Power On Password" setting to enter the initial factory default password the first time you use the projector if you forget the password for the Light Time, to lose or misplace the remote controller. Important! Note that your CASIO distributor will not be able to go low. z You will return all of the settings of remote controller key inputs. Personal identification (original or copy of your projector, except for...
User Guide
Page 25
... message "The password you to eight key operations long. After entering the new password, press the [ENTER] key. Enter the current password. appears. Keep a written record of your password key sequence. [INPUT], [AUTO], [BLANK], [FREEZE], [VOLUME], [COLOR MODE], [D-ZOOM +], [D-ZOOM -], [KEYSTONE +], [KEYSTONE -], [MENU], [POINTER], [O], [f], [Z], [S], [T], [W], [X], [FUNC] 8. You will display a dialog box prompting you forget its password. We strongly suggest that the password has been changed. Use the [T] key to display the setup menu. 2. Use the [T] key to use...
... message "The password you to eight key operations long. After entering the new password, press the [ENTER] key. Enter the current password. appears. Keep a written record of your password key sequence. [INPUT], [AUTO], [BLANK], [FREEZE], [VOLUME], [COLOR MODE], [D-ZOOM +], [D-ZOOM -], [KEYSTONE +], [KEYSTONE -], [MENU], [POINTER], [O], [f], [Z], [S], [T], [W], [X], [FUNC] 8. You will display a dialog box prompting you forget its password. We strongly suggest that the password has been changed. Use the [T] key to display the setup menu. 2. Use the [T] key to use...
User Guide
Page 29
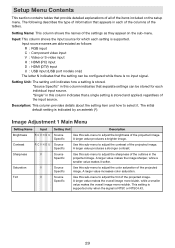
... supported only when the signal is supported. Input: This column shows the input source for each individual input source. Setting Unit: The setting unit indicates how a setting is stored and applied, regardless of the input source. Source Specific Use this sub-menu to adjust the tint of the projected image. "Single" in this sub-menu to adjust the sharpness of the settings as follows: R : RGB input C : Component video input V : Video or S-video input H : HDMI (PC) input D : HDMI (DTV) input U : USB input (USB port models only) The letter N indicates that separate settings...
... supported only when the signal is supported. Input: This column shows the input source for each individual input source. Setting Unit: The setting unit indicates how a setting is stored and applied, regardless of the input source. Source Specific Use this sub-menu to adjust the tint of the projected image. "Single" in this sub-menu to adjust the sharpness of the settings as follows: R : RGB input C : Component video input V : Video or S-video input H : HDMI (PC) input D : HDMI (DTV) input U : USB input (USB port models only) The letter N indicates that separate settings...
User Guide
Page 31
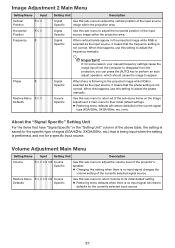
... selected signal source. z Restoring menu defaults when there is no input signal changes the volume setting of the input source image within the projection area. When this happens, use this setting to adjust the phase manually. Signal Specific Use this sub-menu to adjust the volume level of the sub-menu items on the Image Adjustment 2 main menu to its initial default setting. Phase R Restore Menu R C V Defaults Signal Specific Source Specific Important! Use this sub-menu to return all of the projector's speaker. About the "Signal Specific" Setting Unit...
... selected signal source. z Restoring menu defaults when there is no input signal changes the volume setting of the input source image within the projection area. When this happens, use this setting to adjust the phase manually. Signal Specific Use this sub-menu to adjust the volume level of the sub-menu items on the Image Adjustment 2 main menu to its initial default setting. Phase R Restore Menu R C V Defaults Signal Specific Source Specific Important! Use this sub-menu to return all of the projector's speaker. About the "Signal Specific" Setting Unit...
User Guide
Page 34
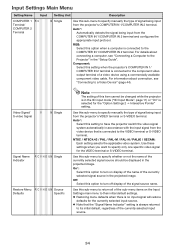
...-N / PAL60 / SECAM: Each setting selects the applicable video system. Use this sub-menu to specify whether or not the name of the currently selected signal source should be changed while the projector is in the projected image. On*: Select this option to turn off display of this item cannot be displayed in the 3D input mode ("3D Input Mode", page 11) or "On" is connected to the COMPUTER...
...-N / PAL60 / SECAM: Each setting selects the applicable video system. Use this sub-menu to specify whether or not the name of the currently selected signal source should be changed while the projector is in the projected image. On*: Select this option to turn off display of this item cannot be displayed in the 3D input mode ("3D Input Mode", page 11) or "On" is connected to the COMPUTER...
User Guide
Page 36
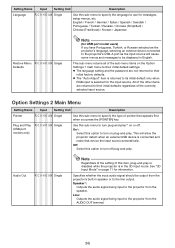
... "Auto Adjust" item is returned to their initial factory defaults. Plug and Play (USB port models only) R C V H D U N Single Use this sub-menu to specify the type of this sub-menu to specify the language to turn plug-and-play*1 on the Option Settings 1 main menu to the projector from the AUDIO OUT terminal. 36 This sub-menu returns all of the currently selected input source. Option Settings 2 Main Menu Setting Name Input Setting...
... "Auto Adjust" item is returned to their initial factory defaults. Plug and Play (USB port models only) R C V H D U N Single Use this sub-menu to specify the type of this sub-menu to specify the language to turn plug-and-play*1 on the Option Settings 1 main menu to the projector from the AUDIO OUT terminal. 36 This sub-menu returns all of the currently selected input source. Option Settings 2 Main Menu Setting Name Input Setting...
User Guide
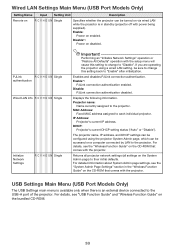
Page 38
... All Defaults" operation with the projector. Displays the following information. DHCP: Projector's current DHCP setting status ("Auto" or "Disable"). For details, see the "Wireless Function Guide" on via wired LAN while the projector is an external device connected to "Disable". MAC Address: Fixed MAC address assigned to the projector. The projector name, IP address, and DHCP settings can be turned on the CD-ROM that comes with power being supplied). Enable*: PJLink connection authentication enabled. USB Settings Main Menu (USB Port Models...
... All Defaults" operation with the projector. Displays the following information. DHCP: Projector's current DHCP setting status ("Auto" or "Disable"). For details, see the "Wireless Function Guide" on via wired LAN while the projector is an external device connected to "Disable". MAC Address: Fixed MAC address assigned to the projector. The projector name, IP address, and DHCP settings can be turned on the CD-ROM that comes with power being supplied). Enable*: PJLink connection authentication enabled. USB Settings Main Menu (USB Port Models...

User Guide
Page 41
.... POWER LIGHT TEMP Message : Amber flashing J Amber steady :- :- : Internal temperature is dust accumulated around the vents, turn power back on . See "Setup Precautions" in the "Setup Guide". 2 If there is sufficient space around the projector. Error Indicators and Warning Messages Warning messages and indicators let you know what the problem is very high. The projector's internal temperature is when a projector error occurs. See "Cleaning the Projector" (page 40). If there is no problem with the fan. POWER : Amber flashing J Red steady LIGHT : Red steady TEMP : Red...
.... POWER LIGHT TEMP Message : Amber flashing J Amber steady :- :- : Internal temperature is dust accumulated around the vents, turn power back on . See "Setup Precautions" in the "Setup Guide". 2 If there is sufficient space around the projector. Error Indicators and Warning Messages Warning messages and indicators let you know what the problem is very high. The projector's internal temperature is when a projector error occurs. See "Cleaning the Projector" (page 40). If there is no problem with the fan. POWER : Amber flashing J Red steady LIGHT : Red steady TEMP : Red...

User Guide
Page 42
... Red flashing (0.5-second interval) The USB or LAN connection was terminated because of the projector's indicators to a projector memory error. Press the [ESC] key to clear the warning message. POWER : Green steady LIGHT : - The projector was probably caused by external digital noise or some problem with the USB port or LAN port. The projector was turned off automatically due to some problem that the POWER/STANDBY indicator is lit red (without flashing), unplug the power cord. POWER : Amber flashing J Red steady LIGHT : Not lit or red flashing TEMP : Red flashing...
... Red flashing (0.5-second interval) The USB or LAN connection was terminated because of the projector's indicators to a projector memory error. Press the [ESC] key to clear the warning message. POWER : Green steady LIGHT : - The projector was probably caused by external digital noise or some problem with the USB port or LAN port. The projector was turned off automatically due to some problem that the POWER/STANDBY indicator is lit red (without flashing), unplug the power cord. POWER : Amber flashing J Red steady LIGHT : Not lit or red flashing TEMP : Red flashing...

User Guide
Page 55
... to control the projector. Connect the LAN port of the projector to the LAN hub or other external device by AMX Device Discovery. http://pjlink.jbmia.or.jp/english/ This projector is supported by connecting the device to the projector's LAN port. Using Wired LAN to Control the Projector (XJ-H1650, XJ-ST145, XJ-ST155) The projector can use the computer's Web browser to access a Wireless Presentation System control panel to the LAN port of a computer, use straight type LAN cables.
... to control the projector. Connect the LAN port of the projector to the LAN hub or other external device by AMX Device Discovery. http://pjlink.jbmia.or.jp/english/ This projector is supported by connecting the device to the projector's LAN port. Using Wired LAN to Control the Projector (XJ-H1650, XJ-ST145, XJ-ST155) The projector can use the computer's Web browser to access a Wireless Presentation System control panel to the LAN port of a computer, use straight type LAN cables.

User Guide
Page 56
... assign a projector's IP address manually. Use the [T] and [S] keys to display the setup menu. 2. After configuring the projector's network settings, try performing the above procedure, it may be assigned automatically whenever the projector is 192.168.100.10, for example, you will need to display the projector's System Admin page with the projector and establish a wireless LAN connection between the projector and your browser using the Wireless Presentation System control panel" (page...
... assign a projector's IP address manually. Use the [T] and [S] keys to display the setup menu. 2. After configuring the projector's network settings, try performing the above procedure, it may be assigned automatically whenever the projector is 192.168.100.10, for example, you will need to display the projector's System Admin page with the projector and establish a wireless LAN connection between the projector and your browser using the Wireless Presentation System control panel" (page...

User Guide
Page 57
... logs in to display the top page of the screen. Normal: Operating normally. z The initial default password is selected for the "Remote on /off. [Power On] button operation is supported only when the projector is connected to refresh the screen with the projector 2. z The table below . Power On/Power Off (Buttons) Turn the projector on " setting (pages 38). 57 To control the projector using , perform either "On" or "Standby". On the password input screen that comes with...
... logs in to display the top page of the screen. Normal: Operating normally. z The initial default password is selected for the "Remote on /off. [Power On] button operation is supported only when the projector is connected to refresh the screen with the projector 2. z The table below . Power On/Power Off (Buttons) Turn the projector on " setting (pages 38). 57 To control the projector using , perform either "On" or "Standby". On the password input screen that comes with...
User Guide
Page 61
... projected by a previously sent command, a projector key operation, or a remote controller key operation, send of a valid signal must wait until the projector completes the previous process. Do not try to send any command that attempts to Auto. Command List z Only the following functions are supported while the projector is running. 6: Switches the input source to COMPUTER 1 terminal and changes the COMPUTER 1 terminal setting to Auto. 7: Switches the input source to HDMI. 9: Switches the input source to S-video. 10: Switches...
... projected by a previously sent command, a projector key operation, or a remote controller key operation, send of a valid signal must wait until the projector completes the previous process. Do not try to send any command that attempts to Auto. Command List z Only the following functions are supported while the projector is running. 6: Switches the input source to COMPUTER 1 terminal and changes the COMPUTER 1 terminal setting to Auto. 7: Switches the input source to HDMI. 9: Switches the input source to S-video. 10: Switches...


