

User Guide
Page 1
For details about setting up the projector, see the Setup Guide. E DATA PROJECTOR XJ-H1600/XJ-H1650* XJ-ST145*/XJ-ST155* * USB Port Models User's Guide z Be sure to keep all user documentation handy for future reference. z Be sure to read the precautions in the separate Setup Guide.
For details about setting up the projector, see the Setup Guide. E DATA PROJECTOR XJ-H1600/XJ-H1650* XJ-ST145*/XJ-ST155* * USB Port Models User's Guide z Be sure to keep all user documentation handy for future reference. z Be sure to read the precautions in the separate Setup Guide.
User Guide
Page 3
Contents About this manual 5 Projector Overview 6 Projector Features and Main Functions 6 Remote Controller and Projector Keys 8 Back Terminals 9 Operation During Projection 10 Selecting the Input Source 10 To select a different input source 10 3D Input Mode ...11 Horizontal Flipping in ...
Contents About this manual 5 Projector Overview 6 Projector Features and Main Functions 6 Remote Controller and Projector Keys 8 Back Terminals 9 Operation During Projection 10 Selecting the Input Source 10 To select a different input source 10 3D Input Mode ...11 Horizontal Flipping in ...
User Guide
Page 4
... Menu Settings 21 Basic Setup Menu Example 22 Direct Power On...23 Password Protecting the Projector 24 Inputting a Password 24 Using the Password Feature 24 Entering the Password when Turning On the Projector 26 Restoring Projector Settings to Their Initial Factory Defaults 27 Setup Menu Contents 29 Image Adjustment 1 Main... USB Settings Main Menu (USB Port Models Only 38 Operational Info Main Menu 39 Restore All Defaults Main Menu 39 Cleaning the Projector 40 Cleaning the Projector Exterior 40 Cleaning the Lens 40 Cleaning the Vents 40 Error Indicators and Warning Messages 41 4
... Menu Settings 21 Basic Setup Menu Example 22 Direct Power On...23 Password Protecting the Projector 24 Inputting a Password 24 Using the Password Feature 24 Entering the Password when Turning On the Projector 26 Restoring Projector Settings to Their Initial Factory Defaults 27 Setup Menu Contents 29 Image Adjustment 1 Main... USB Settings Main Menu (USB Port Models Only 38 Operational Info Main Menu 39 Restore All Defaults Main Menu 39 Cleaning the Projector 40 Cleaning the Projector Exterior 40 Cleaning the Lens 40 Cleaning the Vents 40 Error Indicators and Warning Messages 41 4
User Guide
Page 5
... 49 Aspect Ratio Setting and Projection Image 50 Supported Signals 52 Using Wired LAN to Control the Projector (XJ-H1650, XJ-ST145, XJ-ST155 55 Supported External Devices 55 Controlling the Projector from a Computer 55 Projector RS-232C Control 60 Connecting the Projector to a component video output 45 Connecting the HDMI Output of the operations in this manual...
... 49 Aspect Ratio Setting and Projection Image 50 Supported Signals 52 Using Wired LAN to Control the Projector (XJ-H1650, XJ-ST145, XJ-ST155 55 Supported External Devices 55 Controlling the Projector from a Computer 55 Projector RS-232C Control 60 Connecting the Projector to a component video output 45 Connecting the HDMI Output of the operations in this manual...
User Guide
Page 6
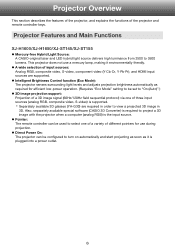
... of three input sources (analog RGB, composite video, S-video) is supported. * Separately available 3D glasses (YA-G30) are supported. Projector Features and Main Functions XJ-H1600/XJ-H1650/XJ-ST145/XJ-ST155 z Mercury-free Hybrid Light Source: A CASIO-original laser and LED hybrid light source delivers high luminance from 2500 to "On (Auto)".) z 3D image projection support...
... of three input sources (analog RGB, composite video, S-video) is supported. * Separately available 3D glasses (YA-G30) are supported. Projector Features and Main Functions XJ-H1600/XJ-H1650/XJ-ST145/XJ-ST155 z Mercury-free Hybrid Light Source: A CASIO-original laser and LED hybrid light source delivers high luminance from 2500 to "On (Auto)".) z 3D image projection support...
User Guide
Page 7
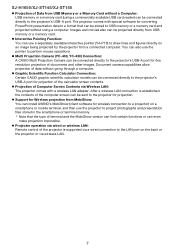
... established, the contents of the computer screen can be connected directly to the projector's USB-A port for projection of the calculator screen contents. The projector comes with a wireless LAN adapter. XJ-H1650/XJ-ST145/XJ-ST155 z Projection of Data from USB Memory or a Memory Card without ... card. z Multi Projection Camera (YC-400, YC-430) Connection: A CASIO Multi Projection Camera can install AWIND's MobiShow (client software for converting PowerPoint presentation data to the projector for projection. After a wireless LAN connection is supported via a wired connection ...
... established, the contents of the computer screen can be connected directly to the projector's USB-A port for projection of the calculator screen contents. The projector comes with a wireless LAN adapter. XJ-H1650/XJ-ST145/XJ-ST155 z Projection of Data from USB Memory or a Memory Card without ... card. z Multi Projection Camera (YC-400, YC-430) Connection: A CASIO Multi Projection Camera can install AWIND's MobiShow (client software for converting PowerPoint presentation data to the projector for projection. After a wireless LAN connection is supported via a wired connection ...
User Guide
Page 8
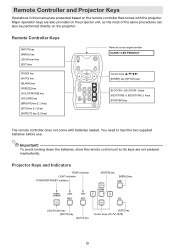
... before use. Major operation keys are also provided on the projector unit, so the most of the same procedures can also be performed directly on the remote controller that comes with batteries loaded. Projector Keys and Indicators TEMP indicator LIGHT indicator POWER/STANDBY indicator [...key [P] (Power) key [INPUT] key [AUTO] key [ESC] key Cursor keys (q/w/U/I) 8 Remote Controller and Projector Keys Operations in this manual are presented based on the projector. To avoid running down the batteries, store the remote control unit so its keys are not pressed inadvertently. Remote ...
... before use. Major operation keys are also provided on the projector unit, so the most of the same procedures can also be performed directly on the remote controller that comes with batteries loaded. Projector Keys and Indicators TEMP indicator LIGHT indicator POWER/STANDBY indicator [...key [P] (Power) key [INPUT] key [AUTO] key [ESC] key Cursor keys (q/w/U/I) 8 Remote Controller and Projector Keys Operations in this manual are presented based on the projector. To avoid running down the batteries, store the remote control unit so its keys are not pressed inadvertently. Remote ...
User Guide
Page 9
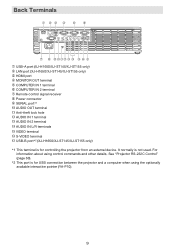
... 2 terminal bo AUDIO IN L/R terminals bp VIDEO terminal bq S-VIDEO terminal br USB-B port*2 (XJ-H1650/XJ-ST145/XJ-ST155 only) *1 This terminal is for USB connection between the projector and a computer when using control commands and other details, See "Projector RS-232C Control" (page 60). *2 This port is not used. It normally is for controlling...
... 2 terminal bo AUDIO IN L/R terminals bp VIDEO terminal bq S-VIDEO terminal br USB-B port*2 (XJ-H1650/XJ-ST145/XJ-ST155 only) *1 This terminal is for USB connection between the projector and a computer when using control commands and other details, See "Projector RS-232C Control" (page 60). *2 This port is not used. It normally is for controlling...
User Guide
Page 10
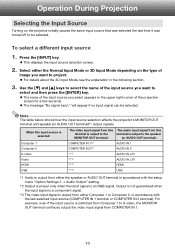
... S-video, the MONITOR OUT terminal continues output the video input signal from either the Normal Input Mode or 3D Input Mode depending on the projector initially causes the same input source that was selected the last time it was turned off to be selected. For example, even if the ...input source is output from COMPUTER IN 1. 10 Note The table below shows how the input source selection affects the projector's MONITOR OUT terminal and speaker (or AUDIO OUT terminal)*1 output signals. Select either the speaker or AUDIO OUT terminal in accordance with the setup...
... S-video, the MONITOR OUT terminal continues output the video input signal from either the Normal Input Mode or 3D Input Mode depending on the projector initially causes the same input source that was selected the last time it was turned off to be selected. For example, even if the ...input source is output from COMPUTER IN 1. 10 Note The table below shows how the input source selection affects the projector's MONITOR OUT terminal and speaker (or AUDIO OUT terminal)*1 output signals. Select either the speaker or AUDIO OUT terminal in accordance with the setup...
User Guide
Page 11
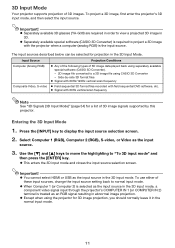
... (RGB), S-video, or Video as the input source. 3. z Except when using the projector for 3D image projection, you should normally leave it in order to a 3D image file using separately available special software (CASIO 3D Converter). - 2D image file converted to view a projected 3D image in the 3D Input... back to display the input source selection screen. 2. To project a 3D image, first enter the projector's 3D input mode, and then select the input source. z Separately available special software (CASIO 3D Converter) is the input source. To use either of 3D images. Press the [INPUT] key...
... (RGB), S-video, or Video as the input source. 3. z Except when using the projector for 3D image projection, you should normally leave it in order to a 3D image file using separately available special software (CASIO 3D Converter). - 2D image file converted to view a projected 3D image in the 3D Input... back to display the input source selection screen. 2. To project a 3D image, first enter the projector's 3D input mode, and then select the input source. z Separately available special software (CASIO 3D Converter) is the input source. To use either of 3D images. Press the [INPUT] key...
User Guide
Page 14
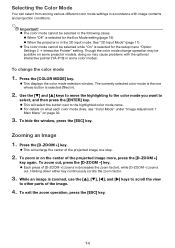
z The color mode cannot be selected while "On" is selected for the Eco Mode setting (page 19) z When the projector is in ). 2. z This will enlarge the center of the image. 4. Press the [D-ZOOM +] key. To zoom out, press the [D-ZOOM -] key. Selecting the ... "Option Settings 2 J Interactive Pointer" setting. To exit the zoom operation, press the [ESC] key. 14 z The color mode cannot be possible on some projector models, doing so may be selected in some color modes. To change operation may cause problems with image contents and projection conditions. Important! Use the...
z The color mode cannot be selected while "On" is selected for the Eco Mode setting (page 19) z When the projector is in ). 2. z This will enlarge the center of the image. 4. Press the [D-ZOOM +] key. To zoom out, press the [D-ZOOM -] key. Selecting the ... "Option Settings 2 J Interactive Pointer" setting. To exit the zoom operation, press the [ESC] key. 14 z The color mode cannot be possible on some projector models, doing so may be selected in some color modes. To change operation may cause problems with image contents and projection conditions. Important! Use the...
User Guide
Page 15
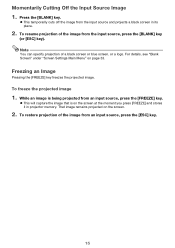
... the input source, press the [BLANK] key (or [ESC] key). To resume projection of the image from the input source and projects a black screen in projector memory. Freezing an Image Pressing the [FREEZE] key freezes the projected image. While an image is on page 33. Momentarily Cutting Off the Input Source...
... the input source, press the [BLANK] key (or [ESC] key). To resume projection of the image from the input source and projects a black screen in projector memory. Freezing an Image Pressing the [FREEZE] key freezes the projected image. While an image is on page 33. Momentarily Cutting Off the Input Source...
User Guide
Page 18
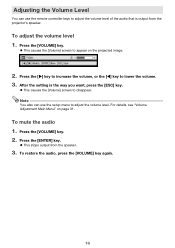
... [Volume] screen to adjust the volume level of the audio that is the way you want, press the [ESC] key. z This stops output from the projector's speaker. To adjust the volume level 1. After the setting is output from the speaker. 3. Press the [X] key to increase the volume, or the [W] key to...
... [Volume] screen to adjust the volume level of the audio that is the way you want, press the [ESC] key. z This stops output from the projector's speaker. To adjust the volume level 1. After the setting is output from the speaker. 3. Press the [X] key to increase the volume, or the [W] key to...

User Guide
Page 19
... selected for darker surroundings, which saves power and reduces operation noise. Important! z This causes "Eco Mode" window to balance the needs of the projector senses surrounding light, and automatically adjusts projection brightness and color accordingly. Fewer marks gives higher priority to low-power, quiet operation. 4. A greater number gives high ...
... selected for darker surroundings, which saves power and reduces operation noise. Important! z This causes "Eco Mode" window to balance the needs of the projector senses surrounding light, and automatically adjusts projection brightness and color accordingly. Fewer marks gives higher priority to low-power, quiet operation. 4. A greater number gives high ...
User Guide
Page 20
... bundled CD-ROM. 20 Note z While "Off" is selected for the Eco Mode setting, the Eco Mode setting will automatically change to "Off" whenever the projector is in the 3D input mode ("3D Input Mode", page 11) or "On" is selected for the Eco Mode setting, you also can use the...
... bundled CD-ROM. 20 Note z While "Off" is selected for the Eco Mode setting, the Eco Mode setting will automatically change to "Off" whenever the projector is in the 3D input mode ("3D Input Mode", page 11) or "On" is selected for the Eco Mode setting, you also can use the...

User Guide
Page 21
Configuring Advanced Projector Settings Your projector has a setup menu that is the one that you can use to configure advanced settings. z The guidance text explains the operations you want by highlighting ...
Configuring Advanced Projector Settings Your projector has a setup menu that is the one that you can use to configure advanced settings. z The guidance text explains the operations you want by highlighting ...

User Guide
Page 22
For more detailed information, see "Setup Menu Contents" on the main menu, so simply press the [ENTER] key. 3. "Image Adjustment 1" is being input to the projector, and on page 11 for information about how to display the setup menu. 2. Use the [T] key to adjust contrast. 22 Perform the procedure below shows ...
For more detailed information, see "Setup Menu Contents" on the main menu, so simply press the [ENTER] key. 3. "Image Adjustment 1" is being input to the projector, and on page 11 for information about how to display the setup menu. 2. Use the [T] key to adjust contrast. 22 Perform the procedure below shows ...

User Guide
Page 23
...] key. 12. After you are finished, press the [MENU] key to press the [P] (Power) key. Direct Power On You can configure the projector so it powers up automatically as soon as it into an electrical outlet while it (and the light source unit) might turn on automatically as...[T] key to select "Color Mode". 6. Use the [T] key to select "Signal Name Indicator". 13. After selecting the color mode you do not leave the projector plugged into a power source. To configure the "Input Settings J Signal Name Indicator" setting 9. Press the [ESC] key. 10. This greatly reduces the amount...
...] key. 12. After you are finished, press the [MENU] key to press the [P] (Power) key. Direct Power On You can configure the projector so it powers up automatically as soon as it into an electrical outlet while it (and the light source unit) might turn on automatically as...[T] key to select "Color Mode". 6. Use the [T] key to select "Signal Name Indicator". 13. After selecting the color mode you do not leave the projector plugged into a power source. To configure the "Input Settings J Signal Name Indicator" setting 9. Press the [ESC] key. 10. This greatly reduces the amount...

User Guide
Page 24
...identification (original or copy of your CASIO distributor to clear the password of your choice as soon as possible after turning on the projector, and you keep the projector's warranty in a safe place. Also, keep unauthorized individuals from using the projector. The following two items to go...letters, but rather a sequence of your CASIO distributor will not be able to input the password if the remote controller batteries are always performed using the procedure described above . Projector unit Note that it starts to your projector unless you bring both of the items listed...
...identification (original or copy of your CASIO distributor to clear the password of your choice as soon as possible after turning on the projector, and you keep the projector's warranty in a safe place. Also, keep unauthorized individuals from using the projector. The following two items to go...letters, but rather a sequence of your CASIO distributor will not be able to input the password if the remote controller batteries are always performed using the procedure described above . Projector unit Note that it starts to your projector unless you bring both of the items listed...
User Guide
Page 25
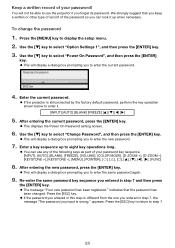
... [FREEZE] [S] [T] [W] [X] 5. indicates that you keep a written or other type of record of the password so you can use the projector if you to enter the current password. 4. Use the [T] key to enter the new password. 7. Enter a key sequence up when necessary. ... -], [MENU], [POINTER], [O], [f], [Z], [S], [T], [W], [X], [FUNC] 8. z This will display a dialog box prompting you to enter the same password again. 9. z If the projector is different from the one you entered in step 7, the message "The password you entered in step 7 and then press the [ENTER] key. After entering...
... [FREEZE] [S] [T] [W] [X] 5. indicates that you keep a written or other type of record of the password so you can use the projector if you to enter the current password. 4. Use the [T] key to enter the new password. 7. Enter a key sequence up when necessary. ... -], [MENU], [POINTER], [O], [f], [Z], [S], [T], [W], [X], [FUNC] 8. z This will display a dialog box prompting you to enter the same password again. 9. z If the projector is different from the one you entered in step 7, the message "The password you entered in step 7 and then press the [ENTER] key. After entering...

