
User Guide
Page 4
... a Drum Set (Drum Sampling E-20 Other Sampling Functions E-22 Playing Built-in Songs E-25 Playing the Demo Songs E-25 Playing Back a Particular Song E-26 Increasing the Selection of Songs E-28 Using Built-in Song E-51 Saving Recorded Data on Power and Playing E-9 Using Headphones E-9 Changing Keyboard Response to Touch Pressure (Touch Response E-10 Adjusting Display Contrast E-10 Using the Metronome E-11 Controlling the Keyboard Sounds E-12 Select from registration memory ..... E-9 Turning on an External Device E-52 E-2 Contents General Guide E-4 Using the 10-key Pad (bs...
... a Drum Set (Drum Sampling E-20 Other Sampling Functions E-22 Playing Built-in Songs E-25 Playing the Demo Songs E-25 Playing Back a Particular Song E-26 Increasing the Selection of Songs E-28 Using Built-in Song E-51 Saving Recorded Data on Power and Playing E-9 Using Headphones E-9 Changing Keyboard Response to Touch Pressure (Touch Response E-10 Adjusting Display Contrast E-10 Using the Metronome E-11 Controlling the Keyboard Sounds E-12 Select from registration memory ..... E-9 Turning on an External Device E-52 E-2 Contents General Guide E-4 Using the 10-key Pad (bs...

User Guide
Page 9
... Function 1 Transpose 2 Accompaniment Volume 3 Song Volume 4 Touch Response 5 Tuning 6 Reverb 7 Chorus 8 Sampling Automatic Sampling Start Automatic Sampling Stop Sampled Tone Protect 9 Step Up Lesson Voice Fingering Guide Note Guide Performance Evaluation Phrase Length 10 Other Settings Arpeggiator Hold Pedal Effect Pitch Bend Range (WK-500 only) Accompaniment Scale LCD Contrast 11 MIDI Settings Keyboard Channel Navigate Channels Local Control Accomp Out 12 Delete Sampled Sound Delete User Rhythm Delete User Song Delete All Data Delete Display Trans. AcompVol Song Vol Touch Tune Reverb...
... Function 1 Transpose 2 Accompaniment Volume 3 Song Volume 4 Touch Response 5 Tuning 6 Reverb 7 Chorus 8 Sampling Automatic Sampling Start Automatic Sampling Stop Sampled Tone Protect 9 Step Up Lesson Voice Fingering Guide Note Guide Performance Evaluation Phrase Length 10 Other Settings Arpeggiator Hold Pedal Effect Pitch Bend Range (WK-500 only) Accompaniment Scale LCD Contrast 11 MIDI Settings Keyboard Channel Navigate Channels Local Control Accomp Out 12 Delete Sampled Sound Delete User Rhythm Delete User Song Delete All Data Delete Display Trans. AcompVol Song Vol Touch Tune Reverb...
User Guide
Page 16
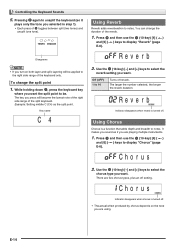
... reverb is a function that adds depth and breadth to display "Reverb" (page E-6). Press ct and then use the bs (10-key) [4] ( ) and [6] ( ) keys to notes. Cho r us Indicator disappears when chorus is turned off . Cho r us 2. Controlling the Keyboard Sounds 5. Disappears • If you press will be . Off (oFF) 1 to notes. E-14 You can change the split point 1. It makes you are five chorus types, plus an off reverb. Example: Setting...
... reverb is a function that adds depth and breadth to display "Reverb" (page E-6). Press ct and then use the bs (10-key) [4] ( ) and [6] ( ) keys to notes. Cho r us Indicator disappears when chorus is turned off . Cho r us 2. Controlling the Keyboard Sounds 5. Disappears • If you press will be . Off (oFF) 1 to notes. E-14 You can change the split point 1. It makes you are five chorus types, plus an off reverb. Example: Setting...

User Guide
Page 17
... the available pedal effects. Use the bs (10-key) [-] and [+] keys to display "Tune" (page E-6). SUSTAIN/ASSIGNABLE JACK Controlling the Keyboard Sounds Changing the Pitch (Transpose, Tuning, Octave Shift) Changing the Pitch in various ways while playing. • A pedal unit does not come with slightly altered tuning. Press bs (10-key) [7] (ENTER) key. 3. Organ and other similar tone notes are released. See page E-3 for information about options. Fine Tuning (Tuning) Use the tuning feature when you change notes in Semitone Steps (Transpose) The transpose feature lets you...
... the available pedal effects. Use the bs (10-key) [-] and [+] keys to display "Tune" (page E-6). SUSTAIN/ASSIGNABLE JACK Controlling the Keyboard Sounds Changing the Pitch (Transpose, Tuning, Octave Shift) Changing the Pitch in various ways while playing. • A pedal unit does not come with slightly altered tuning. Press bs (10-key) [7] (ENTER) key. 3. Organ and other similar tone notes are released. See page E-3 for information about options. Fine Tuning (Tuning) Use the tuning feature when you change notes in Semitone Steps (Transpose) The transpose feature lets you...

User Guide
Page 18
... [+] keys to shift the octave. • Split On : This step affects the right side keyboard range only. • Split Off : This step affects the entire keyboard range. 3. Controlling the Keyboard Sounds Octave Shift Octave Shift lets you raise or lower the pitch of the keyboard notes in octave units. • The octave shift setting range is rotated upwards or downwards. Advance to display "OTHER" (page E-6). Press cq again. The amount the note bends...
... [+] keys to shift the octave. • Split On : This step affects the right side keyboard range only. • Split Off : This step affects the entire keyboard range. 3. Controlling the Keyboard Sounds Octave Shift Octave Shift lets you raise or lower the pitch of the keyboard notes in octave units. • The octave shift setting range is rotated upwards or downwards. Advance to display "OTHER" (page E-6). Press cq again. The amount the note bends...

User Guide
Page 19
... keyboard. Connection and Preparation • Before connecting, make sure that the Digital Keyboard, external devices, and/or the microphone all are highly creative. Connecting cords should have a stereo mini plug on one end and a plug that are turned off. 1. The sampling feature is a great way to the Digital Keyboard. MIC IN jack 2. E-17 Turn on the external device or microphone, and then turn on the Digital Keyboard. • When using a microphone, adjust the input volume...
... keyboard. Connection and Preparation • Before connecting, make sure that the Digital Keyboard, external devices, and/or the microphone all are highly creative. Connecting cords should have a stereo mini plug on one end and a plug that are turned off. 1. The sampling feature is a great way to the Digital Keyboard. MIC IN jack 2. E-17 Turn on the external device or microphone, and then turn on the Digital Keyboard. • When using a microphone, adjust the input volume...

User Guide
Page 35
... for songs loaded from the beginning to display "NoteGuid". E-33 Use the bs (10-key) [4] ( ) and [6] ( ) keys to select the phrase length you want. Off (oFF) Preset (PrE) The phrase length is turned off performance evaluation, which sounds the note to turn off . Turning Off Note Guide Use the following procedure to Master Keyboard Play Changing the Phrase Length You can use the bs (10-key) [4] ( ) and [6] ( ) keys to display "Scoring". Use...
... for songs loaded from the beginning to display "NoteGuid". E-33 Use the bs (10-key) [4] ( ) and [6] ( ) keys to select the phrase length you want. Off (oFF) Preset (PrE) The phrase length is turned off performance evaluation, which sounds the note to turn off . Turning Off Note Guide Use the following procedure to Master Keyboard Play Changing the Phrase Length You can use the bs (10-key) [4] ( ) and [6] ( ) keys to display "Scoring". Use...

User Guide
Page 43
... of four notes. Adds country style harmony. Adds 2-note close harmony, for strings. Press cr to turn off Auto Harmonize. Select another mode if you want to use Auto Harmonize. 2. Do not select them when using the same button cr as the chord input mode. Adds 3-note close harmony, for a total of four notes. Adds big band style harmony. 4. You can select from the next lower octave. Adds harmony that is controlled using the Auto Harmonize. Adds block chord notes. Due t 2 Using Auto Accompaniment Type number Type Name 001 Duet...
... of four notes. Adds country style harmony. Adds 2-note close harmony, for strings. Press cr to turn off Auto Harmonize. Select another mode if you want to use Auto Harmonize. 2. Do not select them when using the same button cr as the chord input mode. Adds 3-note close harmony, for a total of four notes. Adds big band style harmony. 4. You can select from the next lower octave. Adds harmony that is controlled using the Auto Harmonize. Adds block chord notes. Due t 2 Using Auto Accompaniment Type number Type Name 001 Duet...
User Guide
Page 44
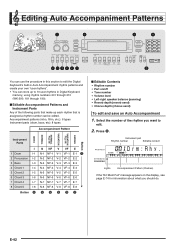
...; Reverb depth (reverb send) • Chorus depth (chorus send) To edit and save an Auto Accompaniment 1. Accompaniment patterns (intro, fill-in Digital Keyboard memory, using rhythm numbers 201 through 210 (WK-200: 181 through 190). ■ Editable Accompaniment Patterns and Instrument Parts Any of the rhythm you should do. Press 6. Select the number of the following parts that make up to 10 user rhythms in , etc.): 6 types Instrument parts (drum, bass, etc): 8 types Accompaniment Pattern Button ENDING...
...; Reverb depth (reverb send) • Chorus depth (chorus send) To edit and save an Auto Accompaniment 1. Accompaniment patterns (intro, fill-in Digital Keyboard memory, using rhythm numbers 201 through 210 (WK-200: 181 through 190). ■ Editable Accompaniment Patterns and Instrument Parts Any of the rhythm you should do. Press 6. Select the number of the following parts that make up to 10 user rhythms in , etc.): 6 types Instrument parts (drum, bass, etc): 8 types Accompaniment Pattern Button ENDING...

User Guide
Page 45
... to part I -1, for editing. Repeat steps 3 through ending). 10. Drm:Rhy . Use the bs (10-key) [-] and [+] keys to select the rhythm number you want to assign to the instrument part you want to I -2, for the setting you assign rhythm 003 to edit. Parts that contain data. Setting Type Display Settings 1 Part on the display. Press bq. Press bn to select the instrument part you want (intro through 8 as many times...
... to part I -1, for editing. Repeat steps 3 through ending). 10. Drm:Rhy . Use the bs (10-key) [-] and [+] keys to select the rhythm number you want to assign to the instrument part you want to I -2, for the setting you assign rhythm 003 to edit. Parts that contain data. Setting Type Display Settings 1 Part on the display. Press bq. Press bn to select the instrument part you want (intro through 8 as many times...

User Guide
Page 48
...; Registration Memory Data The following setups in Bank 1. • Initial melody setup saved to Setup 1-1. • Second melody setup saved to Setup 1-2. • Third melody setup saved to a registration memory setup. • Tone numbers (main, layer, split) • Rhythm number • Tempo • Auto Harmonize • Transpose • Split point • Touch Response • Octave shift • Chord fingerings • Accompaniment volume • Arpeggiator setting (on, off, type) • Synchro start • Reverb (on, off, type) • Chorus (on, off, type) • Bend...
...; Registration Memory Data The following setups in Bank 1. • Initial melody setup saved to Setup 1-1. • Second melody setup saved to Setup 1-2. • Third melody setup saved to a registration memory setup. • Tone numbers (main, layer, split) • Rhythm number • Tempo • Auto Harmonize • Transpose • Split point • Touch Response • Octave shift • Chord fingerings • Accompaniment volume • Arpeggiator setting (on, off, type) • Synchro start • Reverb (on, off, type) • Chorus (on, off, type) • Bend...

User Guide
Page 51
...the delete operation. appears on the keyboard, the following information also is recorded. • Track 1 Settings: Tone number, rhythm number, tempo, reverb, chorus, chords, layer/split settings, Auto Harmonize/Arpeggiator setting Operations: Pedal, pitch bend wheel (WK-500 only), INTRO button, SYNCHRO/ENDING button, NORMAL/FILL-IN button, VARIATION/FILL-IN button • Tracks 2 through the settings shown below. Tips for Maintaining Data • Use both batteries and the AC adaptor together. • Make sure that batteries with sufficient power are no more unused recorder memory...
...the delete operation. appears on the keyboard, the following information also is recorded. • Track 1 Settings: Tone number, rhythm number, tempo, reverb, chorus, chords, layer/split settings, Auto Harmonize/Arpeggiator setting Operations: Pedal, pitch bend wheel (WK-500 only), INTRO button, SYNCHRO/ENDING button, NORMAL/FILL-IN button, VARIATION/FILL-IN button • Tracks 2 through the settings shown below. Tips for Maintaining Data • Use both batteries and the AC adaptor together. • Make sure that batteries with sufficient power are no more unused recorder memory...

User Guide
Page 53
... a specific song for playback. 1. Example: Track 2 P l ay No . 3. To stop recording or playback, press bm. 4. Making a new recording replaces (deletes) previously recorded data. 1. Press 5. Flashes Flashes 4. Press bq. 2. The song number will appear in memory. Press 5 twice to play along and record along with a built-in song in recorder memory. Press [+] (YES) to delete the song, or [-] (NO) to five songs (numbered 1 through 5) in the upper left corner of the display for a few seconds. Recording Your Keyboard Play Recording while Playing...
... a specific song for playback. 1. Example: Track 2 P l ay No . 3. To stop recording or playback, press bm. 4. Making a new recording replaces (deletes) previously recorded data. 1. Press 5. Flashes Flashes 4. Press bq. 2. The song number will appear in memory. Press 5 twice to play along and record along with a built-in song in recorder memory. Press [+] (YES) to delete the song, or [-] (NO) to five songs (numbered 1 through 5) in the upper left corner of the display for a few seconds. Recording Your Keyboard Play Recording while Playing...

User Guide
Page 59
... and falling (Type A) Repeat pattern alternating between rising and falling (Type B) Random arrangement of notes of [+] (YES). Playing a chord on • The tempo setting of the Arpeggiator is complete, "Complete" will start arpeggio play. • Press cr again to turn on Arpeggiator. Press bs (10-key) [7] (ENTER) key. Other Useful Digital Keyboard Functions Deleting User Song Data You can use the bs (10-key) [4] ( ) and [6] ( ) keys to delete user song data stored as that set for the metronome (page E-11...
... and falling (Type A) Repeat pattern alternating between rising and falling (Type B) Random arrangement of notes of [+] (YES). Playing a chord on • The tempo setting of the Arpeggiator is complete, "Complete" will start arpeggio play. • Press cr again to turn on Arpeggiator. Press bs (10-key) [7] (ENTER) key. Other Useful Digital Keyboard Functions Deleting User Song Data You can use the bs (10-key) [4] ( ) and [6] ( ) keys to delete user song data stored as that set for the metronome (page E-11...
User Guide
Page 60
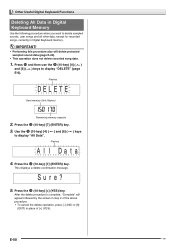
... display "All Data". Press the bs (10-key) [7] (ENTER) key. 3. E-58 B After the delete procedure is complete, "Complete" will appear followed by the screen in step 2 of the above procedure. • To cancel the delete operation, press [-] (NO) or [9] (EXIT) in Digital Keyboard memory. • Performing this procedure also will delete protected sampled sound data (page E-24). • This operation does not delete recorded song data. 1. Other Useful Digital Keyboard Functions Deleting All Data in Digital Keyboard Memory Use...
... display "All Data". Press the bs (10-key) [7] (ENTER) key. 3. E-58 B After the delete procedure is complete, "Complete" will appear followed by the screen in step 2 of the above procedure. • To cancel the delete operation, press [-] (NO) or [9] (EXIT) in Digital Keyboard memory. • Performing this procedure also will delete protected sampled sound data (page E-24). • This operation does not delete recorded song data. 1. Other Useful Digital Keyboard Functions Deleting All Data in Digital Keyboard Memory Use...

User Guide
Page 61
... of malfunction. • Electrostatic charge discharging from an external device (cannot be saved and loaded Data Type Description File Name Extension Sampled sound (page E-18) Sampled sound data TW7 DW7*1 User rhythms (page E-42) Edited Auto Accompaniment data AC7 User songs (page E-28) Recorded songs (page E-48) User scale memory (page E-53) Registration setups (page E-46) All data Song data imported from your fingers or the SD memory card to the card slot can become quite...
... of malfunction. • Electrostatic charge discharging from an external device (cannot be saved and loaded Data Type Description File Name Extension Sampled sound (page E-18) Sampled sound data TW7 DW7*1 User rhythms (page E-42) Edited Auto Accompaniment data AC7 User songs (page E-28) Recorded songs (page E-48) User scale memory (page E-53) Registration setups (page E-46) All data Song data imported from your fingers or the SD memory card to the card slot can become quite...

User Guide
Page 64
..." "Regist." To load this data Sampled sound User rhythm User song Recorded song User scale memory Registration data All data Display this Sampled sound Select the tone number of data Do this screen "Lod" "SmplTone" "Lod" "UserRhy." On the Digital Keyboard, select the data you want to load. To load this type of the sampled sound you want to load. Hold down dk until the button lights. • To cancel data load, press dk again. 4. "Lod" "All Data" E-62 Using a Memory Card (WK...
..." "Regist." To load this data Sampled sound User rhythm User song Recorded song User scale memory Registration data All data Display this Sampled sound Select the tone number of data Do this screen "Lod" "SmplTone" "Lod" "UserRhy." On the Digital Keyboard, select the data you want to load. To load this type of the sampled sound you want to load. Hold down dk until the button lights. • To cancel data load, press dk again. 4. "Lod" "All Data" E-62 Using a Memory Card (WK...

User Guide
Page 70
... MIDI file (SMF format). If you download from the Internet Data Expansion system of the CASIO MUSIC SITE (http://music.casio.com/) and load it into a power outlet before replacing batteries. Note that there is required in Memory After you save recorded song data to you disconnect the AC adaptor. • Connect the AC adaptor to enter the model name of this product and search for storage. You also can be deleted. You cannot save data in step...
... MIDI file (SMF format). If you download from the Internet Data Expansion system of the CASIO MUSIC SITE (http://music.casio.com/) and load it into a power outlet before replacing batteries. Note that there is required in Memory After you save recorded song data to you disconnect the AC adaptor. • Connect the AC adaptor to enter the model name of this product and search for storage. You also can be deleted. You cannot save data in step...
User Guide
Page 73
... and adjust the reverb setting (page E-14). • Turn power off and then back on to initialize all Digital Keyboard settings (page E-9). Computer Connection I can save setups to registration memory for some tones, octaves do not change my keyboard touch. • Change the Touch Response setting (page E-10). • Turn power off and then back on to initialize all Digital Keyboard settings (page E-9). • Replace the batteries with new ones or switch over to AC adaptor power (page E-8). Next, turn on the Digital Keyboard. quality sound are...
... and adjust the reverb setting (page E-14). • Turn power off and then back on to initialize all Digital Keyboard settings (page E-9). Computer Connection I can save setups to registration memory for some tones, octaves do not change my keyboard touch. • Change the Touch Response setting (page E-10). • Turn power off and then back on to initialize all Digital Keyboard settings (page E-9). • Replace the batteries with new ones or switch over to AC adaptor power (page E-8). Next, turn on the Digital Keyboard. quality sound are...

User Guide
Page 74
...: 200 Auto Harmonize 12 types Arpeggiator 90 types MIDI 16 multi-timbre received, GM Level 1 standard Musical Information Function Tone, Rhythm, Song Bank, numbers and names; staff notation, fingering, pedal operation, tempo, measure and beat number, chord name, etc. Reference Specifications Models WK-200 / WK-500 Keyboard 76 standard-size keys Touch Response 2 types, Off Maximum Polyphony 48 notes (24 for certain tones) Tones Built-in Tones Sampling Tones WK-200: 570 WK-500: 670 Up to 8 (Melody Sampling: 5, Drum Sampling...
...: 200 Auto Harmonize 12 types Arpeggiator 90 types MIDI 16 multi-timbre received, GM Level 1 standard Musical Information Function Tone, Rhythm, Song Bank, numbers and names; staff notation, fingering, pedal operation, tempo, measure and beat number, chord name, etc. Reference Specifications Models WK-200 / WK-500 Keyboard 76 standard-size keys Touch Response 2 types, Off Maximum Polyphony 48 notes (24 for certain tones) Tones Built-in Tones Sampling Tones WK-200: 570 WK-500: 670 Up to 8 (Melody Sampling: 5, Drum Sampling...


