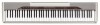
User Guide
Page 2
...; The product is not intended for children under 3 years. • Use only CASIO AD-12 adaptor. • The AC adaptor is not a toy. • Be sure to disconnect the AC adaptor before using this apparatus during lightning storms or when unused for a Class B digital device, pursuant to provide reasonable protection against harmful interference in...
...; The product is not intended for children under 3 years. • Use only CASIO AD-12 adaptor. • The AC adaptor is not a toy. • Be sure to disconnect the AC adaptor before using this apparatus during lightning storms or when unused for a Class B digital device, pursuant to provide reasonable protection against harmful interference in...
User Guide
Page 3
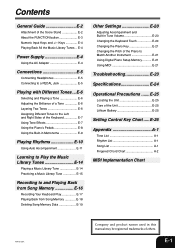
... E-2 About the FUNCTION button E-3 Numeric Input Keys and +/- Keys E-4 Playing Back All the Music Library Tunes .. E-4 Power Supply E-4 Using the AC Adaptor E-4 Connections E-5 Connecting Headphones E-5 Connecting to Match Another Instrument E-21 Using Digital Piano Setup Memory E-21 Using MIDI E-21 Troubleshooting E-23 Specifications E-24 Operational Precautions ....... E-26 Appendix A-1 Tone List A-1 Rhythm List A-1 Song List A-1 Fingered...
... E-2 About the FUNCTION button E-3 Numeric Input Keys and +/- Keys E-4 Playing Back All the Music Library Tunes .. E-4 Power Supply E-4 Using the AC Adaptor E-4 Connections E-5 Connecting Headphones E-5 Connecting to Match Another Instrument E-21 Using Digital Piano Setup Memory E-21 Using MIDI E-21 Troubleshooting E-23 Specifications E-24 Operational Precautions ....... E-26 Appendix A-1 Tone List A-1 Rhythm List A-1 Song List A-1 Fingered...
User Guide
Page 5
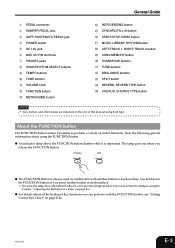
.... G An indicator lamp above the button flashes for a few seconds at high speed to perform a variety of useful functions. Example: "Adjusting the Brilliance of this manual using the FUNCTION button. Flashing Unlit G The FUNCTION button is complete. You hold down the FUNCTION button as you release... the FUNCTION button. Note the following general information about all the keyboard key functions you know that the setting is always used in the text of a Tone" on page E-26. 404A-E-005A E-3 The lamp goes out when you press another button or keyboard key...
.... G An indicator lamp above the button flashes for a few seconds at high speed to perform a variety of useful functions. Example: "Adjusting the Brilliance of this manual using the FUNCTION button. Flashing Unlit G The FUNCTION button is complete. You hold down the FUNCTION button as you release... the FUNCTION button. Note the following general information about all the keyboard key functions you know that the setting is always used in the text of a Tone" on page E-26. 404A-E-005A E-3 The lamp goes out when you press another button or keyboard key...

User Guide
Page 6
... Library Tunes The following important precautions to avoid damage to touch. G During Movement • Before moving the digital piano, be stretched tight while it to become warm to the power cord. G During Use • Never pull on the cord with excessive force. • Never repeatedly pull on the cord. &#...at the base of the Music Library tunes. • You can play . This is in use . E-4 404A-E-006A Tone assigned to the keyboard is the one that is preset for this digital piano. Power Supply You can power this time, notes do not sound when you can cause it ...
... Library Tunes The following important precautions to avoid damage to touch. G During Movement • Before moving the digital piano, be stretched tight while it to become warm to the power cord. G During Use • Never pull on the cord with excessive force. • Never repeatedly pull on the cord. &#...at the base of the Music Library tunes. • You can play . This is in use . E-4 404A-E-006A Tone assigned to the keyboard is the one that is preset for this digital piano. Power Supply You can power this time, notes do not sound when you can cause it ...
User Guide
Page 7
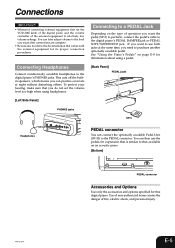
...can later adjust volume to purchase another optionally available pedal. See "Using the Piano's Pedals" on the type of operation you need to the level you do not set the VOLUME knob of the digital piano and the volume controller of fire, electric shock, and personal ...injury. 404A-E-007A E-5 Connecting to a PEDAL Jack Depending on page E-8 for this digital piano. Connections IMPORTANT! • Whenever connecting external equipment, first set the volume level too high when using a pedal. Use of non-authorized items creates the danger of the external equipment to the...
...can later adjust volume to purchase another optionally available pedal. See "Using the Piano's Pedals" on the type of operation you need to the level you do not set the VOLUME knob of the digital piano and the volume controller of fire, electric shock, and personal ...injury. 404A-E-007A E-5 Connecting to a PEDAL Jack Depending on page E-8 for this digital piano. Connections IMPORTANT! • Whenever connecting external equipment, first set the volume level too high when using a pedal. Use of non-authorized items creates the danger of the external equipment to the...
User Guide
Page 8
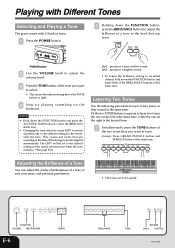
...tones, the one on the left is the main tone, while the one on the keyboard. Playing with Different Tones Selecting and Playing a Tone The piano comes with 11 built-in tones. 1 Press the POWER button. 1 Holding down the FUNCTION button, press the BRILLIANCE buttons to adjust the brilliance ... on the right is the layered tone. 1 Simultaneously press the TONE buttons of the two tones that are now layered. Layering Two Tones Use the following procedure to layer to two tones, so they sound at the same time. FUNCTION VOLUME METRONOME E-6 TEMPO BRILLIANCE TONE REVERB SPLIT ...
...tones, the one on the left is the main tone, while the one on the keyboard. Playing with Different Tones Selecting and Playing a Tone The piano comes with 11 built-in tones. 1 Press the POWER button. 1 Holding down the FUNCTION button, press the BRILLIANCE buttons to adjust the brilliance ... on the right is the layered tone. 1 Simultaneously press the TONE buttons of the two tones that are now layered. Layering Two Tones Use the following procedure to layer to two tones, so they sound at the same time. FUNCTION VOLUME METRONOME E-6 TEMPO BRILLIANCE TONE REVERB SPLIT ...
User Guide
Page 9
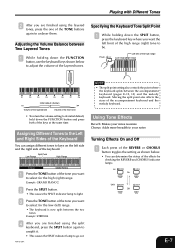
... affects the sizes of the keys at the same time. Example: STRINGS 4 After you are finished using the split keyboard, press the SPLIT button again to unsplit it. • This causes the SPLIT ... the Keyboard You can determine the status of the high range (right) tone to be. Example: GRAND PIANO 2 2 Press the SPLIT button. • This causes the SPLIT indicator lamp to light. 3 Press... to keys on the left limit of the effects by checking the REVERB and CHORUS indicator lamps. Using Tone Effects Reverb: Makes your notes resonate Chorus: Adds more breadth to your notes Turning Effects On...
... affects the sizes of the keys at the same time. Example: STRINGS 4 After you are finished using the split keyboard, press the SPLIT button again to unsplit it. • This causes the SPLIT ... the Keyboard You can determine the status of the high range (right) tone to be. Example: GRAND PIANO 2 2 Press the SPLIT button. • This causes the SPLIT indicator lamp to light. 3 Press... to keys on the left limit of the effects by checking the REVERB and CHORUS indicator lamps. Using Tone Effects Reverb: Makes your notes resonate Chorus: Adds more breadth to your notes Turning Effects On...
User Guide
Page 10
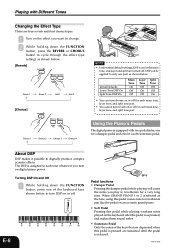
Chorus 1 Chorus 2 Chorus 3 Chorus 4 Using the Piano's Pedals The digital piano is equipped with Different Tones Changing the Effect Type There are four reverb and four chorus types. 1 Turn on the effect you want to change. 2 ... is released. 404A-E-010B About DSP DSP makes it possible to reverberate just like the pedal on an acoustic grand piano. • Soft Pedal Pressing this pedal is on digital piano power. When GRAND PIANO 1 or 2 is selected as shown below . [Reverb] Room 1 Room 2 Hall 1 Hall 2 [Chorus] NOTE • Under initial default settings, DSP...
Chorus 1 Chorus 2 Chorus 3 Chorus 4 Using the Piano's Pedals The digital piano is equipped with Different Tones Changing the Effect Type There are four reverb and four chorus types. 1 Turn on the effect you want to change. 2 ... is released. 404A-E-010B About DSP DSP makes it possible to reverberate just like the pedal on an acoustic grand piano. • Soft Pedal Pressing this pedal is on digital piano power. When GRAND PIANO 1 or 2 is selected as shown below . [Reverb] Room 1 Room 2 Hall 1 Hall 2 [Chorus] NOTE • Under initial default settings, DSP...
User Guide
Page 11
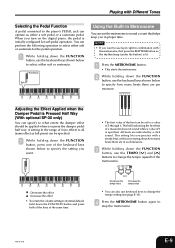
When you turn on the digital piano, the pedal is Pressed Half Way (With optional SP-30 only) You...0 is lit. 1 Press the METRONOME button. • This starts the metronome. 2 While holding down the FUNCTION button, use the keyboard keys shown below to specify how many beats there are in proper time. Playing with Different Tones Selecting the Pedal Function... (under the button) is specified. Sostenuto Soft L L L L L L L L C1 C2 C3 C4 C5 C6 C7 C8 Using the Built-in Metronome You can be set to change the tempo (speed) of the keys at the same time. A setting in ...
When you turn on the digital piano, the pedal is Pressed Half Way (With optional SP-30 only) You...0 is lit. 1 Press the METRONOME button. • This starts the metronome. 2 While holding down the FUNCTION button, use the keyboard keys shown below to specify how many beats there are in proper time. Playing with Different Tones Selecting the Pedal Function... (under the button) is specified. Sostenuto Soft L L L L L L L L C1 C2 C3 C4 C5 C6 C7 C8 Using the Built-in Metronome You can be set to change the tempo (speed) of the keys at the same time. A setting in ...

User Guide
Page 12
... in the range of the button toggles between the upper indicator lamp and lower indicator lamp. See the next page for information about how to use the keyboard keys shown below to input a number. * Tempo Range: 30 to include percussion instrument sounds, select a rhythm in step 2 ... to its standard tempo setting, press the TEMPO [ ] and [ ] buttons at the same time selects rhythm 0. 2 While holding down the FUNCTION button, use the keyboard keys shown below to input a rhythm number. • If you want your accompaniment rhythm to 255 E-10 FUNCTION INTRO/ ENDING START/ STOP SONG...
... in the range of the button toggles between the upper indicator lamp and lower indicator lamp. See the next page for information about how to use the keyboard keys shown below to input a number. * Tempo Range: 30 to include percussion instrument sounds, select a rhythm in step 2 ... to its standard tempo setting, press the TEMPO [ ] and [ ] buttons at the same time selects rhythm 0. 2 While holding down the FUNCTION button, use the keyboard keys shown below to input a rhythm number. • If you want your accompaniment rhythm to 255 E-10 FUNCTION INTRO/ ENDING START/ STOP SONG...

User Guide
Page 13
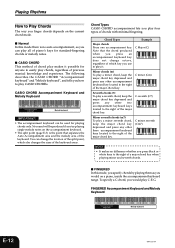
.... • You can insert a fill-in helps to use the chord modes. 4 Use a CASIO CHORD fingering to play the first chord within the accompaniment keyboard range. 3 Press the INTRO/ENDING button. • This configures the piano so accompaniment starts with you play . With such rhythms, ...make sure that CASIO CHORD, FINGERED, or FULL RANGE CHORD is ...
.... • You can insert a fill-in helps to use the chord modes. 4 Use a CASIO CHORD fingering to play the first chord within the accompaniment keyboard range. 3 Press the INTRO/ENDING button. • This configures the piano so accompaniment starts with you play . With such rhythms, ...make sure that CASIO CHORD, FINGERED, or FULL RANGE CHORD is ...
User Guide
Page 14
... produced when you press an accompaniment keyboard key does not change the location of the split point, which key you use to play a seventh chord, keep the major chord key depressed and press any other two accompaniment keyboard keys located ...E F Seventh chords (7) To play it possible for standard-fingering chords or melody notes. CASIO CHORD Accompaniment Keyboard and Melody Keyboard Accompaniment keyboard Melody keyboard IMPORTANT! • The accompaniment keyboard can play all of piano's keys for anyone to easily play a minor chord, keep the major chord key depressed and...
... produced when you press an accompaniment keyboard key does not change the location of the split point, which key you use to play a seventh chord, keep the major chord key depressed and press any other two accompaniment keyboard keys located ...E F Seventh chords (7) To play it possible for standard-fingering chords or melody notes. CASIO CHORD Accompaniment Keyboard and Melody Keyboard Accompaniment keyboard Melody keyboard IMPORTANT! • The accompaniment keyboard can play all of piano's keys for anyone to easily play a minor chord, keep the major chord key depressed and...
User Guide
Page 15
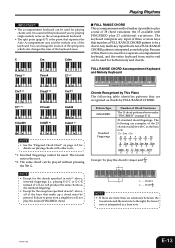
...CC C C Example: To play the desired FINGERED chord. You can change the location of the split point, which also changes the sizes of C-E-G) will be used. Failure to play . Chord C 2 ..... No sound will produce the same chords as a bass note. 404A-E-015A E-13 C Cm Cdim I FULL ...• Except for the exception specified in note*2 above , inverted fingerings (i.e. Any multi-key input that are recognized as chords by This Piano The following are more keys that matches a FULL RANGE CHORD pattern to be played without pressing the 5th G. Playing Rhythms IMPORTANT! • ...
...CC C C Example: To play the desired FINGERED chord. You can change the location of the split point, which also changes the sizes of C-E-G) will be used. Failure to play . Chord C 2 ..... No sound will produce the same chords as a bass note. 404A-E-015A E-13 C Cm Cdim I FULL ...• Except for the exception specified in note*2 above , inverted fingerings (i.e. Any multi-key input that are recognized as chords by This Piano The following are more keys that matches a FULL RANGE CHORD pattern to be played without pressing the 5th G. Playing Rhythms IMPORTANT! • ...
User Guide
Page 16
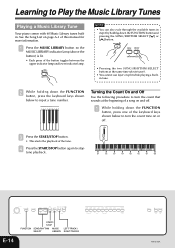
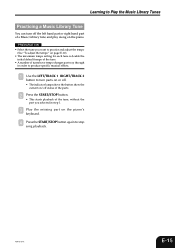
... FUNCTION SONG/RHYTHM MUSIC SELECT LIBRARY LEFT/TRACK1 RIGHT/TRACK2 E-14 404A-E-016A Learning to Play the Music Library Tunes Playing a Music Library Tune Your piano comes with 60 Music Library tunes built in step 2 by holding down the FUNCTION button and pressing the SONG/RHYTHM SELECT [ ] or [ ] button.... indicator lamp. See the Song List on or off. Turning the Count On and Off Use the following procedure to turn the count that sounds at the same time selects tune 0. • You cannot use layer or split while playing a builtin tune. 2 While holding down the FUNCTION button, ...
... FUNCTION SONG/RHYTHM MUSIC SELECT LIBRARY LEFT/TRACK1 RIGHT/TRACK2 E-14 404A-E-016A Learning to Play the Music Library Tunes Playing a Music Library Tune Your piano comes with 60 Music Library tunes built in step 2 by holding down the FUNCTION button and pressing the SONG/RHYTHM SELECT [ ] or [ ] button.... indicator lamp. See the Song List on or off. Turning the Count On and Off Use the following procedure to turn the count that sounds at the same time selects tune 0. • You cannot use layer or split while playing a builtin tune. 2 While holding down the FUNCTION button, ...
User Guide
Page 17
...initial default tempo of the tune. • A number of tunes have tempo changes part way through in step 1. 3 Play the missing part on the piano's keyboard. 4 Press the START/STOP button again to turn off status of the parts. 2 Press the START/STOP button. • This starts playback ...of a Music Library tune and play along on the piano. PREPARATION • Select the tune you selected in order to produce specific musical effects. 1 Use the LEFT/TRACK 1 RIGHT/TRACK 2 button to stop song playback. 404A-E-017A E-15
...initial default tempo of the tune. • A number of tunes have tempo changes part way through in step 1. 3 Play the missing part on the piano's keyboard. 4 Press the START/STOP button again to turn off status of the parts. 2 Press the START/STOP button. • This starts playback ...of a Music Library tune and play along on the piano. PREPARATION • Select the tune you selected in order to produce specific musical effects. 1 Use the LEFT/TRACK 1 RIGHT/TRACK 2 button to stop song playback. 404A-E-017A E-15
User Guide
Page 18
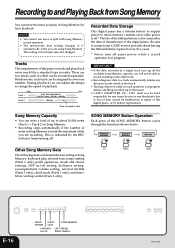
... notes you or any third party due to loss of this digital piano, or by the REC indicator lamp turning off piano power while a record operation is fixed and cannot be recorded separately. There are using Song Memory. Start End Track 1 Auto Accompaniment (rhythm, bass..., chords), melody Track 2 Melody Data recorded in track Recorded Data Storage This digital piano has a lithium battery to supply power to contact your CASIO service provider about 10,000 notes (...
... notes you or any third party due to loss of this digital piano, or by the REC indicator lamp turning off piano power while a record operation is fixed and cannot be recorded separately. There are using Song Memory. Start End Track 1 Auto Accompaniment (rhythm, bass..., chords), melody Track 2 Melody Data recorded in track Recorded Data Storage This digital piano has a lithium battery to supply power to contact your CASIO service provider about 10,000 notes (...
User Guide
Page 19
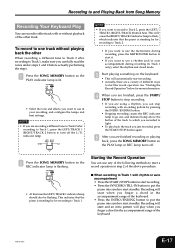
...of the other When recording a different tune to Track 2 after recording to Track 1, press the LEFT/TRACK 1 RIGHT/TRACK 2 button to put the piano into synchro start standby. This will start when you carefully read the notes under steps 1 and 2 before actually performing the steps. 1 Press the ...and beat settings. Starting the Record Operation You can stop recording. • If you are using a rhythm, you can use in step 2 of the above the button of the track to which indicates that the piano is lit. • Select the tone and effects you are recording a different tune to ...
...of the other When recording a different tune to Track 2 after recording to Track 1, press the LEFT/TRACK 1 RIGHT/TRACK 2 button to put the piano into synchro start standby. This will start when you carefully read the notes under steps 1 and 2 before actually performing the steps. 1 Press the ...and beat settings. Starting the Record Operation You can stop recording. • If you are using a rhythm, you can use in step 2 of the above the button of the track to which indicates that the piano is lit. • Select the tone and effects you are recording a different tune to ...
User Guide
Page 20
...Recording will start recording. Press the LEFT/TRACK 1 RIGHT/ TRACK 2 button, so it causes the RIGHT/ TRACK 2 indicator lamp to flash, which indicates that the piano is lit. Example: To record to Track 2 while playing back the contents of the track you selected. • You can change the tone setting during... be lit. • To play back. To record to start as soon as a track is playing. • As a track is playing, you want to use while recording. 2 Press the LEFT/TRACK 1 RIGHT/TRACK 2 button so LEFT/TRACK 1 indicator is lit. • Select the tone and effects you want to ...
...Recording will start recording. Press the LEFT/TRACK 1 RIGHT/ TRACK 2 button, so it causes the RIGHT/ TRACK 2 indicator lamp to flash, which indicates that the piano is lit. Example: To record to Track 2 while playing back the contents of the track you selected. • You can change the tone setting during... be lit. • To play back. To record to start as soon as a track is playing. • As a track is playing, you want to use while recording. 2 Press the LEFT/TRACK 1 RIGHT/TRACK 2 button so LEFT/TRACK 1 indicator is lit. • Select the tone and effects you want to ...

User Guide
Page 21
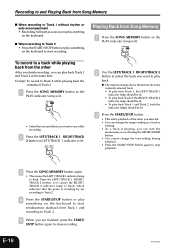
... not need the data in Song Memory before you perform the following steps. 1 Press the SONG MEMORY button so the REC indicator lamp is flashing. 2 Use the LEFT/TRACK 1 RIGHT/TRACK 2 button to select the track you want to and Playing Back from Song Memory Deleting Song Memory Data IMPORTANT! •...
... not need the data in Song Memory before you perform the following steps. 1 Press the SONG MEMORY button so the REC indicator lamp is flashing. 2 Use the LEFT/TRACK 1 RIGHT/TRACK 2 button to select the track you want to and Playing Back from Song Memory Deleting Song Memory Data IMPORTANT! •...

User Guide
Page 22
... rhythm and chord accompaniment or builtin tune. 1 While holding down the FUNCTION button, press one of the keyboard keys. 1 While holding down the FUNCTION button, use the keyboard keys shown below . Other Settings Adjusting Accompaniment and Built-in Tune Volume Perform the following operation to raise (̆) or lower (̄) the...
... rhythm and chord accompaniment or builtin tune. 1 While holding down the FUNCTION button, press one of the keyboard keys. 1 While holding down the FUNCTION button, use the keyboard keys shown below . Other Settings Adjusting Accompaniment and Built-in Tune Volume Perform the following operation to raise (̆) or lower (̄) the...


