

User Guide
Page 4
...Songs E-26 Playing Back a Particular Song E-26 Using the Karaoke Feature E-29 Increasing the Selection of Songs E-29 Using Built-in Songs to Master Keyboard Play E-30 Phrases E-30 Step Up Lesson Flow E-30 Selecting the Song, Phrase, and Part You Want to Play E-9 Preparing the Music Stand ... All Parts E-38 Using Auto Accompaniment Effectively E-40 Using One-Touch Preset E-41 Using Auto Harmonize E-42 Looking Up the Notes of the Keyboard E-49 Using Music Preset E-50 Using the Arpeggiator E-51 Deleting User Song Data E-52 Deleting All Data in Song E-47 Saving Recorded Data...
...Songs E-26 Playing Back a Particular Song E-26 Using the Karaoke Feature E-29 Increasing the Selection of Songs E-29 Using Built-in Songs to Master Keyboard Play E-30 Phrases E-30 Step Up Lesson Flow E-30 Selecting the Song, Phrase, and Part You Want to Play E-9 Preparing the Music Stand ... All Parts E-38 Using Auto Accompaniment Effectively E-40 Using One-Touch Preset E-41 Using Auto Harmonize E-42 Looking Up the Notes of the Keyboard E-49 Using Music Preset E-50 Using the Arpeggiator E-51 Deleting User Song Data E-52 Deleting All Data in Song E-47 Saving Recorded Data...
User Guide
Page 5
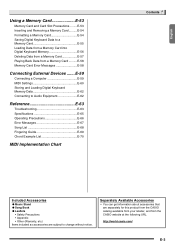
... that are subject to a Memory Card E-55 Loading Data from a Memory Card into Digital Keyboard Memory E-56 Deleting Data from a Memory Card E-57 Playing Back Data from the CASIO website at the following URL. English Using a Memory Card E-53 Memory Card and Card Slot... Precautions.........E-53 Inserting and Removing a Memory Card..........E-54 Formatting a Memory Card E-54 Saving Digital Keyboard Data to change without notice. E-59 Connecting ...
... that are subject to a Memory Card E-55 Loading Data from a Memory Card into Digital Keyboard Memory E-56 Deleting Data from a Memory Card E-57 Playing Back Data from the CASIO website at the following URL. English Using a Memory Card E-53 Memory Card and Card Slot... Precautions.........E-53 Inserting and Removing a Memory Card..........E-54 Formatting a Memory Card E-54 Saving Digital Keyboard Data to change without notice. E-59 Connecting ...
User Guide
Page 6
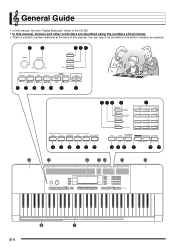
You can tear it out and refer to the LK-280. • In this manual, buttons and other controllers are identified using the numbers shown below. • There is a button number reference at the back of this manual. General Guide • In this manual, the term "Digital Keyboard" refers to the button numbers as required. 12 345 6 7 8 9 bk bl bm bq bp bo bn br bs bt ck cl cm cn co cp cq cr cs ct dk dl dm dn do dp dk dq dr E-4
You can tear it out and refer to the LK-280. • In this manual, buttons and other controllers are identified using the numbers shown below. • There is a button number reference at the back of this manual. General Guide • In this manual, the term "Digital Keyboard" refers to the button numbers as required. 12 345 6 7 8 9 bk bl bm bq bp bo bn br bs bt ck cl cm cn co cp cq cr cs ct dk dl dm dn do dp dk dq dr E-4

User Guide
Page 9
... input using the number buttons. br • After selecting functions 8 through 13, press the (10-key) [9] (ENTER) key to perform a wide range of other Digital Keyboard operations.
... input using the number buttons. br • After selecting functions 8 through 13, press the (10-key) [9] (ENTER) key to perform a wide range of other Digital Keyboard operations.

User Guide
Page 10
...SONG BANK) and the [1] 10-key (br) key. • You will be able to their initial defaults whenever you turn on and off the Digital Keyboard. Turn off . General Guide Function 1 Transpose 2 Accompaniment Volume 3 Song Volume 4 Touch Response 5 Tuning 6 Reverb 7 Chorus 8 Sampling Automatic Sampling Start Automatic...10 Preset Scales 11 Other Settings Arpeggiator Hold Pedal Effect Accompaniment Scale LCD Contrast Power On Alert 12 MIDI Settings Keyboard Channel Navigate Channels Local Control Accomp Out 13 Delete Sampled Sound Delete User Song Delete All Data Delete Display Trans. Returning the...
...SONG BANK) and the [1] 10-key (br) key. • You will be able to their initial defaults whenever you turn on and off the Digital Keyboard. Turn off . General Guide Function 1 Transpose 2 Accompaniment Volume 3 Song Volume 4 Touch Response 5 Tuning 6 Reverb 7 Chorus 8 Sampling Automatic Sampling Start Automatic...10 Preset Scales 11 Other Settings Arpeggiator Hold Pedal Effect Accompaniment Scale LCD Contrast Power On Alert 12 MIDI Settings Keyboard Channel Navigate Channels Local Control Accomp Out 13 Delete Sampled Sound Delete User Song Delete All Data Delete Display Trans. Returning the...

User Guide
Page 11
... Insert the tabs of the battery cover into the holes on the power cord. Tabs AC adaptor • Be sure to turn off Digital Keyboard power before loading batteries. • It is recommended. • The AC adaptor does not come with new ones. No winding! •... or disconnecting the AC adaptor. • The AC adaptor will become warm to power this Digital Keyboard. Replace the batteries with this Digital Keyboard. See page E-3 for this Digital Keyboard. Normally, use oxyride batteries or any type of accident. ■ Low Battery Indication The indicator ...
... Insert the tabs of the battery cover into the holes on the power cord. Tabs AC adaptor • Be sure to turn off Digital Keyboard power before loading batteries. • It is recommended. • The AC adaptor does not come with new ones. No winding! •... or disconnecting the AC adaptor. • The AC adaptor will become warm to power this Digital Keyboard. Replace the batteries with this Digital Keyboard. See page E-3 for this Digital Keyboard. Normally, use oxyride batteries or any type of accident. ■ Low Battery Indication The indicator ...
User Guide
Page 12
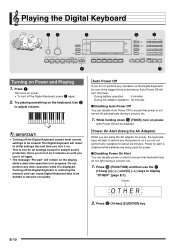
.... 1 • To turn on power. This is in progress. Power on alert is disabled while batteries are using the AC adaptor for power, the keyboard keys will turn it off power. Press (10-key) [9] (ENTER) key. Try playing something on Power and Playing 1. Auto Power Off will revert ... to remind you do not light during a concert, etc. bn 1. While holding down (TONE), turn off automatically during a concert, etc. 1. The Digital Keyboard will be cleared. Auto Power Off If you that power is on the display while a data save operation is true for all settings except for...
.... 1 • To turn on power. This is in progress. Power on alert is disabled while batteries are using the AC adaptor for power, the keyboard keys will turn it off power. Press (10-key) [9] (ENTER) key. Try playing something on Power and Playing 1. Auto Power Off will revert ... to remind you do not light during a concert, etc. bn 1. While holding down (TONE), turn off automatically during a concert, etc. 1. The Digital Keyboard will be cleared. Auto Power Off If you that power is on the display while a data save operation is true for all settings except for...

User Guide
Page 13
...(10-key) [-] key to display "Demo2". This provides you some of hearing damage. • If you do not come with keyboard pressure (speed). Changing Touch Response Sensitivity Use the procedure below to Touch Pressure (Touch Response) Touch Response alters tone volume in accordance ...FUNCTION) and then use too much the volume of played notes change in accordance with the Digital Keyboard. • Use commercially available headphones. Playing the Digital Keyboard Changing Keyboard Response to control how much pressure. • Headphones do not leave the adaptor plugged in ...
...(10-key) [-] key to display "Demo2". This provides you some of hearing damage. • If you do not come with keyboard pressure (speed). Changing Touch Response Sensitivity Use the procedure below to Touch Pressure (Touch Response) Touch Response alters tone volume in accordance ...FUNCTION) and then use too much the volume of played notes change in accordance with the Digital Keyboard. • Use commercially available headphones. Playing the Digital Keyboard Changing Keyboard Response to control how much pressure. • Headphones do not leave the adaptor plugged in ...
User Guide
Page 14
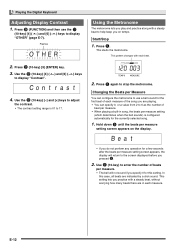
... 2 to enter the number of beat per measure setting (which determines when the bell sounds) is 01 to display "OTHER" (page E-7). E-12 Playing the Digital Keyboard Adjusting Display Contrast 1. br 3. Use (10-key) to 6 as t br 4. This pattern changes with a steady beat to adjust the contrast. • The contrast setting range...
... 2 to enter the number of beat per measure setting (which determines when the bell sounds) is 01 to display "OTHER" (page E-7). E-12 Playing the Digital Keyboard Adjusting Display Contrast 1. br 3. Use (10-key) to 6 as t br 4. This pattern changes with a steady beat to adjust the contrast. • The contrast setting range...
User Guide
Page 15
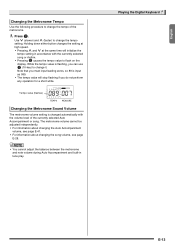
.... Tempo value (flashes) Changing the Metronome Sound Volume The metronome volume setting is changed automatically with the currently selected song or rhythm. Playing the Digital Keyboard E-13 Use y (slower) and t (faster) to flash on the display.
.... Tempo value (flashes) Changing the Metronome Sound Volume The metronome volume setting is changed automatically with the currently selected song or rhythm. Playing the Digital Keyboard E-13 Use y (slower) and t (faster) to flash on the display.

User Guide
Page 16
...buttons to select the tone number you want. Controlling the Keyboard Sounds bn br Select from a variety of musical instrument sounds Your Digital Keyboard lets you select tones for a wide variety of the drum sets is selected, each keyboard key is selected) Accompaniment : Rhythm part only Local Control...an organ tone is assigned a different percussion sound. The corresponding tone number and tone name will sound. Even the same song sound takes on the keyboard. Tone number Tone name S t .GrPno br 2. Use (10-key) to enter the tone number. Specify three digits for playing 1. co...
...buttons to select the tone number you want. Controlling the Keyboard Sounds bn br Select from a variety of musical instrument sounds Your Digital Keyboard lets you select tones for a wide variety of the drum sets is selected, each keyboard key is selected) Accompaniment : Rhythm part only Local Control...an organ tone is assigned a different percussion sound. The corresponding tone number and tone name will sound. Even the same song sound takes on the keyboard. Tone number Tone name S t .GrPno br 2. Use (10-key) to enter the tone number. Specify three digits for playing 1. co...

User Guide
Page 17
... tones for the right side range (page E-14). Select the tone for a split keyboard 1. Example: 303 FLUTE 1 Flute 1 2. VIBRAPHONE 1 Split point FLUTE 1 F3 E-15 Controlling the Keyboard Sounds Splitting the Keyboard between Two Different Tones You can use the following procedure to the left and right side... to layer two different tones (such as piano and strings) so they sound simultaneously when you want. Press cp. Play something on the keyboard. Example: 032 ELEC.PIANO 1 E.Pi ano1 2. Press co. Lights br 3. English Layering Two Tones You can use the procedure below ...
... tones for the right side range (page E-14). Select the tone for a split keyboard 1. Example: 303 FLUTE 1 Flute 1 2. VIBRAPHONE 1 Split point FLUTE 1 F3 E-15 Controlling the Keyboard Sounds Splitting the Keyboard between Two Different Tones You can use the following procedure to the left and right side... to layer two different tones (such as piano and strings) so they sound simultaneously when you want. Press cp. Play something on the keyboard. Example: 032 ELEC.PIANO 1 E.Pi ano1 2. Press co. Lights br 3. English Layering Two Tones You can use the procedure below ...

User Guide
Page 18
... to display "Chorus" (page E-7). Indicator disappears when chorus is a function that adds depth and breadth to display "Reverb" (page E-7). Controlling the Keyboard Sounds co 5. To change the duration of toggles between split (two tones) and unsplit (one tone). • If you are using. E-16 ... and then use the br (10-key) [4] (o) and [6] (p) keys to notes. Use the (10-key) [-] and [+] keys to unsplit the keyboard (so it plays only the tone you want. You can change the split point co 1. There are playing multiple instruments. 1. Pressing again to select the...
... to display "Chorus" (page E-7). Indicator disappears when chorus is a function that adds depth and breadth to display "Reverb" (page E-7). Controlling the Keyboard Sounds co 5. To change the duration of toggles between split (two tones) and unsplit (one tone). • If you are using. E-16 ... and then use the br (10-key) [4] (o) and [6] (p) keys to notes. Use the (10-key) [-] and [+] keys to unsplit the keyboard (so it plays only the tone you want. You can change the split point co 1. There are playing multiple instruments. 1. Pressing again to select the...

User Guide
Page 19
... Sustain (SUS) Sostenuto (SoS) Sustains notes played while the pedal is depressed. SUSTAIN/ASSIGNABLE JACK Selecting the Pedal Effect 1. Jack Controlling the Keyboard Sounds br 4. Pressing the pedal starts and stops Auto Accompaniment or song playback. Trans . Press ct (FUNCTION). Use the (10-key) ...Transpose, Tuning, Octave Shift) Changing the Pitch in various ways while playing. • A pedal unit does not come with the Digital Keyboard. Sustains notes that of a singer. • The transpose setting range is -12 to select the pedal effect you want . •...
... Sustain (SUS) Sostenuto (SoS) Sustains notes played while the pedal is depressed. SUSTAIN/ASSIGNABLE JACK Selecting the Pedal Effect 1. Jack Controlling the Keyboard Sounds br 4. Pressing the pedal starts and stops Auto Accompaniment or song playback. Trans . Press ct (FUNCTION). Use the (10-key) ...Transpose, Tuning, Octave Shift) Changing the Pitch in various ways while playing. • A pedal unit does not come with the Digital Keyboard. Sustains notes that of a singer. • The transpose setting range is -12 to select the pedal effect you want . •...

User Guide
Page 20
...-key) operation to adjust the tuning, the current frequency setting will appear. Octave Shift Octave Shift lets you raise or lower the pitch of the keyboard notes in 0.1 Hz steps. 440 . 0Hz br • Even if you want to use Split, turn on a CD. • The tuning feature ... the A4 note. Oc t Lowe r 4. Oc t Uppe r br 2. Advance to +2 octaves. • When using Split (page E-15), you can set the left side keyboard range. • Split Off : The screen shown below . Use the (10-key) [-] and [+] keys to adjust the tuning. • Performing this screen appears, the display...
...-key) operation to adjust the tuning, the current frequency setting will appear. Octave Shift Octave Shift lets you raise or lower the pitch of the keyboard notes in 0.1 Hz steps. 440 . 0Hz br • Even if you want to use Split, turn on a CD. • The tuning feature ... the A4 note. Oc t Lowe r 4. Oc t Uppe r br 2. Advance to +2 octaves. • When using Split (page E-15), you can set the left side keyboard range. • Split Off : The screen shown below . Use the (10-key) [-] and [+] keys to adjust the tuning. • Performing this screen appears, the display...

User Guide
Page 21
...bark of your dog and then use the microphone. • Sampled sounds are highly creative. Turn on the microphone and then the Digital Keyboard. Sampling and Playing a Melody Sound (Melody Sampling) Use the procedures in monaural. Turn the volume levels of microphone input. The sampling ...feature is located to assign the sound to the keyboard. E-19 Simply select the tone number where the sound you want to store the sampled sound. Connect a microphone. Press bn (TONE)...
...bark of your dog and then use the microphone. • Sampled sounds are highly creative. Turn on the microphone and then the Digital Keyboard. Sampling and Playing a Melody Sound (Melody Sampling) Use the procedures in monaural. Turn the volume levels of microphone input. The sampling ...feature is located to assign the sound to the keyboard. E-19 Simply select the tone number where the sound you want to store the sampled sound. Connect a microphone. Press bn (TONE)...

User Guide
Page 22
...page E-25 for 10 seconds. C4 Looping a Sampled Sound You can use the following . See "Deleting a Sampled Sound" on the Digital Keyboard. 1. Sampling will start automatically. • Sampling will stop automatically whenever there is finished, press cr and cs at different pitches. The allowable ...n g • Sampling sound and storing it will change to the following procedure to the left and right of Sampled Sounds" on the Digital Keyboard 2. The keys to loop a sampled sound so it is started. Sampling Sounds and Playing Them on page E-25. ■ How sampled sounds ...
...page E-25 for 10 seconds. C4 Looping a Sampled Sound You can use the following . See "Deleting a Sampled Sound" on the Digital Keyboard. 1. Sampling will start automatically. • Sampling will stop automatically whenever there is finished, press cr and cs at different pitches. The allowable ...n g • Sampling sound and storing it will change to the following procedure to the left and right of Sampled Sounds" on the Digital Keyboard 2. The keys to loop a sampled sound so it is started. Sampling Sounds and Playing Them on page E-25. ■ How sampled sounds ...

User Guide
Page 23
...the selected sound. While the loop is released. Loop 3 (Loop3) Loops the sample sound and lowers the pitch of the resonating sound when the keyboard key is sounding, hold down the same bt cn sampled sound button ( to ) as you want to cn). • This will decrease ...Pitch 1 (Ptch1) Changes the pitch from high to the screen that corresponds to the melody sampling tone number you press any keyboard key. • Pressing the keyboard key quickly will increase sample sound volume, while pressing slowly will cause the sounds loop to sampled sounds. 1. Funny 1 (Funy1...
...the selected sound. While the loop is released. Loop 3 (Loop3) Loops the sample sound and lowers the pitch of the resonating sound when the keyboard key is sounding, hold down the same bt cn sampled sound button ( to ) as you want to cn). • This will decrease ...Pitch 1 (Ptch1) Changes the pitch from high to the screen that corresponds to the melody sampling tone number you press any keyboard key. • Pressing the keyboard key quickly will increase sample sound volume, while pressing slowly will cause the sounds loop to sampled sounds. 1. Funny 1 (Funy1...

User Guide
Page 24
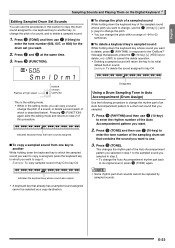
... need will free up the currently selected drum set. E-22 Simply select the tone number where the drum set you are about to the same keyboard key. No Da t a Smp l D r m1 Lights 3. No Da t a Used memory (Unit: Kbytes) Remaining memory capacity Sampling will delete ...any sound data currently assigned to sample. There are assigned to each keyboard key. • You can repeat steps 3 through 6 to change to sample for more sound being input from the microphone. Wa i t i n g ...
... need will free up the currently selected drum set. E-22 Simply select the tone number where the drum set you are about to the same keyboard key. No Da t a Smp l D r m1 Lights 3. No Da t a Used memory (Unit: Kbytes) Remaining memory capacity Sampling will delete ...any sound data currently assigned to sample. There are assigned to each keyboard key. • You can repeat steps 3 through 6 to change to sample for more sound being input from the microphone. Wa i t i n g ...
User Guide
Page 25
... key to its original sound, press (TONE) again. Example: To delete the sound assigned to key D4 Disappears Flashes at the same time. 3. Indicates the keyboard key whose pitch you want . 2. Press bn (TONE) and then use br (10-key) to enter the rhythm number of an Auto Accompaniment pattern to... editing mode and returns to step 2 of the sampling drum set you want . 2. Press cr and cs at high speed This is assigned, press the keyboard key to which the sampled sound you want to copy is the editing mode. • While in step 1 to the sampled sound you want bo...
... key to its original sound, press (TONE) again. Example: To delete the sound assigned to key D4 Disappears Flashes at the same time. 3. Indicates the keyboard key whose pitch you want . 2. Press bn (TONE) and then use br (10-key) to enter the rhythm number of an Auto Accompaniment pattern to... editing mode and returns to step 2 of the sampling drum set you want . 2. Press cr and cs at high speed This is assigned, press the keyboard key to which the sampled sound you want to copy is the editing mode. • While in step 1 to the sampled sound you want bo...


