
PowerShot S2 IS Camera User Guide
Page 5
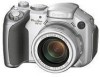
Table of Contents Items marked with are lists or charts that summarize camera functions or procedures. 1 2 Read This First 3 Chapter 1 Preparing the Camera 4 Components Guide 12 Operation Panel ...14 5 Installing the Batteries 16 Installing the Memory Card 18 6 Turning ...the Power On/Off 23 Setting the Date and Time 24 7 Setting the Language 25 Using the Viewfinder and the LCD Monitor 27 8 Chapter 2 Shooting-The Basics 9 Auto Mode...33 Reviewing...
Table of Contents Items marked with are lists or charts that summarize camera functions or procedures. 1 2 Read This First 3 Chapter 1 Preparing the Camera 4 Components Guide 12 Operation Panel ...14 5 Installing the Batteries 16 Installing the Memory Card 18 6 Turning ...the Power On/Off 23 Setting the Date and Time 24 7 Setting the Language 25 Using the Viewfinder and the LCD Monitor 27 8 Chapter 2 Shooting-The Basics 9 Auto Mode...33 Reviewing...

PowerShot S2 IS Camera User Guide
Page 34
... distribution of the shot image. Dark Image Balanced Image Bright Image Overexposure Warning In the following cases, overexposed portions of the image blink. ‹ When reviewing an image right after shooting in the LCD monitor (information view) or in the graph, the darker the image. If the exposure requires adjustment, set... mode of the Playback mode 32 button if the histogram and other information are not shown. ‹ Please note that image information recorded by this camera. Press the DISP. The greater the bias toward the right, the brighter the image.
... distribution of the shot image. Dark Image Balanced Image Bright Image Overexposure Warning In the following cases, overexposed portions of the image blink. ‹ When reviewing an image right after shooting in the LCD monitor (information view) or in the graph, the darker the image. If the exposure requires adjustment, set... mode of the Playback mode 32 button if the histogram and other information are not shown. ‹ Please note that image information recorded by this camera. Press the DISP. The greater the bias toward the right, the brighter the image.
PowerShot S2 IS Camera User Guide
Page 38
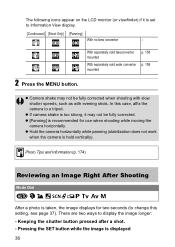
...viewfinder) if it may not be fully corrected. z If camera shake is too strong, it is set to Information View display. [Continuous] [Shoot Only] [Panning] With no lens converter - Photo Tips and Information (p. 174) Reviewing an Image Right After Shooting Mode Dial After a photo is...). There are two ways to a tripod. z Hold the camera horizontally while panning (stabilization does not work when the camera is recommended for two seconds (to change this case, affix the camera to display the image longer: - z Camera shake may not be fully corrected when shooting with slow shutter ...
...viewfinder) if it may not be fully corrected. z If camera shake is too strong, it is set to Information View display. [Continuous] [Shoot Only] [Panning] With no lens converter - Photo Tips and Information (p. 174) Reviewing an Image Right After Shooting Mode Dial After a photo is...). There are two ways to a tripod. z Hold the camera horizontally while panning (stabilization does not work when the camera is recommended for two seconds (to change this case, affix the camera to display the image longer: - z Camera shake may not be fully corrected when shooting with slow shutter ...

PowerShot S2 IS Camera User Guide
Page 39
...; Display the image's information (p. 27). ‹ Display the magnified image (p. 43). ‹ Erase individual images (p. 47, 48) ‹ Attach sound memos (p. 115) Changing the Review Duration 1 Select [Review] from the [ (Rec.)] menu and use the W or X to select the duration setting. z Selecting Menus and Settings (p. 73) Off: Images do not display 2 to...
...; Display the image's information (p. 27). ‹ Display the magnified image (p. 43). ‹ Erase individual images (p. 47, 48) ‹ Attach sound memos (p. 115) Changing the Review Duration 1 Select [Review] from the [ (Rec.)] menu and use the W or X to select the duration setting. z Selecting Menus and Settings (p. 73) Off: Images do not display 2 to...

PowerShot S2 IS Camera User Guide
Page 79
... teleconverter (TC-DC58B) or wide-angle converter (WC-DC58A) is mounted on or off. p. 56 On*/Off Digital Zoom Sets the digital zoom to on the camera, this function automatically adjusts exposure settings in the viewfinder) after the shutter button is released. On/Off* AF Mode... Sets the frequency of autofocus activation. p. 61 On/Off* Review Sets the duration images display on the LCD monitor (...
... teleconverter (TC-DC58B) or wide-angle converter (WC-DC58A) is mounted on or off. p. 56 On*/Off Digital Zoom Sets the digital zoom to on the camera, this function automatically adjusts exposure settings in the viewfinder) after the shutter button is released. On/Off* AF Mode... Sets the frequency of autofocus activation. p. 61 On/Off* Review Sets the duration images display on the LCD monitor (...

PowerShot S2 IS Camera User Guide
Page 117
..., press the SET button again. Use the W or X button to movies. Exiting the Sound Memos Menu z Press the button. Speak towards the microphone of 7 the camera. You can add as many sound memos as you will display. 2 Use the W or X button to select (Record) and press the SET button. z You can... image. Playback-Advanced Functions Playback-Advanced Functions Attaching Sound Memos to Images In Playback mode (including single image playback, index playback, magnified playback and the review immediately after shooting in No Information display mode).
..., press the SET button again. Use the W or X button to movies. Exiting the Sound Memos Menu z Press the button. Speak towards the microphone of 7 the camera. You can add as many sound memos as you will display. 2 Use the W or X button to select (Record) and press the SET button. z You can... image. Playback-Advanced Functions Playback-Advanced Functions Attaching Sound Memos to Images In Playback mode (including single image playback, index playback, magnified playback and the review immediately after shooting in No Information display mode).

PowerShot S2 IS Camera User Guide
Page 181
Menu 76 Red-eye Reduction Function 40 Lamp 12, 40 Resetting Settings to Their Default Values 81 Resolution 38 Reverse Disp 77 Review 37, 77 Duration 37 Rotate 78 Rotating 114 S Sampling rate 68 Save Settings 78 Saving Custom Settings . . . . . 113 Selecting Menus and Settings . 73 Self-Timer ...
Menu 76 Red-eye Reduction Function 40 Lamp 12, 40 Resetting Settings to Their Default Values 81 Resolution 38 Reverse Disp 77 Review 37, 77 Duration 37 Rotate 78 Rotating 114 S Sampling rate 68 Save Settings 78 Saving Custom Settings . . . . . 113 Selecting Menus and Settings . 73 Self-Timer ...

PowerShot S2 IS Quick Start Guide
Page 2
...reviewing installation settings. If one of these applications is complete, click [Quit]. List of the camera's DIGITAL terminal cover, lift it from the following website. Start Image Capture, click the [Image Capture] menu and select [Preferences]. 2. Close Image Capture. • Double-click the [Canon Digital Camera... image to download and the destination folder by selecting the [Applications], [Canon Utilities] and [CameraWindow] folders. 4. Install the software. Place the Canon Digital Camera Solution Disk into the [Pictures] folder. Set the ImageBrowser auto start ...
...reviewing installation settings. If one of these applications is complete, click [Quit]. List of the camera's DIGITAL terminal cover, lift it from the following website. Start Image Capture, click the [Image Capture] menu and select [Preferences]. 2. Close Image Capture. • Double-click the [Canon Digital Camera... image to download and the destination folder by selecting the [Applications], [Canon Utilities] and [CameraWindow] folders. 4. Install the software. Place the Canon Digital Camera Solution Disk into the [Pictures] folder. Set the ImageBrowser auto start ...

Software Starter Guide (For the Canon Digital Camera Solution Disk Ver.24)
Page 16
...if you agree to all of the terms of the software license agreement. 8 Review the installation settings and click [Next]. Ensure that you select a USB driver from below (the appropriate one for connecting) is required when the camera is connected to the software installed. 12 Installing the Software and USB Driver 5... operating system is used so there is Selected The USB driver (the software for your operating system). •Windows 2000/Windows 98 SE: Canon Camera TWAIN Driver •Windows Me: Canon Camera WIA Driver With Windows XP, the USB driver supplied with an interface cable.
...if you agree to all of the terms of the software license agreement. 8 Review the installation settings and click [Next]. Ensure that you select a USB driver from below (the appropriate one for connecting) is required when the camera is connected to the software installed. 12 Installing the Software and USB Driver 5... operating system is used so there is Selected The USB driver (the software for your operating system). •Windows 2000/Windows 98 SE: Canon Camera TWAIN Driver •Windows Me: Canon Camera WIA Driver With Windows XP, the USB driver supplied with an interface cable.

Software Starter Guide (For the Canon Digital Camera Solution Disk Ver.24)
Page 54
... you agree to delete the software installed with these procedures. See Uninstalling the Software (p. 83) to all of the terms of the software license agreement. 7 Review the installation settings and click [Next]. This concludes the software installation. 50 Installing the Software 5 Select [Easy Installation] and click [Next].
... you agree to delete the software installed with these procedures. See Uninstalling the Software (p. 83) to all of the terms of the software license agreement. 7 Review the installation settings and click [Next]. This concludes the software installation. 50 Installing the Software 5 Select [Easy Installation] and click [Next].


