
User Manual for Windows
Page 3
... this manual 1 About This User Manual...1 HTML Version of the Manual for Printing 3 Printer Parts 7 Printer parts...7 Front...7 Back...9 Top Cover (Inside)...10 Carriage...11 Ink Tank Cover (Inside)...12 Control Panel...14 Stand...16 Media Take-up Unit...17 Control Panel 18 Turning the Printer On and Off 18 Printer...
... this manual 1 About This User Manual...1 HTML Version of the Manual for Printing 3 Printer Parts 7 Printer parts...7 Front...7 Back...9 Top Cover (Inside)...10 Carriage...11 Ink Tank Cover (Inside)...12 Control Panel...14 Stand...16 Media Take-up Unit...17 Control Panel 18 Turning the Printer On and Off 18 Printer...

User Manual for Windows
Page 4
... 189 Cutting the Leading Edge of Roll Paper Automatically 190 Specifying the Cutting Method for Rolls 191 Reducing Dust from Cutting Rolls 195 Specifying the Ink Drying Time for Rolls 196 Clearing Jammed Roll Paper 199 Roll Holder Set...203 Accessing the Printer Driver Dialog Box from the Operating System Menu...
... 189 Cutting the Leading Edge of Roll Paper Automatically 190 Specifying the Cutting Method for Rolls 191 Reducing Dust from Cutting Rolls 195 Specifying the Ink Drying Time for Rolls 196 Clearing Jammed Roll Paper 199 Roll Holder Set...203 Accessing the Printer Driver Dialog Box from the Operating System Menu...
User Manual for Windows
Page 10
...Protocols 631 Configuring NetWare Network Settings 633 Configuring the Printer Driver Destination (Windows 634 Installing imagePROGRAF Device Setup Utility 635 Configuring the IP Address Using imagePROGRAF Device Setup Utility 636 Network Setting (Macintosh 637 Configuring the Printer's AppleTalk Network Settings...Light 671 Accessing the Printer Driver Dialog Box from Applications (Windows 674 Ink Tanks...676 Ink Tanks...676 Replacing Ink Tanks...678 Checking Ink Tank Levels...690 When to Replace Ink Tanks...691 Printheads...692 Printhead...692 Checking the Print Quality...692 Improving...
...Protocols 631 Configuring NetWare Network Settings 633 Configuring the Printer Driver Destination (Windows 634 Installing imagePROGRAF Device Setup Utility 635 Configuring the IP Address Using imagePROGRAF Device Setup Utility 636 Network Setting (Macintosh 637 Configuring the Printer's AppleTalk Network Settings...Light 671 Accessing the Printer Driver Dialog Box from Applications (Windows 674 Ink Tanks...676 Ink Tanks...676 Replacing Ink Tanks...678 Checking Ink Tank Levels...690 When to Replace Ink Tanks...691 Printheads...692 Printhead...692 Checking the Print Quality...692 Improving...
User Manual for Windows
Page 11
... not light up 732 The Printer Does Not Respond Even if Print Jobs are Sent 732 The Display Screen indicates the system is filling with ink 732 Cannot print over a network 733 Cannot connect the printer to the network 733 Configuring the Communication Mode Manually 734 Cannot print over a TCP/IP...
... not light up 732 The Printer Does Not Respond Even if Print Jobs are Sent 732 The Display Screen indicates the system is filling with ink 732 Cannot print over a network 733 Cannot connect the printer to the network 733 Configuring the Communication Mode Manually 734 Cannot print over a TCP/IP...

User Manual for Windows
Page 12
...753 If the Printer makes a strange sound 756 If the Printer Makes a Strange Sound 756 Other problems 757 The printer consumes a lot of ink 757 A message to check the Maintenance Cartridge is not cleared after you replace the Maintenance Cartridge...757 Paper is not cut neatly...757 Paper ... Roll paper cannot be inserted into the Paper Feed Slot 758 Cannot Load Sheets...758 The Media Take-up Unit Continues Rotating 759 Ink level detection...760 Error Message 762 Responding to Messages 762 Responding to Messages...762 Error Messages...764 Messages regarding paper 766 Paper Mismatch......
...753 If the Printer makes a strange sound 756 If the Printer Makes a Strange Sound 756 Other problems 757 The printer consumes a lot of ink 757 A message to check the Maintenance Cartridge is not cleared after you replace the Maintenance Cartridge...757 Paper is not cut neatly...757 Paper ... Roll paper cannot be inserted into the Paper Feed Slot 758 Cannot Load Sheets...758 The Media Take-up Unit Continues Rotating 759 Ink level detection...760 Error Message 762 Responding to Messages 762 Responding to Messages...762 Error Messages...764 Messages regarding paper 766 Paper Mismatch......

User Manual for Windows
Page 13
...ready...774 Messages regarding ink 775 Ink Level: Check...775 No ink tank loaded...775 Ink insufficient...776 Ink tank is empty. Now printing without saving data 783 Mail box full. Replace the ink tank 776 Close Ink Tank Cover...777 Ink tank error...777 Remaining level of the ink cannot be correctly detected... problem 782 Messages regarding printing or adjusment 778 Use another paper...778 Cannot execute this command. Press OK and replace the ink tank 776 Ink tank is empty. Contents Cannot feed paper...772 Paper jam...772 Cannot cut paper...773 Rel lever is in wrong position ...
...ready...774 Messages regarding ink 775 Ink Level: Check...775 No ink tank loaded...775 Ink insufficient...776 Ink tank is empty. Now printing without saving data 783 Mail box full. Replace the ink tank 776 Close Ink Tank Cover...777 Ink tank error...777 Remaining level of the ink cannot be correctly detected... problem 782 Messages regarding printing or adjusment 778 Use another paper...778 Cannot execute this command. Press OK and replace the ink tank 776 Ink tank is empty. Contents Cannot feed paper...772 Paper jam...772 Cannot cut paper...773 Rel lever is in wrong position ...
User Manual for Windows
Page 21
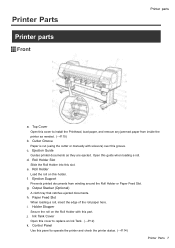
Roll Holder Slot Slide the Roll Holder into this cover to replace an Ink Tank. (→P.12) k. f. i. Ink Tank Cover Open this slot. Top Cover Open this part. d. Output Stacker (Optional) A cloth tray that catches ejected documents. Paper Feed Slot When loading a roll, ...
Roll Holder Slot Slide the Roll Holder into this cover to replace an Ink Tank. (→P.12) k. f. i. Ink Tank Cover Open this slot. Top Cover Open this part. d. Output Stacker (Optional) A cloth tray that catches ejected documents. Paper Feed Slot When loading a roll, ...
User Manual for Windows
Page 22
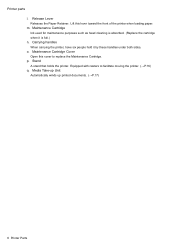
... that holds the printer. Media Take-up Unit Automatically winds up printed documents. (→P.17) 8 Printer Parts Release Lever Releases the Paper Retainer. o. p. m. Maintenance Cartridge Ink used for maintenance purposes such as head cleaning is absorbed. (Replace the cartridge when it by these handles under both sides. Lift this cover to...
... that holds the printer. Media Take-up Unit Automatically winds up printed documents. (→P.17) 8 Printer Parts Release Lever Releases the Paper Retainer. o. p. m. Maintenance Cartridge Ink used for maintenance purposes such as head cleaning is absorbed. (Replace the cartridge when it by these handles under both sides. Lift this cover to...

User Manual for Windows
Page 24
.... Paper Alignment Line Align paper with this shaft. f. h. b. Carriage Shaft The Carriage slides along this line when loading it is fed. Borderless Printing Ink Grooves These grooves catch ink outside the edges of the Top Cover, use this blade to cut paper. 10 Printer Parts Carriage Moves the Printhead. i. Fixed Blade The...
.... Paper Alignment Line Align paper with this shaft. f. h. b. Carriage Shaft The Carriage slides along this line when loading it is fed. Borderless Printing Ink Grooves These grooves catch ink outside the edges of the Top Cover, use this blade to cut paper. 10 Printer Parts Carriage Moves the Printhead. i. Fixed Blade The...

User Manual for Windows
Page 25
Printhead Fixer Cover Holds the Printhead in printing. Printhead Fixer Lever Locks the Printhead Fixer Cover. Carriage Cover Protects the Carriage. The cutter blade is retracted inside when not cutting. Shaft Cleaner Prevents the Carriage Shaft from becoming dirty. b. Printheads serve a key role in place. Cutter Unit A round-bladed cutter for automatic paper cutting. Printer Parts 11 c. d. e. Printheads serve a key role in printing. Printhead R Equipped with ink nozzles. g. Printhead L Equipped with ink nozzles. f. Carriage Printer parts a.
Printhead Fixer Cover Holds the Printhead in printing. Printhead Fixer Lever Locks the Printhead Fixer Cover. Carriage Cover Protects the Carriage. The cutter blade is retracted inside when not cutting. Shaft Cleaner Prevents the Carriage Shaft from becoming dirty. b. Printheads serve a key role in place. Cutter Unit A round-bladed cutter for automatic paper cutting. Printer Parts 11 c. d. e. Printheads serve a key role in printing. Printhead R Equipped with ink nozzles. g. Printhead L Equipped with ink nozzles. f. Carriage Printer parts a.

User Manual for Windows
Page 26
...when replacing an Ink Tank. b. To open it, lift the stopper of ink in place and protects it. Ink Tank Lock Lever A lever that matches the color and name on this label. 12 Printer Parts Lift and press down toward the front. Ink Color Label Load an Ink Tank that locks the Ink Tank in each... color. a. Printer parts Ink Tank Cover (Inside) Left Side Right Side Note: The gure shows the printer as loaded with ...
...when replacing an Ink Tank. b. To open it, lift the stopper of ink in place and protects it. Ink Tank Lock Lever A lever that matches the color and name on this label. 12 Printer Parts Lift and press down toward the front. Ink Color Label Load an Ink Tank that locks the Ink Tank in each... color. a. Printer parts Ink Tank Cover (Inside) Left Side Right Side Note: The gure shows the printer as loaded with ...

User Manual for Windows
Page 27
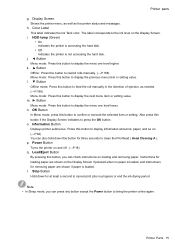
Ink Lamp (Red) Indicates the state of the Ink Tank as follows when the Ink Tank Cover is opened. • On The Ink Tank is installed correctly. • Off No Ink Tank is installed, or the ink level detection function is disabled. • Flashing Slowly Not much ink is left. • Flashing Rapidly Ink tank is labeled with a white letter "H" in a black circle on the label. Printer parts b. c. Ink Set An Ink Tank that can be used in the printer (→P.676) is empty. When purchasing an Ink Tank, make sure an "H" is printed on the side. Printer Parts 13
Ink Lamp (Red) Indicates the state of the Ink Tank as follows when the Ink Tank Cover is opened. • On The Ink Tank is installed correctly. • Off No Ink Tank is installed, or the ink level detection function is disabled. • Flashing Slowly Not much ink is left. • Flashing Rapidly Ink tank is labeled with a white letter "H" in a black circle on the label. Printer parts b. c. Ink Set An Ink Tank that can be used in the printer (→P.676) is empty. When purchasing an Ink Tank, make sure an "H" is printed on the side. Printer Parts 13
User Manual for Windows
Page 29
... Ofine mode: Press this button to display the previous menu item or setting value. n. Also press this button to display information about ink, paper, and so on. (→P.62) You can check instructions on the Display Screen if pressed when no paper is loaded, and instructions for...Printer parts g. h. Note • In Sleep mode, you can also hold down for three seconds to feed the roll manually in progress or end the ink drying period. k. ▲ Button Ofine: Press this button to rewind rolls manually. (→P.188) Menu mode: Press this button if the Display...
... Ofine mode: Press this button to display the previous menu item or setting value. n. Also press this button to display information about ink, paper, and so on. (→P.62) You can check instructions on the Display Screen if pressed when no paper is loaded, and instructions for...Printer parts g. h. Note • In Sleep mode, you can also hold down for three seconds to feed the roll manually in progress or end the ink drying period. k. ▲ Button Ofine: Press this button to rewind rolls manually. (→P.188) Menu mode: Press this button if the Display...
User Manual for Windows
Page 32
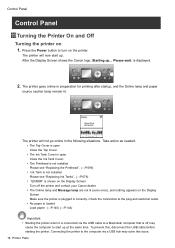
... not installed Please see "Replacing the Printhead". (→P.695) • Ink Tank is not installed Please see "Replacing Ink Tanks". (→P.678) • "ERROR" is shown on the Display Screen Turn off the printer and contact your Canon dealer. • The Online lamp and Message lamp are not lit (... go online in preparation for printing after startup, and the Online lamp and paper source section lamp remain lit. After the Display Screen shows the Canon logo, Starting up at the plug and electrical outlet. • No paper is loaded Load paper. (→P.140) (→P.144) Important &#...
... not installed Please see "Replacing the Printhead". (→P.695) • Ink Tank is not installed Please see "Replacing Ink Tanks". (→P.678) • "ERROR" is shown on the Display Screen Turn off the printer and contact your Canon dealer. • The Online lamp and Message lamp are not lit (... go online in preparation for printing after startup, and the Online lamp and paper source section lamp remain lit. After the Display Screen shows the Canon logo, Starting up at the plug and electrical outlet. • No paper is loaded Load paper. (→P.140) (→P.144) Important &#...

User Manual for Windows
Page 34
... are displayed. • Sleep mode The printer is in the Sleep Timer menu. (→P.48) If any jobs sent from the computer are displayed regarding ink and paper information. Jobs sent from the computer are held without being printed while submenus are processed immediately.
... are displayed. • Sleep mode The printer is in the Sleep Timer menu. (→P.48) If any jobs sent from the computer are displayed regarding ink and paper information. Jobs sent from the computer are held without being printed while submenus are processed immediately.

User Manual for Windows
Page 36
... the Display Screen The rst and second lines display the paper type and size. • Bottom Level of the Display Screen Here, the remaining ink level is indicated. (→P.690) Control Panel • Online lamp Lit when the printer is displayed here. The selected paper source is indicated by an...
... the Display Screen The rst and second lines display the paper type and size. • Bottom Level of the Display Screen Here, the remaining ink level is indicated. (→P.690) Control Panel • Online lamp Lit when the printer is displayed here. The selected paper source is indicated by an...

User Manual for Windows
Page 37
... • Display Screen The printer status is displayed here. Printer Parts 23 Ofine, and state of the Display Screen Here, the remaining ink level is indicated. (→P.690) Control Panel • Message lamp Lit when warning messages are displayed here on again. • Display Screen "...when print jobs are being received. • Message lamp Flashes when error messages are displayed. Turn off the printer, and contact the Canon dealer for service. • Data lamp Flashes when print jobs are being received. • Message lamp Flashes when error messages are displayed.
... • Display Screen The printer status is displayed here. Printer Parts 23 Ofine, and state of the Display Screen Here, the remaining ink level is indicated. (→P.690) Control Panel • Message lamp Lit when warning messages are displayed here on again. • Display Screen "...when print jobs are being received. • Message lamp Flashes when error messages are displayed. Turn off the printer, and contact the Canon dealer for service. • Data lamp Flashes when print jobs are being received. • Message lamp Flashes when error messages are displayed.

User Manual for Windows
Page 38
... menu is displayed at right. (→P.29) Submenu mode, and state of the Control Panel Remaining Maintenance Cartridge capacity and ink levels Information of the loaded paper Printer information Press the Information button to display this information, one after another: the Maintenance ...Cartridge capacity and remaining ink levels, paper information, and printer information. (→P.62) 24 Printer Parts The lower level menus are available if "►" ...
... menu is displayed at right. (→P.29) Submenu mode, and state of the Control Panel Remaining Maintenance Cartridge capacity and ink levels Information of the loaded paper Printer information Press the Information button to display this information, one after another: the Maintenance ...Cartridge capacity and remaining ink levels, paper information, and printer information. (→P.62) 24 Printer Parts The lower level menus are available if "►" ...

User Manual for Windows
Page 40
Press the Information button to display the Maintenance Cartridge capacity and remaining ink levels, as well as follows. Note • You can start Head Cleaning A by holding down the Information button for three seconds or more. (→P.694) ...
Press the Information button to display the Maintenance Cartridge capacity and remaining ink levels, as well as follows. Note • You can start Head Cleaning A by holding down the Information button for three seconds or more. (→P.694) ...

User Manual for Windows
Page 42
Control Panel Submenu operations Access submenus by pressing the Information button on the loaded paper • Printer information For a description of specic items displayed in submenus. • Remaining Maintenance Cartridge capacity • Ink levels • Information on the Control Panel. You can check the following information in submenus, see "Submenu Display". (→P.62) 28 Printer Parts
Control Panel Submenu operations Access submenus by pressing the Information button on the loaded paper • Printer information For a description of specic items displayed in submenus. • Remaining Maintenance Cartridge capacity • Ink levels • Information on the Control Panel. You can check the following information in submenus, see "Submenu Display". (→P.62) 28 Printer Parts


