Basic Guide
Page 14
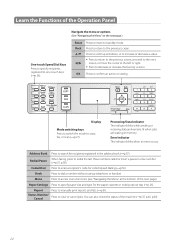
Navigate the menu or options. (See "Navigating the Menu" on the next page.) Reset Back ▲/▼ ◄/► Press to return to copy, fax, or scan (→p.27). Display Mode switching keys Press to switch the mode to ...
Navigate the menu or options. (See "Navigating the Menu" on the next page.) Reset Back ▲/▼ ◄/► Press to return to copy, fax, or scan (→p.27). Display Mode switching keys Press to switch the mode to ...

Basic Guide
Page 16
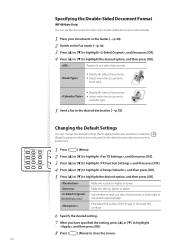
To change the settings: 1. Scan Mode Select the scan type. Fax Mode Specify destination. 01/01/2012 12:52AM RX Mode: Auto Resolution: 200 x 1... Press [▲] or [▼] to specify the values, and then press [OK]. Press or [►] to highlight an item, and then press [OK]. 2. Computer Remote Scanner To select the scan method: Press [▲] or [▼] to use the Fax mode for a while, the machine returns to specify the values, and then press [OK]. Switch to Copy/Fax/Scan Mode Switch to Copy, Fax, or Scan mode first to highlight an item, and then press [OK]. ...
To change the settings: 1. Scan Mode Select the scan type. Fax Mode Specify destination. 01/01/2012 12:52AM RX Mode: Auto Resolution: 200 x 1... Press [▲] or [▼] to specify the values, and then press [OK]. Press or [►] to highlight an item, and then press [OK]. 2. Computer Remote Scanner To select the scan method: Press [▲] or [▼] to use the Fax mode for a while, the machine returns to specify the values, and then press [OK]. Switch to Copy/Fax/Scan Mode Switch to Copy, Fax, or Scan mode first to highlight an item, and then press [OK]. ...

Basic Guide
Page 18
Time & Date Settings Auto Sleep Time Auto Reset Time 4 Press [▲] or [▼] to highlight , and then press [OK]. • To change the date and time settings. 1 Press [ ] (Menu). 2 Press [▲] or [▼] ...
Time & Date Settings Auto Sleep Time Auto Reset Time 4 Press [▲] or [▼] to highlight , and then press [OK]. • To change the date and time settings. 1 Press [ ] (Menu). 2 Press [▲] or [▼] ...

Basic Guide
Page 37
... and then press [OK]. Select the copy quantity. Make the density lighter or darker. Emphasize the outline of the image or decrease the contrast. * MF4890dw/MF4880dw only 5 Specify the desired setting. 6 After you have specified the setting, press [▲] or [▼] to highlight , and then press [...Settings You can view or cancel copy jobs while the jobs are applied when the machine is restarted, [ ] (Reset) is pressed or the screen is returned to the default screen after auto reset is performed. 1 Press [ ] (Menu). 2 Press [▲] or [▼] to highlight , and then ...
... and then press [OK]. Select the copy quantity. Make the density lighter or darker. Emphasize the outline of the image or decrease the contrast. * MF4890dw/MF4880dw only 5 Specify the desired setting. 6 After you have specified the setting, press [▲] or [▼] to highlight , and then press [...Settings You can view or cancel copy jobs while the jobs are applied when the machine is restarted, [ ] (Reset) is pressed or the screen is returned to the default screen after auto reset is performed. 1 Press [ ] (Menu). 2 Press [▲] or [▼] to highlight , and then ...
Basic Guide
Page 54
...press [OK]. 4 Press [▲] or [▼] to highlight the desired option, and then press [OK]. Make the resolution higher or lower. (MF4890dw only) Make the density lighter or darker. Set whether to read one side of documents. • Read both sides of documents. • Select ...]. 8 Press [ ] (Menu) to close the screen. 54 Specifying the Double-Sided Document Format (MF4890dw Only) You can change the default settings that is applied when the machine is restarted, [ ] (Reset) is pressed or the screen is returned to the default screen after auto screen is calendar type. ...
...press [OK]. 4 Press [▲] or [▼] to highlight the desired option, and then press [OK]. Make the resolution higher or lower. (MF4890dw only) Make the density lighter or darker. Set whether to read one side of documents. • Read both sides of documents. • Select ...]. 8 Press [ ] (Menu) to close the screen. 54 Specifying the Double-Sided Document Format (MF4890dw Only) You can change the default settings that is applied when the machine is restarted, [ ] (Reset) is pressed or the screen is returned to the default screen after auto screen is calendar type. ...

Basic Guide
Page 80
... features of each setting dialog box of a document to the default values. For more details, see [Scanning] → [Using the MF Toolbox] in MF Toolbox Reset the configured settings to be saved for the scanned image. • Manually set the location to save the scanned image by clicking [Browse]. • Select...
... features of each setting dialog box of a document to the default values. For more details, see [Scanning] → [Using the MF Toolbox] in MF Toolbox Reset the configured settings to be saved for the scanned image. • Manually set the location to save the scanned image by clicking [Browse]. • Select...
Starter Guide
Page 26
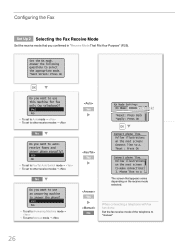
... set to Fax/Tel Auto Switch mode → • To set to other receive modes → Yes RX Mode Settings RX Mode: XXXXXX ◀ Check! *Reset: Press Back *Apply: Press OK No Do you want to "manual." 26 Follow illustrations on the next screen: Connect line to Manual mode → Yes...
... set to Fax/Tel Auto Switch mode → • To set to other receive modes → Yes RX Mode Settings RX Mode: XXXXXX ◀ Check! *Reset: Press Back *Apply: Press OK No Do you want to "manual." 26 Follow illustrations on the next screen: Connect line to Manual mode → Yes...


