Basic Guide
Page 6
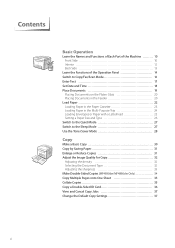
... or Paper with a Letterhead 25 Setting a Paper Size and Type 26 Switch to the Quiet Mode 27 Switch to the Sleep Mode 27 Use the Toner Saver Mode 28 Copy Make a Basic Copy 30 Copy by Saving Paper 31 Enlarge or Reduce Copies 31 Adjust the Image Quality for Copy 32... Adjusting the density 32 Selecting the Document Type 32 Adjusting the sharpness 33 Make Double-Sided Copies (MF4890dw/MF4880dw Only 34 Copy Multiple Pages onto One Sheet 35 Collate Copies 35 Copy a Double-Sided ID Card 36 View and Cancel Copy Jobs 37...
... or Paper with a Letterhead 25 Setting a Paper Size and Type 26 Switch to the Quiet Mode 27 Switch to the Sleep Mode 27 Use the Toner Saver Mode 28 Copy Make a Basic Copy 30 Copy by Saving Paper 31 Enlarge or Reduce Copies 31 Adjust the Image Quality for Copy 32... Adjusting the density 32 Selecting the Document Type 32 Adjusting the sharpness 33 Make Double-Sided Copies (MF4890dw/MF4880dw Only 34 Copy Multiple Pages onto One Sheet 35 Collate Copies 35 Copy a Double-Sided ID Card 36 View and Cancel Copy Jobs 37...
Basic Guide
Page 47
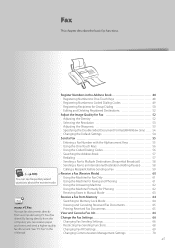
... for Fax 52 Adjusting the Density 52 Selecting the Resolution 53 Adjusting the Sharpness 53 Specifying the Double-Sided Document Format (MF4890dw Only) ...... 54 Changing the Default Settings 54 Send a Fax 55 Entering a Fax Number with the Alphanumeric Keys 55 Using the One-Touch Keys... Sending Settings 66 Restricting Fax Sending Functions 68 Changing Fax RX Settings 69 Changing Communication Management Settings 70 47 Fax This chapter describes the basic fax functions. (→ p.105) You can reserve paper and toner, and send a higher-quality fax document. Register Numbers in the ...
... for Fax 52 Adjusting the Density 52 Selecting the Resolution 53 Adjusting the Sharpness 53 Specifying the Double-Sided Document Format (MF4890dw Only) ...... 54 Changing the Default Settings 54 Send a Fax 55 Entering a Fax Number with the Alphanumeric Keys 55 Using the One-Touch Keys... Sending Settings 66 Restricting Fax Sending Functions 68 Changing Fax RX Settings 69 Changing Communication Management Settings 70 47 Fax This chapter describes the basic fax functions. (→ p.105) You can reserve paper and toner, and send a higher-quality fax document. Register Numbers in the ...
Basic Guide
Page 70
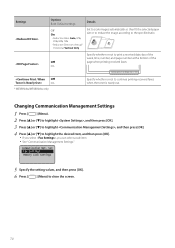
...Lock Settings 5 Specify the setting values, and then press [OK]. 6 Press [ ] (Menu) to the specified ratio. Changing Communication Management Settings 1 Press [ ] (Menu). 2 Press [▲] or [▼] to highlight , and then press ...and then press [OK]. 4 Press [▲] or [▼] to continue printing received faxes when the toner is nearly out. Off On Specify whether or not to print a received date, day of the week.... 01/01/2012 SAT 02:07 PM [TX/RX NO 5001] P.0001 On * MF4890dw/MF4880dw only Specify whether or not to highlight the desired item, and then press [OK]....
...Lock Settings 5 Specify the setting values, and then press [OK]. 6 Press [ ] (Menu) to the specified ratio. Changing Communication Management Settings 1 Press [ ] (Menu). 2 Press [▲] or [▼] to highlight , and then press ...and then press [OK]. 4 Press [▲] or [▼] to continue printing received faxes when the toner is nearly out. Off On Specify whether or not to print a received date, day of the week.... 01/01/2012 SAT 02:07 PM [TX/RX NO 5001] P.0001 On * MF4890dw/MF4880dw only Specify whether or not to highlight the desired item, and then press [OK]....
Basic Guide
Page 100
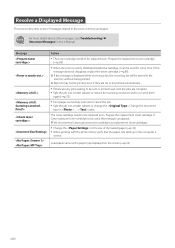
...Canon genuine toner cartridge is correct. We recommend Canon genuine toner cartridges as the paper type displayed on the computer is not used, this message does not disappear, replace the toner cartridge (→p.88). Resolve a Displayed Message This section describes some time. Message Action • The toner... automatically. • If there are any jobs waiting to be replaced soon. Load paper same as replacement toner cartridges. • Change the to the size of messages related to send them again (→p.53). • Print pages successfully scanned...
...Canon genuine toner cartridge is correct. We recommend Canon genuine toner cartridges as the paper type displayed on the computer is not used, this message does not disappear, replace the toner cartridge (→p.88). Resolve a Displayed Message This section describes some time. Message Action • The toner... automatically. • If there are any jobs waiting to be replaced soon. Load paper same as replacement toner cartridges. • Change the to the size of messages related to send them again (→p.53). • Print pages successfully scanned...
Basic Guide
Page 102
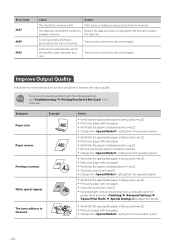
... again. Try to be sent or received. Example Paper creases. Action Print, send, or delete any foreign objects inside the machine. • Change the setting from the operation panel. • Verify that the appropriate paper is being used (→p.22). • Print a test page with... new paper. • Verify that the paper is loaded properly (→p.22). • Check the toner level (→p.87). • Change the setting from the operation panel. • Verify that the appropriate paper is being used (→p.22). • Print a test page...
... again. Try to be sent or received. Example Paper creases. Action Print, send, or delete any foreign objects inside the machine. • Change the setting from the operation panel. • Verify that the appropriate paper is being used (→p.22). • Print a test page with... new paper. • Verify that the paper is loaded properly (→p.22). • Check the toner level (→p.87). • Change the setting from the operation panel. • Verify that the appropriate paper is being used (→p.22). • Print a test page...
Basic Guide
Page 103
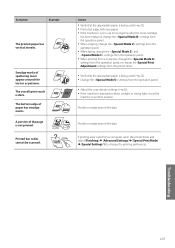
...printed. Provide a margin around the data. The overall print result is exposed to direct sunlight or strong light, move the machine to change the [Special Print Adjustment] settings from the printer driver. • Verify that the appropriate paper is being used (→p.22). &#...the machine is not in use for a long time after the toner cartridge has been replaced, change the settings from the operation panel. • When copying, change the settings from the operation panel. • When faxing, change the and settings from the operation panel. • When printing ...
...printed. Provide a margin around the data. The overall print result is exposed to direct sunlight or strong light, move the machine to change the [Special Print Adjustment] settings from the printer driver. • Verify that the appropriate paper is being used (→p.22). &#...the machine is not in use for a long time after the toner cartridge has been replaced, change the settings from the operation panel. • When copying, change the settings from the operation panel. • When faxing, change the and settings from the operation panel. • When printing ...


