imageCLASS D1180 Tray - Canon
imageCLASS D1180 Tray
View Results Below
Free Canon imageCLASS D1180 manuals!
Problems with Canon imageCLASS D1180?
Ask a Question
Free Canon imageCLASS D1180 manuals!
Problems with Canon imageCLASS D1180?
Ask a Question
Related Manual Pages


Similar Questions

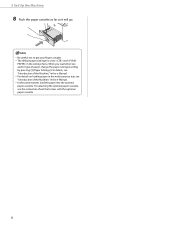
Paper Tray Won't Close
I have had the printer for several years and it working fine. After loading additional paper in the ...
I have had the printer for several years and it working fine. After loading additional paper in the ...
(Posted by bolaterveer 2 years ago)

Error Code 1300, No Paper In Tray. But There Is Paper- How Do I Override This
error code 1300, no paper in tray. but there is paper- how do i override this
error code 1300, no paper in tray. but there is paper- how do i override this
(Posted by langhornepa 9 years ago)

Rear Tray
How do I load paper in the rear tray and where is the rear tray? Thank you. Shirley
How do I load paper in the rear tray and where is the rear tray? Thank you. Shirley
(Posted by rochestersmr 11 years ago)