
iPF650 655 750 755 Setup-Guide
Page 7
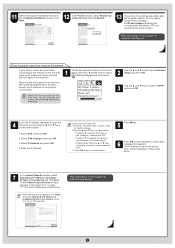
9 After reviewing the installation results in the CD-ROM drive. The installation process begins. 16 After ...license agreement, and then click Next. 15 Click Install. For TCP/IP (network) connections When you first connect the printer to the network 1 Use the LAN cable to connect the LAN port on the top lights connection green. a 7 An...icon is created after the computer restarts. Turn the computer on . The User Manual is now installed. 2 Make sure the printer is displayed, insert the provided User Manuals CD-ROM in the CD-ROM drive and click Next. 13 Click Next. 14 ...
9 After reviewing the installation results in the CD-ROM drive. The installation process begins. 16 After ...license agreement, and then click Next. 15 Click Install. For TCP/IP (network) connections When you first connect the printer to the network 1 Use the LAN cable to connect the LAN port on the top lights connection green. a 7 An...icon is created after the computer restarts. Turn the computer on . The User Manual is now installed. 2 Make sure the printer is displayed, insert the provided User Manuals CD-ROM in the CD-ROM drive and click Next. 13 Click Next. 14 ...
iPF650 655 750 755 Setup-Guide
Page 9
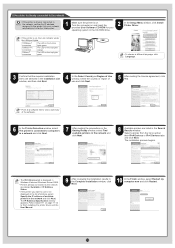
...3 Use the ▲ and ▼ keys to install the User Manual. The IP Address Specification window appears. 11 After reviewing the installation results in the network and click Next. An iPFxxxx Support desktop icon is created after printhead adjustment is finished, specify ...the ◄ and ► keys to select (Settings/Adjustments) and press OK. The IP address is finished. Next, restart installation of the printer driver. 7 In the Search Results window, select Specify the IP address of the control panel, press the ◄ and ► keys to select ...
...3 Use the ▲ and ▼ keys to install the User Manual. The IP Address Specification window appears. 11 After reviewing the installation results in the network and click Next. An iPFxxxx Support desktop icon is created after printhead adjustment is finished, specify ...the ◄ and ► keys to select (Settings/Adjustments) and press OK. The IP address is finished. Next, restart installation of the printer driver. 7 In the Search Results window, select Specify the IP address of the control panel, press the ◄ and ► keys to select ...
iPF650 655 750 755 Setup-Guide
Page 10
... in the CD-ROM drive. 2 In the Setup Menu window, click Install Printer Driver. • If the printer is connected to finish installing the printer driver and the User Manual. 9 After reviewing the installation results in the Search Results window. Select a printer from the list on page 11-12 to computers in a network and...
... in the CD-ROM drive. 2 In the Setup Menu window, click Install Printer Driver. • If the printer is connected to finish installing the printer driver and the User Manual. 9 After reviewing the installation results in the Search Results window. Select a printer from the list on page 11-12 to computers in a network and...

iPF650 655 750 755 Setup-Guide
Page 12
An iPFxxxx Support desktop icon is created after the computer restarts. 9 After reviewing the installation results in the Complete Installation window, click Next. 10 In the Finish window, select Restart my computer now and click Restart. 11 The printer driver settings take effect after installation. (iPFxxxx represents the printer model.) Next, follow steps 12-16 on page 7 to install the User Manual. 12 This completes printer driver installation.
An iPFxxxx Support desktop icon is created after the computer restarts. 9 After reviewing the installation results in the Complete Installation window, click Next. 10 In the Finish window, select Restart my computer now and click Restart. 11 The printer driver settings take effect after installation. (iPFxxxx represents the printer model.) Next, follow steps 12-16 on page 7 to install the User Manual. 12 This completes printer driver installation.

iPF750 User Manual
Page 20
To review multiple topics at once, select the check box of desired topics and click the Apply button. 4 Introduction The terms you want to use this manual 2. How to read. Click a topic you searched for will be highlighted in the topic.
To review multiple topics at once, select the check box of desired topics and click the Apply button. 4 Introduction The terms you want to use this manual 2. How to read. Click a topic you searched for will be highlighted in the topic.
