
iPF710 User Manual
Page 10
...527 Configuring NetWare Network Settings 529 Installing imagePROGRAF Device Setup Utility 530 Configuring the IP Address Using imagePROGRAF Device Setup Utility 530 Network Setting (Macintosh 531 Configuring the Printer Driver Destination (Macintosh 531 Configuring the Printer's AppleTalk Network Settings 532 Configuring the ... Accuracy 555 Adjusting the Vacuum Strength 557 Maintenance 558 Ink Tanks...558 Ink Tanks...558 Replacing Ink Tanks...559 Checking Ink Tank Levels...564 When to Replace Ink Tanks...565 Printheads...566 Printhead...566 Checking the Print Quality...566 Improving ...
...527 Configuring NetWare Network Settings 529 Installing imagePROGRAF Device Setup Utility 530 Configuring the IP Address Using imagePROGRAF Device Setup Utility 530 Network Setting (Macintosh 531 Configuring the Printer Driver Destination (Macintosh 531 Configuring the Printer's AppleTalk Network Settings 532 Configuring the ... Accuracy 555 Adjusting the Vacuum Strength 557 Maintenance 558 Ink Tanks...558 Ink Tanks...558 Replacing Ink Tanks...559 Checking Ink Tank Levels...564 When to Replace Ink Tanks...565 Printheads...566 Printhead...566 Checking the Print Quality...566 Improving ...

iPF710 User Manual
Page 11
...Maintenance Cartridge 579 Maintenance Cartridge...579 Replacing the Maintenance Cartridge 579 Checking the Remaining Maintenance Cartridge Capacity 586 When to Replace the Maintenance Cartridge 587 Cleaning the Printer 588 Cleaning the Printer Exterior...588 Cleaning Inside the Top Cover 589 Cleaning the Paper Retainer...591 Cleaning the Printhead...593 Other Maintenance... 594 Preparing to Transfer the Printer 594 Updating the Firmware...598 Troubleshooting 599 Frequently Asked Questions ...
...Maintenance Cartridge 579 Maintenance Cartridge...579 Replacing the Maintenance Cartridge 579 Checking the Remaining Maintenance Cartridge Capacity 586 When to Replace the Maintenance Cartridge 587 Cleaning the Printer 588 Cleaning the Printer Exterior...588 Cleaning Inside the Top Cover 589 Cleaning the Paper Retainer...591 Cleaning the Printhead...593 Other Maintenance... 594 Preparing to Transfer the Printer 594 Updating the Firmware...598 Troubleshooting 599 Frequently Asked Questions ...
iPF710 User Manual
Page 13
... adjust band...640 Cannot adjust printhead...640 Messages regarding printheads 641 Cannot adjust printhead...641 Cannot adjust band...641 PHead needs cleaning...641 Problem with Printhead...641 Printhead error...642 Messages regarding the maintenance cartridge 643 No maintenance cartridge...643 Prepare for maint cart replacement 643 No Maintenance Cartridge capacity 643 Maintenance cartridge full...643 Maintenance cartridge problem 643 Messages...
... adjust band...640 Cannot adjust printhead...640 Messages regarding printheads 641 Cannot adjust printhead...641 Cannot adjust band...641 PHead needs cleaning...641 Problem with Printhead...641 Printhead error...642 Messages regarding the maintenance cartridge 643 No maintenance cartridge...643 Prepare for maint cart replacement 643 No Maintenance Cartridge capacity 643 Maintenance cartridge full...643 Maintenance cartridge problem 643 Messages...
iPF710 User Manual
Page 27
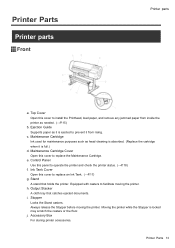
... casters or the oor. j. i. c. Maintenance Cartridge Cover Open this panel to prevent it from inside the printer as needed. (→P.15) b. Printer Parts Printer parts Front Printer parts a. Ink Tank Cover Open this cover to facilitate moving the printer. Stopper Locks the Stand casters. Equipped with casters to install the Printhead, load paper, and remove any...
... casters or the oor. j. i. c. Maintenance Cartridge Cover Open this panel to prevent it from inside the printer as needed. (→P.15) b. Printer Parts Printer parts Front Printer parts a. Ink Tank Cover Open this cover to facilitate moving the printer. Stopper Locks the Stand casters. Equipped with casters to install the Printhead, load paper, and remove any...

iPF710 User Manual
Page 62
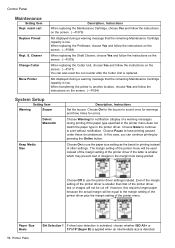
... command is available only if a roll is faint, oddly colored, or contains foreign substances. Choose Head Cleaning B if no ink is printed at the current position. Information Displays information about the printer. For instructions on selecting or setting menu items, see "...Interface Setup Congure the EOP timer and network settings. (→P.55) Maintenance Access maintenance settings when replacing the Printhead or preparing to move the printer. (→P.56) System Setup Specify the printer system settings, including the date format and display language. (→P.56) Test...
... command is available only if a roll is faint, oddly colored, or contains foreign substances. Choose Head Cleaning B if no ink is printed at the current position. Information Displays information about the printer. For instructions on selecting or setting menu items, see "...Interface Setup Congure the EOP timer and network settings. (→P.55) Maintenance Access maintenance settings when replacing the Printhead or preparing to move the printer. (→P.56) System Setup Specify the printer system settings, including the date format and display language. (→P.56) Test...
iPF710 User Manual
Page 70
... Change Cutter Move Printer Description, Instructions When replacing the Maintenance Cartridge, choose Yes and follow the instructions on the screen. (→P.579) Not displayed during a warning message that the remaining Maintenance Cartridge capacity is replaced. When replacing the Printhead, choose Yes and...Instructions Set the buzzer. Choose On to the margin setting of the printer driver plus the margin setting of a warning message) during a warning message that the remaining Maintenance Cartridge capacity is detected. maint cart Replace P.head Repl. However, this...
... Change Cutter Move Printer Description, Instructions When replacing the Maintenance Cartridge, choose Yes and follow the instructions on the screen. (→P.579) Not displayed during a warning message that the remaining Maintenance Cartridge capacity is replaced. When replacing the Printhead, choose Yes and...Instructions Set the buzzer. Choose On to the margin setting of the printer driver plus the margin setting of a warning message) during a warning message that the remaining Maintenance Cartridge capacity is detected. maint cart Replace P.head Repl. However, this...

iPF710 User Manual
Page 76
... information is printed regarding the printer rmware version, various settings, and the utilization level of the printer. Roll Cut Sheet Type Information on the loaded paper. Media Menu Roll Media Type Check Remain. Printhead adjustment value. Control Panel Status... displayed in the Status Print report. Canon imagePROGRAF iPFxxxx Status Print Printer model Firm Boot MIT(DBF) MIT(DB) S/N MC C,M,Y,MBK,MBK2,BK Firmware Version Boot ROM Version MIT Database Format Version MIT Database Version Printer serial number Maintenance Cartridge capacity (%) Ink levels. Press ...
... information is printed regarding the printer rmware version, various settings, and the utilization level of the printer. Roll Cut Sheet Type Information on the loaded paper. Media Menu Roll Media Type Check Remain. Printhead adjustment value. Control Panel Status... displayed in the Status Print report. Canon imagePROGRAF iPFxxxx Status Print Printer model Firm Boot MIT(DBF) MIT(DB) S/N MC C,M,Y,MBK,MBK2,BK Firmware Version Boot ROM Version MIT Database Format Version MIT Database Version Printer serial number Maintenance Cartridge capacity (%) Ink levels. Press ...

iPF710 User Manual
Page 422
... Enlargement Copy . 408 Windows Software Printer Driver • Utility Sheet (Windows) (→P.442) You can specify settings related to maintenance for the Printhead and feed amount, as well as settings for Color imageRUNNER Enlargement Copy. • Support Sheet (Windows) (→P.443)... a single page as desired before printing. Color imageRUNNER Enlargement Copy is a feature for automatic enlargement and printing of scanned originals from various source applications on the printer and see the printer driver version. imagePROGRAF Free Layout is a feature for freely arranging...
... Enlargement Copy . 408 Windows Software Printer Driver • Utility Sheet (Windows) (→P.442) You can specify settings related to maintenance for the Printhead and feed amount, as well as settings for Color imageRUNNER Enlargement Copy. • Support Sheet (Windows) (→P.443)... a single page as desired before printing. Color imageRUNNER Enlargement Copy is a feature for automatic enlargement and printing of scanned originals from various source applications on the printer and see the printer driver version. imagePROGRAF Free Layout is a feature for freely arranging...

iPF710 User Manual
Page 467
... cutting. • Utility Pane (Mac OS X) (→P.471) You can specify settings related to maintenance for the Printhead and feed amount, as well as settings for Color imageRUNNER Enlargement Copy. • Additional Settings Pane (Mac OS X) (→P.472) You can specify ... OS X Software 453 For details, see Color imageRUNNER Enlargement Copy . With the imagePROGRAF Preview feature, you can automatically enlarge and print scanned originals from Applications (Mac OS X) (→P.460) Printer Driver For information on the Mac OS X printer driver settings, refer to the following topics....
... cutting. • Utility Pane (Mac OS X) (→P.471) You can specify settings related to maintenance for the Printhead and feed amount, as well as settings for Color imageRUNNER Enlargement Copy. • Additional Settings Pane (Mac OS X) (→P.472) You can specify ... OS X Software 453 For details, see Color imageRUNNER Enlargement Copy . With the imagePROGRAF Preview feature, you can automatically enlarge and print scanned originals from Applications (Mac OS X) (→P.460) Printer Driver For information on the Mac OS X printer driver settings, refer to the following topics....

iPF710 User Manual
Page 489
...Printer Driver For information on the printing application or Advanced Settings to complete more detailed settings as desired. • Media Detailed Settings Dialog Box (Mac OS 9) (→P.497) • View Settings Dialog Box for the Printing Application (Mac OS 9) (→P.498) • Color Settings Pane: Color...specify the media source, watermarks, and orientation. • Device Settings Pane (Mac OS 9) (→P.490) You can perform maintenance for the Printhead or feed amount. • Additional Settings Pane (Mac OS 9) (→P.491) You can specify settings for background printing,...
...Printer Driver For information on the printing application or Advanced Settings to complete more detailed settings as desired. • Media Detailed Settings Dialog Box (Mac OS 9) (→P.497) • View Settings Dialog Box for the Printing Application (Mac OS 9) (→P.498) • Color Settings Pane: Color...specify the media source, watermarks, and orientation. • Device Settings Pane (Mac OS 9) (→P.490) You can perform maintenance for the Printhead or feed amount. • Additional Settings Pane (Mac OS 9) (→P.491) You can specify settings for background printing,...

iPF710 User Manual
Page 574
... prompts you to open the Ink Tank Cover. Ink Tanks Replacing an Ink Tank 1. A message on the printer, or during printing or printhead cleaning. You can replace Ink Tank if the Display Screen indicates the printer is being canceled or if paper is Online or Ofine, or if messages advise you.... Do not remove an Ink Tank during initialization immediately after turning on the Display Screen advises you to check the amount of ink left . 560 Maintenance The Ink Lamp ashes quickly if there is no print jobs are unnecessary in progress.
... prompts you to open the Ink Tank Cover. Ink Tanks Replacing an Ink Tank 1. A message on the printer, or during printing or printhead cleaning. You can replace Ink Tank if the Display Screen indicates the printer is being canceled or if paper is Online or Ofine, or if messages advise you.... Do not remove an Ink Tank during initialization immediately after turning on the Display Screen advises you to check the amount of ink left . 560 Maintenance The Ink Lamp ashes quickly if there is no print jobs are unnecessary in progress.

iPF710 User Manual
Page 580
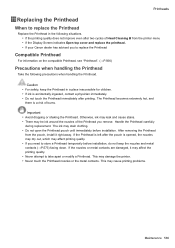
... is faint or streaked in different colors, make sure the Printhead nozzles are clear by printing a test pattern to check the nozzles. Clean the Printhead if the printed test pattern was faint. Printheads Printheads Printhead • Printhead PF-03 Note • For instructions on cleaning the Printhead, see "Cleaning the Printhead". (→P.568) 566 Maintenance For instructions on replacing the...
... is faint or streaked in different colors, make sure the Printhead nozzles are clear by printing a test pattern to check the nozzles. Clean the Printhead if the printed test pattern was faint. Printheads Printheads Printhead • Printhead PF-03 Note • For instructions on cleaning the Printhead, see "Cleaning the Printhead". (→P.568) 566 Maintenance For instructions on replacing the...
iPF710 User Manual
Page 581
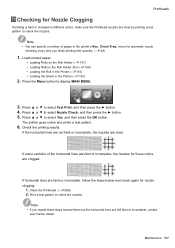
...Printer (→P.110) • Loading the Sheet in different colors, make sure the Printhead nozzles are clogged. If some sections of pages in the printer's Noz. Clean the Printhead. (→P.568) 2. Check Freq. menu for those colors... not faint or incomplete, the nozzles are still faint or incomplete, contact your Canon dealer. Print a test pattern to display MAIN MENU. 3. Press ▲.... 5. Note • If you nish printing that quantity. (→P.48) 1. Maintenance 567 Printheads Checking for nozzle clogging. 1. Press ▲ or ▼ to check the nozzles. Check...
...Printer (→P.110) • Loading the Sheet in different colors, make sure the Printhead nozzles are clogged. If some sections of pages in the printer's Noz. Clean the Printhead. (→P.568) 2. Check Freq. menu for those colors... not faint or incomplete, the nozzles are still faint or incomplete, contact your Canon dealer. Print a test pattern to display MAIN MENU. 3. Press ▲.... 5. Note • If you nish printing that quantity. (→P.48) 1. Maintenance 567 Printheads Checking for nozzle clogging. 1. Press ▲ or ▼ to check the nozzles. Check...

iPF710 User Manual
Page 582
... not solve the problem. Contact your Canon dealer. Cleaning the Printhead 1. It takes about four minutes to select the type of cleaning, and then press the OK button. • Head Cleaning A Use Head Cleaning A if printing is cleaned, and the printer goes online. 4. Press ▲...cleaning. 568 Maintenance It takes about three minutes to check the nozzles, and determine whether cleaning has cleared the nozzles. (→P.567) Note • If printing does not improve after Head Cleaning A, try Head Cleaning B. Printheads Cleaning the Printhead Cleaning the Printhead may have ...
... not solve the problem. Contact your Canon dealer. Cleaning the Printhead 1. It takes about four minutes to select the type of cleaning, and then press the OK button. • Head Cleaning A Use Head Cleaning A if printing is cleaned, and the printer goes online. 4. Press ▲...cleaning. 568 Maintenance It takes about three minutes to check the nozzles, and determine whether cleaning has cleared the nozzles. (→P.567) Note • If printing does not improve after Head Cleaning A, try Head Cleaning B. Printheads Cleaning the Printhead Cleaning the Printhead may have ...
iPF710 User Manual
Page 583
...Maintenance 569 If the nozzles or metal contacts are damaged, it right away. This may damage the printer. • Never touch the Printhead nozzles or the metal contacts. The ink may stain clothing. • Do not open the Printhead pouch until immediately before installation, do not keep the Printhead... a Printhead. Handle the Printhead carefully during replacement. After removing the Printhead from the printer menu • If the Display Screen indicates Open top cover and replace the printhead. • If your Canon dealer has advised you need to store a Printhead temporarily before...
...Maintenance 569 If the nozzles or metal contacts are damaged, it right away. This may damage the printer. • Never touch the Printhead nozzles or the metal contacts. The ink may stain clothing. • Do not open the Printhead pouch until immediately before installation, do not keep the Printhead... a Printhead. Handle the Printhead carefully during replacement. After removing the Printhead from the printer menu • If the Display Screen indicates Open top cover and replace the printhead. • If your Canon dealer has advised you need to store a Printhead temporarily before...

iPF710 User Manual
Page 584
... then press the ► button. 5. Ink is shown on the Display Screen regarding Printhead replacement. 570 Maintenance Clean inside the Top Cover. (→P.589) 3. Press ▲ or ▼ to have the printer automatically adjust the Printhead alignment after replacement of the cutting method selected, cut it manually and remove it. (→P.401) 2. Press the...
... then press the ► button. 5. Ink is shown on the Display Screen regarding Printhead replacement. 570 Maintenance Clean inside the Top Cover. (→P.589) 3. Press ▲ or ▼ to have the printer automatically adjust the Printhead alignment after replacement of the cutting method selected, cut it manually and remove it. (→P.401) 2. Press the...

iPF710 User Manual
Page 585
Printheads 8. Important • Never touch the Linear Scale (a) or Carriage Shaft (b). • Never touch the metal contacts of the Carriage. Lift the Carriage Cover to wipe it fully. If the Printhead Fixer Cover or Printhead Fixer Lever is dirty, use a damp cloth that you have wrung out completely to open it clean. This may damage the printer. 9. Maintenance 571
Printheads 8. Important • Never touch the Linear Scale (a) or Carriage Shaft (b). • Never touch the metal contacts of the Carriage. Lift the Carriage Cover to wipe it fully. If the Printhead Fixer Cover or Printhead Fixer Lever is dirty, use a damp cloth that you have wrung out completely to open it clean. This may damage the printer. 9. Maintenance 571

iPF710 User Manual
Page 586
The metal parts of the Printhead become hot during printing, and there is a risk of the used Printhead. Pull up the Printhead Fixer Cover to open it completely. 12. Note • Dispose of burns from touching these parts. Caution • When replacing the Printhead immediately after printing, wait a few minutes before replacing it completely. 11. Remove the used Printhead in accordance with local regulations. 572 Maintenance Printheads 10. Pull the Printhead Fixer Lever forward all the way to open it .
The metal parts of the Printhead become hot during printing, and there is a risk of the used Printhead. Pull up the Printhead Fixer Cover to open it completely. 12. Note • Dispose of burns from touching these parts. Caution • When replacing the Printhead immediately after printing, wait a few minutes before replacing it completely. 11. Remove the used Printhead in accordance with local regulations. 572 Maintenance Printheads 10. Pull the Printhead Fixer Lever forward all the way to open it .

iPF710 User Manual
Page 587
...not to touch areas other hand to protect the Printhead. Maintenance 573 Handle it . Wipe off any spilled ink with ink to remove the orange Safety Cap 1 (a). Spilled ink may damage the Printhead and affect printing quality. 14. Holding the new Printhead by the grips (a). Important • Safety ...way. 13. This may be coated with a dry cloth. Never touch the nozzles (b) or the metal contacts (c). Printheads Important • When handling the Printhead, always hold it by the grips (a), remove it may stain the printer or surrounding area. This may cause stains.
...not to touch areas other hand to protect the Printhead. Maintenance 573 Handle it . Wipe off any spilled ink with ink to remove the orange Safety Cap 1 (a). Spilled ink may damage the Printhead and affect printing quality. 14. Holding the new Printhead by the grips (a). Important • Safety ...way. 13. This may be coated with a dry cloth. Never touch the nozzles (b) or the metal contacts (c). Printheads Important • When handling the Printhead, always hold it by the grips (a), remove it may stain the printer or surrounding area. This may cause stains.

iPF710 User Manual
Page 588
Push the Carriage Cover forward until it clicks. 574 Maintenance Pull the Printhead Fixer Cover down and the metal contacts toward the front to lock the Printhead in place. 17. Push the Printhead Fixer Lever toward the back of the printer until it clicks. 18. Printheads 15. With the nozzles facing down toward the back, insert the Printhead into the carriage. 16. Making sure that the metal contacts do not touch the Carriage, carefully push the printhead rmly into the Carriage.
Push the Carriage Cover forward until it clicks. 574 Maintenance Pull the Printhead Fixer Cover down and the metal contacts toward the front to lock the Printhead in place. 17. Push the Printhead Fixer Lever toward the back of the printer until it clicks. 18. Printheads 15. With the nozzles facing down toward the back, insert the Printhead into the carriage. 16. Making sure that the metal contacts do not touch the Carriage, carefully push the printhead rmly into the Carriage.


