Quick Start Guide
Page 2
... telephone technical support, free of the printer): Setup Software and User's Guide CD version number (USCD X.X) located on the top of service charges, MondaySaturday (excluding holidays), during your Canon service and support, call (1-800-385-2155), or visit our web site at www.canontechsupport.com. * Support program specifics are subject to buy" instructions are found here. 2. Extended Service and Support - www.canonesp.com Canon CarePAK Extended Service Plan is...
... telephone technical support, free of the printer): Setup Software and User's Guide CD version number (USCD X.X) located on the top of service charges, MondaySaturday (excluding holidays), during your Canon service and support, call (1-800-385-2155), or visit our web site at www.canontechsupport.com. * Support program specifics are subject to buy" instructions are found here. 2. Extended Service and Support - www.canonesp.com Canon CarePAK Extended Service Plan is...
Quick Start Guide
Page 5
...23 Accessing Printer Driver 29 Adjusting Print Quality for Photographs 30 Using the Bundle Software 37 Printing Borderless Photographs 38 Printing Maintenance When Printing Becomes Faint or Colors are Incorrect 41 Printing the Nozzle Check Pattern 42 Print Head Cleaning 47 Print Head Deep Cleaning 52 Aligning the Print Head 57 Replacing an Ink Tank 61 Troubleshooting Cannot Install the Printer Driver 70 Print Quality is Poor or Contains Errors 72 Troubleshooting Printer Hardware 74 Paper Does Not Feed Properly 75 Handling Error Messages 76 An Error Message Appears on the Screen...
...23 Accessing Printer Driver 29 Adjusting Print Quality for Photographs 30 Using the Bundle Software 37 Printing Borderless Photographs 38 Printing Maintenance When Printing Becomes Faint or Colors are Incorrect 41 Printing the Nozzle Check Pattern 42 Print Head Cleaning 47 Print Head Deep Cleaning 52 Aligning the Print Head 57 Replacing an Ink Tank 61 Troubleshooting Cannot Install the Printer Driver 70 Print Quality is Poor or Contains Errors 72 Troubleshooting Printer Hardware 74 Paper Does Not Feed Properly 75 Handling Error Messages 76 An Error Message Appears on the Screen...
Quick Start Guide
Page 20
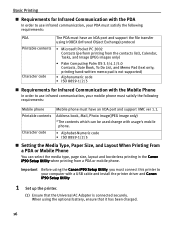
..., Photo image(JPEG image only) *The contents which can select the media type, page size, layout and borderless printing in the Canon iP90 Setup Utility when printing from the contacts list), Calendar, Tasks, and Image (JPEG images only) • Palm Computing Palm OS 3.5/4.1/5.0 Contacts, Date Book, To Do List, and Memo Pad (text only; Basic Printing Requirements for Infrared Communication with a USB cable and install the printer driver and Canon iP90 Setup Utility. 1 Set up...
..., Photo image(JPEG image only) *The contents which can select the media type, page size, layout and borderless printing in the Canon iP90 Setup Utility when printing from the contacts list), Calendar, Tasks, and Image (JPEG images only) • Palm Computing Palm OS 3.5/4.1/5.0 Contacts, Date Book, To Do List, and Memo Pad (text only; Basic Printing Requirements for Infrared Communication with a USB cable and install the printer driver and Canon iP90 Setup Utility. 1 Set up...
Quick Start Guide
Page 33
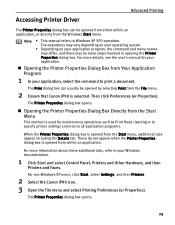
... as Print Head cleaning or to specify printer settings common to all application programs. When the Printer Properties dialog box is opened from Your Application Program 1 In your application, select the command to print a document. For more steps involved in opening the Printer Properties dialog box. Opening the Printer Properties Dialog Box Directly from the Start Menu This method is used for your Windows documentation. 1 Click Start and select Control Panel, Printers...
... as Print Head cleaning or to specify printer settings common to all application programs. When the Printer Properties dialog box is opened from Your Application Program 1 In your application, select the command to print a document. For more steps involved in opening the Printer Properties dialog box. Opening the Printer Properties Dialog Box Directly from the Start Menu This method is used for your Windows documentation. 1 Click Start and select Control Panel, Printers...
Quick Start Guide
Page 34
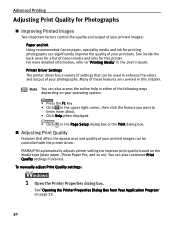
... media type (plain paper, Photo Paper Pro, and so on page 29. 30 Note You can be used to enhance the colors and output of these features are covered in the User's Guide. To manually adjust Print Quality settings: 1 Open the Printer Properties dialog box. Printer Driver Settings The printer driver has a variety of settings that affect the appearance and quality of Canon media and inks for a list of your printed images can also access the online help in either of your photographs. PIXMA iP90 automatically adjusts printer settings...
... media type (plain paper, Photo Paper Pro, and so on page 29. 30 Note You can be used to enhance the colors and output of these features are covered in the User's Guide. To manually adjust Print Quality settings: 1 Open the Printer Properties dialog box. Printer Driver Settings The printer driver has a variety of settings that affect the appearance and quality of Canon media and inks for a list of your printed images can also access the online help in either of your photographs. PIXMA iP90 automatically adjusts printer settings...
Quick Start Guide
Page 42
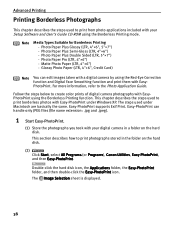
... to the Photo Application Guide. The steps used to print photographs stored in a folder on the hard disk. (2) Click Start, select All Programs (or Programs), Canon Utilities, Easy-PhotoPrint, and then Easy-PhotoPrint. This section describes how to print borderless photos with a digital camera by using the Borderless Printing mode. Photo Paper Plus Double Sided (LTR, 5"×7") - This chapter describes the steps used under Windows XP. Photo Paper Pro (LTR, 4"×6") - Double-click the hard disk...
... to the Photo Application Guide. The steps used to print photographs stored in a folder on the hard disk. (2) Click Start, select All Programs (or Programs), Canon Utilities, Easy-PhotoPrint, and then Easy-PhotoPrint. This section describes how to print borderless photos with a digital camera by using the Borderless Printing mode. Photo Paper Plus Double Sided (LTR, 5"×7") - This chapter describes the steps used under Windows XP. Photo Paper Pro (LTR, 4"×6") - Double-click the hard disk...
Quick Start Guide
Page 63
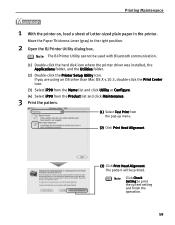
.... 3 Print the pattern. (1) Select Test Print from the pop-up menu. (2) Click Print Head Alignment. (3) Click Print Head Alignment. The pattern will be used with Bluetooth communication. (1) Double-click the hard disk icon where the printer driver was installed, the Applications folder, and the Utilities folder. (2) Double-click the Printer Setup Utility icon. Note Click Check Setting to the right position. 2 Open the BJ Printer Utility dialog box. Printing Maintenance 1 With the printer on, load a sheet of Letter-sized plain paper in the printer. Move the Paper Thickness Lever...
.... 3 Print the pattern. (1) Select Test Print from the pop-up menu. (2) Click Print Head Alignment. (3) Click Print Head Alignment. The pattern will be used with Bluetooth communication. (1) Double-click the hard disk icon where the printer driver was installed, the Applications folder, and the Utilities folder. (2) Double-click the Printer Setup Utility icon. Note Click Check Setting to the right position. 2 Open the BJ Printer Utility dialog box. Printing Maintenance 1 With the printer on, load a sheet of Letter-sized plain paper in the printer. Move the Paper Thickness Lever...
Quick Start Guide
Page 69
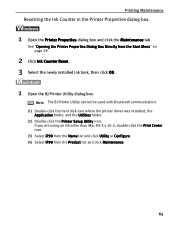
Printing Maintenance Resetting the Ink Counter in the Printer Properties dialog box 1 Open the Printer Properties dialog box and click the Maintenance tab. If you are using an OS other than Mac OS X v.10.3, double-click the Print Center icon. (3) Select iP90 from the Name list and click Utility or Configure. (4) Select iP90 from the Start Menu" on page 29 2 Click Ink Counter Reset. 3 Select the newly installed ink tank, then click OK...
Printing Maintenance Resetting the Ink Counter in the Printer Properties dialog box 1 Open the Printer Properties dialog box and click the Maintenance tab. If you are using an OS other than Mac OS X v.10.3, double-click the Print Center icon. (3) Select iP90 from the Name list and click Utility or Configure. (4) Select iP90 from the Start Menu" on page 29 2 Click Ink Counter Reset. 3 Select the newly installed ink tank, then click OK...

Quick Start Guide
Page 73
... Windows 2000, a BJ Status Monitor screen is displayed automatically. Troubleshooting Troubleshooting Troubleshooting usually falls into one of the following categories. In this chapter you will find the most common printing problems. Refer to the User's Guide for additional information on topics not covered in this section. • "Cannot Install the Printer Driver" on page 70 • "Print Quality is Poor or Contains Errors" on page 72 • "Troubleshooting Printer Hardware" on page 74 • "Paper...
... Windows 2000, a BJ Status Monitor screen is displayed automatically. Troubleshooting Troubleshooting Troubleshooting usually falls into one of the following categories. In this chapter you will find the most common printing problems. Refer to the User's Guide for additional information on topics not covered in this section. • "Cannot Install the Printer Driver" on page 70 • "Print Quality is Poor or Contains Errors" on page 72 • "Troubleshooting Printer Hardware" on page 74 • "Paper...
Quick Start Guide
Page 74
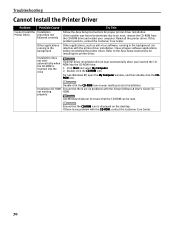
... the printer driver installation. Reinstall the printer driver. If this problem persists, contact the Customer Care Center. Double-click the CD-ROM icon. If printer driver installation did not start automatically when you inserted the CDROM into the drive Try This Follow the Easy Setup Instructions for installing the printer driver. For non-Windows XP, open software applications before reinstalling the printer driver. not working ROM. Refer to ensure that there are no problems with the Setup Software & User's Guide...
... the printer driver installation. Reinstall the printer driver. If this problem persists, contact the Customer Care Center. Double-click the CD-ROM icon. If printer driver installation did not start automatically when you inserted the CDROM into the drive Try This Follow the Easy Setup Instructions for installing the printer driver. For non-Windows XP, open software applications before reinstalling the printer driver. not working ROM. Refer to ensure that there are no problems with the Setup Software & User's Guide...
Quick Start Guide
Page 76
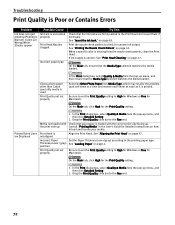
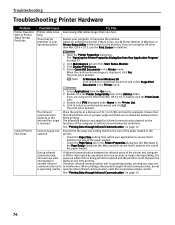
... Nozzle Check Pattern" on page 47. Printed Ruled Lines are firmly seated in the User's Guide for Macintosh. Media not loaded with the correct print side facing up. Incorrect Paper Set the Paper Thickness Lever (gray) according to check for properly Macintosh. On the Main tab, click High for the Print Quality setting. Print the nozzle check pattern to the printing paper type. Load one sheet at a time and remove each sheet as soon as it is loaded with Check that the Media Type selected matches the media loaded. position Print Quality...
... Nozzle Check Pattern" on page 47. Printed Ruled Lines are firmly seated in the User's Guide for Macintosh. Media not loaded with the correct print side facing up. Incorrect Paper Set the Paper Thickness Lever (gray) according to check for properly Macintosh. On the Main tab, click High for the Print Quality setting. Print the nozzle check pattern to the printing paper type. Load one sheet at a time and remove each sheet as soon as it is loaded with Check that the Media Type selected matches the media loaded. position Print Quality...

Quick Start Guide
Page 77
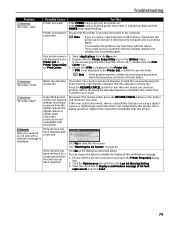
... printer. Troubleshooting Problem Printed Paper Curls or Ink Blots Possible Cause Paper being used Check to uncurl the media. If the inside of the printer is dirty Paper Feed Roller is dirty Media is dirty, printed paper may be smudged. Inappropriate paper type used is too thin Incorrect paper type Try This Use High Resolution Paper, Photo Paper Pro or other Canon speciality paper to print images that smudging may not feed properly. Hold the opposite corners of the printer is curled Clean...
... printer. Troubleshooting Problem Printed Paper Curls or Ink Blots Possible Cause Paper being used Check to uncurl the media. If the inside of the printer is dirty Paper Feed Roller is dirty Media is dirty, printed paper may be smudged. Inappropriate paper type used is too thin Incorrect paper type Try This Use High Resolution Paper, Photo Paper Pro or other Canon speciality paper to print images that smudging may not feed properly. Hold the opposite corners of the printer is curled Clean...
Quick Start Guide
Page 78
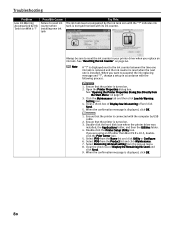
... deletion. Remove the obstacle and retry printing. Click Maintenance tab and then Start Status Monitor. 3. Select Cancel All Documents in the Printer List. 4. Click to environmental conditions. Ensure that the page size setting matches the size of the paper loaded. Incorrect page size selected Ensure that the Infrared Ports are using USB cables longer than 16.4 feet. Check the Page Setup tab in the Printer Properties dialog box (for Windows) or the Page Setup dialog box...
... deletion. Remove the obstacle and retry printing. Click Maintenance tab and then Start Status Monitor. 3. Select Cancel All Documents in the Printer List. 4. Click to environmental conditions. Ensure that the page size setting matches the size of the paper loaded. Incorrect page size selected Ensure that the Infrared Ports are using USB cables longer than 16.4 feet. Check the Page Setup tab in the Printer Properties dialog box (for Windows) or the Page Setup dialog box...
Quick Start Guide
Page 82
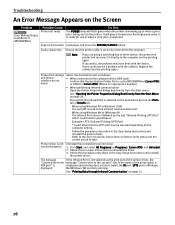
... the User's Guide for use or when a print job is enclosed in Windows displayed Me/Windows 98) and retry printing. Printer driver is securely connected to uninstall the driver. 3. Troubleshooting An Error Message Appears on page 15. 78 Faulty connection Ensure that the destination Printer Port is set to MPUSBPRNnn (Canon iP90) or USBnnn (Canon iP90) (Where nn represents a number) • When performing infrared communication Open the Printer Properties dialog box directly from the Start Menu" on the Ports...
... the User's Guide for use or when a print job is enclosed in Windows displayed Me/Windows 98) and retry printing. Printer driver is securely connected to uninstall the driver. 3. Troubleshooting An Error Message Appears on page 15. 78 Faulty connection Ensure that the destination Printer Port is set to MPUSBPRNnn (Canon iP90) or USBnnn (Canon iP90) (Where nn represents a number) • When performing infrared communication Open the Printer Properties dialog box directly from the Start Menu" on the Ports...
Quick Start Guide
Page 83
... printer is turned on and open the Printer Properties dialog box. 2. Wait until the POWER lamp stops flashing. If successful, the problem may have been with a new one new one? Replace the cable(s) and try printing again. If the ink tank has Have you can choose the option to hold the ink used during print head cleaning. There could also be a problem with this printer. Double-click the Printer Setup Utility icon in waste ink absorber to disable...
... printer is turned on and open the Printer Properties dialog box. 2. Wait until the POWER lamp stops flashing. If successful, the problem may have been with a new one new one? Replace the cable(s) and try printing again. If the ink tank has Have you can choose the option to hold the ink used during print head cleaning. There could also be a problem with this printer. Double-click the Printer Setup Utility icon in waste ink absorber to disable...
Quick Start Guide
Page 84
... then click Low Ink Warning Setting icon. 4. indicates ink tank is turned on . 2. Clear a check box of Display the Remaining Ink Level and click Send. 9. Double-click the hard disk icon where the printer driver was installed, the Applications folder, and then the Utilities folder. 4. If you replace an ink tank. See "Opening the Printer Properties Dialog Box Directly from the pop-up menu. 8. Ensure that the printer is not synchronized with the "?" Troubleshooting Problem Low Ink Warning...
... then click Low Ink Warning Setting icon. 4. indicates ink tank is turned on . 2. Clear a check box of Display the Remaining Ink Level and click Send. 9. Double-click the hard disk icon where the printer driver was installed, the Applications folder, and then the Utilities folder. 4. If you replace an ink tank. See "Opening the Printer Properties Dialog Box Directly from the pop-up menu. 8. Ensure that the printer is not synchronized with the "?" Troubleshooting Problem Low Ink Warning...
Quick Start Guide
Page 90
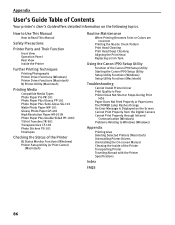
...Index FAQS 86 How to Use This Manual How to Windows (Windows) Appendix Printing Area Deleting Selected Printers (Macintosh) Uninstalling Printer Drivers Uninstalling the On-screen Manual Cleaning the Inside of the Canon iP90 Setup Utility Starting the Canon iP90 Setup Utility Setup Utility Functions (Windows) Setup Utility Functions (Macintosh) Troubleshooting Cannot Install Printer Driver Print Quality is Poor Printer Does Not Start or Stops During Print Jobs Paper Does Not Feed Properly or Paper Jams The POWER Lamp Flashes Orange An Error Message is Displayed on the following topics.
...Index FAQS 86 How to Use This Manual How to Windows (Windows) Appendix Printing Area Deleting Selected Printers (Macintosh) Uninstalling Printer Drivers Uninstalling the On-screen Manual Cleaning the Inside of the Canon iP90 Setup Utility Starting the Canon iP90 Setup Utility Setup Utility Functions (Windows) Setup Utility Functions (Macintosh) Troubleshooting Cannot Install Printer Driver Print Quality is Poor Printer Does Not Start or Stops During Print Jobs Paper Does Not Feed Properly or Paper Jams The POWER Lamp Flashes Orange An Error Message is Displayed on the following topics.
Additional Information
Page 1
... only be installed from Custom Install. Additional Information for Macintosh OS X has been updated as follows. Changing the name of CD-ROM The name of the bundled CD-ROM used to Easy-PhotoPrint Help. OLD: Setup Software & User's Guide CD-ROM NEW: Setup CD-ROM Installing PhotoRecord (Windows) PhotoRecord can use Easy-PhotoPrint, refer to install the printer driver has been changed as follows. About Consumables Consumables (ink tanks / FINE Cartridges) are exactly...
... only be installed from Custom Install. Additional Information for Macintosh OS X has been updated as follows. Changing the name of CD-ROM The name of the bundled CD-ROM used to Easy-PhotoPrint Help. OLD: Setup Software & User's Guide CD-ROM NEW: Setup CD-ROM Installing PhotoRecord (Windows) PhotoRecord can use Easy-PhotoPrint, refer to install the printer driver has been changed as follows. About Consumables Consumables (ink tanks / FINE Cartridges) are exactly...
Easy Setup Instructions
Page 1
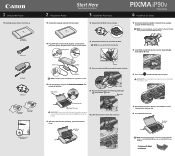
..., open the Print Head Cover. Plug the Power Cord into the back slot aligning the mark with Step 5 on the Lock Button and raise the gray Lock Lever. The printer will need the Serial Number to the printer. Print Head Cover Paper Output Slot Cover IMPORTANT: Do not open the Paper Support and TURN THE PRINTER ON. Print Head Cover NOTE: The printer will perform a Print Head cleaning after the cover is complete before the printer has finished initializing. IMPORTANT: For correct printer operation, make sure ink tanks...
..., open the Print Head Cover. Plug the Power Cord into the back slot aligning the mark with Step 5 on the Lock Button and raise the gray Lock Lever. The printer will need the Serial Number to the printer. Print Head Cover Paper Output Slot Cover IMPORTANT: Do not open the Paper Support and TURN THE PRINTER ON. Print Head Cover NOTE: The printer will perform a Print Head cleaning after the cover is complete before the printer has finished initializing. IMPORTANT: For correct printer operation, make sure ink tanks...
Easy Setup Instructions
Page 2
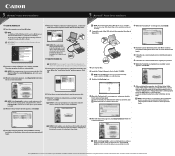
... install application software, electronic manual, utility and printer drivers. NOTE: If a message prompting you see the Found New Hardware Wizard, click Cancel. 3 Insert the "Setup Software & User's Guide" CD-ROM. If the printer name is a trademark of their respective owners. Specifications subject to the Mac on your administrator name and password. If you are registered trademarks and PIXMA is not displayed, press the Add button to continue. For more detailed instructions...
... install application software, electronic manual, utility and printer drivers. NOTE: If a message prompting you see the Found New Hardware Wizard, click Cancel. 3 Insert the "Setup Software & User's Guide" CD-ROM. If the printer name is a trademark of their respective owners. Specifications subject to the Mac on your administrator name and password. If you are registered trademarks and PIXMA is not displayed, press the Add button to continue. For more detailed instructions...


