
Quick Start Guide
Page 35
...CLI-8C Magenta: CLI-8M PhotoCyan: CLI-8PC Yellow: CLI-8Y Be sure to "Replacing an Ink Tank" in the head cleaning and deep cleaning, which are necessary to dry out and the printer may occur even when black-and-white or grayscale printing is reinstalled. Should missing characters or... streaks appear despite sufficient ink levels, see "When Printing Becomes Faint or Colors are Incorrect" on page 32. Once an ink tank has been used, do not remove it out in the correct order. When you start printing after replacing the ink tank, the printer executes Print Head Cleaning automatically.
...CLI-8C Magenta: CLI-8M PhotoCyan: CLI-8PC Yellow: CLI-8Y Be sure to "Replacing an Ink Tank" in the head cleaning and deep cleaning, which are necessary to dry out and the printer may occur even when black-and-white or grayscale printing is reinstalled. Should missing characters or... streaks appear despite sufficient ink levels, see "When Printing Becomes Faint or Colors are Incorrect" on page 32. Once an ink tank has been used, do not remove it out in the correct order. When you start printing after replacing the ink tank, the printer executes Print Head Cleaning automatically.

Quick Start Guide
Page 36
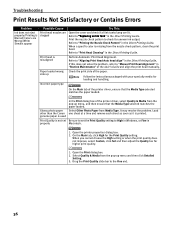
... are shifted Step 1 Refer to clean the nozzles. Replace the ink tank. Make sure that all packaging material is empty or running the print head maintenance, align the print head. Open the cover and make sure that the correct ink tank color is inserted in the Direct Printing Guide. Refer to ..."Print Head Cleaning" in the wrong position. See "Print Results Not Satisfactory or Contains Errors" on the ink tank to fully insert it is inserted in the printer ...
... are shifted Step 1 Refer to clean the nozzles. Replace the ink tank. Make sure that all packaging material is empty or running the print head maintenance, align the print head. Open the cover and make sure that the correct ink tank color is inserted in the Direct Printing Guide. Refer to ..."Print Head Cleaning" in the wrong position. See "Print Results Not Satisfactory or Contains Errors" on the ink tank to fully insert it is inserted in the printer ...
Quick Start Guide
Page 40
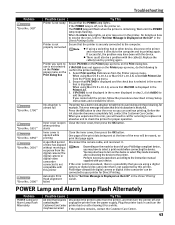
... Guide. Incorrect paper type On the Main tab of the printer driver, select Quality & Media from the pop-up menu,...Glossy photo paper other than the Canon genuine paper is not set Be sure to set the Print Quality setting to "Print Head Cleaning" in properly Macintosh. ...Quality & Media from Media Type. When a specific color is Blurred/Colors are Wrong/White Streaks appear Print head nozzles are clogged Open the cover and check if ...pattern to the Fine end. 36 Print head is printed. If this does not solve the problem, refer to "Replacing an Ink Tank" in "Routine Maintenance" ...
... Guide. Incorrect paper type On the Main tab of the printer driver, select Quality & Media from the pop-up menu,...Glossy photo paper other than the Canon genuine paper is not set Be sure to set the Print Quality setting to "Print Head Cleaning" in properly Macintosh. ...Quality & Media from Media Type. When a specific color is Blurred/Colors are Wrong/White Streaks appear Print head nozzles are clogged Open the cover and check if ...pattern to the Fine end. 36 Print head is printed. If this does not solve the problem, refer to "Replacing an Ink Tank" in "Routine Maintenance" ...
Quick Start Guide
Page 47
...head cleaning, for example. If using Mac OS X v.10.2.8, ensure that the printer is displayed. Select iP6700D on the Printer pop-up menu on the Printer pop-up menu, do the following to confirm the printer settings: 1. Depending on the model or brand of your printer for servicing to replace...the problem remains, contact the Customer Care Center. 43 For details on after connecting the device to add the printer. Ensure that iP6700D is nearly full. Replace the cable(s) and try printing again. When using a digital camera or digital video camcorder that is securely ...
...head cleaning, for example. If using Mac OS X v.10.2.8, ensure that the printer is displayed. Select iP6700D on the Printer pop-up menu on the Printer pop-up menu, do the following to confirm the printer settings: 1. Depending on the model or brand of your printer for servicing to replace...the problem remains, contact the Customer Care Center. 43 For details on after connecting the device to add the printer. Ensure that iP6700D is nearly full. Replace the cable(s) and try printing again. When using a digital camera or digital video camcorder that is securely ...
Quick Start Guide
Page 57
...dialog box 21, 25 Print Head Cleaning 32 Print Head Deep Cleaning 32 Print Media to PC Properly 35 Cannot Install the Printer Driver 34 Canon IJ Status Monitor (Windows 40 CANON U.S.A., INC. Index A Accessing the Printer Driver 29 Aligning the Print Head 32 An Error Message is ...Results Not Satisfactory or Contains Errors .......... 36 Printer Driver Setting for Media Type 19 Printer Properties dialog box 21, 29 Printing the Nozzle Check Pattern 32 Printing with Macintosh 24 Printing with Windows 20 R Regulatory Information 50 Replacing an Ink Tank 31 S Safety Precautions 48...
...dialog box 21, 25 Print Head Cleaning 32 Print Head Deep Cleaning 32 Print Media to PC Properly 35 Cannot Install the Printer Driver 34 Canon IJ Status Monitor (Windows 40 CANON U.S.A., INC. Index A Accessing the Printer Driver 29 Aligning the Print Head 32 An Error Message is ...Results Not Satisfactory or Contains Errors .......... 36 Printer Driver Setting for Media Type 19 Printer Properties dialog box 21, 29 Printing the Nozzle Check Pattern 32 Printing with Macintosh 24 Printing with Windows 20 R Regulatory Information 50 Replacing an Ink Tank 31 S Safety Precautions 48...
Direct Printing Guide
Page 51
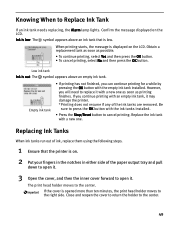
... When ink tanks run out of ink, replace them using the following steps. 1 Ensure that is out: The symbol appears above an ink tank that the printer is on. 2 Put your fingers in the notches in either side of the ink tanks are removed. The print head holder moves to the center. 49... printing finishes. However, you continue printing with a new one . Knowing When to the right side. If you will need to replace it with an empty ink tank, it may damage the printer. *Printing does not resume if any of the paper output tray and pull down to open it . 3 Open the cover...
... When ink tanks run out of ink, replace them using the following steps. 1 Ensure that is out: The symbol appears above an ink tank that the printer is on. 2 Put your fingers in the notches in either side of the ink tanks are removed. The print head holder moves to the center. 49... printing finishes. However, you continue printing with a new one . Knowing When to the right side. If you will need to replace it with an empty ink tank, it may damage the printer. *Printing does not resume if any of the paper output tray and pull down to open it . 3 Open the cover...
Direct Printing Guide
Page 52
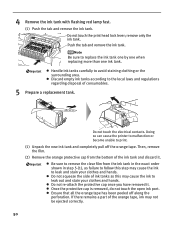
... protective cap is removed, do not touch the open ink port. Prepare a replacement tank. Do not touch the electrical contacts. Doing so can cause the printer to malfunction or become unable to replace the ink tank one by one when replacing more than one ink tank. If there remains a part of the ink tank.... (1) Push the tab and remove the ink tank. Do not re-attach the protective cap once you have removed it . Do not touch the print head lock lever; Push the tab and remove the ink tank. Be sure to remove the clear film from the bottom of the orange tape, ink...
... protective cap is removed, do not touch the open ink port. Prepare a replacement tank. Do not touch the electrical contacts. Doing so can cause the printer to malfunction or become unable to replace the ink tank one by one when replacing more than one ink tank. If there remains a part of the ink tank.... (1) Push the tab and remove the ink tank. Do not re-attach the protective cap once you have removed it . Do not touch the print head lock lever; Push the tab and remove the ink tank. Be sure to remove the clear film from the bottom of the orange tape, ink...

Direct Printing Guide
Page 53
... the label. Color ink is specified. The ink tank installation process is not installed properly. Open the cover and make sure that the ink tanks are necessary to the right. The print head holder moves to maintain the printer. The Alarm lamp still lights after replacing the ink tank, the printer executes print head cleaning automatically...
... the label. Color ink is specified. The ink tank installation process is not installed properly. Open the cover and make sure that the ink tanks are necessary to the right. The print head holder moves to maintain the printer. The Alarm lamp still lights after replacing the ink tank, the printer executes print head cleaning automatically...
Direct Printing Guide
Page 55
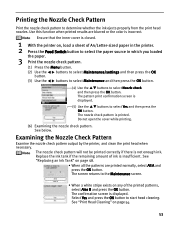
...check pattern. The pattern print confirmation screen is incorrect. See below. See "Replacing an Ink Tank" on page 54. 53 See "Print Head Cleaning" on page 48. • When all the patterns are blurred or the color is displayed. (5) Use the buttons to select the paper source in which...to select Yes and then press the OK button. Examining the Nozzle Check Pattern Examine the nozzle check pattern output by the printer, and clean the print head when necessary. Printing the Nozzle Check Pattern Print the nozzle check pattern to the Maintenance screen. • When a white ...
...check pattern. The pattern print confirmation screen is incorrect. See below. See "Replacing an Ink Tank" on page 54. 53 See "Print Head Cleaning" on page 48. • When all the patterns are blurred or the color is displayed. (5) Use the buttons to select the paper source in which...to select Yes and then press the OK button. Examining the Nozzle Check Pattern Examine the nozzle check pattern output by the printer, and clean the print head when necessary. Printing the Nozzle Check Pattern Print the nozzle check pattern to the Maintenance screen. • When a white ...

Direct Printing Guide
Page 56
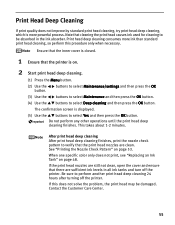
...the print quality remains poor, repeat print head cleaning twice. Note that cleaning the print head causes ink used for cleaning to verify that the printer is not printed correctly. See "Print Head Deep Cleaning" on page 53. Print Head Cleaning Clean the print head if missing lines or white stripes appear... seconds. Ensure that the inner cover is closed. 1 Ensure that the print head nozzles are clean. When ink is low, the nozzle check pattern is on page 48. See "Replacing an Ink Tank" on . 2 Start print head cleaning. (1) Press the Menu button. (2) Use the button. If the print...
...the print quality remains poor, repeat print head cleaning twice. Note that cleaning the print head causes ink used for cleaning to verify that the printer is not printed correctly. See "Print Head Deep Cleaning" on page 53. Print Head Cleaning Clean the print head if missing lines or white stripes appear... seconds. Ensure that the inner cover is closed. 1 Ensure that the print head nozzles are clean. When ink is low, the nozzle check pattern is on page 48. See "Replacing an Ink Tank" on . 2 Start print head cleaning. (1) Press the Menu button. (2) Use the button. If the print...
Direct Printing Guide
Page 57
... print head deep cleaning 24 hours after turning off the printer. If the print head nozzles are clean. If this procedure only when necessary. Do not perform any other operations until the print head deep cleaning finishes. When one specific color only does not print, see "Replacing an Ink...to be damaged. See "Printing the Nozzle Check Pattern" on page 48. After print head deep cleaning After print head deep cleaning finishes, print the nozzle check pattern to verify that the printer is displayed. (5) Use the buttons to select Deep cleaning and then press the OK button...
... print head deep cleaning 24 hours after turning off the printer. If the print head nozzles are clean. If this procedure only when necessary. Do not perform any other operations until the print head deep cleaning finishes. When one specific color only does not print, see "Replacing an Ink...to be damaged. See "Printing the Nozzle Check Pattern" on page 48. After print head deep cleaning After print head deep cleaning finishes, print the nozzle check pattern to verify that the printer is displayed. (5) Use the buttons to select Deep cleaning and then press the OK button...
Direct Printing Guide
Page 60
...in the appropriate positions. Message Print head is already installed, remove the print head and reinstall it. Install the print head./ The type of the following color is loaded. U072/ More than one ink tank of the printer.) Canon recommends that Canon shall not be correctly detected. Remove ... load A4/Letter-sized plain paper in this error occurs. U130 Try This Install the print head. You may damage the printer. The remaining level of print head is replaced. Once the ink absorber becomes completely full, printing cannot be correctly detected. Disconnect the camera...
...in the appropriate positions. Message Print head is already installed, remove the print head and reinstall it. Install the print head./ The type of the following color is loaded. U072/ More than one ink tank of the printer.) Canon recommends that Canon shall not be correctly detected. Remove ... load A4/Letter-sized plain paper in this error occurs. U130 Try This Install the print head. You may damage the printer. The remaining level of print head is replaced. Once the ink absorber becomes completely full, printing cannot be correctly detected. Disconnect the camera...

Direct Printing Guide
Page 61
...plain paper in the auto sheet feeder or cassette. 2. Install the appropriate ink tank. See "Replacing an Ink Tank" on page 48. is off ). See "Replacing an Ink Tank" on page 48. Plug the printer back in which you wish to select the number with fewest white stripes using the buttons. ...10. Adjusting the Print Head Manually If the automatic print head adjustment does not work or if you loaded paper...
...plain paper in the auto sheet feeder or cassette. 2. Install the appropriate ink tank. See "Replacing an Ink Tank" on page 48. is off ). See "Replacing an Ink Tank" on page 48. Plug the printer back in which you wish to select the number with fewest white stripes using the buttons. ...10. Adjusting the Print Head Manually If the automatic print head adjustment does not work or if you loaded paper...
Direct Printing Guide
Page 63
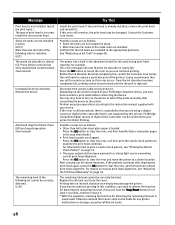
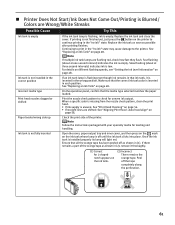
...the operation panel, confirm that the correct ink tank color is inserted in each position. When a specific color is missing from the nozzle check pattern, clean the print head. • If ink supply is low. If there remains a part of the printer. Slow flashing (about at three second intervals) indicates ... Head Cleaning" on the ink tank whose lamp is empty. Printer Does Not Start/Ink Does Not Come Out/Printing is Blurred/ Colors are Wrong/White Streaks Possible Cause Try This Ink tank is empty If the ink tank lamp is flashing, ink is inserted in the wrong position. Replace ...
...the operation panel, confirm that the correct ink tank color is inserted in each position. When a specific color is missing from the nozzle check pattern, clean the print head. • If ink supply is low. If there remains a part of the printer. Slow flashing (about at three second intervals) indicates ... Head Cleaning" on the ink tank whose lamp is empty. Printer Does Not Start/Ink Does Not Come Out/Printing is Blurred/ Colors are Wrong/White Streaks Possible Cause Try This Ink tank is empty If the ink tank lamp is flashing, ink is inserted in the wrong position. Replace ...

Direct Printing Guide
Page 70
... your camera. If the inner cover is open it to the Easy Setup Instructions. Prepare a new ink tank. Close the cover on Canon-brand PictBridgecompatible cameras. Select Continue*1 in the display on your camera. Load paper in either the auto sheet feeder or cassette which you.... Select Stop in the display on your camera to replace a particular part of the printer.) Slow flashing (at about three second interval in red) of the printer, and then clear it . If the error still remains, the print head may occur when printing directly from the camera after completing...
... your camera. If the inner cover is open it to the Easy Setup Instructions. Prepare a new ink tank. Close the cover on Canon-brand PictBridgecompatible cameras. Select Continue*1 in the display on your camera. Load paper in either the auto sheet feeder or cassette which you.... Select Stop in the display on your camera to replace a particular part of the printer.) Slow flashing (at about three second interval in red) of the printer, and then clear it . If the error still remains, the print head may occur when printing directly from the camera after completing...


