
iP6000D Diect Print Guide
Page 3
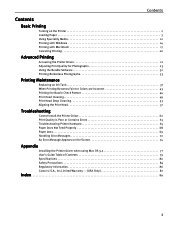
Auto head align 75 Troubleshooting A Message is Displayed on the LCD 77 Index 86 2 Contents Replacing an Ink Tank Knowing When to Replace Ink Tank 66 Replacing Ink Tanks 67 Printing Maintenance When Printing Becomes Faint or Colors are Incorrect 70 Printing the Nozzle Check Pattern 71 Examining the Nozzle Check Pattern 72 Print Head Cleaning 73 Print Head Deep Cleaning 74 Aligning Print Head -
Auto head align 75 Troubleshooting A Message is Displayed on the LCD 77 Index 86 2 Contents Replacing an Ink Tank Knowing When to Replace Ink Tank 66 Replacing Ink Tanks 67 Printing Maintenance When Printing Becomes Faint or Colors are Incorrect 70 Printing the Nozzle Check Pattern 71 Examining the Nozzle Check Pattern 72 Print Head Cleaning 73 Print Head Deep Cleaning 74 Aligning Print Head -
iP6000D Diect Print Guide
Page 7
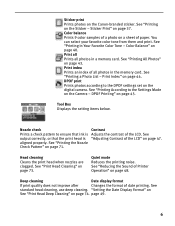
... Printing" on page 73. See "Print Head Cleaning" on page 45. See "Printing on the Canon-branded sticker. See "Printing in a memory card. Print index Prints an index of the LCD" on page 47. Nozzle check Prints a check pattern to the Settings Made on page 71. Deep cleaning Date display format If print quality does not improve after Changes the format of Printer...
... Printing" on page 73. See "Print Head Cleaning" on page 45. See "Printing on the Canon-branded sticker. See "Printing in a memory card. Print index Prints an index of the LCD" on page 47. Nozzle check Prints a check pattern to the Settings Made on page 71. Deep cleaning Date display format If print quality does not improve after Changes the format of Printer...

iP6000D Diect Print Guide
Page 70
... of first use. The ink tank installation process is open . When you start printing after replacing the ink tank, the printer executes print head cleaning automatically. Ensure that the inner cover is specified. Do not perform any other functions until the print head cleaning finishes. Color ink consumption may not function. Once an ink tank has been used, do...
... of first use. The ink tank installation process is open . When you start printing after replacing the ink tank, the printer executes print head cleaning automatically. Ensure that the inner cover is specified. Do not perform any other functions until the print head cleaning finishes. Color ink consumption may not function. Once an ink tank has been used, do...
iP6000D Diect Print Guide
Page 71
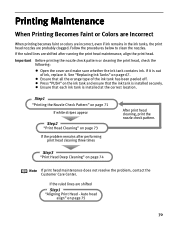
... the ink tank has been peeled off. Step3 "Print Head Deep Cleaning" on page 75 70 If the ruled lines are probably clogged. If the ruled lines are shifted after performing print head cleaning three times After print head cleaning, print the nozzle check pattern. Important Before printing the nozzle check pattern or cleaning the print head, check the following: Open the cover and...
... the ink tank has been peeled off. Step3 "Print Head Deep Cleaning" on page 75 70 If the ruled lines are probably clogged. If the ruled lines are shifted after performing print head cleaning three times After print head cleaning, print the nozzle check pattern. Important Before printing the nozzle check pattern or cleaning the print head, check the following: Open the cover and...

iP6000D Diect Print Guide
Page 73
...printer. (1) (1) Examining the nozzle check pattern. The Pattern Check screen appears on the LCD after printing the nozzle check pattern. (2) Use the buttons to select the pattern more similar to the Tool Box screen. The Head Cleaning screen is discharged properly. See "Print Head Cleaning" on any of the printed... patterns, select Also B and press the OK button. Select Yes and press the OK button to start Head Cleaning. When a white stripe exists on page ...
...printer. (1) (1) Examining the nozzle check pattern. The Pattern Check screen appears on the LCD after printing the nozzle check pattern. (2) Use the buttons to select the pattern more similar to the Tool Box screen. The Head Cleaning screen is discharged properly. See "Print Head Cleaning" on any of the printed... patterns, select Also B and press the OK button. Select Yes and press the OK button to start Head Cleaning. When a white stripe exists on page ...
iP6000D Diect Print Guide
Page 74
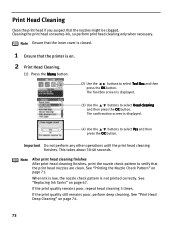
Print Head Cleaning Clean the print head if you suspect that the printer is on. 2 Print Head Cleaning. (1) Press the Menu button. (2) Use the buttons to select Tool Box and then press the OK button. The Tool Box screen is not printed correctly. Important Do not perform any other operations until the print head cleaning.... (4) Use the buttons to verify that the print head nozzles are clean. See "Printing the Nozzle Check Pattern" on page 74. 73 Note After print head cleaning finishes After print head cleaning finishes, print the nozzle check pattern to select Yes and then...
Print Head Cleaning Clean the print head if you suspect that the printer is on. 2 Print Head Cleaning. (1) Press the Menu button. (2) Use the buttons to select Tool Box and then press the OK button. The Tool Box screen is not printed correctly. Important Do not perform any other operations until the print head cleaning.... (4) Use the buttons to verify that the print head nozzles are clean. See "Printing the Nozzle Check Pattern" on page 74. 73 Note After print head cleaning finishes After print head cleaning finishes, print the nozzle check pattern to select Yes and then...
iP6000D Diect Print Guide
Page 75
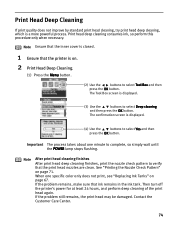
...Contact the Customer Care Center. 74 Note After print head cleaning finishes After print head deep cleaning finishes, print the nozzle check pattern to verify that the printer is closed. 1 Ensure that the print head nozzles are clean. When one minute to select Tool Box and... still remains, the print head may be damaged. Important The process takes about one specific color only does not print, see "Replacing Ink Tanks" on page 71. Print Head Deep Cleaning If print quality does not improve by standard print head cleaning, try print head deep cleaning, which is displayed....
...Contact the Customer Care Center. 74 Note After print head cleaning finishes After print head deep cleaning finishes, print the nozzle check pattern to verify that the printer is closed. 1 Ensure that the print head nozzles are clean. When one minute to select Tool Box and... still remains, the print head may be damaged. Important The process takes about one specific color only does not print, see "Replacing Ink Tanks" on page 71. Print Head Deep Cleaning If print quality does not improve by standard print head cleaning, try print head deep cleaning, which is displayed....
iP6000D Diect Print Guide
Page 80
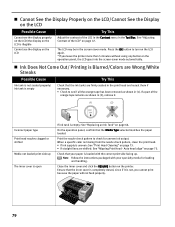
... the printer. Close the inner cover and click the RESUME button on page 75. See "Adjusting Contrast of the LCD in the Contrast menu in the Tool Box. Incorrect paper type Print head nozzles clogged or shifted Media not loaded print-side up . When a specific color is missing from the nozzle check pattern, clean the print head. •...
... the printer. Close the inner cover and click the RESUME button on page 75. See "Adjusting Contrast of the LCD in the Contrast menu in the Tool Box. Incorrect paper type Print head nozzles clogged or shifted Media not loaded print-side up . When a specific color is missing from the nozzle check pattern, clean the print head. •...
iP6000D Diect Print Guide
Page 85
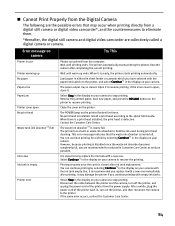
.... This error message indicates that may damage the printer if you replace it to hold the ink used during print head cleaning. It may occur when printing directly from the camera after completing the current printing. Error message on camera Printer in the display on your camera to stop printing. Wait until warm-up No paper Paper error...
.... This error message indicates that may damage the printer if you replace it to hold the ink used during print head cleaning. It may occur when printing directly from the camera after completing the current printing. Error message on camera Printer in the display on your camera to stop printing. Wait until warm-up No paper Paper error...
iP6000D Quick Start Guide
Page 3
... Canceling Printing 20 Advanced Printing Accessing the Printer Driver 21 Adjusting Print Quality for Photographs 23 Using the Bundle Software 32 Printing Borderless Photographs 33 Printing Maintenance Replacing an Ink Tank 37 When Printing Becomes Faint or Colors are Incorrect 43 Printing the Nozzle Check Pattern 44 Print Head Cleaning 49 Print Head Deep Cleaning 53 Aligning the Print Head 57 Troubleshooting Cannot Install the Printer Driver 62 Print...
... Canceling Printing 20 Advanced Printing Accessing the Printer Driver 21 Adjusting Print Quality for Photographs 23 Using the Bundle Software 32 Printing Borderless Photographs 33 Printing Maintenance Replacing an Ink Tank 37 When Printing Becomes Faint or Colors are Incorrect 43 Printing the Nozzle Check Pattern 44 Print Head Cleaning 49 Print Head Deep Cleaning 53 Aligning the Print Head 57 Troubleshooting Cannot Install the Printer Driver 62 Print...
iP6000D Quick Start Guide
Page 23
... the Canon PIXMA iP6000D is used for your application. 1 In your application program, the command and menu names may differ, and there may vary depending on your application, select the command to Windows XP operation. The operations may be more details, see the user's manual for maintenance operations such as print head cleaning, or to specify printer...
... the Canon PIXMA iP6000D is used for your application. 1 In your application program, the command and menu names may differ, and there may vary depending on your application, select the command to Windows XP operation. The operations may be more details, see the user's manual for maintenance operations such as print head cleaning, or to specify printer...
iP6000D Quick Start Guide
Page 44
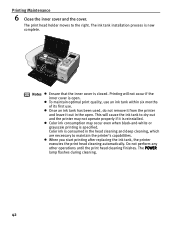
... not operate properly if it out in the head cleaning and deep cleaning, which are necessary to maintain the printer's capabilities. When you start printing after replacing the ink tank, the printer executes the print head cleaning automatically. Notes Ensure that the inner cover is consumed in the open . Color ink is closed. Printing will cause the ink tank to the...
... not operate properly if it out in the head cleaning and deep cleaning, which are necessary to maintain the printer's capabilities. When you start printing after replacing the ink tank, the printer executes the print head cleaning automatically. Notes Ensure that the inner cover is consumed in the open . Color ink is closed. Printing will cause the ink tank to the...
iP6000D Quick Start Guide
Page 45
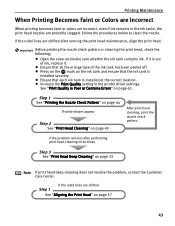
... 2 See "Print Head Cleaning" on page 53 Note If print head deep cleaning does not resolve the problem, contact the Customer Care Center. Follow the procedures below to clean the nozzle. If it . See "Print Quality is out of the ink tank has been peeled off. Printing Maintenance When Printing Becomes Faint or Colors are Incorrect When printing becomes faint or colors are...
... 2 See "Print Head Cleaning" on page 53 Note If print head deep cleaning does not resolve the problem, contact the Customer Care Center. Follow the procedures below to clean the nozzle. If it . See "Print Quality is out of the ink tank has been peeled off. Printing Maintenance When Printing Becomes Faint or Colors are Incorrect When printing becomes faint or colors are...
iP6000D Quick Start Guide
Page 47
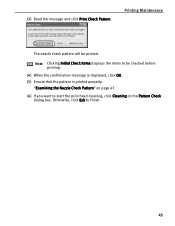
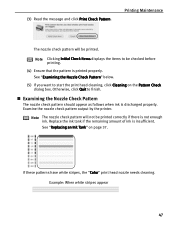
"Examining the Nozzle Check Pattern" on the Pattern Check dialog box. Note Clicking Initial Check Items displays the items to start the print head cleaning, click Cleaning on page 47. (6) If you want to be printed. Otherwise, click Exit to finish. 45 Printing Maintenance The nozzle check pattern will be checked before printing. (4) When the confirmation message is displayed, click OK. (5) Ensure that the pattern is printed properly. (3) Read the message and click Print Check Pattern.
"Examining the Nozzle Check Pattern" on the Pattern Check dialog box. Note Clicking Initial Check Items displays the items to start the print head cleaning, click Cleaning on page 47. (6) If you want to be printed. Otherwise, click Exit to finish. 45 Printing Maintenance The nozzle check pattern will be checked before printing. (4) When the confirmation message is displayed, click OK. (5) Ensure that the pattern is printed properly. (3) Read the message and click Print Check Pattern.
iP6000D Quick Start Guide
Page 49
... the nozzle check pattern output by the printer. See "Replacing an Ink Tank" on the Pattern Check dialog box. Note Clicking Initial Check Items displays the items to finish. If these patterns have white stripes, the "Color" print head nozzle needs cleaning. (3) Read the message and click Print Check Pattern. Printing Maintenance The nozzle check pattern will...
... the nozzle check pattern output by the printer. See "Replacing an Ink Tank" on the Pattern Check dialog box. Note Clicking Initial Check Items displays the items to finish. If these patterns have white stripes, the "Color" print head nozzle needs cleaning. (3) Read the message and click Print Check Pattern. Printing Maintenance The nozzle check pattern will...
iP6000D Quick Start Guide
Page 50
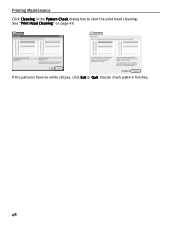
See "Print Head Cleaning" on page 49. Nozzle check pattern finishes. 48 If the patterns have no white stripes, click Exit or Quit. Printing Maintenance Click Cleaning in the Pattern Check dialog box to start the print head cleaning.
See "Print Head Cleaning" on page 49. Nozzle check pattern finishes. 48 If the patterns have no white stripes, click Exit or Quit. Printing Maintenance Click Cleaning in the Pattern Check dialog box to start the print head cleaning.
iP6000D Quick Start Guide
Page 51
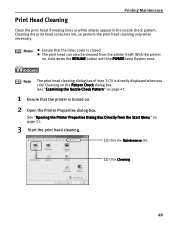
... button until the POWER lamp flashes once. Cleaning the print head consumes ink, so perform the print head cleaning only when necessary. The print head can also be cleaned from the Start Menu" on . 2 Open the Printer Properties dialog box. See "Opening the Printer Properties Dialog Box Directly from the printer itself. Print Head Cleaning Printing Maintenance Clean the print head if missing lines or white stripes appear in...
... button until the POWER lamp flashes once. Cleaning the print head consumes ink, so perform the print head cleaning only when necessary. The print head can also be cleaned from the Start Menu" on . 2 Open the Printer Properties dialog box. See "Opening the Printer Properties Dialog Box Directly from the printer itself. Print Head Cleaning Printing Maintenance Clean the print head if missing lines or white stripes appear in...
iP6000D Quick Start Guide
Page 52
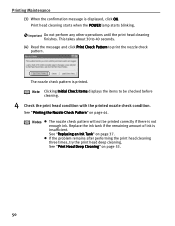
... Check Pattern" on page 53. 50 The nozzle check pattern is insufficient. Printing Maintenance (3) When the confirmation message is not enough ink. See "Print Head Deep Cleaning" on page 44. . If the problem remains after performing the print head cleaning three times, try the print head deep cleaning. This takes about 30 to 40 seconds. (4) Read the message and click...
... Check Pattern" on page 53. 50 The nozzle check pattern is insufficient. Printing Maintenance (3) When the confirmation message is not enough ink. See "Print Head Deep Cleaning" on page 44. . If the problem remains after performing the print head cleaning three times, try the print head deep cleaning. This takes about 30 to 40 seconds. (4) Read the message and click...

iP6000D Quick Start Guide
Page 53
... list and click Maintenance. 3 Start the print head cleaning. (1) Select Cleaning from the Name list and click Utility. When using Mac OS X v.10.2.x, double-click the Print Center icon. (3) Select iP6000D from the pop-up menu. (2) Click Cleaning. 51 See "Examining the Nozzle Check Pattern" on page 47. 1 Ensure that the printer is directly displayed when you click...
... list and click Maintenance. 3 Start the print head cleaning. (1) Select Cleaning from the Name list and click Utility. When using Mac OS X v.10.2.x, double-click the Print Center icon. (3) Select iP6000D from the pop-up menu. (2) Click Cleaning. 51 See "Examining the Nozzle Check Pattern" on page 47. 1 Ensure that the printer is directly displayed when you click...

iP6000D Quick Start Guide
Page 54
... message is insufficient. This takes about 30 to 40 seconds. (4) Read the message and click Print Check Pattern to be printed correctly if there is printed. If the problem remains after performing the print head cleaning three times, try the print head deep cleaning. Replace the ink tank if the remaining amount of ink is displayed, click OK. See...
... message is insufficient. This takes about 30 to 40 seconds. (4) Read the message and click Print Check Pattern to be printed correctly if there is printed. If the problem remains after performing the print head cleaning three times, try the print head deep cleaning. Replace the ink tank if the remaining amount of ink is displayed, click OK. See...


