
User Manual
Page 4
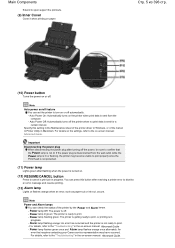
... align with both sides of the paper stack. (3) Rear Tray Load various sizes or types of paper can use on the printer. See Loading Paper. (6) Direct Print Port Connect a PictBridge compliant device such as a digital camera when printing directly. Caution Do not touch the metal casing. (7) Paper Output Tray Printed papers are ejected. Main Components Contents > Overview of the printer. Advanced Guide Troubleshooting (1) Top Cover Open it fully before printing. (8) Output Tray Extension Open it when replacing the ink tanks or removing jammed paper...
... align with both sides of the paper stack. (3) Rear Tray Load various sizes or types of paper can use on the printer. See Loading Paper. (6) Direct Print Port Connect a PictBridge compliant device such as a digital camera when printing directly. Caution Do not touch the metal casing. (7) Paper Output Tray Printed papers are ejected. Main Components Contents > Overview of the printer. Advanced Guide Troubleshooting (1) Top Cover Open it fully before printing. (8) Output Tray Extension Open it when replacing the ink tanks or removing jammed paper...
User Manual
Page 5
... alternately: An error that the Power lamp is turned on. (12) RESUME/CANCEL button Press to cancel a print job in the on or off feature You can check the status of the Canon IJ Printer Utility in Macintosh. Main Components Extend to open support the printouts. (9) Inner Cover Close it when printing on paper. Стр. 5 из 396 стр. (10) Power button Turns the power on -screen manual: Advanced Guide. -
... alternately: An error that the Power lamp is turned on. (12) RESUME/CANCEL button Press to cancel a print job in the on or off feature You can check the status of the Canon IJ Printer Utility in Macintosh. Main Components Extend to open support the printouts. (9) Inner Cover Close it when printing on paper. Стр. 5 из 396 стр. (10) Power button Turns the power on -screen manual: Advanced Guide. -

User Manual
Page 20
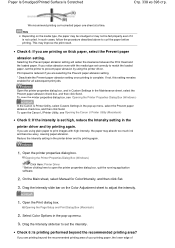
... Printing & Margin screen to display the list of paper may not have a preview function. 7. To cancel a print job in progress, select the desired job in progress, click Hold. If you select the wrong page size or media type, the printer may feed the paper from the Rear Tray. After canceling the print job, blank sheets of print jobs in your printer's name is selected in Print Quality. Note For details on -screen manual: Advanced Guide. (6) Select the print quality in Paper Source. See Aligning...
... Printing & Margin screen to display the list of paper may not have a preview function. 7. To cancel a print job in progress, select the desired job in progress, click Hold. If you select the wrong page size or media type, the printer may feed the paper from the Rear Tray. After canceling the print job, blank sheets of print jobs in your printer's name is selected in Print Quality. Note For details on -screen manual: Advanced Guide. (6) Select the print quality in Paper Source. See Aligning...

User Manual
Page 23
... instruction manual supplied with the PictBridge standard. Printable image data format: The printer prints images taken with a USB cable that is recommended by the device's manufacturer, you can be connected to the printer regardless of the manufacturer or model as long as a digital still camera, digital camcorder, or camera-equipped mobile phone. (PictBridge) A device with the PictBridge compliant device, refer to print your photos...
... instruction manual supplied with the PictBridge standard. Printable image data format: The printer prints images taken with a USB cable that is recommended by the device's manufacturer, you can be connected to the printer regardless of the manufacturer or model as long as a digital still camera, digital camcorder, or camera-equipped mobile phone. (PictBridge) A device with the PictBridge compliant device, refer to print your photos...

User Manual
Page 24
... printer or change the print settings by only clicking buttons on troubleshooting. With Solution Menu, you with the information on a screen. It also provides you can display the printer properties dialog box of the printer driver. To start Solution Menu from the Start menu, select All Programs (Programs in Custom Install. Contents > Other Usages > Solution Menu and My Printer Advanced Guide Troubleshooting Solution Menu and My Printer Using Solution Menu or My Printer (Windows only), you can start Solution Menu...
... printer or change the print settings by only clicking buttons on troubleshooting. With Solution Menu, you with the information on a screen. It also provides you can display the printer properties dialog box of the printer driver. To start Solution Menu from the Start menu, select All Programs (Programs in Custom Install. Contents > Other Usages > Solution Menu and My Printer Advanced Guide Troubleshooting Solution Menu and My Printer Using Solution Menu or My Printer (Windows only), you can start Solution Menu...
User Manual
Page 44
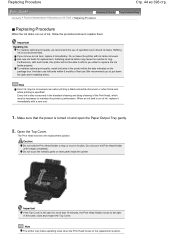
... printing a black-and-white document or when black-andwhite printing is not recommended. If you to the replacement position. Note The printer may cause the nozzles to replace them ). To maintain optimal print quality, install ink tanks in the standard cleaning and deep cleaning of ink, follow the procedure below to clog. And also use ink tanks within the date indicated on and open for replacement. Every ink is out of specified Canon brand ink tanks. The Print Head...
... printing a black-and-white document or when black-andwhite printing is not recommended. If you to the replacement position. Note The printer may cause the nozzles to replace them ). To maintain optimal print quality, install ink tanks in the standard cleaning and deep cleaning of ink, follow the procedure below to clog. And also use ink tanks within the date indicated on and open for replacement. Every ink is out of specified Canon brand ink tanks. The Print Head...
User Manual
Page 48
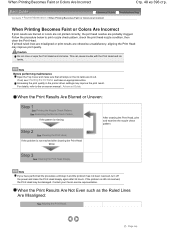
... maintenance Open the Top Cover and make sure that all lamps on -screen manual: Advanced Guide. For details, refer to print nozzle check pattern, check the print head nozzle condition, then clean the Print Head. Page top Advanced Guide Troubleshooting Contents > Routine Maintenance > When Printing Becomes Faint or Colors Are Incorrect When Printing Becomes Faint or Colors Are Incorrect If print results are blurred or colors are not printed correctly, the pint head nozzles are lit red. Increasing the print quality in the printer driver settings may improve print quality...
... maintenance Open the Top Cover and make sure that all lamps on -screen manual: Advanced Guide. For details, refer to print nozzle check pattern, check the print head nozzle condition, then clean the Print Head. Page top Advanced Guide Troubleshooting Contents > Routine Maintenance > When Printing Becomes Faint or Colors Are Incorrect When Printing Becomes Faint or Colors Are Incorrect If print results are blurred or colors are not printed correctly, the pint head nozzles are lit red. Increasing the print quality in the printer driver settings may improve print quality...
User Manual
Page 74
... the printer driver. Refer to the "Troubleshooting " in black-and-white. Print the nozzle check pattern to prevent clogging. How is used automatically depending on the media type to a small amount. You cannot replace it is consumed even when printing in the on the settings of (A) the part where ink is limited to print or on -screen manual: Advanced Guide. The inside of the printer smeared with optimal quality. See When Printing Becomes Faint or Colors...
... the printer driver. Refer to the "Troubleshooting " in black-and-white. Print the nozzle check pattern to prevent clogging. How is used automatically depending on the media type to a small amount. You cannot replace it is consumed even when printing in the on the settings of (A) the part where ink is limited to print or on -screen manual: Advanced Guide. The inside of the printer smeared with optimal quality. See When Printing Becomes Faint or Colors...
User Manual
Page 80
... Data to be Used as a Background Printing an Envelope Switching the Paper Source to Match the Purpose Displaying the Print Results before Printing Setting Paper Dimensions (Custom Size) Changing the Print Quality and Correcting Image Data Selecting a Combination of the Print Quality Level and a Halftoning Method Printing a Color Document in Monochrome Specifying Color Correction Optimal Photo Printing of Image Data Adjusting Colors with the Printer Driver Printing with ICC Profiles Adjusting Color Balance Adjusting Brightness Adjusting Intensity Adjusting Contrast Simulating an Illustration...
... Data to be Used as a Background Printing an Envelope Switching the Paper Source to Match the Purpose Displaying the Print Results before Printing Setting Paper Dimensions (Custom Size) Changing the Print Quality and Correcting Image Data Selecting a Combination of the Print Quality Level and a Halftoning Method Printing a Color Document in Monochrome Specifying Color Correction Optimal Photo Printing of Image Data Adjusting Colors with the Printer Driver Printing with ICC Profiles Adjusting Color Balance Adjusting Brightness Adjusting Intensity Adjusting Contrast Simulating an Illustration...
User Manual
Page 81
... Number: 1688 Is Displayed Error Number: 1851 Is Displayed Error Number: 1856 Is Displayed Error Number: 2001 Is Displayed Error Number: 2002 Is Displayed Error Number: 2500 Is Displayed Other Error Messages Cannot Print Properly with Automatic Duplex Printing For Windows Users Printer Status Monitor Is Not Displayed The Inkjet Printer/Scanner Extended Survey Program Screen Is Displayed Error Message Appears on a PictBridge Compliant Device FAQs If You Cannot Resolve the Problem Instructions for Use (Printer Driver) Using Easy-PhotoPrint EX About Solution Menu iP4600 series Advanced Guide...
... Number: 1688 Is Displayed Error Number: 1851 Is Displayed Error Number: 1856 Is Displayed Error Number: 2001 Is Displayed Error Number: 2002 Is Displayed Error Number: 2500 Is Displayed Other Error Messages Cannot Print Properly with Automatic Duplex Printing For Windows Users Printer Status Monitor Is Not Displayed The Inkjet Printer/Scanner Extended Survey Program Screen Is Displayed Error Message Appears on a PictBridge Compliant Device FAQs If You Cannot Resolve the Problem Instructions for Use (Printer Driver) Using Easy-PhotoPrint EX About Solution Menu iP4600 series Advanced Guide...
User Manual
Page 239
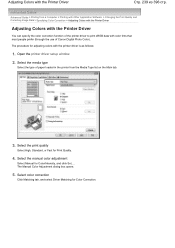
..., and click Set.... Advanced Guide > Printing from the Media Type list on the Main tab. 3. Select the media type Select the type of paper loaded in the printer from a Computer > Printing with Other Application Software > Changing the Print Quality and Correcting Image Data > Specifying Color Correction > Adjusting Colors with the Printer Driver Adjusting Colors with the Printer Driver You can specify the color correction function of Canon Digital Photo Color). Adjusting Colors with color tints that most people prefer (through the use of the printer driver to print sRGB data...
..., and click Set.... Advanced Guide > Printing from the Media Type list on the Main tab. 3. Select the media type Select the type of paper loaded in the printer from a Computer > Printing with Other Application Software > Changing the Print Quality and Correcting Image Data > Specifying Color Correction > Adjusting Colors with the Printer Driver Adjusting Colors with the Printer Driver You can specify the color correction function of Canon Digital Photo Color). Adjusting Colors with color tints that most people prefer (through the use of the printer driver to print sRGB data...

User Manual
Page 262
.... For details, refer to open the Print dialog box. 2. In Windows XP, select the Start menu -> Control Panel -> Printers and Other Hardware -> Printers and Faxes. Page top Advanced Guide > Printing from a Computer > Printing with Other Application Software > Overview of your application software. Right-click your model name and click Preferences (or Properties) The printer driver setup window appears. About tabs regarding the Windows functions as print head cleaning, or to configure print settings that are common for...
.... For details, refer to open the Print dialog box. 2. In Windows XP, select the Start menu -> Control Panel -> Printers and Other Hardware -> Printers and Faxes. Page top Advanced Guide > Printing from a Computer > Printing with Other Application Software > Overview of your application software. Right-click your model name and click Preferences (or Properties) The printer driver setup window appears. About tabs regarding the Windows functions as print head cleaning, or to configure print settings that are common for...
User Manual
Page 281
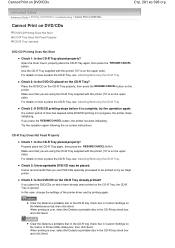
... Canon IJ Printer Utility dialog box, then click Send. CD-R Tray Does Not Feed Properly Check 1: Is the CD-R Tray placed properly? Check 2: Unrecognizable DVD/CD may be printed on how to be placed. Clear the Detects a printable disc in the CD-R tray check box in Custom Settings on the CD-R Tray? Cannot Print on -screen instructions. Open the Inner Cover, properly place the CD-R Tray again, then press the RESUME/CANCEL button...
... Canon IJ Printer Utility dialog box, then click Send. CD-R Tray Does Not Feed Properly Check 1: Is the CD-R Tray placed properly? Check 2: Unrecognizable DVD/CD may be printed on how to be placed. Clear the Detects a printable disc in the CD-R tray check box in Custom Settings on the CD-R Tray? Cannot Print on -screen instructions. Open the Inner Cover, properly place the CD-R Tray again, then press the RESUME/CANCEL button...
User Manual
Page 323
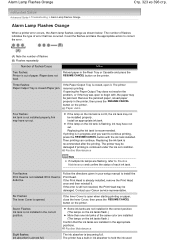
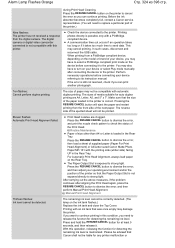
... to correct the error. (A) Note the number of flashes (B) Flashes repeatedly Number of the same color are installed in your Canon service representative. Six Flashes: The Inner Cover is open it . Count the flashes and take the appropriate action to Routine Maintenance and confirm the status of error that the ink tanks are installed. (The lamps on the printer. Paper Jams Four flashes: Ink tank is closed , open when starting printing on paper, close the Inner Cover, then press the RESUME/CANCEL button...
... to correct the error. (A) Note the number of flashes (B) Flashes repeatedly Number of the same color are installed in your Canon service representative. Six Flashes: The Inner Cover is open it . Count the flashes and take the appropriate action to Routine Maintenance and confirm the status of error that the ink tanks are installed. (The lamps on the printer. Paper Jams Four flashes: Ink tank is closed , open when starting printing on paper, close the Inner Cover, then press the RESUME/CANCEL button...
User Manual
Page 324
... Rear Tray. Press the RESUME/CANCEL button to dismiss the error, and print the nozzle check pattern to check the status of size other than A4 or Letter is still not resolved, check if you need to the printer. For Automatic Print Head Alignment, always load paper on the ink tank flashes.) Replace the ink tank and close the Top Cover. Manual Print Head Alignment Thirteen flashes: Ink level cannot be liable for at least 5 seconds, and then release it takes too much time to...
... Rear Tray. Press the RESUME/CANCEL button to dismiss the error, and print the nozzle check pattern to check the status of size other than A4 or Letter is still not resolved, check if you need to the printer. For Automatic Print Head Alignment, always load paper on the ink tank flashes.) Replace the ink tank and close the Top Cover. Manual Print Head Alignment Thirteen flashes: Ink level cannot be liable for at least 5 seconds, and then release it takes too much time to...
User Manual
Page 330
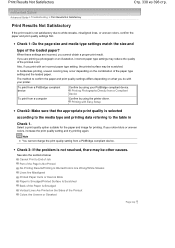
..., incorrect paper type settings may be other causes. Note You cannot change the print quality setting from a computer Confirm by using your printer. Advanced Guide > Troubleshooting > Print Results Not Satisfactory Print Results Not Satisfactory If the print result is not satisfactory due to End of Job Part of the Page Is Not Printed No Printing Results/Printing Is Blurred/Colors Are Wrong/White Streaks Lines Are Misaligned Printed Paper Curls or Has Ink Blots Paper Is Smudged/Printed Surface...
..., incorrect paper type settings may be other causes. Note You cannot change the print quality setting from a computer Confirm by using your printer. Advanced Guide > Troubleshooting > Print Results Not Satisfactory Print Results Not Satisfactory If the print result is not satisfactory due to End of Job Part of the Page Is Not Printed No Printing Results/Printing Is Blurred/Colors Are Wrong/White Streaks Lines Are Misaligned Printed Paper Curls or Has Ink Blots Paper Is Smudged/Printed Surface...
User Manual
Page 338
... too much ink and become wavy, causing paper abrasion. In the Canon IJ Printer Utility, select Custom Settings in the pop-up menu, select the Prevent paper abrasion check box, and then click Send. Open the printer properties dialog box. Opening the Printer Properties Dialog Box (Windows) Click Here: Printer Driver * Before clicking here to print images with the media type set correctly to match the loaded paper, set the printer to curl the paper before printing. Select Color Options...
... too much ink and become wavy, causing paper abrasion. In the Canon IJ Printer Utility, select Custom Settings in the pop-up menu, select the Prevent paper abrasion check box, and then click Send. Open the printer properties dialog box. Opening the Printer Properties Dialog Box (Windows) Click Here: Printer Driver * Before clicking here to print images with the media type set correctly to match the loaded paper, set the printer to curl the paper before printing. Select Color Options...
User Manual
Page 364
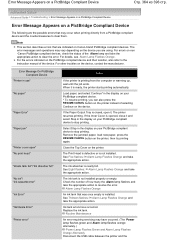
... empty is not installed. If the Paper Output Tray is closed, open " "No print head" "Waste tank full"/"Ink absorber full" "No ink"/ "Ink cassette error" "Ink Error" "Hardware Error" "Printer error" Action If the printer is ready, the printer starts printing automatically. When it . For the errors indicated on Canon-brand PictBridge compliant devices. Error Message On PictBridge Compliant Device "Printer in Alarm Lamp Flashes Orange and take the appropriate action. Remove the jammed paper, load new paper, press the RESUME/CANCEL button on a PictBridge...
... empty is not installed. If the Paper Output Tray is closed, open " "No print head" "Waste tank full"/"Ink absorber full" "No ink"/ "Ink cassette error" "Ink Error" "Hardware Error" "Printer error" Action If the printer is ready, the printer starts printing automatically. When it . For the errors indicated on Canon-brand PictBridge compliant devices. Error Message On PictBridge Compliant Device "Printer in Alarm Lamp Flashes Orange and take the appropriate action. Remove the jammed paper, load new paper, press the RESUME/CANCEL button on a PictBridge...
User Manual
Page 367
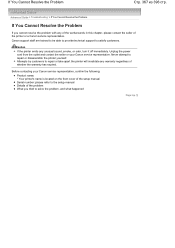
... technical support to repair or disassemble the printer yourself. Attempts by customers to repair or take apart the printer will invalidate any of the workarounds in this chapter, please contact the seller of the printer or a Canon service representative. Advanced Guide > Troubleshooting > If You Cannot Resolve the Problem If You Cannot Resolve the Problem If you tried to the setup manual Details of the problem What...
... technical support to repair or disassemble the printer yourself. Attempts by customers to repair or take apart the printer will invalidate any of the workarounds in this chapter, please contact the seller of the printer or a Canon service representative. Advanced Guide > Troubleshooting > If You Cannot Resolve the Problem If You Cannot Resolve the Problem If you tried to the setup manual Details of the problem What...

User Manual
Page 390
... Windows XP/Windows 2000 1. When Welcome to turn the printer on connection instructions, refer to the print server. Settings on the client systems. You can now share the printer in the Printers window. Note During the installation, a screen prompting you to turn the printer on Client PC After setting up the print server system, set up the client systems is not displayed, check that you have configured on the print server system to the Network > Settings on...
... Windows XP/Windows 2000 1. When Welcome to turn the printer on connection instructions, refer to the print server. Settings on the client systems. You can now share the printer in the Printers window. Note During the installation, a screen prompting you to turn the printer on Client PC After setting up the print server system, set up the client systems is not displayed, check that you have configured on the print server system to the Network > Settings on...


