Quick Start Guide
Page 5
... 3 Before Using the Printer 6 Included Items 6 Turning the Printer On and Off 6 Loading Printing Paper 8 Printing from Your Computer 16 Printing with Windows 16 Printing with Macintosh 17 Routine Maintenance 18 When Printing Becomes Faint or Colors Are Incorrect 18 Printing the Nozzle Check Pattern 19 Examining the Nozzle Check Pattern ...........21 Print Head Cleaning 22 Print Head Deep Cleaning 25...
... 3 Before Using the Printer 6 Included Items 6 Turning the Printer On and Off 6 Loading Printing Paper 8 Printing from Your Computer 16 Printing with Windows 16 Printing with Macintosh 17 Routine Maintenance 18 When Printing Becomes Faint or Colors Are Incorrect 18 Printing the Nozzle Check Pattern 19 Examining the Nozzle Check Pattern ...........21 Print Head Cleaning 22 Print Head Deep Cleaning 25...
Quick Start Guide
Page 8
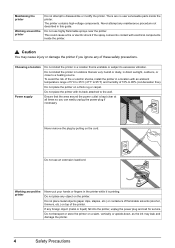
... of 10% to disassemble or modify the printer. Choosing a location Power supply Do not install the printer in locations that the area around the power outlet is printing. Do not install the printer in a location that is unstable or subject to a heating source. Do not place the printer on the cord. Never remove the plug...
... of 10% to disassemble or modify the printer. Choosing a location Power supply Do not install the printer in locations that the area around the power outlet is printing. Do not install the printer in a location that is unstable or subject to a heating source. Do not place the printer on the cord. Never remove the plug...

Quick Start Guide
Page 9
...). If irritation or discomfort occurs, obtain medical advice immediately. If irritation to drink. Safety Precautions 5 Never touch the electrical contacts or Print Head Nozzles on a FINE Cartridge (Ink Cartridge) after printing. Do not throw FINE Cartridges (Ink Cartridges) into fire. The metal parts may spill out and stain clothing or the surrounding...
...). If irritation or discomfort occurs, obtain medical advice immediately. If irritation to drink. Safety Precautions 5 Never touch the electrical contacts or Print Head Nozzles on a FINE Cartridge (Ink Cartridge) after printing. Do not throw FINE Cartridges (Ink Cartridges) into fire. The metal parts may spill out and stain clothing or the surrounding...
Quick Start Guide
Page 10
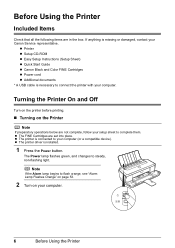
...FINE Cartridges are in the box. z Printer z Setup CD-ROM z Easy Setup Instructions (Setup Sheet) z Quick Start Guide z Canon Black and Color FINE Cartridges z Power cord z Additional documents * A USB cable is connected to your computer (or a compatible device). z The printer is necessary to flash orange, see "... follow your Canon Service representative. The Power lamp flashes green, and changes to complete them. Before Using the Printer Included Items Check that all the following items are set into place. Turning the Printer On and Off Turn on the printer before printing. „ ...
...FINE Cartridges are in the box. z Printer z Setup CD-ROM z Easy Setup Instructions (Setup Sheet) z Quick Start Guide z Canon Black and Color FINE Cartridges z Power cord z Additional documents * A USB cable is connected to your computer (or a compatible device). z The printer is necessary to flash orange, see "... follow your Canon Service representative. The Power lamp flashes green, and changes to complete them. Before Using the Printer Included Items Check that all the following items are set into place. Turning the Printer On and Off Turn on the printer before printing. „ ...
Quick Start Guide
Page 11
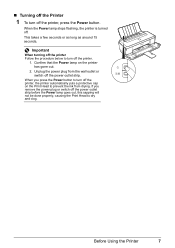
... on the Print Head to dry and clog. When the Power lamp stops flashing, the printer is turned off the power outlet strip. Important When turning off the printer Follow the procedure below to turn off the printer, press the Power button. Before Using the Printer 7 „ Turning off the Printer 1 To... turn off the printer. 1. If you press the Power button to turn off the power outlet strip before the Power lamp goes out, this capping will not be done properly, causing the Print Head to prevent the ink...
... on the Print Head to dry and clog. When the Power lamp stops flashing, the printer is turned off the power outlet strip. Important When turning off the printer Follow the procedure below to turn off the printer, press the Power button. Before Using the Printer 7 „ Turning off the Printer 1 To... turn off the printer. 1. If you press the Power button to turn off the power outlet strip before the Power lamp goes out, this capping will not be done properly, causing the Print Head to prevent the ink...
Quick Start Guide
Page 12
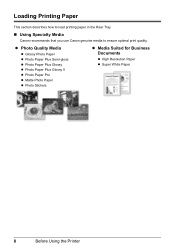
z Photo Quality Media z Glossy Photo Paper z Photo Paper Plus Semi-gloss z Photo Paper Plus Glossy z Photo Paper Plus Glossy II z Photo Paper Pro z Matte Photo Paper z Photo Stickers z Media Suited for Business Documents z High Resolution Paper z Super White Paper 8 Before Using the Printer Loading Printing Paper This section describes how to load printing paper in the Rear Tray. „ Using Specialty Media Canon recommends that you use Canon genuine media to ensure optimal print quality.
z Photo Quality Media z Glossy Photo Paper z Photo Paper Plus Semi-gloss z Photo Paper Plus Glossy z Photo Paper Plus Glossy II z Photo Paper Pro z Matte Photo Paper z Photo Stickers z Media Suited for Business Documents z High Resolution Paper z Super White Paper 8 Before Using the Printer Loading Printing Paper This section describes how to load printing paper in the Rear Tray. „ Using Specialty Media Canon recommends that you use Canon genuine media to ensure optimal print quality.
Quick Start Guide
Page 13
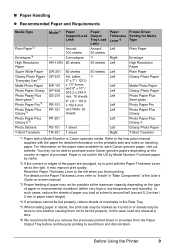
... Lever set to "Inside" in paper stack height). *4 If envelopes cannot be fed properly, reduce sheets of the paper are smudged, try to print with a Model Number is Canon specialty media. HR-101N SW-201 GP-501 MP-101 GP-502 SG-201 PR-101 PP-101 PP-201 PS-101 TR.... You may be stuck to one sheet at the maximum capacity depending on the country or region of paper may improve print quality. Paper is fed in stacks, the print side may be fed properly. For details on the paper sizes available for each Canon genuine paper, visit our website. Before Using the Printer 9
... Lever set to "Inside" in paper stack height). *4 If envelopes cannot be fed properly, reduce sheets of the paper are smudged, try to print with a Model Number is Canon specialty media. HR-101N SW-201 GP-501 MP-101 GP-502 SG-201 PR-101 PP-101 PP-201 PS-101 TR.... You may be stuck to one sheet at the maximum capacity depending on the country or region of paper may improve print quality. Paper is fed in stacks, the print side may be fed properly. For details on the paper sizes available for each Canon genuine paper, visit our website. Before Using the Printer 9
Quick Start Guide
Page 14
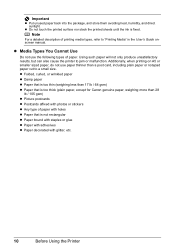
...Any type of paper. Using such paper will not only produce unsatisfactory results, but can also cause the printer to jam or malfunction. z Do not touch the printed surface nor stack the printed sheets until the ink is not rectangular z Paper bound with staples or glue z Paper with adhesives z... Paper decorated with holes z Paper that is too thick (plain paper, except for Canon genuine paper, weighing more than a post ...
...Any type of paper. Using such paper will not only produce unsatisfactory results, but can also cause the printer to jam or malfunction. z Do not touch the printed surface nor stack the printed sheets until the ink is not rectangular z Paper bound with staples or glue z Paper with adhesives z... Paper decorated with holes z Paper that is too thick (plain paper, except for Canon genuine paper, weighing more than a post ...
Quick Start Guide
Page 15
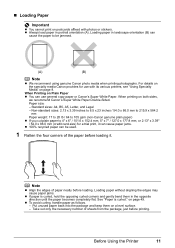
...paper jams. z 100% recycled paper can use with photos or stickers. When Printing on Plain Paper z You can be jammed. (A) (B) Note z We recommend using genuine Canon photo media when printing photographs. Loading paper without aligning the edges may cause paper jams. z If ...and gently bend them on a level surface. - z To avoid curling, handle paper as follows. - Standard sizes: A4, B5, A5, Letter, and Legal - Before Using the Printer 11 Loading paper in landscape orientation (B) can cause the paper to 4" x 6" / 101.6 x 152.4 mm, 5" x 7" / 127.0 x 177.8 mm, or 2.13" ...
...paper jams. z 100% recycled paper can use with photos or stickers. When Printing on Plain Paper z You can be jammed. (A) (B) Note z We recommend using genuine Canon photo media when printing photographs. Loading paper without aligning the edges may cause paper jams. z If ...and gently bend them on a level surface. - z To avoid curling, handle paper as follows. - Standard sizes: A4, B5, A5, Letter, and Legal - Before Using the Printer 11 Loading paper in landscape orientation (B) can cause the paper to 4" x 6" / 101.6 x 152.4 mm, 5" x 7" / 127.0 x 177.8 mm, or 2.13" ...

Quick Start Guide
Page 16
...shirt transfers, and left side of the paper are smudged, try to the left when you finish printing. 3 Load the paper. (1) Load the paper in the printer driver. For details on printer driver settings, see "Printing with Windows" on any other type of paper. (1) (2) (3) Note If the corners or edges... of the paper stack. 2 Prepare to the right. Reset the Paper Thickness Lever to print with Macintosh" on page 17. 12 Before Using the Printer Paper may improve print quality. If it is not opened fully, an error may occur. (3) Extend the Output Tray Extension. ...
...shirt transfers, and left side of the paper are smudged, try to the left when you finish printing. 3 Load the paper. (1) Load the paper in the printer driver. For details on printer driver settings, see "Printing with Windows" on any other type of paper. (1) (2) (3) Note If the corners or edges... of the paper stack. 2 Prepare to the right. Reset the Paper Thickness Lever to print with Macintosh" on page 17. 12 Before Using the Printer Paper may improve print quality. If it is not opened fully, an error may occur. (3) Extend the Output Tray Extension. ...
Quick Start Guide
Page 17
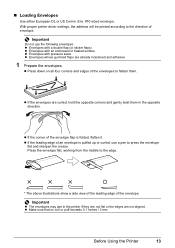
...z If the envelopes are curled, hold the opposite corners and gently twist them . Important Do not use a pen to flatten them in the printer if they are not flat or the edges are already moistened and adhesive 1 Prepare the envelopes. Press the envelope flat, working from the middle ...to the direction of envelope. With proper printer driver settings, the address will be printed according to the edge. * The above illustrations show a side view of the leading edge of the envelopes to press the ...
...z If the envelopes are curled, hold the opposite corners and gently twist them . Important Do not use a pen to flatten them in the printer if they are not flat or the edges are already moistened and adhesive 1 Prepare the envelopes. Press the envelope flat, working from the middle ...to the direction of envelope. With proper printer driver settings, the address will be printed according to the edge. * The above illustrations show a side view of the leading edge of the envelopes to press the ...
Quick Start Guide
Page 18
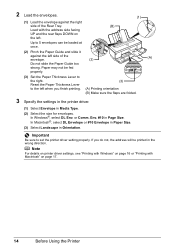
.... Note For details on printer driver settings, see "Printing with Windows" on page 16 or "Printing with the address side facing UP and the rear flaps DOWN on page 17. 14 Before Using the Printer Env. #10 in Orientation. If you finish printing. (3) (A) Printing orientation (B) Make sure the... flaps are folded. 3 Specify the settings in the printer driver. (1) Select Envelope in the wrong direction. Reset the Paper...
.... Note For details on printer driver settings, see "Printing with Windows" on page 16 or "Printing with the address side facing UP and the rear flaps DOWN on page 17. 14 Before Using the Printer Env. #10 in Orientation. If you finish printing. (3) (A) Printing orientation (B) Make sure the... flaps are folded. 3 Specify the settings in the printer driver. (1) Select Envelope in the wrong direction. Reset the Paper...
Quick Start Guide
Page 19
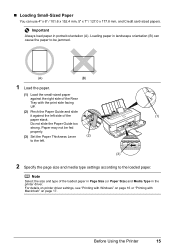
... and type of the (1) paper stack. Do not slide the Paper Guide too strong. Before Using the Printer 15 For details on printer driver settings, see "Printing with Windows" on page 16 or "Printing with the print side facing UP. (2) Pinch the Paper Guide and slide it against the right side of the Rear Tray... paper. (1) Load the small-sized paper against the left side of the loaded paper in Page Size (or Paper Size) and Media Type in the printer driver. Loading paper in portrait orientation (A).
... and type of the (1) paper stack. Do not slide the Paper Guide too strong. Before Using the Printer 15 For details on printer driver settings, see "Printing with Windows" on page 16 or "Printing with the print side facing UP. (2) Pinch the Paper Guide and slide it against the right side of the Rear Tray... paper. (1) Load the small-sized paper against the left side of the loaded paper in Page Size (or Paper Size) and Media Type in the printer driver. Loading paper in portrait orientation (A).
Quick Start Guide
Page 20
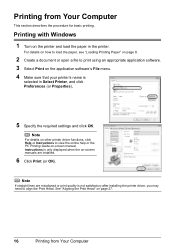
... 8. 2 Create a document or open a file to align the Print Head. Printing with Windows 1 Turn on the application software's File menu. 4 Make sure that your printer's name is selected in the printer. Note If straight lines are installed. 6 Click Print (or OK). Note For details on other printer driver functions, click Help or Instructions to view the...
... 8. 2 Create a document or open a file to align the Print Head. Printing with Windows 1 Turn on the application software's File menu. 4 Make sure that your printer's name is selected in the printer. Note If straight lines are installed. 6 Click Print (or OK). Note For details on other printer driver functions, click Help or Instructions to view the...

Quick Start Guide
Page 21
... 17 For details on how to load the paper, see "Loading Printing Paper" on page 8. 2 Create a document or open a file to align the Print Head. Note For details on other printer driver functions, click to view the PC Printing Guide on -screen manual is not displayed even if is not satisfactory.... 3 Select Page Setup on the application software's File menu. 4 Make sure that your printer's name is selected in Format for. 5 Select the desired paper size in Paper Size. 6 Click OK. 7 Select Print on the printer and load the paper in the pop-up menu. 9 Specify the required settings. If the...
... 17 For details on how to load the paper, see "Loading Printing Paper" on page 8. 2 Create a document or open a file to align the Print Head. Note For details on other printer driver functions, click to view the PC Printing Guide on -screen manual is not displayed even if is not satisfactory.... 3 Select Page Setup on the application software's File menu. 4 Make sure that your printer's name is selected in Format for. 5 Select the desired paper size in Paper Size. 6 Click OK. 7 Select Print on the printer and load the paper in the pop-up menu. 9 Specify the required settings. If the...
Quick Start Guide
Page 22
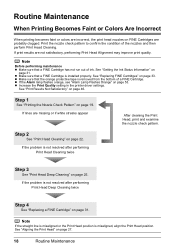
... When Printing Becomes Faint or Colors Are Incorrect When printing becomes faint or colors are incorrect, the print head nozzles on page 46. Step 1 See "Printing the Nozzle Check Pattern" on page 22. Step 2 See "Print Head ...Cleaning" on page 19. See "Replacing FINE Cartridges" on page 27. 18 Routine Maintenance See "Aligning the Print Head" on page 33. z Increase the Print Quality setting in the printer...
... When Printing Becomes Faint or Colors Are Incorrect When printing becomes faint or colors are incorrect, the print head nozzles on page 46. Step 1 See "Printing the Nozzle Check Pattern" on page 22. Step 2 See "Print Head ...Cleaning" on page 19. See "Replacing FINE Cartridges" on page 27. 18 Routine Maintenance See "Aligning the Print Head" on page 33. z Increase the Print Quality setting in the printer...
Quick Start Guide
Page 23
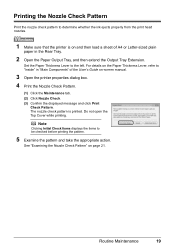
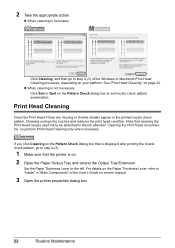
... nozzle check pattern to determine whether the ink ejects properly from the print head nozzles. 1 Make sure that the printer is printed. Set the Paper Thickness Lever to be checked before printing the pattern. 5 Examine the pattern and take the appropriate action. The nozzle check pattern...a sheet of the User's Guide on-screen manual. 3 Open the printer properties dialog box. 4 Print the Nozzle Check Pattern. (1) Click the Maintenance tab. (2) Click Nozzle Check. (3) Confirm the displayed message and click Print Check Pattern. See "Examining the Nozzle Check Pattern" on the Paper Thickness...
... nozzle check pattern to determine whether the ink ejects properly from the print head nozzles. 1 Make sure that the printer is printed. Set the Paper Thickness Lever to be checked before printing the pattern. 5 Examine the pattern and take the appropriate action. The nozzle check pattern...a sheet of the User's Guide on-screen manual. 3 Open the printer properties dialog box. 4 Print the Nozzle Check Pattern. (1) Click the Maintenance tab. (2) Click Nozzle Check. (3) Confirm the displayed message and click Print Check Pattern. See "Examining the Nozzle Check Pattern" on the Paper Thickness...
Quick Start Guide
Page 24
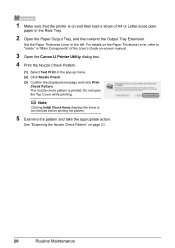
... the pop-up menu. (2) Click Nozzle Check. (3) Confirm the displayed message and click Print Check Pattern. See "Examining the Nozzle Check Pattern" on -screen manual. 3 Open the Canon IJ Printer Utility dialog box. 4 Print the Nozzle Check Pattern. (1) Select Test Print in the Rear Tray. 2 Open the Paper Output Tray, and then extend the Output...
... the pop-up menu. (2) Click Nozzle Check. (3) Confirm the displayed message and click Print Check Pattern. See "Examining the Nozzle Check Pattern" on -screen manual. 3 Open the Canon IJ Printer Utility dialog box. 4 Print the Nozzle Check Pattern. (1) Select Test Print in the Rear Tray. 2 Open the Paper Output Tray, and then extend the Output...

Quick Start Guide
Page 25
...will not be printed correctly if there is insufficient. Replace the FINE Cartridge if the remaining amount of this pattern are missing (Black ink) (2) If these patterns have white streaks, the Color print head nozzle needs cleaning. Example: When white streaks appear (Color ink) Routine ...Maintenance 21 Example: When lines are missing, the Black print head nozzle needs cleaning.
...will not be printed correctly if there is insufficient. Replace the FINE Cartridge if the remaining amount of this pattern are missing (Black ink) (2) If these patterns have white streaks, the Color print head nozzle needs cleaning. Example: When white streaks appear (Color ink) Routine ...Maintenance 21 Example: When lines are missing, the Black print head nozzle needs cleaning.
Quick Start Guide
Page 26
... Cleaning" on -screen manual. 3 Open the printer properties dialog box. 22 Routine Maintenance Cleaning the Print Head consumes ink, so perform Print Head Cleaning only when necessary. Set the Paper Thickness Lever to be absorbed in the printed nozzle check pattern. For details on the Paper Thickness Lever, ... the Pattern Check dialog box to step 4-(3) of the User's Guide on page 22. Note that the printer is necessary Click Cleaning, and then go to step 4-(3). 1 Make sure that cleaning the Print Head causes used ink to the left. Cleaning unclogs the nozzles and restores the...
... Cleaning" on -screen manual. 3 Open the printer properties dialog box. 22 Routine Maintenance Cleaning the Print Head consumes ink, so perform Print Head Cleaning only when necessary. Set the Paper Thickness Lever to be absorbed in the printed nozzle check pattern. For details on the Paper Thickness Lever, ... the Pattern Check dialog box to step 4-(3) of the User's Guide on page 22. Note that the printer is necessary Click Cleaning, and then go to step 4-(3). 1 Make sure that cleaning the Print Head causes used ink to the left. Cleaning unclogs the nozzles and restores the...


