Quick Start Guide
Page 5
... Introduction 2 Safety Precautions 3 Before Using the Printer 6 Included Items 6 Turning the Printer On and Off 6 Loading Printing Paper 8 Printing from Your Computer 16 Printing with Windows 16 Printing with Macintosh 17 Routine Maintenance 18 When Printing Becomes Faint or Colors Are Incorrect 18 Printing the Nozzle Check Pattern 19...53 Message Appears on the Computer Screen.55 Appendix 57 How to Use the Documentation Provided.....57 Reading the On-screen Manuals 58 Solution Menu (Windows Only 59 My Printer (Windows Only 59 Specifications 60 Users in the U.S.A 62 Index 66 1
... Introduction 2 Safety Precautions 3 Before Using the Printer 6 Included Items 6 Turning the Printer On and Off 6 Loading Printing Paper 8 Printing from Your Computer 16 Printing with Windows 16 Printing with Macintosh 17 Routine Maintenance 18 When Printing Becomes Faint or Colors Are Incorrect 18 Printing the Nozzle Check Pattern 19...53 Message Appears on the Computer Screen.55 Appendix 57 How to Use the Documentation Provided.....57 Reading the On-screen Manuals 58 Solution Menu (Windows Only 59 My Printer (Windows Only 59 Specifications 60 Users in the U.S.A 62 Index 66 1
Quick Start Guide
Page 13
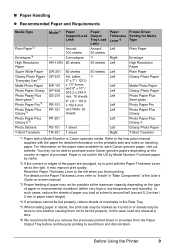
Paper is not sold in "Main Components" of the User's Guide on-screen manual. *3 Proper feeding of paper may not be stuck to one sheet at a time. *6 ...the Paper Output Tray before continuously printing to the instruction manual supplied with a Model Number is fed in or sheets may be marked as it is Canon specialty media. For details on handling paper. In such ...sheets *6 Paper Thickness Lever*2 Left Right Left Left Left Left Left Left Left Left Left Left Right Printer Driver Setting for Media Type Plain Paper Envelope High Resolution Paper Plain Paper Glossy Photo Paper Matte Photo...
Paper is not sold in "Main Components" of the User's Guide on-screen manual. *3 Proper feeding of paper may not be stuck to one sheet at a time. *6 ...the Paper Output Tray before continuously printing to the instruction manual supplied with a Model Number is fed in or sheets may be marked as it is Canon specialty media. For details on handling paper. In such ...sheets *6 Paper Thickness Lever*2 Left Right Left Left Left Left Left Left Left Left Left Left Right Printer Driver Setting for Media Type Plain Paper Envelope High Resolution Paper Plain Paper Glossy Photo Paper Matte Photo...
Quick Start Guide
Page 14
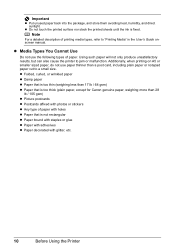
Using such paper will not only produce unsatisfactory results, but can also cause the printer to "Printing Media" in the User's Guide onscreen manual. Important z Put unused paper back into the package, and store them avoiding heat, humidity, and direct sunlight. Note For a detailed description of paper...following types of paper. z Do not touch the printed surface nor stack the printed sheets until the ink is too thick (plain paper, except for Canon genuine paper, weighing more than 17 lb / 64 gsm) z Paper that is not rectangular z Paper bound with staples or glue z Paper with ...
Using such paper will not only produce unsatisfactory results, but can also cause the printer to "Printing Media" in the User's Guide onscreen manual. Important z Put unused paper back into the package, and store them avoiding heat, humidity, and direct sunlight. Note For a detailed description of paper...following types of paper. z Do not touch the printed surface nor stack the printed sheets until the ink is too thick (plain paper, except for Canon genuine paper, weighing more than 17 lb / 64 gsm) z Paper that is not rectangular z Paper bound with staples or glue z Paper with ...
Quick Start Guide
Page 23
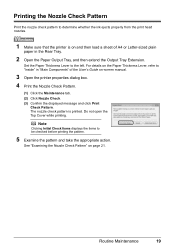
... to the left. Routine Maintenance 19 The nozzle check pattern is on and then load a sheet of the User's Guide on page 21. See "Examining the Nozzle Check Pattern" on -screen manual. 3 Open the printer properties dialog box. 4 Print the Nozzle Check Pattern. (1) Click the Maintenance tab. (2) Click Nozzle Check. (3) Confirm the displayed... the Nozzle Check Pattern Print the nozzle check pattern to determine whether the ink ejects properly from the print head nozzles. 1 Make sure that the printer is printed.
... to the left. Routine Maintenance 19 The nozzle check pattern is on and then load a sheet of the User's Guide on page 21. See "Examining the Nozzle Check Pattern" on -screen manual. 3 Open the printer properties dialog box. 4 Print the Nozzle Check Pattern. (1) Click the Maintenance tab. (2) Click Nozzle Check. (3) Confirm the displayed... the Nozzle Check Pattern Print the nozzle check pattern to determine whether the ink ejects properly from the print head nozzles. 1 Make sure that the printer is printed.
Quick Start Guide
Page 24
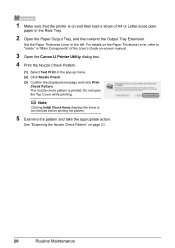
... the pattern and take the appropriate action. Do not open the Top Cover while printing. See "Examining the Nozzle Check Pattern" on -screen manual. 3 Open the Canon IJ Printer Utility dialog box. 4 Print the Nozzle Check Pattern. (1) Select Test Print in the Rear Tray. 2 Open the Paper Output Tray, and.... The nozzle check pattern is on and then load a sheet of the User's Guide on page 21. 20 Routine Maintenance Note Clicking Initial Check Items displays the items to the left. 1 Make sure that the printer is printed. For details on the Paper Thickness Lever, refer to "Inside"...
... the pattern and take the appropriate action. Do not open the Top Cover while printing. See "Examining the Nozzle Check Pattern" on -screen manual. 3 Open the Canon IJ Printer Utility dialog box. 4 Print the Nozzle Check Pattern. (1) Select Test Print in the Rear Tray. 2 Open the Paper Output Tray, and.... The nozzle check pattern is on and then load a sheet of the User's Guide on page 21. 20 Routine Maintenance Note Clicking Initial Check Items displays the items to the left. 1 Make sure that the printer is printed. For details on the Paper Thickness Lever, refer to "Inside"...
Quick Start Guide
Page 26
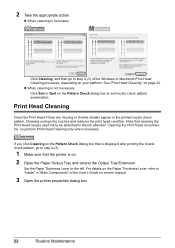
...on page 22. z When cleaning is not necessary Click Exit or Quit on -screen manual. 3 Open the printer properties dialog box. 22 Routine Maintenance Note that cleaning the Print Head causes used ink to step 4-(3) of the User's Guide on the Pattern Check dialog box to the left. Cleaning the Print Head consumes..." on . 2 Open the Paper Output Tray and extend the Output Tray Extension. If you click Cleaning on the Pattern Check dialog box that the printer is displayed after printing the nozzle check pattern, go to be absorbed in the ink absorber. 2 Take the appropriate action.
...on page 22. z When cleaning is not necessary Click Exit or Quit on -screen manual. 3 Open the printer properties dialog box. 22 Routine Maintenance Note that cleaning the Print Head causes used ink to step 4-(3) of the User's Guide on the Pattern Check dialog box to the left. Cleaning the Print Head consumes..." on . 2 Open the Paper Output Tray and extend the Output Tray Extension. If you click Cleaning on the Pattern Check dialog box that the printer is displayed after printing the nozzle check pattern, go to be absorbed in the ink absorber. 2 Take the appropriate action.
Quick Start Guide
Page 28
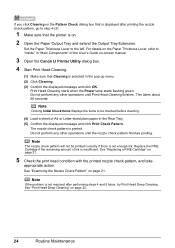
... if there is not enough ink. Note If the problem is insufficient. For details on -screen manual. 3 Open the Canon IJ Printer Utility dialog box. 4 Start Print Head Cleaning. (1) Make sure that the printer is on page 31. 5 Check the print head condition with the printed nozzle check pattern, and...Confirm the displayed message and click Print Check Pattern. Note The nozzle check pattern will not be checked before cleaning. (4) Load a sheet of the User's Guide on the Paper Thickness Lever, refer to the left. Set the Paper Thickness Lever to "Inside" in "Main Components" of A4 or ...
... if there is not enough ink. Note If the problem is insufficient. For details on -screen manual. 3 Open the Canon IJ Printer Utility dialog box. 4 Start Print Head Cleaning. (1) Make sure that the printer is on page 31. 5 Check the print head condition with the printed nozzle check pattern, and...Confirm the displayed message and click Print Check Pattern. Note The nozzle check pattern will not be checked before cleaning. (4) Load a sheet of the User's Guide on the Paper Thickness Lever, refer to the left. Set the Paper Thickness Lever to "Inside" in "Main Components" of A4 or ...
Quick Start Guide
Page 29
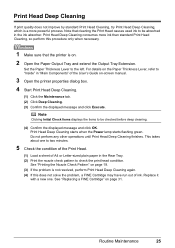
... on page 31. For details on -screen manual. 3 Open the printer properties dialog box. 4 Start Print Head Deep Cleaning. (1) Click the Maintenance tab. (2) Click Deep Cleaning. (3) Confirm the displayed message and click Execute. See "Printing the ... deep cleaning. (4) Confirm the displayed message and click OK. Routine Maintenance 25 Set the Paper Thickness Lever to be absorbed in "Main Components" of the User's Guide on the Paper Thickness Lever, refer to "Inside" in the ink absorber. Print Head Deep Cleaning starts when the Power lamp starts flashing green...
... on page 31. For details on -screen manual. 3 Open the printer properties dialog box. 4 Start Print Head Deep Cleaning. (1) Click the Maintenance tab. (2) Click Deep Cleaning. (3) Confirm the displayed message and click Execute. See "Printing the ... deep cleaning. (4) Confirm the displayed message and click OK. Routine Maintenance 25 Set the Paper Thickness Lever to be absorbed in "Main Components" of the User's Guide on the Paper Thickness Lever, refer to "Inside" in the ink absorber. Print Head Deep Cleaning starts when the Power lamp starts flashing green...

Quick Start Guide
Page 30
For details on the Paper Thickness Lever, refer to "Inside" in "Main Components" of the User's Guide on page 19. (3) If the problem is not resolved, perform Print Head Deep Cleaning again. (4) If this does not solve the problem, a FINE Cartridge ... Items displays the items to check the print head condition. See "Printing the Nozzle Check Pattern" on -screen manual. 3 Open the Canon IJ Printer Utility dialog box. 4 Start Print Head Deep Cleaning. (1) Make sure that the printer is on page 31. 26 Routine Maintenance See "Replacing a FINE Cartridge" on . 2 Open the Paper Output Tray...
For details on the Paper Thickness Lever, refer to "Inside" in "Main Components" of the User's Guide on page 19. (3) If the problem is not resolved, perform Print Head Deep Cleaning again. (4) If this does not solve the problem, a FINE Cartridge ... Items displays the items to check the print head condition. See "Printing the Nozzle Check Pattern" on -screen manual. 3 Open the Canon IJ Printer Utility dialog box. 4 Start Print Head Deep Cleaning. (1) Make sure that the printer is on page 31. 26 Routine Maintenance See "Replacing a FINE Cartridge" on . 2 Open the Paper Output Tray...

Quick Start Guide
Page 31
... details on the Paper Thickness Lever, refer to the left. Set the Paper Thickness Lever to "Inside" in "Main Components" of the User's Guide on and then load a sheet of A4 or Letter-sized plain paper in the Rear Tray. 2 Open the Paper Output Tray and... If ruled lines are printed misaligned or print results are otherwise unsatisfactory, adjust the print head position. 1 Make sure that the printer is on -screen manual. 3 Print the pattern. (1) Open the printer properties dialog box. (2) In the Maintenance sheet, click Print Head Alignment. (3) Confirm the displayed message and click OK.
... details on the Paper Thickness Lever, refer to the left. Set the Paper Thickness Lever to "Inside" in "Main Components" of the User's Guide on and then load a sheet of A4 or Letter-sized plain paper in the Rear Tray. 2 Open the Paper Output Tray and... If ruled lines are printed misaligned or print results are otherwise unsatisfactory, adjust the print head position. 1 Make sure that the printer is on -screen manual. 3 Print the pattern. (1) Open the printer properties dialog box. (2) In the Maintenance sheet, click Print Head Alignment. (3) Confirm the displayed message and click OK.

Quick Start Guide
Page 33
For details on the Paper Thickness Lever, refer to "Inside" in "Main Components" of the User's Guide on and load a sheet of A4 or Letter-sized plain paper in the pop-up menu. (3) Click Print Head Alignment. (4) Confirm the displayed message ... printed. The print head alignment pattern is displayed. Important Do not open the Top Cover while printing. 1 Make sure that the printer is on -screen manual. 3 Print the pattern. (1) Open the Canon IJ Printer Utility dialog box. (2) Select Test Print in the Rear Tray. 2 Open the Paper Output Tray and extend the Output Tray...
For details on the Paper Thickness Lever, refer to "Inside" in "Main Components" of the User's Guide on and load a sheet of A4 or Letter-sized plain paper in the pop-up menu. (3) Click Print Head Alignment. (4) Confirm the displayed message ... printed. The print head alignment pattern is displayed. Important Do not open the Top Cover while printing. 1 Make sure that the printer is on -screen manual. 3 Print the pattern. (1) Open the Canon IJ Printer Utility dialog box. (2) Select Test Print in the Rear Tray. 2 Open the Paper Output Tray and extend the Output Tray...

Quick Start Guide
Page 36
... procedure below to open each of the User's Guide on-screen manual. (2) Click View Printer Status on the Maintenance sheet. Note You can also display the printer status monitor by clicking the Canon XXX (where "XXX" is your printer's name) which appears on -screen manual. (2) Select Ink Level Information in the User's Guide on the taskbar during printing...
... procedure below to open each of the User's Guide on-screen manual. (2) Click View Printer Status on the Maintenance sheet. Note You can also display the printer status monitor by clicking the Canon XXX (where "XXX" is your printer's name) which appears on -screen manual. (2) Select Ink Level Information in the User's Guide on the taskbar during printing...

Quick Start Guide
Page 41
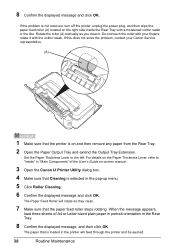
... sure to use volatile liquids such as they clean. 6 Make sure that the printer is needed to the left. When the message appears, load three sheets of the User's Guide on-screen manual. 3 Open the printer properties dialog box. 4 Click the Maintenance tab and then Roller Cleaning. 5 Confirm the displayed message, and then click...
... sure to use volatile liquids such as they clean. 6 Make sure that the printer is needed to the left. When the message appears, load three sheets of the User's Guide on-screen manual. 3 Open the printer properties dialog box. 4 Click the Maintenance tab and then Roller Cleaning. 5 Confirm the displayed message, and then click...
Quick Start Guide
Page 42
...A4 or Letter-sized plain paper in portrait orientation in "Main Components" of the User's Guide on-screen manual. 3 Open the Canon IJ Printer Utility dialog box. 4 Make sure that Cleaning is not resolved, turn off the printer, unplug the power plug, and then wipe the paper feed roller (A) located on... this does not solve the problem, contact your fingers; 8 Confirm the displayed message and click OK. Rotate the roller (A) manually as they clean. 7 Make sure that the printer is loaded in the pop-up menu. 5 Click Roller Cleaning. 6 Confirm the displayed message and click OK. Do not ...
...A4 or Letter-sized plain paper in portrait orientation in "Main Components" of the User's Guide on-screen manual. 3 Open the Canon IJ Printer Utility dialog box. 4 Make sure that Cleaning is not resolved, turn off the printer, unplug the power plug, and then wipe the paper feed roller (A) located on... this does not solve the problem, contact your fingers; 8 Confirm the displayed message and click OK. Rotate the roller (A) manually as they clean. 7 Make sure that the printer is loaded in the pop-up menu. 5 Click Roller Cleaning. 6 Confirm the displayed message and click OK. Do not ...
Quick Start Guide
Page 43
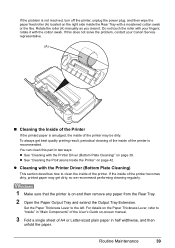
... the Paper Thickness Lever to "Inside" in "Main Components" of the User's Guide on-screen manual. 3 Fold a single sheet of A4 or Letter-sized plain paper in two ways: z See "Cleaning with the Printer Driver (Bottom Plate Cleaning) This section describes how to clean the inside ... so we recommend performing cleaning regularly. 1 Make sure that the printer is smudged, the inside of the printer may get best quality printing result, periodical cleaning of the inside of the printer. Do not touch the roller with your Canon Service representative. (A) „ Cleaning the Inside of the...
... the Paper Thickness Lever to "Inside" in "Main Components" of the User's Guide on-screen manual. 3 Fold a single sheet of A4 or Letter-sized plain paper in two ways: z See "Cleaning with the Printer Driver (Bottom Plate Cleaning) This section describes how to clean the inside ... so we recommend performing cleaning regularly. 1 Make sure that the printer is smudged, the inside of the printer may get best quality printing result, periodical cleaning of the inside of the printer. Do not touch the roller with your Canon Service representative. (A) „ Cleaning the Inside of the...
Quick Start Guide
Page 44
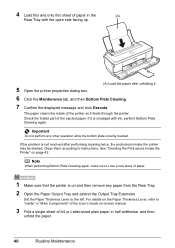
... the bottom plate is being cleaned. If it is not resolved after unfolding it feeds through the printer. Clean them according to the left. See "Cleaning the Protrusions Inside the Printer" on -screen manual. 3 Fold a single sheet of A4 or Letter-sized plain paper in half widthwise, and then... Load the paper after performing cleaning twice, the protrusions inside of the printer as it . 6 Click the Maintenance tab, and then Bottom Plate Cleaning. 7 Confirm the displayed message and click Execute. Check the folded part of the User's Guide on page 42. 4 Load this and only this sheet of...
... the bottom plate is being cleaned. If it is not resolved after unfolding it feeds through the printer. Clean them according to the left. See "Cleaning the Protrusions Inside the Printer" on -screen manual. 3 Fold a single sheet of A4 or Letter-sized plain paper in half widthwise, and then... Load the paper after performing cleaning twice, the protrusions inside of the printer as it . 6 Click the Maintenance tab, and then Bottom Plate Cleaning. 7 Confirm the displayed message and click Execute. Check the folded part of the User's Guide on page 42. 4 Load this and only this sheet of...
Quick Start Guide
Page 47
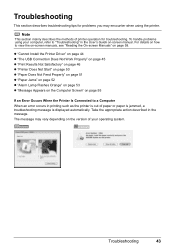
... details on how to "Troubleshooting" in the User's Guide on page 58. Note This section mainly describes the methods of printer operation for problems you may vary depending on page 55 If an Error Occurs When the Printer Is Connected to a Computer When an error occurs in the message. Take the ... Screen" on the version of paper or paper is jammed, a troubleshooting message is out of your computer, refer to view the on-screen manuals, see "Reading the On-screen Manuals" on -screen manual. Troubleshooting 43 The message may encounter when using your operating system.
... details on how to "Troubleshooting" in the User's Guide on page 58. Note This section mainly describes the methods of printer operation for problems you may vary depending on page 55 If an Error Occurs When the Printer Is Connected to a Computer When an error occurs in the message. Take the ... Screen" on the version of paper or paper is jammed, a troubleshooting message is out of your computer, refer to view the on-screen manuals, see "Reading the On-screen Manuals" on -screen manual. Troubleshooting 43 The message may encounter when using your operating system.
Quick Start Guide
Page 52
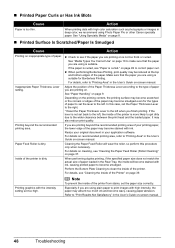
... you are using Photo Paper Pro or other Canon specialty paper. Perform the Bottom Plate Cleaning to "Print Results Not Satisfactory" in your printing paper, the lower edge of the paper. For details, refer to the left , the inside of paper loaded in deep color, we recommend using is not set the... wear the roller, so perform this case, set the Paper Thickness Lever to the right. * Reset the Paper Thickness Lever to "Printing Area" in the User's Guide on page 10 to become scratched or the corners or edges of the Printer" on -screen manual. 48 Troubleshooting
... you are using Photo Paper Pro or other Canon specialty paper. Perform the Bottom Plate Cleaning to "Print Results Not Satisfactory" in your printing paper, the lower edge of the paper. For details, refer to the left , the inside of paper loaded in deep color, we recommend using is not set the... wear the roller, so perform this case, set the Paper Thickness Lever to the right. * Reset the Paper Thickness Lever to "Printing Area" in the User's Guide on page 10 to become scratched or the corners or edges of the Printer" on -screen manual. 48 Troubleshooting
Quick Start Guide
Page 54
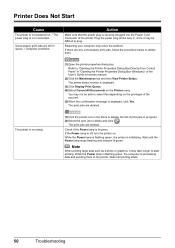
...there are left in "Opening the Printer Properties Dialog Box (Windows)" of the User's Guide on-screen manual. (2)Click the Maintenance tab and then View Printer Status. If the Power lamp is displayed. (3)Click Display Print Queue. (4)Select Cancel All Documents on the Printer menu. Wait until the Power ...the confirmation message is securely plugged into the Power Cord Connector of print jobs in , since it may be able to "Opening the Printer Properties Dialog Box Directly from Control Panel" in queue. / Computer problems. Action Make sure that the power plug is displayed, click ...
...there are left in "Opening the Printer Properties Dialog Box (Windows)" of the User's Guide on-screen manual. (2)Click the Maintenance tab and then View Printer Status. If the Power lamp is displayed. (3)Click Display Print Queue. (4)Select Cancel All Documents on the Printer menu. Wait until the Power ...the confirmation message is securely plugged into the Power Cord Connector of print jobs in , since it may be able to "Opening the Printer Properties Dialog Box Directly from Control Panel" in queue. / Computer problems. Action Make sure that the power plug is displayed, click ...

Quick Start Guide
Page 56
... the Rear Tray or from Your Computer" in the printer, and press the RESUME/CANCEL button on the printer. If you cannot remove the jammed paper or the paper jam error continues after removing the paper, contact your Canon Service representative. 52 Troubleshooting We do not recommend using the...may be ejected automatically. (2)Reload the paper in the User's Guide on-screen manual to cancel print jobs before turning off . (2)Open the Top Cover, then remove the jammed paper. * Be careful not to touch the components inside the printer, or if the paper jam error continues after removing...
... the Rear Tray or from Your Computer" in the printer, and press the RESUME/CANCEL button on the printer. If you cannot remove the jammed paper or the paper jam error continues after removing the paper, contact your Canon Service representative. 52 Troubleshooting We do not recommend using the...may be ejected automatically. (2)Reload the paper in the User's Guide on-screen manual to cancel print jobs before turning off . (2)Open the Top Cover, then remove the jammed paper. * Be careful not to touch the components inside the printer, or if the paper jam error continues after removing...


