Quick Start Guide
Page 5
... the Printer 6 Included Items 6 Turning the Printer On and Off 6 Loading Printing Paper 8 Printing from Your Computer 16 Printing with Windows 16 Printing with Macintosh 17 Routine Maintenance 18 When Printing Becomes Faint or Colors Are Incorrect... 18 Printing the Nozzle Check Pattern 19 Examining the Nozzle Check Pattern ...........21 Print Head Cleaning 22 Print Head Deep Cleaning 25 Aligning the Print Head 27 Replacing a FINE Cartridge 31 Keeping the Best Printing Results 36 Cleaning Your Printer 37 Troubleshooting 43 Cannot Install the Printer Driver...
... the Printer 6 Included Items 6 Turning the Printer On and Off 6 Loading Printing Paper 8 Printing from Your Computer 16 Printing with Windows 16 Printing with Macintosh 17 Routine Maintenance 18 When Printing Becomes Faint or Colors Are Incorrect... 18 Printing the Nozzle Check Pattern 19 Examining the Nozzle Check Pattern ...........21 Print Head Cleaning 22 Print Head Deep Cleaning 25 Aligning the Print Head 27 Replacing a FINE Cartridge 31 Keeping the Best Printing Results 36 Cleaning Your Printer 37 Troubleshooting 43 Cannot Install the Printer Driver...

Quick Start Guide
Page 16
... not load higher than the Load Limit Mark (A). 4 Specify the page size and media type settings according to the right. For details on printer driver settings, see "Printing with Windows" on page 16 or "Printing with Macintosh" on any other type of paper. (1) (2) (3) Note If the corners or edges of the Paper Thickness... the Paper Thickness Lever set to the loaded paper. 2 Prepare to the left when you finish printing. 3 Load the paper. (1) Load the paper in the printer driver.
... not load higher than the Load Limit Mark (A). 4 Specify the page size and media type settings according to the right. For details on printer driver settings, see "Printing with Windows" on page 16 or "Printing with Macintosh" on any other type of paper. (1) (2) (3) Note If the corners or edges of the Paper Thickness... the Paper Thickness Lever set to the loaded paper. 2 Prepare to the left when you finish printing. 3 Load the paper. (1) Load the paper in the printer driver.
Quick Start Guide
Page 18
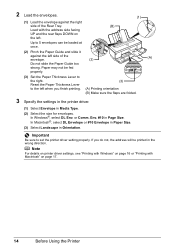
... the right side of the envelope. (2) (A) Do not slide the Paper Guide too strong. Note For details on printer driver settings, see "Printing with Windows" on page 16 or "Printing with the address side facing UP and the rear flaps DOWN on page 17. 14...address will be printed in Media Type. (2) Select the size for envelopes. In Windows®, select DL Env. If you finish printing. (3) (A) Printing orientation (B) Make sure the flaps are folded. 3 Specify the settings in the printer driver. (1) Select Envelope in the wrong direction. 2 Load the envelopes. (1) (1)...
... the right side of the envelope. (2) (A) Do not slide the Paper Guide too strong. Note For details on printer driver settings, see "Printing with Windows" on page 16 or "Printing with the address side facing UP and the rear flaps DOWN on page 17. 14...address will be printed in Media Type. (2) Select the size for envelopes. In Windows®, select DL Env. If you finish printing. (3) (A) Printing orientation (B) Make sure the flaps are folded. 3 Specify the settings in the printer driver. (1) Select Envelope in the wrong direction. 2 Load the envelopes. (1) (1)...
Quick Start Guide
Page 19
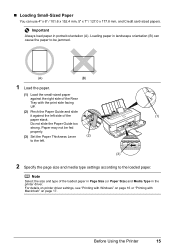
... paper in Page Size (or Paper Size) and Media Type in portrait orientation (A). Before Using the Printer 15 Note Select the size and type of the (1) paper stack. For details on printer driver settings, see "Printing with Windows" on page 16 or "Printing with the print side facing UP. (2) Pinch the Paper Guide and...
... paper in Page Size (or Paper Size) and Media Type in portrait orientation (A). Before Using the Printer 15 Note Select the size and type of the (1) paper stack. For details on printer driver settings, see "Printing with Windows" on page 16 or "Printing with the print side facing UP. (2) Pinch the Paper Guide and...
Quick Start Guide
Page 20
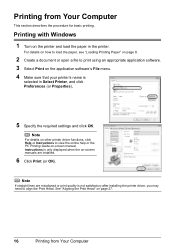
Printing from Your Computer Note For details on other printer driver functions, click Help or Instructions to align the Print Head. ... OK). Instructions is only displayed when the on-screen manuals are misaligned or print quality is selected in the printer. For details on how to load the paper, see "Loading Printing Paper" on page 8. 2 Create a...the required settings and click OK. Printing with Windows 1 Turn on the application software's File menu. 4 Make sure that your printer's name is not satisfactory after installing the printer driver, you may need to view the online help ...
Printing from Your Computer Note For details on other printer driver functions, click Help or Instructions to align the Print Head. ... OK). Instructions is only displayed when the on-screen manuals are misaligned or print quality is selected in the printer. For details on how to load the paper, see "Loading Printing Paper" on page 8. 2 Create a...the required settings and click OK. Printing with Windows 1 Turn on the application software's File menu. 4 Make sure that your printer's name is not satisfactory after installing the printer driver, you may need to view the online help ...
Quick Start Guide
Page 48
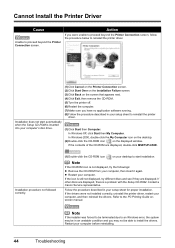
... with the Setup CD-ROM. Contact a Canon Service representative. Note If the installer was forced to be terminated due to an Windows error, the system may be in an unstable condition and you may not be able to reinstall the printer driver. (1)Click Start then Computer. In Windows 2000, double-click the My Computer icon...
... with the Setup CD-ROM. Contact a Canon Service representative. Note If the installer was forced to be terminated due to an Windows error, the system may be in an unstable condition and you may not be able to reinstall the printer driver. (1)Click Start then Computer. In Windows 2000, double-click the My Computer icon...
Quick Start Guide
Page 59
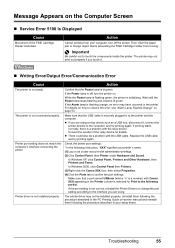
... following the procedure described in the printer. In Windows 2000, click Control Panel then Printers. (3)Right-click the Canon XXX icon, then select Properties. (4)Click the Ports tab to touch the components inside the printer. The printer driver may have occurred in your computer, turn off , turn the printer on page 53. Printer port setting does not match the...
... following the procedure described in the printer. In Windows 2000, click Control Panel then Printers. (3)Right-click the Canon XXX icon, then select Properties. (4)Click the Ports tab to touch the components inside the printer. The printer driver may have occurred in your computer, turn off , turn the printer on page 53. Printer port setting does not match the...

Quick Start Guide
Page 63
...) This menu screen helps you to operate this printer. My Printer (Windows Only) This application helps you can be. Use this application has a menu to open the printer driver or the status monitor screen and confirm or change both the printer settings or status. Experience how easy it is to launch menu items by using the...
...) This menu screen helps you to operate this printer. My Printer (Windows Only) This application helps you can be. Use this application has a menu to open the printer driver or the status monitor screen and confirm or change both the printer settings or status. Experience how easy it is to launch menu items by using the...

Easy Setup Instructions
Page 2
...User Registration screen appears, click Next. Screens may appear during restarting. The printer driver, On-screen Manuals, and application software are installed automatically. Note If ...Follow the on . In Windows Vista, go to Step k. Note Make sure the printer is clicked, the PIXMA Extended Survey Program will begin identifying the printer port being used. n...Windows" is restarted automatically. Note • If you can agree, click Agree. If you can use of the USB cable to the computer, the other countries. Follow on -screen manual. a Connect one end of Canon printers...
...User Registration screen appears, click Next. Screens may appear during restarting. The printer driver, On-screen Manuals, and application software are installed automatically. Note If ...Follow the on . In Windows Vista, go to Step k. Note Make sure the printer is clicked, the PIXMA Extended Survey Program will begin identifying the printer port being used. n...Windows" is restarted automatically. Note • If you can agree, click Agree. If you can use of the USB cable to the computer, the other countries. Follow on -screen manual. a Connect one end of Canon printers...


